|

|
|
|
|

|

|

|

|

|


regards, Peter
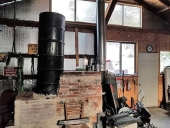
![[Thumbnail for IMAG0729.jpg]](/t/88412/a/62463/IMAG0729.jpg "Filename: IMAG0729.jpg
Description:")
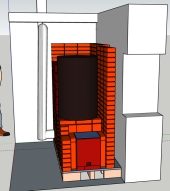
![[Thumbnail for 200mm-design.jpg]](/t/88412/a/62509/200mm-design.jpg "Filename: 200mm-design.jpg
Description:")
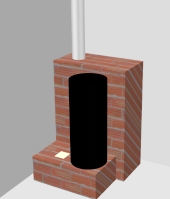
![[Thumbnail for 200mm-design2.jpg]](/t/88412/a/62511/200mm-design2.jpg "Filename: 200mm-design2.jpg
Description:")


For all your Montana Masonry Heater parts (also known as) Rocket Mass heater parts.
Visit me at
dragontechrmh.com Once you go brick you will never go back!
God of procrastination https://www.youtube.com/watch?v=q1EoT9sedqY
![[Thumbnail for 15311177390902144726508.jpg]](/t/88412/a/62686/15311177390902144726508.jpg "Filename: 15311177390902144726508.jpg
Description:")
God of procrastination https://www.youtube.com/watch?v=q1EoT9sedqY
Benen Huntley wrote:As well as the fire box door?
God of procrastination https://www.youtube.com/watch?v=q1EoT9sedqY
God of procrastination https://www.youtube.com/watch?v=q1EoT9sedqY

God of procrastination https://www.youtube.com/watch?v=q1EoT9sedqY
![[Thumbnail for IMAG0763.jpg]](/t/88412/a/62732/IMAG0763.jpg "Filename: IMAG0763.jpg
Description:")
God of procrastination https://www.youtube.com/watch?v=q1EoT9sedqY
God of procrastination https://www.youtube.com/watch?v=q1EoT9sedqY
![[Thumbnail for double-batch1.jpg]](/t/88412/a/62745/double-batch1.jpg "Filename: double-batch1.jpg
Description:")
![[Thumbnail for double-batch-2.jpg]](/t/88412/a/62746/double-batch-2.jpg "Filename: double-batch-2.jpg
Description:")
God of procrastination https://www.youtube.com/watch?v=q1EoT9sedqY
Benen Huntley wrote: The inside of the cavity is rendered which I can remove. The outside is plaster board glued to the render.
God of procrastination https://www.youtube.com/watch?v=q1EoT9sedqY
God of procrastination https://www.youtube.com/watch?v=q1EoT9sedqY
Satamax Antone wrote:Can't you take a bit more room, in the back of the heater, to make it deeper? Narrow bells like this tend to have more of a flowing pattern, than heat layer stagnation in bigger bells. This is the case of single bells, vs double bells too.
As well, if you don't need to heat upstairs, it's better to have a lower bell.
https://permies.com/t/53413/Inexpensive-vacuum-formed-ceramic-fiber
God of procrastination https://www.youtube.com/watch?v=q1EoT9sedqY
God of procrastination https://www.youtube.com/watch?v=q1EoT9sedqY
God of procrastination https://www.youtube.com/watch?v=q1EoT9sedqY
God of procrastination https://www.youtube.com/watch?v=q1EoT9sedqY
God of procrastination https://www.youtube.com/watch?v=q1EoT9sedqY

|
please buy my thing and then I'll have more money:
try homesteading without the stress and anxieties of buying a homestead
https://wheaton-labs.com/bootcamp
|


![[Download 200mm-design.skp]](https://permies.com/templates/default/betaview/images/download-attachment.gif)