• Post Reply Bookmark Topic Watch Topic
  • New Topic
permaculture forums growies critters building homesteading energy monies kitchen purity ungarbage community wilderness fiber arts art permaculture artisans regional education skip experiences global resources cider press projects digital market permies.com pie forums private forums all forums
this forum made possible by our volunteer staff, including ...
master stewards:
  • Nancy Reading
  • Carla Burke
  • r ranson
  • John F Dean
  • paul wheaton
  • Pearl Sutton
stewards:
  • Jay Angler
  • Liv Smith
  • Leigh Tate
master gardeners:
  • Christopher Weeks
  • Timothy Norton
gardeners:
  • thomas rubino
  • Jeremy VanGelder
  • Maieshe Ljin

Batch Rocket Design Planning / Questions

 
rocket scientist
Posts: 176
Location: Sangre de Cristo Mountains, CO - Lat 38°14' - Zone 5b
131
hunting earthworks solar wood heat rocket stoves homestead
  • Likes 4
  • Mark post as helpful
  • send pies
    Number of slices to send:
    Optional 'thank-you' note:
  • Quote
  • Report post to moderator
Apologies in advance for the lengthy post but I’m trying to provide as much information as possible to clearly state the goals and questions.

I’ve been reading everything I can and beginning to develop my thoughts on design and would love to hear feedback. As I’ve noted in previous posts, I have an existing 6” chimney that I will be using so locked in on size. Note that the top of the chimney tube is roughly 24’ above the level of the floor. Considering my normal daily routine, I usually light my current shop stove around 5:00 AM while having coffee in the house and it is several hours before we are in the shop which is adequate time to raise the temp about 8-10 degrees to almost 60F. My batch rocket heating goal will be to generate some immediate heat with the barrel to achieve our 60F in a few hours and more importantly, drive heat into a large bell that will store as much heat as possible to carry over through the evening. If this is successful, it should reduce the demand for the immediate heating via the barrel too. As I have also mentioned in previous threads, I have a 2nd stove in the shop so it the concept and my build are successful I would then add a 2nd batch rocket leveraging the other 6” chimney.

An additional item for the design wish list is the idea of having the combustion core/firebox elevated above slab/floor level to reduce bending over to load and manage the fire, especially for my wife. We are highly active but no longer youngsters, so minimizing bending down would be great.

My current design thoughts and questions are as follows.
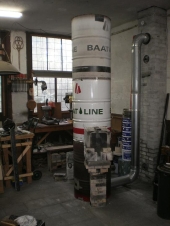
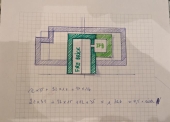
1) General design concept: A single barrel connected to a masonry bell to accomplish the quick heat radiation from the barrel followed by the long dissipation of heat from the masonry to carry through to the next morning, with the emphasis toward the overnight heat retention. The two designs that illustrate the direction I am thinking are from Tom Rubino and Peter vdB. Photos attached below... I hope :-).

2) Combustion core built from refractory brick. I happen to be about a 90 minute drive from a company called Refractories West, Inc that stocks brick, wool, mortar, etc. I think this will be the best path for the combustion core vs other material/construction methods. Ref West sells several grades of brick. The 2 lowest cost options are a fireplace/pizza oven brick that is rated to temps <2,000F and a refractory brick that is $1.30 more each that is rated to 3,000F. My thinking is to go with a 5 minute riser or ceramic riser sleeve so I’m wondering if the back of the combustion box, upstream of the port, where it transitions to the riser would be seeing temps in excess of 2,000F... thoughts? For long term performance and integrity would it be advised to use the higher temp rated refractory brick?

3) I’ve been researching ceramic riser sleeves and suppliers. From what I’ve read, these are expensive but can yield the best results over a longer period of time. I’m certainly not wealthy but I can commit budget to do the project right. With my critical systems on the homestead we try to budget on the basis of “buy once, cry once”, if that will yield a better long term solution that minimizes maintenance. So, curious to hear if the current thinking is still that the best long-term performance can be achieved with a ceramic riser v/s a 5 minute riser and if the added cost can be rationalized given available budget? Building a 5 minute riser does not concern me, so happy to go that route. Also curious if anyone has recently identified friendly ceramic riser suppliers who will work with small quantity buyers. My research so far has identified an initial list of 5 potential foundry supplied that show riser sleeves on their website, including Thermotec that I picked up from a mention one of the forums. Unfortunately, none of them are within a reasonable drive from me so the supplier would have to ship.

4) For raising the height of the combustion core, I’m thinking that a brick or block foundation then build the batch rocket/barrel. It appears from the posted pictures that Tom Rubino’s shop batch rocket and the single barrel/brick bell on Peter’s website both have elevated combustion chambers. Ideally, we would like the floor of the combustion chamber to be about 24” high. I’m curious what needs to be considered for placing the core at this height and how that may affect the relationship of the bell elevation? Weight is not an issue, I’ll be building on a 6” slab.

5) For maximum heat storage, Peter suggested in a previous thread to design with a double skin. I’ve also seen on Peter’s website mention of columns within the bell for greater heat storage. I also read on Peter’s site on the Building page about bell size and a 6” system would dictate a bell internal surface area of 57 sq ft. I am unclear if the ISA includes the barrel or is just the connected bell? Using a double skin design to me would mean two layers of brick or other heat absorbing mass. Brick & mortar would be simple to double skin. Another thought… living in the Rocky Mountains we have lots of granite on our land. The potential benefit being thermal retention but the challenge is the shape is more chunky (rough sphere) and not flat so it’s not as simple to construct vertical surfaces. The other major rock type that we have is more compressed sandstone which does offer plenty of flat profile rocks but I’m not sure the thermal retention would even equal brick. Form must follow function and brick is not objectionable to look at but the rocks are free.

6) Several drawings that I’ve seen show a refractory plate as the roof of the combustion chamber vs one that is a pitched roof design made of brick with an angle cut to accommodate the pitch. I’ve yet to identify a supplier for the flat plate. I have lots of experience with a wet saw from tiling our house so the pitched roof is certainly possible. Any considerations for either design other than the labor aspect?

7) I’m hoping to do enough research and Q/A up front to get a solid design the first time. I hope the learning curve isn't so steep that I need to build a prototype or two to get the desired results. Please let me know any thoughts, if I am best advised to plan a prototype build before the “permanent” build. Unless I build a prototype inside in-place I just not sure how I would accomplish the prototype and the effect on draft of a 24’ chimney pipe.
thumb-20230106_150656.jpg
[Thumbnail for thumb-20230106_150656.jpg]
IMG_0068.jpg
[Thumbnail for IMG_0068.jpg]
 
Glenn Littman
rocket scientist
Posts: 176
Location: Sangre de Cristo Mountains, CO - Lat 38°14' - Zone 5b
131
hunting earthworks solar wood heat rocket stoves homestead
  • Likes 2
  • Mark post as helpful
  • send pies
    Number of slices to send:
    Optional 'thank-you' note:
  • Quote
  • Report post to moderator
I just came upon Thomas' post <https://permies.com/t/207117/Extreme-Burning-Batch-box-roof>; that talks about a 12x24x2 firebrick tile. This would seem to answer my question #6 for the combustion chamber roof material.
 
Posts: 564
Location: Sierra Nevada foothills, 350 m, USDA 8b, sunset zone 7
98
  • Likes 3
  • Mark post as helpful
  • send pies
    Number of slices to send:
    Optional 'thank-you' note:
  • Quote
  • Report post to moderator
Glen,

Please use the regular firebricks for the roof of the firebox, especially if you have a saw and know how to use it. The smaller the elements that you use - the better they will respond to expansion and shrinking. Bricks are also easier to source than less popular sizes of refractories.
 
Glenn Littman
rocket scientist
Posts: 176
Location: Sangre de Cristo Mountains, CO - Lat 38°14' - Zone 5b
131
hunting earthworks solar wood heat rocket stoves homestead
  • Likes 3
  • Mark post as helpful
  • send pies
    Number of slices to send:
    Optional 'thank-you' note:
  • Quote
  • Report post to moderator
I just wandered on to another thread with a reply from Thomas. His sage advice to that post was:

"It is hard to do, but try not to overthink your build.  (most everyone does on a first build!)
This is easy easy, playing like a child in a mud bog.  Very messy while building, be prepared to make a clay mess in your home.
Just take it one step at a time, figure out your next step when you get to it.  If you try to plan everything out perfectly ahead of time A) it will take way too long and B) you may have no hair left after ripping it all out!
"

Made me chuckle as I ponder how much I am over thinking this new frontier. I like to plan and minimize dumb mistakes but maybe I just need to build a prototype somewhere and learn from doing. It would just be great to get as much as I can right so I can build the next and the next. I'm already thinking about the 2nd batch rocket for the shop, a small RMH for the house, a small one for the greenhouse and one for the garage... ambitious stuff given that I haven't started building #1 yet.
 
Glenn Littman
rocket scientist
Posts: 176
Location: Sangre de Cristo Mountains, CO - Lat 38°14' - Zone 5b
131
hunting earthworks solar wood heat rocket stoves homestead
  • Likes 3
  • Mark post as helpful
  • send pies
    Number of slices to send:
    Optional 'thank-you' note:
  • Quote
  • Report post to moderator
I've been making good use of the Permies search function and getting a lot of my questions answered and making great progress on my build plan. I've never been able to master Sketchup, so sorry no fancy CAD drawing to share.

The simple overview of my build is a tall monolithic structure, brick bell with the batch box combustion unit housed within the bell. I'll include a steel plate, size not yet determined, to allow for some fast radiant heat and also to serve as an access port that can easily be removed to allow internal inspection, cleaning, modification, etc. The general goal is more focused toward heat storage and extended release v/s fast heating.

This will be a 6" system since I am repurposing an existing 6" stovepipe chimney that is roughly 25' tall. I built a pretty simple spreadsheet to play with bell sizing to achieve the 57 sq ft ISA and landed on an internal dimension of 34" wide x 25" deep x 71" tall. This accounts for the wall surface area of the combustion box taking up 1.5 sq ft. This also accounts for fabrication of a 16" steel stand to place the combustion chamber at a more senior-friendly height. I'm happy to share the spreadsheet if anyone wants... its not rocket science stuff but helped me play with the numbers easily and hit the target ISA.

A few questions that I would love to get input from rocket scientists out there...

First and foremost is the question of the firebrick for the upper section of the bell. Do most people just transition from red clay brick to firebrick at the appropriate point and have two different types of brick visible from the exterior? I've been pondering how to have just the red clay brick on the exterior but the only way I see to do this is a full double-skin which I don't think I want to do, both because of added expense as well as prolonging the warm-up time to get the mass radiating heat. However, I am curious to hear comments on double-skinning the bell. Or, is there some magic way to add the firebrick to the upper section of the bell but have the exterior all red clay brick?

At what elevation on the bell should I begin the firebrick? Adjacent to the top of the riser or lower/higher?

I have no prior experience working with clay/sand mortar. My thought is to use this for the entire bell mortar material to allow for future simplicity to modify the design and not have to deal with cement. Can anyone provide a rough guesstimate of how many pounds of powdered clay I should buy? I can figure out the sand based on that recommendation.

Thanks in advance for reading my ramblings and any input provided.
 
rocket scientist
Posts: 6342
Location: latitude 47 N.W. montana zone 6A
3205
cat pig rocket stoves
  • Likes 5
  • Mark post as helpful
  • send pies
    Number of slices to send:
    Optional 'thank-you' note:
  • Quote
  • Report post to moderator
Hi Glenn;
Here is my 2 cents worth on how much clay to buy.
Get two sacks for sure, so #100,  but if you travel a long way to get it, buy three.
I recommend Sacrete brand commercial medium sand sold in #100 sacks to mix with.

Without double skinning or cutting bricks thin, there is no easy way to change the brick type.
Only the top 3 or 4 rows should need to be firebrick.
Solid clay bricks laid flat can take up to 1200F of heat.

The temperature inside your riser will be 2000F +
It starts cooling the moment it leaves the riser.


images-(1).jpg
[Thumbnail for images-(1).jpg]
 
Glenn Littman
rocket scientist
Posts: 176
Location: Sangre de Cristo Mountains, CO - Lat 38°14' - Zone 5b
131
hunting earthworks solar wood heat rocket stoves homestead
  • Likes 3
  • Mark post as helpful
  • send pies
    Number of slices to send:
    Optional 'thank-you' note:
  • Quote
  • Report post to moderator
Thanks for the recommendation on quantity. Yup, it's a 4 hour round trip to the big city to get clay so 3 bags it is. Thanks as well for all of your input along the way. I'm starting to feel like I have a pretty good grasp on my initial build thanks to you, so have a little pie.
 
Glenn Littman
rocket scientist
Posts: 176
Location: Sangre de Cristo Mountains, CO - Lat 38°14' - Zone 5b
131
hunting earthworks solar wood heat rocket stoves homestead
  • Likes 1
  • Mark post as helpful
  • send pies
    Number of slices to send:
    Optional 'thank-you' note:
  • Quote
  • Report post to moderator
For the past few days I've been pondering the structural integrity of my planned 6" design of the brick bell/stratification chamber. The external dimensions are approximately 42" wide x 33" deep x 74" tall. I've done some brickwork repair in the past but I've never built a brick structure so I don't want to make a huge novice mistake.

Does anyone have any thoughts whether a single-skin brick structure of this height will be structurally sound? Does it need some form of structural support? My design height is dictated by the firebox being internal to the bell and 16" off of floor level with a 43 3/8" riser and 12" clearance above the top of the riser.
 
thomas rubino
rocket scientist
Posts: 6342
Location: latitude 47 N.W. montana zone 6A
3205
cat pig rocket stoves
  • Likes 6
  • Mark post as helpful
  • send pies
    Number of slices to send:
    Optional 'thank-you' note:
  • Quote
  • Report post to moderator
Hi Glenn;
The short answer is yes, it will be stable.
During construction, before your mortar dries you can knock it about by accident... So don't bump it while drying!
If you use a clay mortar, after it is dry, it would be possible (not very likely) for a traumatic crash to "break" the bell.

Imagine a #200 man tripping and crashing his shoulder/ body into the bell, a couple dozen bricks might break free.
This could be a problem if the stove is running but no big deal if it is not.
Clay mortar repair is super fast and easy, the bricks and the mortar are reusable!
Remember you will have T-bars across the top to support your roof, they will help stabilize the whole box.

Now you can use a cement mortar below the riser and refractory cement above if you prefer.
This makes a permanent bell, much harder to break.
It is also very  unforgiving during construction, cement is hard on the hands to work with, and clay is a pleasure to work with.
Cement is very tough to clean up once it dries, clay is not.
Decide that you want a larger or a different-shaped bell, it is easy peasy to make changes with clay mortar... a real chore if it is concrete mortar.

At my home, the shop dragon bell is all clay mortar.
The studio dragon having a stand-alone core, and no bell uses a concrete mortar.
Beyond the core, it is all clay.


steward and tree herder
Posts: 8454
Location: Isle of Skye, Scotland. Nearly 70 inches rain a year
3998
4
transportation dog forest garden foraging trees books food preservation woodworking wood heat rocket stoves ungarbage
  • Likes 4
  • Mark post as helpful
  • send pies
    Number of slices to send:
    Optional 'thank-you' note:
  • Quote
  • Report post to moderator

Glenn Littman wrote:For the past few days I've been pondering the structural integrity of my planned 6" design of the brick bell/stratification chamber. The external dimensions are approximately 42" wide x 33" deep x 74" tall. I've done some brickwork repair in the past but I've never built a brick structure so I don't want to make a huge novice mistake.

Does anyone have any thoughts whether a single-skin brick structure of this height will be structurally sound? Does it need some form of structural support? My design height is dictated by the firebox being internal to the bell and 16" off of floor level with a 43 3/8" riser and 12" clearance above the top of the riser.


I think you'll be fine, although I'm not an expert. The box structure should give enough stability to the structure. I found this online reference  for house building, which implies that a single skin wall is OK when 10 ft high and 36ft long. Obviously that is a house wall, not a stove....
Given that you want it to expand contiguously to avoid cracking, butresses may cause more trouble than they solve.
 
Glenn Littman
rocket scientist
Posts: 176
Location: Sangre de Cristo Mountains, CO - Lat 38°14' - Zone 5b
131
hunting earthworks solar wood heat rocket stoves homestead
  • Likes 7
  • Mark post as helpful
  • send pies
    Number of slices to send:
    Optional 'thank-you' note:
  • Quote
  • Report post to moderator
Wow, Permies is not just informational, its also a great stress reliever.

Thank you Tom and Nancy for your great responses and confirmation of structural integrity. To your point Tom, my intention is to use clay mortar to simplify future modifications or repairs. Drying of the mortar should not be a problem here given our low humidity. Nancy, great reference on brick wall stability and expert confirmation that a single stack is no issue at a 6 foot height.

Onward and upward... I'm accumulating all of my materials and will shortly begin building a test combustion system outside to get a little batch rocket experience, get all of my firebrick cut to size and determine exact dimensions for welding up the combustion system stand.
 
As if that wasn't enough, a dog then peed on the tiny ad.
Rocket Mass Heater Jamboree And Updates
https://permies.com/t/170234/Rocket-Mass-Heater-Jamboree-Updates
reply
    Bookmark Topic Watch Topic
  • New Topic