• Post Reply Bookmark Topic Watch Topic
  • New Topic
permaculture forums growies critters building homesteading energy monies kitchen purity ungarbage community wilderness fiber arts art permaculture artisans regional education skip experiences global resources cider press projects digital market permies.com pie forums private forums all forums
this forum made possible by our volunteer staff, including ...
master stewards:
  • Carla Burke
  • Nancy Reading
  • John F Dean
  • r ranson
  • Jay Angler
  • paul wheaton
stewards:
  • Pearl Sutton
  • Liv Smith
  • Anne Miller
master gardeners:
  • Timothy Norton
  • Christopher Weeks
gardeners:
  • Andrés Bernal
  • Jeremy VanGelder
  • Matt McSpadden

Shippable cores - progress report

 
Posts: 211
22
  • Likes 3
  • Mark post as helpful
  • send pies
    Number of slices to send:
    Optional 'thank-you' note:
  • Quote
  • Report post to moderator
I'll be at Paul's rocket mass heater Jamboree in October for Part II of the Jamboree, October 9-12. I'll be bringing a prototype of a vacuum formed ceramic fiber rocket heater core to show anyone who might be interested what it looks like (it's just a little different than current tech) and how it's assembled and works. I think (hope?!) people will be pleasantly surprised by how simple and easy it is to assemble a 6" rocket heater based on this design as well as simplifying the creation of the manifold. (I'll be driving out to Montana from here in PA in my little Nissan Versa Note with a little motorcycle trailer to haul stuff. I'll be alone and have never made this kind of cross country trip so it should be a real adventure.)

We've already submitted AutoCAD drawings to three manufacturers of vacuum formed ceramic fiber shapes to get an idea of tooling/mold costs up front (which we anticipate to be in the thousands of dollars) as well as per unit costs once production begins. We start filming a Kickstarter campaign video on Monday with a friend who is a good professional videographer to raise capital for tooling/molding expenses up front.

I don't have any hard cost estimates yet, but the good news is that, based on preliminary conversations with all three companies these should be relatively affordable and within the range I had hoped. We'll know more soon enough. (And a lot depends on the Kickstarter campaign.)

A couple of the companies want us to consider other refractory possibilities so I don't know yet if this will be made entirely of ceramic fiber or something else entirely, or a combination of different highly insulating and high temp materials.

I'll post updates as we progress this fall.
 
Brian James
Posts: 211
22
  • Likes 2
  • Mark post as helpful
  • send pies
    Number of slices to send:
    Optional 'thank-you' note:
  • Quote
  • Report post to moderator
Another shippable core is on the market now from an impeccable source!
https://permies.com/t/69535/Walker-Stoves-Super-Hot-Shippable
 
Brian James
Posts: 211
22
  • Likes 3
  • Mark post as helpful
  • send pies
    Number of slices to send:
    Optional 'thank-you' note:
  • Quote
  • Report post to moderator
As I said to Peter over at Donkey's forum, I'm building the prototype core out of layers of various thicknesses of 2300 degree F ceramic fiber board, cut into the 3D configuration of the design, glued together with ceramic cement, and rigidized with a diluted solution of the same (which is all the rigidizer is anyhow.) The firebox will be lined with fire brick splits but the production version will have a layer of metal(?) separating the fire brick from the vacuum formed ceramic fiber shape. If I have time, I'm going to include an 18g version of the liner in this prototype. Production models will employ thicker liners and 2600 degree F ceramic fiber.

As far as the limited market in the rocket heater community, that's why I'm marketing this as a kit so individuals can put together their own backyard or deck or patio combination heater, cook top and pizza oven. The market for deck heaters and pizza ovens is huge compared to rocket heaters. If I can effectively enter that market, I can then use the capital to further develop a dedicated household wood fired rocket heater with this core. It will be easy to tie in an "Ugly drum smoker" so I can also target the BBQ/smoker crowd with an environmentally clean alternative to charcoal grills. The Ugly drum smoker would effectively double as a second bell if lined with brick to hold up a grill insert. In recent years the EPA has been raising back yard charcoal grilling as an environmental hazard. This type of stove, using compressed sawdust firewood logs, would be a very clean, green alternative using recycled waste (sawdust) as a fuel with very little release of smoke, i.e., volatiles or particulates.

I'm shooting to keep this rocket heater core kit under $600 and if its all vacuum formed ceramic fiber (which ain't cheap!), shipping weight should be well under UPS limits, so it could ship via UPS instead of freight. The consumer would buy their fire brick splits and a couple other items locally or via the internet, and detailed instructions on assembly will be provided. Since its being marketed as an outdoor appliance, UL and local building ordinances wouldn't apply. But it should be relatively easy to incorporate this core into a "masonry stove."

(I had 4 strokes in March 2016 that left me paralyzed in the left arm and leg (and is the reason it still takes me multiple edits to find typos and complete my thoughts!), and I had to retire my license as a Podiatrist. I gave away my practice of 21 years, and the bank took back our house. This effort is to reestablish my life and an income. I received two stents in the arteries of my brain at the time of the strokes and I've recovered physically remarkably well, lost 75 pounds, and am in better shape now than most of my adult life.)
 
Brian James
Posts: 211
22
  • Likes 4
  • Mark post as helpful
  • send pies
    Number of slices to send:
    Optional 'thank-you' note:
  • Quote
  • Report post to moderator
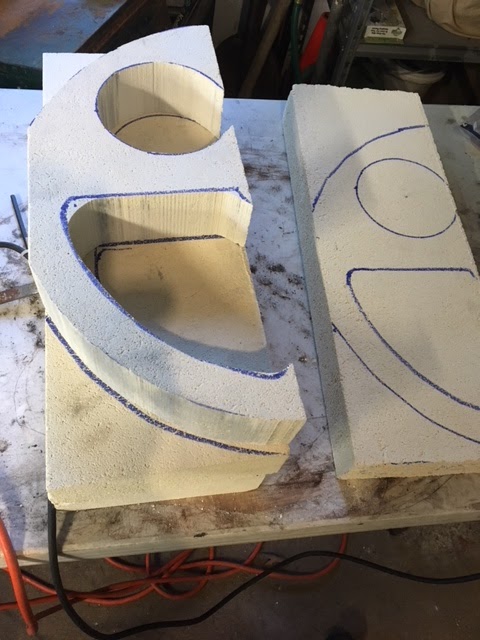
The prototype of the eventual vacuum formed ceramic fiber core I've been constructing from ceramic fiber board layers (glued together with ceramic cement) is coming along nicely. It will be ready for the jamboree. You can get a hint of the design elements I'm including from these photos. I'll have it entirely assembled and running by the end of this week and I'll post more photos. (Yes, it's two piece, the firebox and the half round section on the left which fits the diameter of the bottom of a 55 gallon barrel. Turn the barrel upside down, cut a half circle in the barrel and take out a piece the height of the firebox, and insert the core pieces like an 8 track tape in an 8 track tape player. Door is from the USSC barrel stove kit, mounted on sheet metal and attached to the barrel with rivet nuts. Manifold is the barrel stove kit chimney collar mounted in the side of the barrel just above the core.)
IMG_1472.JPG
[Thumbnail for IMG_1472.JPG]
IMG_1474.JPG
[Thumbnail for IMG_1474.JPG]
IMG_1479.JPG
[Thumbnail for IMG_1479.JPG]
IMG_1485.JPG
[Thumbnail for IMG_1485.JPG]
IMG_1488.JPG
[Thumbnail for IMG_1488.JPG]
 
Brian James
Posts: 211
22
  • Likes 3
  • Mark post as helpful
  • send pies
    Number of slices to send:
    Optional 'thank-you' note:
  • Quote
  • Report post to moderator
I'm trying to create a kit that uses all off the shelf parts and simple tools from Harbor Freight (Angle grinder, rivnut kit, metal bender) and a barrel stove kit that just about anyone with a little mechanical ability can put together in a weekend. A second barrel (bell) can be attached with the USSC stacking barrel stove kit pretty easily.

Mock up:
IMG_1486.JPG
[Thumbnail for IMG_1486.JPG]
IMG_1487.JPG
[Thumbnail for IMG_1487.JPG]
IMG_1499.JPG
[Thumbnail for IMG_1499.JPG]
 
Brian James
Posts: 211
22
  • Likes 2
  • Mark post as helpful
  • send pies
    Number of slices to send:
    Optional 'thank-you' note:
  • Quote
  • Report post to moderator
Ceramic rigidizer has been applied to both halves of the core and I'm ready to start assembly:
IMG_1512.JPG
[Thumbnail for IMG_1512.JPG]
IMG_1510.JPG
[Thumbnail for IMG_1510.JPG]
IMG_1513.JPG
[Thumbnail for IMG_1513.JPG]
 
Brian James
Posts: 211
22
  • Likes 1
  • Mark post as helpful
  • send pies
    Number of slices to send:
    Optional 'thank-you' note:
  • Quote
  • Report post to moderator
Now I just need to surround the firebox in sheet metal and line it with firebrick, insert the secondary air tube assembly in front of the port, hang the door and mount the flue collar manifold. I hope it's obvious that this is a full powered self contained 6" unit, and a second barrel could easily be mounted on top the first and the exhaust stream can simply be routed through a bell or a bench (or in this case, my plan is a second 55 gallon barrel lined with red brick to serve as a masonry bell but designed to also function as a BBQ.)
IMG_1516.JPG
[Thumbnail for IMG_1516.JPG]
 
Brian James
Posts: 211
22
  • Likes 1
  • Mark post as helpful
  • send pies
    Number of slices to send:
    Optional 'thank-you' note:
  • Quote
  • Report post to moderator
I weighed everything today. With heavy coats of rigidizer the left semicircle part weighs 20lbs, the right firebox weighs 30lbs, the cut out barrel 40lbs, and the barrel stove kit cast iron parts 20lbs. Sheet metal around the firebox might be another 5-10lbs? So 120lbs is a good total estimate, not including firebrick to line the firebox.

The ceramic cement, diluted with water and applied as rigidizer in pancake batter consistency with a foam paint brush, set up and hardened better than I thought it would. Firebox has 2 coats. It doesn't make it really hard but I'm not afraid to handle it now and no particles of ceramic fiber board can be easily broken off with your fingernail now.

Someone asked me what holds the section of vertical riser. It just sets tightly in a 1" groove in the top:
IMG_1466.JPG
[Thumbnail for IMG_1466.JPG]
IMG_1469.JPG
[Thumbnail for IMG_1469.JPG]
 
Brian James
Posts: 211
22
  • Likes 1
  • Mark post as helpful
  • send pies
    Number of slices to send:
    Optional 'thank-you' note:
  • Quote
  • Report post to moderator
Progress. (I put it on the back burner for two weeks while my oldest son was home from California.) Secondary air tube assembly is shown inside next to the Venturi port. I still have to weld it up and screw it all together.
IMG_1660.JPG
[Thumbnail for IMG_1660.JPG]
IMG_1675.JPG
[Thumbnail for IMG_1675.JPG]
IMG_1676.JPG
[Thumbnail for IMG_1676.JPG]
IMG_1682.JPG
[Thumbnail for IMG_1682.JPG]
IMG_1673.JPG
[Thumbnail for IMG_1673.JPG]
 
Brian James
Posts: 211
22
  • Likes 1
  • Mark post as helpful
  • send pies
    Number of slices to send:
    Optional 'thank-you' note:
  • Quote
  • Report post to moderator
The secondary air assembly is simply 1 1/4" square steel tubing, the horizontal is 4 1/2" and the vertical (slanting away from the Venturi port) is 5".

A 2"X 1" recess is already built into the ceramic fiber board floor and is covered with firebrick and extends to the base of the Venturi port.

Edit to add:

Based on crucial technical advice from Peter van den Berg (the base of the secondary air tube cannot be so close to the Venturi port) I've revised that part:
IMG_1640.JPG
[Thumbnail for IMG_1640.JPG]
IMG_1697.JPG
[Thumbnail for IMG_1697.JPG]
IMG_1689.JPG
[Thumbnail for IMG_1689.JPG]
 
Brian James
Posts: 211
22
  • Mark post as helpful
  • send pies
    Number of slices to send:
    Optional 'thank-you' note:
  • Quote
  • Report post to moderator
Almost ready for first fire tomorrow
FD98EEA9-CCE8-4061-B2C1-B2BF6EF36CC8.jpeg
[Thumbnail for FD98EEA9-CCE8-4061-B2C1-B2BF6EF36CC8.jpeg]
02BF5603-83CD-4DE9-9920-DF4C97AD213D.jpeg
[Thumbnail for 02BF5603-83CD-4DE9-9920-DF4C97AD213D.jpeg]
 
Brian James
Posts: 211
22
  • Mark post as helpful
  • send pies
    Number of slices to send:
    Optional 'thank-you' note:
  • Quote
  • Report post to moderator
With the first prototype the highest I got on the top of the barrel was 865 degrees, and 615 degrees in the open pizza oven. Of course that was with 25” of barrel on top of the core and about 14” between the vertical riser and the barrel top. On this one there’s only 11” or 12” between riser top and barrel, and only about 17” of Barrel being heated. With similar weather, I finally lit this prototype this afternoon at 5:30 but was called away till 7:08. At that point, barrel top temp was 858• and pizza oven almost 600•. Peak temp has been after about 45 minutes after starting the fire in the first prototype. I’m pretty sure I missed peak this burn cycle. I’m using the same compressed sawdust fire bricks for direct comparison which burned 6 hours in the previous prototype. I’ll try to keep track of total burn time this cycle.
D5412D06-5A93-4B7C-BD1A-799BB1237F1A.jpeg
[Thumbnail for D5412D06-5A93-4B7C-BD1A-799BB1237F1A.jpeg]
 
Brian James
Posts: 211
22
  • Mark post as helpful
  • send pies
    Number of slices to send:
    Optional 'thank-you' note:
  • Quote
  • Report post to moderator
Three hours into this burn cycle, barrel top temp 450•


At 4 1/2 hours, Barrel top temp was 125• and most of the fuel burned up. I suspect it burned hotter/faster because I opened up/ reamed out the primary air ports in the barrel stove kit door assembly. I’m figuring peak barrel top temp probably reached 885•+ but I’ll have to run another batch to tell for sure.

This version definitely has higher exhaust gas temps for heating a bell, bench etc  
96D71616-A9BB-496E-8368-B5A7B40F6FE3.jpeg
[Thumbnail for 96D71616-A9BB-496E-8368-B5A7B40F6FE3.jpeg]
 
Brian James
Posts: 211
22
  • Mark post as helpful
  • send pies
    Number of slices to send:
    Optional 'thank-you' note:
  • Quote
  • Report post to moderator
Also, honestly, before anyone looks at this and says it's too involved or too much work, please realize that this took me a while because I've had five strokes, but I have no background whatsoever in metal work or working with ceramics. This whole project was completed with a Harbor Freight angle grinder & 30" metal bender, a Makita cordless drill and driver, a table top grinder, some furnace cement, and simple hand tools. (I bought a cheap Craigslist band saw to cut the ceramic fiber board, but if I manage to get these into production as a vacuum formed ceramic fiber shippable core, that wouldn't be necessary.) The only thing I got help with was tack welding the secondary air assembly at a local machine shop ($12) and that was only because I was impatient and didn't want this project further delayed while I learned to weld on a Harbor Freight MIG welder I bought.


The eventual shippable core could be used in multiple types of rocket heater applications, not just the upright barrel shown. A cut down barrel would just be used to contain the ceramic core.
 
Posts: 36
  • Likes 1
  • Mark post as helpful
  • send pies
    Number of slices to send:
    Optional 'thank-you' note:
  • Quote
  • Report post to moderator
I have to admit this is looking pretty promising. I'm really curious to see how it does as far as the initial goal for like a porch style heater I believe is what you were going for? Also in regards to your pizza oven that's really neat idea what are you using to either make the oven out of or coat the barrel with cuz last time we try to remember we melted all the paint off the barrel
 
Brian James
Posts: 211
22
  • Likes 2
  • Mark post as helpful
  • send pies
    Number of slices to send:
    Optional 'thank-you' note:
  • Quote
  • Report post to moderator

Jon McLain wrote:I have to admit this is looking pretty promising. I'm really curious to see how it does as far as the initial goal for like a porch style heater I believe is what you were going for? Also in regards to your pizza oven that's really neat idea what are you using to either make the oven out of or coat the barrel with cuz last time we try to remember we melted all the paint off the barrel


Hi Jon,
After burning off the paint with the first fire (outdoors!), I used 2000• grill/stove paint to repaint it.

Yes, the initial goal is to enter the outdoor heater market - Deck Heaters, patio Heaters, etc, but to also offer the versatility of the cook top and oven options. Of course the core itself could be incorporated into many designs.

The pizza oven is just a bottom of a barrel, cut off and flipped over on top of the rocket heater. Pizza shops run their stoves on average at 600•, varying from 550• to 675• so I think I’ve got this one dialed in pretty good at 600-615•.
F4687780-17C5-4AE9-8244-A7A4EF0D764C.jpeg
[Thumbnail for F4687780-17C5-4AE9-8244-A7A4EF0D764C.jpeg]
 
Jon McLain
Posts: 36
  • Likes 1
  • Mark post as helpful
  • send pies
    Number of slices to send:
    Optional 'thank-you' note:
  • Quote
  • Report post to moderator
Ok so we should buy a few frozen pizzas and rest your oven and cooking quality. I'm excited to see this in person
 
Brian James
Posts: 211
22
  • Mark post as helpful
  • send pies
    Number of slices to send:
    Optional 'thank-you' note:
  • Quote
  • Report post to moderator
Disappointing news - my traveling companion had to back out due to health reasons, and it's not a trip I can or should attempt by myself due to my own health troubles, so unfortunately I'm not going to be able to attend the rocket heater Jamboree in Montana after all.
 
Jon McLain
Posts: 36
  • Mark post as helpful
  • send pies
    Number of slices to send:
    Optional 'thank-you' note:
  • Quote
  • Report post to moderator

Brian James wrote:Disappointing news - my traveling companion had to back out due to health reasons, and it's not a trip I can or should attempt by myself due to my own health troubles, so unfortunately I'm not going to be able to attend the rocket heater Jamboree in Montana after all.


Disappointing news my friend. We shall get some good data this sunday I hope. Perhaps some good videos
 
Brian James
Posts: 211
22
  • Mark post as helpful
  • send pies
    Number of slices to send:
    Optional 'thank-you' note:
  • Quote
  • Report post to moderator
I’ve been traveling and just got a chance to run another batch of the compressed sawdust fire bricks tonight. I lit it around 6:45. Barrel top temps were as follows. Firebox door was open about a half inch. It gets too hot too fast that way!
7:20   575•F
7:30   930•F
Closed firebox door
7:33   853•F

I wanted to see how hot the pizza oven would get so I placed insulation blocks to block the pizza oven door:
7:32   450•F  (firebox door closed)
8:02   640•F  (cracked firebox door approx 3/8” open)
8:07   700•F

At this point I figured I better check the barrel top temps, and it was over 1000•F on the laser thermometer and starting to glow red around the bases of the firebrick in the pizza oven, so I closed the firebox door and removed the insulation from the pizza oven doorway to let everything cool down.

Barrel top temps
8:16   960•F
8:24   812•F (closed air)
8:31   733•F
557EAFF4-EDE8-47F4-BCBE-12BAB3163067.jpeg
[Thumbnail for 557EAFF4-EDE8-47F4-BCBE-12BAB3163067.jpeg]
973DE228-B181-4999-BC67-3ED05DCF5C81.jpeg
[Thumbnail for 973DE228-B181-4999-BC67-3ED05DCF5C81.jpeg]
69791D1E-E1E8-4B6C-8296-1ED7759B0769.jpeg
[Thumbnail for 69791D1E-E1E8-4B6C-8296-1ED7759B0769.jpeg]
30B1EADA-11A0-45DA-9D8C-363A7A3DEB94.jpeg
[Thumbnail for 30B1EADA-11A0-45DA-9D8C-363A7A3DEB94.jpeg]
C74151FC-9C33-4A2F-812B-732C60B1C4F5.jpeg
[Thumbnail for C74151FC-9C33-4A2F-812B-732C60B1C4F5.jpeg]
 
Brian James
Posts: 211
22
  • Likes 1
  • Mark post as helpful
  • send pies
    Number of slices to send:
    Optional 'thank-you' note:
  • Quote
  • Report post to moderator
And at 10:45, four hours after starting this batch, barrel top temp is 445•F. It looks like there’s enough wood left in the firebox to burn another 1 to 1 1/2 hours, but I’m hitting the sack.
ABBF4040-9A5E-43CC-A3CF-D66677666784.jpeg
[Thumbnail for ABBF4040-9A5E-43CC-A3CF-D66677666784.jpeg]
 
Brian James
Posts: 211
22
  • Likes 1
  • Mark post as helpful
  • send pies
    Number of slices to send:
    Optional 'thank-you' note:
  • Quote
  • Report post to moderator
Curiosity got the best of me, so I stayed up to check it at 11:45, five hours since lighting this batch. Barrel top temp was 340•F and there’s still enough fuel for about another hour in the firebox.
7C325B72-255E-4B56-ABE2-51EFA513AF49.jpeg
[Thumbnail for 7C325B72-255E-4B56-ABE2-51EFA513AF49.jpeg]
 
Jon McLain
Posts: 36
  • Likes 1
  • Mark post as helpful
  • send pies
    Number of slices to send:
    Optional 'thank-you' note:
  • Quote
  • Report post to moderator
That is crazy! 5 hours of intense heat for so little wood. These stoves continue to blow my mind. I'm so excited to see this in person
 
Brian James
Posts: 211
22
  • Mark post as helpful
  • send pies
    Number of slices to send:
    Optional 'thank-you' note:
  • Quote
  • Report post to moderator

Jon McLain wrote:That is crazy! 5 hours of intense heat for so little wood. These stoves continue to blow my mind. I'm so excited to see this in person


Looking forward to it!

I have the second barrel lined with 300 pounds of firebrick. There’s about 5” of grilling/baking/BBQ space above the grill insert. If its just going to be used as a masonry bell I can take out the grill and add another 110 pounds of firebrick. I should have it plumbed in and functional with the bypass dampers by tomorrow evening.
D38AE517-6551-4EBC-9076-1ACE82533E13.jpeg
[Thumbnail for D38AE517-6551-4EBC-9076-1ACE82533E13.jpeg]
BACA6BF0-0DE3-4199-A794-99B50D87D431.jpeg
[Thumbnail for BACA6BF0-0DE3-4199-A794-99B50D87D431.jpeg]
1BB70735-EE08-4C37-806B-EEADD28857A3.jpeg
[Thumbnail for 1BB70735-EE08-4C37-806B-EEADD28857A3.jpeg]
 
Brian James
Posts: 211
22
  • Mark post as helpful
  • send pies
    Number of slices to send:
    Optional 'thank-you' note:
  • Quote
  • Report post to moderator
After getting everything assembled this weekend, I realized I had forgotten the main bypass draft control between the rocket stove and the flue. So after tearing it apart again, I did it right and finally got to fire tonight. I just used 6 medium size pieces of ash firewood with some 1/2”x3” pine boards to get it started. The firewood has been uncovered and we’ve had some rain this week so it was slow and smokey/steamy getting started but it caught up just fine after about 25 minutes. Peak barrel top temp got to 860• (outside temp 55•F and drizzle). I started with 4 pieces of firewood and added one after an hour then one an hour later. After opening the bypass draft to the second masonry filled barrel, it got up to 400• then leveled out at 350.

I cooked pizza for dinner and it was pretty good. I could easily have baked something in the second barrel as a black oven at 350 degrees F for several hours at the same time.

Overall I’m very pleased.
1C8E7EFA-2E3B-4DC4-8295-1F3B5F9372C4.jpeg
[Thumbnail for 1C8E7EFA-2E3B-4DC4-8295-1F3B5F9372C4.jpeg]
5981DEDF-5F5C-4D15-9199-25596BA75A4C.jpeg
[Thumbnail for 5981DEDF-5F5C-4D15-9199-25596BA75A4C.jpeg]
7080599B-F407-4C22-8F7C-C8C00DC4BAE0.jpeg
[Thumbnail for 7080599B-F407-4C22-8F7C-C8C00DC4BAE0.jpeg]
76FD0CAB-C2AA-448A-AB12-BE4802DE4425.jpeg
[Thumbnail for 76FD0CAB-C2AA-448A-AB12-BE4802DE4425.jpeg]
 
Brian James
Posts: 211
22
  • Mark post as helpful
  • send pies
    Number of slices to send:
    Optional 'thank-you' note:
  • Quote
  • Report post to moderator
I started this batch with four medium pieces of ash firewood then added a piece at one hour and another at the start of the second hour. Four and a half hours after lighting this batch my barrel top temp is down to 300•F and my masonry barrel is at 150•F. There’s enough firewood left in the firebox for another half hour or so.
DF674B78-C8D1-46E8-B58F-1154BCC9B650.jpeg
[Thumbnail for DF674B78-C8D1-46E8-B58F-1154BCC9B650.jpeg]
 
pollinator
Posts: 585
Location: Burton, Ohio
250
11
  • Likes 1
  • Mark post as helpful
  • send pies
    Number of slices to send:
    Optional 'thank-you' note:
  • Quote
  • Report post to moderator
Brian,
This is Mud. I'm at the Rocket Mass Heater Jamboree looking at the lovely things you've been doing with yours. Where are you? What's the next step?
IMG_20171013_142752377.jpg
[Thumbnail for IMG_20171013_142752377.jpg]
 
Brian James
Posts: 211
22
  • Mark post as helpful
  • send pies
    Number of slices to send:
    Optional 'thank-you' note:
  • Quote
  • Report post to moderator

Chris McClellan wrote:Brian,
This is Mud. I'm at the Rocket Mass Heater Jamboree looking at the lovely things you've been doing with yours. Where are you? What's the next step?


Hi Chris,
I’m really sorry and really disappointed not to be there. I was going to drive out and I even got a trailer hitch and wiring installed on my Nissan subcompact and picked up a lightweight motorcycle trailer to mount this rocket stove and bell/barrel and bring it out. I had the whole trip planned, friends that offered to let me stay over various nights of the trip out and back, etc.

Unfortunately my travel companion backed out at the last minute due to health issues and it was too late to find someone else and there’s no way I could attempt the trip myself. I’ve had strokes and suffer from chronic fatigue syndrome as a result and it just wouldn’t have been physically possible.

So I have to just watch developments from afar this year and try to document my stove developments here online.

I have a second stove design using this type of core that looks like a more traditional wood stove but uses our family room fireplace as a masonry bell. I want to include it in my Kickstarter video so I’m starting the build this weekend.

So as I get that assembled I’ll document it too.

Thanks for your post! Please give all the good folks at the jamboree my apologies and warmest regards.

Brian
43D8AC6B-0B31-48EE-8DFB-778B7ECC195B.jpeg
[Thumbnail for 43D8AC6B-0B31-48EE-8DFB-778B7ECC195B.jpeg]
9E28754E-D3D9-4DFD-B69E-AC74DB1DBF33.jpeg
[Thumbnail for 9E28754E-D3D9-4DFD-B69E-AC74DB1DBF33.jpeg]
0E628B3C-DEAC-479D-A0FD-B709F56FE5A9.jpeg
[Thumbnail for 0E628B3C-DEAC-479D-A0FD-B709F56FE5A9.jpeg]
5F597B7D-281B-40E0-A1C9-7A9B54A78D86.jpeg
[Thumbnail for 5F597B7D-281B-40E0-A1C9-7A9B54A78D86.jpeg]
 
Brian James
Posts: 211
22
  • Mark post as helpful
  • send pies
    Number of slices to send:
    Optional 'thank-you' note:
  • Quote
  • Report post to moderator
As far as what’s next, we had to thoroughly revise our AutoCAD drawings because of the demands and parameters of the molding process, and we put off the Kickstarter video while I build this next prototype. But I should know a lot more from the manufacturers by the end of this month. This process is taking forever and it’s driving me nuts because I’m impatient. This is a real learning process.
 
Brian James
Posts: 211
22
  • Mark post as helpful
  • send pies
    Number of slices to send:
    Optional 'thank-you' note:
  • Quote
  • Report post to moderator
I’m building a second unit right now out of a combination of ceramic fiber board and big pieces of insulating fire brick slabs. It will be a more traditional looking square stove, 24”x24” and about 35” tall, top half metal and bottom half surrounded by red brick. I'm going to close in the fireplace in our family room with 24"x12"x4" thick firebrick and use it as the masonry bell with this rocket heater. I'm using the same design core but it will be the basis of a square stove.

I'm seriously considering changing this design. Instead of a vacuum formed ceramic fiber shapes, these insulating fire brick slabs are cheaper, and can be cut by the buyer if they want to assemble the core themselves. Its inert (ceramic fiber dust can cause silicosis) and easier to change shapes and sizes too.


Brian James
Posts: 211
22
  • Likes 1
  • Mark post as helpful
  • send pies
    Number of slices to send:
    Optional 'thank-you' note:
  • Quote
  • Report post to moderator
I hope its obvious to the majority of folks here, but some friends who are uninitiated to rocket heater principles asked how exactly the exhaust works.
 
Brian James
Posts: 211
22
  • Likes 1
  • Mark post as helpful
  • send pies
    Number of slices to send:
    Optional 'thank-you' note:
  • Quote
  • Report post to moderator
Well, I fired it up the new combination rocket heater and UDS (“Ugly Drum Smoker” - the second barrel/masonry bell that serves as a grill) with a combination of compressed hardwood sawdust fire bricks and cherry firewood. I added two 3/4” air holes beside the bottom of the door frame so it could breathe easier. Even with the new additional air supply, I had to keep the door cracked to keep the grill UDS at 300. Interestingly it was producing a thicker amount of smoke than I expected.

I realized after about an hour why it was still smoking, despite adding two new air holes - I had closed the air supply slide when I drilled the new holes and forgot to reopen them!

When we opened the air supply slide it immediately stopped smoking but it had smoked the entire first hour. We basted the chicken for the first time after an hour, and it had gotten too black from the smoke, so we used water and a basting brush to clean some of it off the chicken.

We used a combination of Worcester Sauce, vinegar and water to baste the chicken, then seasoned it with a combo of Lowry's Salt, salt, garlic powder, onion powder, and black pepper. We turned the chicken about 4 times, basting it each time and putting on the seasoning, cooking for a total of 2 hours and 15 minutes at 300 degrees.

And it was simply delicious! We had it with fried peppers with squash, macaroni salad, and water melon.

After about 2 hours cooking (three hours after lighting the fire) it struggled to get the UDS back up to 250 after we took off the lid and turned everything the last time, so I added two small pieces of cherry firewood...


...and it came right back up to 300. Drilling the two additional air holes was very helpful.


Brian James
Posts: 211
22
  • Mark post as helpful
  • send pies
    Number of slices to send:
    Optional 'thank-you' note:
  • Quote
  • Report post to moderator
I’ve gone back to the drawing board and based on a lot more research and experimenting I’ve created a shippable core “kit” that is more generic/universal.

I’m working on a batch box firebox shippable core kit that will utlilize three types of insulating material:
1) high temp high density insulating fire brick (cut from 24”x9”x2.5” slabs) for the first 9” of the walls that will be in contact with the firewood. It’s 4x as dense and resistant to abrasion as regular insulating firebrick but only loses about 1/3 of the insulation value as regular insulating firebrick, so it’s still has insulating properties for the firebox but can withstand abuse
2) regular insulating fire brick (cut from 24”x9”x2.5” slabs) for the next 4.5” of the walls of the fire box, and
3) ceramic fiber board insulation for the roof of the fire box as well as the expansion chamber/riser combo.

The floor of the firebox will be 4 flat dense firebricks or Peter’s design, whichever the buyer prefers. However secondary air still arrives via a central channel in the ceramic board under the fire brick floor.

I’m thinking of having a vacuum formed ceramic fiber shape made to cap the dense insulating fire brick walls in place of the 4.5” regular insulating fire brick (which is considerably cheaper but not as insulating as the ceramic board) as well as a vacuum formed ceramic fiber expansion chamber / riser that could be used with either a rear port, left or right sidewinder, or top port similar to Peter’s latest invention. So it will be generic enough to be used with the vast majority of current popular designs. That will depend on whether the final price per unit is somewhat comparable to building it out of ceramic fiber board by hand and/or making the last 4.5” of the firebox walls out of regular insulating fire brick.

Regardless I’m picking up a skid of the various bricks and multiple cases of ceramic fiber board insulation tomorrow so I can show what this type of shippable core kit will look like, what a handmade kit would cost, and what packaging and shipping will cost.

Also I’m getting 24”x9”x3” regular insulating fire brick that can be set vertical in a pinwheel fashion so that 4 bricks make a perfect 6” square vertical riser 24” tall. Add two more bricks, cut them in half lengthwise, and you’ve got a 36” tall vertical riser. Although with these new designs a vertical riser is no longer as important with batch boxes, they’ll remain so with J tubes.

If anyone has any input or constructive criticism, I’d really appreciate it. I’m going several thousand dollars in dept tomorrow to set up a rocket heater supply, probably on eBay, and I’m flying blind as to whether there will be a demand for these materials.
 
Brian James
Posts: 211
22
  • Mark post as helpful
  • send pies
    Number of slices to send:
    Optional 'thank-you' note:
  • Quote
  • Report post to moderator
Also I have a design and all the parts to convert one 55 gallon smooth sided drum into a full sized self contained 6” rocket heater using a readily available prefab door assembly that simply bolts to the side of the barrel. On a straight sided barrel there’s about 7” clearance (smooth sided drums are 34” high internally) between the riser and the inside top of the drum and the exhaust exits the rear next to floor level underneath the firebox assembly through a bolt on barrel stove flue collar. So the entire rocket heater will be self contained in one barrel with a shippable firebox and riser kit and bolt on door and flue, and it will utilize more than 3/4 of the barrel’s total surface to radiate heat.

This unit will definitely be “portable” insofar as total weight will be less than 130 pounds. But the insulating fire brick are still fragile and would need to be disassembled and packed separately for transport.
 
Brian James
Posts: 211
22
  • Mark post as helpful
  • send pies
    Number of slices to send:
    Optional 'thank-you' note:
  • Quote
  • Report post to moderator
A skid load, 3/4 of a ton worth of various 24”x9” insulating fire brick slabs and cases of ceramic fiber board insulation, followed me home today. (More ceramic fiber boards and a 5 gallon pail of rigidizer - consisting of water glass, small ceramic fibers and a refractory binder - were already in the bed of my truck.) I’m going to have to sort everything out and learn how to use eBay, but at least now what was just an idea is taking concrete form.

An engineer from the ceramic fiber plant told me today that once the initial molding fees are retired, the price per unit of the vacuum formed ceramic fiber shape to cap the firebox and separate expansion chamber/riser would be about the same as assembling them from ceramic fiber boards by hand, and would obviously save considerable time and labor. This is the first I’ve gotten that solid of a commitment out of them regarding cost comparisons between the two options, and it’s a good sign to continue to pursue that path in the near future. It looks like I’m going to follow that route.

Anyone know a good tutorial for building an eBay marketplace?
5EAF9A0B-9A01-44C7-BF84-C63B39E80A30.jpeg
[Thumbnail for 5EAF9A0B-9A01-44C7-BF84-C63B39E80A30.jpeg]
 
Brian James
Posts: 211
22
  • Mark post as helpful
  • send pies
    Number of slices to send:
    Optional 'thank-you' note:
  • Quote
  • Report post to moderator
Getting closer. I expect to open a website and eBay store the first week of the new year. I have also sourced 30”x12”x3” or 24”x12”x3”  regular dense firebrick to use to cap a masonry bell, and I’m picking them up Tuesday at another factory, but the biggest ones weigh 86 pounds each, so I won’t be able to ship these via UPS like the shippable core kits. They’ll either be local pick up, or I’ll deliver them within a 250 mile radius of Altoona PA for a fee.
690BE205-A840-469F-9ABC-671ABCE95D71.jpeg
[Thumbnail for 690BE205-A840-469F-9ABC-671ABCE95D71.jpeg]
28119CE1-AF67-44E2-AB0C-A60975149241.jpeg
[Thumbnail for 28119CE1-AF67-44E2-AB0C-A60975149241.jpeg]
 
Posts: 71
Location: North Alabama
7
  • Likes 1
  • Mark post as helpful
  • send pies
    Number of slices to send:
    Optional 'thank-you' note:
  • Quote
  • Report post to moderator
Wow Brian! When you start something you really go at it full bore. I look forward to seeing more.
 
Brian James
Posts: 211
22
  • Likes 1
  • Mark post as helpful
  • send pies
    Number of slices to send:
    Optional 'thank-you' note:
  • Quote
  • Report post to moderator

Duane Hylton wrote:Wow Brian! When you start something you really go at it full bore. I look forward to seeing more.


Thanks Duane. I just registered the domain tonight, www.pennrocketheaters.com, and a friend is going to build it for me over the next month and link it to my eBay store, which will go by the same name, Penn Rocket Heaters. I’m also eventually going to import firebox doors with glass and primary air vents, as well as cast iron cook tops, and I’ve found a source for marine grade 316 stainless tubing and mounting brackets that are really going to simplify creating and mounting secondary air tubes.
32E711D1-F09E-4ED2-86AD-B8C92CE6F3A5.jpeg
[Thumbnail for 32E711D1-F09E-4ED2-86AD-B8C92CE6F3A5.jpeg]
 
Brian James
Posts: 211
22
  • Mark post as helpful
  • send pies
    Number of slices to send:
    Optional 'thank-you' note:
  • Quote
  • Report post to moderator
The 6” batch box shippable core kit will consist of 2/3 of the height of the left and right firebox wall, 9”, to be made from continuous 21”x9”x2 1/2” bricks of high density 2600•F insulating firebrick. It’s about 4 times stronger than regular 2300•F insulating firebrick and should withstand the loading of firewood in the firebox well. It will use regular insulating firebrick for the next 4 1/2” of the firebox walls. The rear wall will be 9” of the dense and 4 1/2” of the regular insulating fire brick. It will then use ceramic fiber board insulation for the roof. The port can be placed in a rear port, left or right sidewinder, or top (roof) port configuration.

You only lose about 1/3 the insulating value of regular insulating firebrick but this denser insulating firebrick has 4x the strength and seems strong enough for the left and right hand and rear walls and the port.

It will use regular dense non insulating firebrick for the floor though, as that gets the most abrasion and abuse from loading firewood. It seems a decent compromise to decrease mass and maintain insulating value for the firebox build . The upper walls and the roof maintain the highest insulation values for the rising heat inside the firebox.

The floor can either be flat dense regular firebrick splits, which is the best configuration for burning the flat bottomed compressed sawdust fire brick fuel I’m using, or the traditional PVDB “V” shaped configuration. The firebox will be 9” wide, 13 1/2” tall, and 18 1/2” deep (to accommodate 4 flat firebrick splits, a sill and a 1/2” gap to the firebox door.) The kit will NOT include the heavy firebrick for lining the floor. That can be sourced locally by the purchaser.

Roof can either be 1” or 2” ceramic fiber board. For a top vent, 1” might suffice, because the expansion chamber / horizontal riser will be built directly over the firebox roof. With a left or right sidewinder configuration the roof will extend over both the firebox and the expansion chamber/ horizontal riser which will be the same height as the firebox along the left or right side. The kit will include the expansion chamber / horizontal riser for all the configurations.

Secondary air will still be delivered via a recess in the ceramic fiber board under the firebrick floor. I’ve sourced marine grade 316 stainless steel tubing and mounts to make it easily attachable to a piece of metal plate between the ceramic fiber board under the floor and the layer of firebrick for the floor.

The expansion chamber/horizontal riser needs to maintain the highest temps so will be made of ceramic fiber board. It will be included unless the purchaser requests just the firebox.

Vertical 6” square risers can easily be constructed from 24”x9”x3” regular insulating firebrick arranged in a pinwheel fashion. Four bricks will create a 24” vertical riser, six will create a 36” riser, and 8 will create a 48” vertical riser. These bricks will be available separately

All of this kit will be robustly packaged to protect the fragile insulating firebrick and shipped in one box via UPS or USPS. Assembly will be simple with easy to follow directions.

Photos this week hopefully.

I’m still contemplating having a vacuum formed ceramic fiber shape made that would take the place of the 4 1/2” regular insulating firebrick wall extension and ceramic fiber board roof and serve as a cap for the HD 2600 9” walls. It would further simplify creation of the firebox but cost a lot of money up front for molding fees. I’m also contemplating having one vacuum molded ceramic fiber shape for the expansion chamber / riser.

At present the shippable core kit will not include these vacuum formed ceramic fiber shapes.

Shippable core kits will be available the first week of 2018.
 
Brian James
Posts: 211
22
  • Likes 2
  • Mark post as helpful
  • send pies
    Number of slices to send:
    Optional 'thank-you' note:
  • Quote
  • Report post to moderator
6” BBR shippable core kits are now available:
https://permies.com/t/72909/Shippable-core-kits-January
 
Alas, poor Yorick, he knew this tiny ad:
two giant solar food dehydrators - one with rocket assist
https://solar-food-dehydrator.com
reply
    Bookmark Topic Watch Topic
  • New Topic