• Post Reply Bookmark Topic Watch Topic
  • New Topic
permaculture forums growies critters building homesteading energy monies kitchen purity ungarbage community wilderness fiber arts art permaculture artisans regional education skip experiences global resources cider press projects digital market permies.com pie forums private forums all forums
this forum made possible by our volunteer staff, including ...
master stewards:
  • Carla Burke
  • Nancy Reading
  • John F Dean
  • r ranson
  • Jay Angler
  • paul wheaton
stewards:
  • Pearl Sutton
  • Leigh Tate
  • Devaka Cooray
master gardeners:
  • Christopher Weeks
  • Timothy Norton
gardeners:
  • thomas rubino
  • Matt McSpadden
  • Jeremy VanGelder

Batch rocket 150mm(6'') 2 bell Project + Questions

 
Posts: 46
Location: Aosta valley, italy
20
  • Likes 5
  • Mark post as helpful
  • send pies
    Number of slices to send:
    Optional 'thank-you' note:
  • Quote
  • Report post to moderator


Hello, I would like to share with you my batch 150(6'')project for my uninsulated stone tiny house. What do you think?

Short description: Combustion chamber and riser in refractory bricks, Square riser 156mm x 156mm (6,1 thumb)
P chanel on the floor
First bell: 55 gallon oil barrel
Second bell: bricks/refractory bricks 20'' x 23'' H 52''
Gas outlet: first 70"in a 6" steel tube then a 6" x 6" square of asbestos 105"high
Passage between the two bells of 7,5" x 7,5"

Between the stone wall of the house and the walls of the bell and around the combustion chamber I put 4" of expanded clay
1"ceramic fiber insulated riser
Between the wooden floor and the stove 4" of air and a 2" layer of concrete
Plate for cooking on the combustion chamber
The combustion chamber door made with a 2" thick refractory cement mold
Forgive me for the schketchup drawing but I'm a beginner...

I have a few questions to ask you:
1) Is the plate for cooking better in 0,3"  cast iron or 0,15" tempered glass? How can I seal between the plate and the bricks?
2) how to seal the space between the trunk and the bricks?
3) is it possible to insert an oven in the bell?
4) insulated in correct?

What do you think? I can't wait to read the replies This world is amazing
frontale.PNG
[Thumbnail for frontale.PNG]
laterale.PNG
[Thumbnail for laterale.PNG]
porta-e-piano-cottura.PNG
[Thumbnail for porta-e-piano-cottura.PNG]
totale-senza-porta.PNG
[Thumbnail for totale-senza-porta.PNG]
vista-totale.PNG
[Thumbnail for vista-totale.PNG]
senza-fusto.PNG
[Thumbnail for senza-fusto.PNG]
senza-fusto-dall-alto.PNG
[Thumbnail for senza-fusto-dall-alto.PNG]
 
rocket scientist
Posts: 6355
Location: latitude 47 N.W. montana zone 6A
3209
cat pig rocket stoves
  • Likes 3
  • Mark post as helpful
  • send pies
    Number of slices to send:
    Optional 'thank-you' note:
  • Quote
  • Report post to moderator
Hi Cedric;
That sounds super!
Is this stove built yet?  
It sounds like you have done/planned everything properly!

Let me try to answer your questions.
#1) Both will work, the cast is cheaper, and the glass is more scenic.
I vote for glass.
#2) ceramic blanket with cob at the edges.
#3) Yes, but controlling the temperature is not easy.  Too hot or not hot enough.
#4) ?  not sure what you are asking.


thomas rubino
rocket scientist
Posts: 6355
Location: latitude 47 N.W. montana zone 6A
3209
cat pig rocket stoves
  • Likes 4
  • Mark post as helpful
  • send pies
    Number of slices to send:
    Optional 'thank-you' note:
  • Quote
  • Report post to moderator
Cedric;
After rereading your post I think you have a tight spot.
You say the passage from bell one into bell two is 7.5 x 7.5 which is not large enough.
Three times the csa of your riser is required for free travel of the hot gasses.
 
Cedric Noussan
Posts: 46
Location: Aosta valley, italy
20
  • Likes 4
  • Mark post as helpful
  • send pies
    Number of slices to send:
    Optional 'thank-you' note:
  • Quote
  • Report post to moderator
Thanks thomas
I'm starting to reinforce the wood floor and gather materials in the coming weeks I will build, I will update you
#2) instead of the cob can I use refractory cement?
#4) sorry for my english, i meant if the expanded clay around the core goes

Ok let's see if I understand:
Csa riser= 6.14'' x 6.14"= 37.7 square inch
Csa passage from bell= 37.7" x 3 = 113.1
Side dimension passage = square root 113.1= 10.6"
 
thomas rubino
rocket scientist
Posts: 6355
Location: latitude 47 N.W. montana zone 6A
3209
cat pig rocket stoves
  • Likes 5
  • Mark post as helpful
  • send pies
    Number of slices to send:
    Optional 'thank-you' note:
  • Quote
  • Report post to moderator
Hey Cedric;
Refractory cement will quickly crack.  Cob will as well, but is easily reapplied with your finger.
Cob is just one part clay and 3 parts sand.  Just add water.

What is expanded clay?  

I see I missed your question about sealing the "trunk?" to the bricks.
Again, I'm not quite sure where exactly you mean, but I can say that ceramic blanket will seal just about anything.
I call it the duct tape of the RMH world!

So you have found my bain... Math!  My teachers had no hair left after attempting to teach me...
I cannot tell you if your number is correct or not.  It still sounds small to me.
I would say a 6" riser needs 18" of room, so maybe 12" wide and 6" tall?
 
Posts: 290
Location: North East Iowa, USA
74
  • Likes 3
  • Mark post as helpful
  • send pies
    Number of slices to send:
    Optional 'thank-you' note:
  • Quote
  • Report post to moderator

thomas rubino wrote:Hey Cedric;

I cannot tell you if your number is correct or not.  It still sounds small to me.
I would say a 6" riser needs 18" of room, so maybe 12" wide and 6" tall?


you guys have to get on the same page and then you can talk numbers,

18" of room?    2 x 9 is 18 inches square...
but 12 x 6" is 72 inches squared,

So, these are not even close to the same.  Being that I am not in the conversation per say, I will stay out... but  one needs to dictate to the other what they have or want.    Length of run, can sometimes come into play, but that is a whole 'nother can of worms.

Best of success!
 
thomas rubino
rocket scientist
Posts: 6355
Location: latitude 47 N.W. montana zone 6A
3209
cat pig rocket stoves
  • Likes 4
  • Mark post as helpful
  • send pies
    Number of slices to send:
    Optional 'thank-you' note:
  • Quote
  • Report post to moderator
Hey Cedric;
I keep looking at your Sketchup/ and seeing things.
I would like to see the outlet pipe from the bell funnel from 8" or even 10" and then attach your 6" pipe.
Rather than leaving your bell with a pipe consider a low wide brick box (10"x6" ??).
That box attaches to the bell and your 6" pipe sits directly on top of the box.
The idea is to make it easy for those cooling gasses to find their way out of your bell.

I did not notice any bypass arrangements in your plans.
Having a shortcut for hot gasses to warm the outgoing chimney can be a very good thing when starting a cold stove.
 
thomas rubino
rocket scientist
Posts: 6355
Location: latitude 47 N.W. montana zone 6A
3209
cat pig rocket stoves
  • Likes 3
  • Mark post as helpful
  • send pies
    Number of slices to send:
    Optional 'thank-you' note:
  • Quote
  • Report post to moderator
Hey, Scott;
Ha Ha, I did say math is not my strong point.
Of course, you are correct.  Perhaps Cedric's math is correct as well.

As you know, in a transition area, bigger is better than too small.


Cedric Noussan
Posts: 46
Location: Aosta valley, italy
20
  • Likes 4
  • Mark post as helpful
  • send pies
    Number of slices to send:
    Optional 'thank-you' note:
  • Quote
  • Report post to moderator


Sorry for my english but i'm italian
By expanded clay I meant clay pebbles
Yes the  trunk is the barrel….

What density should the ceramic fiber have?

I have no idea  to build  bypass, I will use other heating solutions to warm the  chimney...

here the new project for the exit bell
dimension-bell.PNG
[Thumbnail for dimension-bell.PNG]
exit-bell-2.PNG
[Thumbnail for exit-bell-2.PNG]
exit-bell.PNG
[Thumbnail for exit-bell.PNG]
 
thomas rubino
rocket scientist
Posts: 6355
Location: latitude 47 N.W. montana zone 6A
3209
cat pig rocket stoves
  • Likes 5
  • Mark post as helpful
  • send pies
    Number of slices to send:
    Optional 'thank-you' note:
  • Quote
  • Report post to moderator
Cerdic;
Yes, that exit looks perfect!
Creating a bypass is easier than you think.

Your exit chimney is rising to the ceiling right next to your bell.
Just below the top of the bell in the side, you create a 4" hole.  A short 4" pipe then connects between the top of the bell and the exhaust chimney.
There are several ways to then create a "sliding gate"  or use a standard 4" wood stove damper that has the holes sealed up.
Here is an example of the sliding gate that I use and how I installed it.
https://permies.com/t/155372/Installing-Bypass-bell

#8 density for ceramic blanket is what I build with.
 
Cedric Noussan
Posts: 46
Location: Aosta valley, italy
20
  • Likes 4
  • Mark post as helpful
  • send pies
    Number of slices to send:
    Optional 'thank-you' note:
  • Quote
  • Report post to moderator

thanks thomas i'm learning a lot from your advice

I already have them I will use a 6" T and a woodworking door to create the by pass

Thanks again, I'll keep you updated on the build
 
Cedric Noussan
Posts: 46
Location: Aosta valley, italy
20
  • Likes 2
  • Mark post as helpful
  • send pies
    Number of slices to send:
    Optional 'thank-you' note:
  • Quote
  • Report post to moderator
Hello
I'm making the list of materials to buy and I have a question:
1) can I build my secondary bell entirely in classic bricks? or above the gas inlet should I make a double layer of refractory bricks with insulation in the middle?
2) are refractory bricks correct for the bell ceiling?
3) Can only a 4 inch layer of concrete/ clay pebbles/ sand go for the bell floor?
4) refractory cement or portland cement for the bell?


thanks for the replies
 
thomas rubino
rocket scientist
Posts: 6355
Location: latitude 47 N.W. montana zone 6A
3209
cat pig rocket stoves
  • Likes 4
  • Mark post as helpful
  • send pies
    Number of slices to send:
    Optional 'thank-you' note:
  • Quote
  • Report post to moderator
Hi Cedric;
Only directly above the riser is it critical to use high heat-resistant materials.
The secondary bell can be all clay brick.
Yes, that is more than needed as a floor inside the bell, it does not get very hot there.

On my brick bell, I placed angle iron across it and then put a bed of cob mortar on the bricks.
A 1/2" sheet of "durarock" cement board over the entire bell.  I then dry-stacked clay brick on top of the cement board.
This works outstanding.  The cement board can easily handle bell temps and the covering bricks can be removed in moments if you need to access the bell.
 
Cedric Noussan
Posts: 46
Location: Aosta valley, italy
20
  • Likes 3
  • Mark post as helpful
  • send pies
    Number of slices to send:
    Optional 'thank-you' note:
  • Quote
  • Report post to moderator
Hi everyone


after realizing I don't need much radiant heat or deciding to revisit my design, here it is in a nutshell:

Combustion chamber in refractory bricks

6.1" x 6.1" Square Firebrick Riser.


P channel on the floor


bell internal dimensions: 17" x 50" x 55"

bell-shaped stratification: first layer in concrete blocks, second layer in bricks, third layer in double refractory brick with 1/2" ceramic fiber

Ceiling: 2 layers of refractory bricks divided by 1/2" of ceramic fiber with a layer of refractory cement on top

For the first two layers I use Portland cement, for the last one I use refractory cement


the gases exit in a cube of bricks and then in a 150mm tube

there will be a by-pass that I haven't drawn


between the wall and the bell using 3" aerated concrete.


to insulate the wooden floor I use a layer of concrete and clay pebbles and on top of it a layer of bricks and tiles


glass cooking plate


1" iron plate on bell for radiant heat


in the drawings I forgot to draw the wooden floor oops...


my questions:


1) Is a riser with 2" thick firebricks with 1" ceramic fiber efficient?


2) between the bricks of the third layer of the bell is 1" of ceramic fiber sufficient?


3) is the gas outlet from the hood correct?


what do you think? thanks to whoever can answer me
4.JPG
[Thumbnail for 4.JPG]
exit-bell.JPG
[Thumbnail for exit-bell.JPG]
front-2.JPG
[Thumbnail for front-2.JPG]
front-3.JPG
[Thumbnail for front-3.JPG]
front.JPG
[Thumbnail for front.JPG]
iron.JPG
[Thumbnail for iron.JPG]
isolation-wood-floor.JPG
[Thumbnail for isolation-wood-floor.JPG]
plan-to-cook.JPG
[Thumbnail for plan-to-cook.JPG]
section-bell.JPG
[Thumbnail for section-bell.JPG]
 
Cedric Noussan
Posts: 46
Location: Aosta valley, italy
20
  • Likes 4
  • Mark post as helpful
  • send pies
    Number of slices to send:
    Optional 'thank-you' note:
  • Quote
  • Report post to moderator
weila, I made new changes to my project:
riser with 1"  fire brick
ceramic fiber insulator between the combustion chamber and the bell
I removed the iron plate on the side of the bell
I added a 2" cast iron plaque to the ceiling of the bell

what do you think of my gas output? Could the 15" long flat piece and two 90 degree bends be a problem?
COMBUSTION-CHAMBER.JPG
[Thumbnail for COMBUSTION-CHAMBER.JPG]
exit-gas.JPG
[Thumbnail for exit-gas.JPG]
FIRST-LAYER-CEELING.JPG
[Thumbnail for FIRST-LAYER-CEELING.JPG]
INSIDE-BELL.JPG
[Thumbnail for INSIDE-BELL.JPG]
SECOND-LAYER-CELLING-BELL.JPG
[Thumbnail for SECOND-LAYER-CELLING-BELL.JPG]
TOTAL.JPG
[Thumbnail for TOTAL.JPG]
 
Scott Weinberg
Posts: 290
Location: North East Iowa, USA
74
  • Likes 2
  • Mark post as helpful
  • send pies
    Number of slices to send:
    Optional 'thank-you' note:
  • Quote
  • Report post to moderator

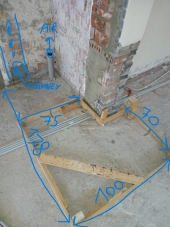
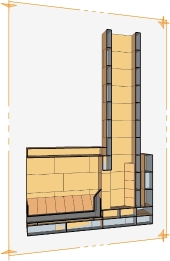
Cedric Noussan wrote:Hi everyone


after realizing I don't need much radiant heat or deciding to revisit my design, here it is in a nutshell:

Combustion chamber in refractory bricks

6.1" x 6.1" Square Firebrick Riser.

P channel on the floor

bell internal dimensions: 17" x 50" x 55"

bell-shaped stratification: first layer in concrete blocks, second layer in bricks, third layer in double refractory brick with 1/2" ceramic fiber

Ceiling: 2 layers of refractory bricks divided by 1/2" of ceramic fiber with a layer of refractory cement on top

For the first two layers I use Portland cement, for the last one I use refractory cement


to insulate the wooden floor I use a layer of concrete and clay pebbles and on top of it a layer of bricks and tiles

glass cooking plate

1" iron plate on bell for radiant heat

in the drawings I forgot to draw the wooden floor oops...


what do you think? thanks to whoever can answer me


While your measurements of the inside of the bell correspond to the desired 57 sq feet, the jpeg photos don't show me that? unless the drawings are of unconventional brick measurements- (both fire and standard brick,  For example it would appear you have two long, and one cross laid brick on the top inside, that to me would be 9+9+4.5  or 22.5 wide bell  but you mention you have 17"?

you also ask, if you should have two layers of refractory bricks, then a layer of fiber and then another layer of refractory?  I don't every recall this being suggested for any bell,  but I may have missed that for a bell top. I am not sure the extra cost of the top refractory  pour is warranted or needed. I don't mind to be corrected, but tossing it out there.
 
Cedric Noussan
Posts: 46
Location: Aosta valley, italy
20
  • Likes 3
  • Mark post as helpful
  • send pies
    Number of slices to send:
    Optional 'thank-you' note:
  • Quote
  • Report post to moderator
thanks scott,
for the first layer I use concrete bricks with non-standard sizes like the ones in the photo
dimension: 9,4"x 4,7"x 2,7"
IMG_2433.jpg
[Thumbnail for IMG_2433.jpg]
IMG_2434.jpg
[Thumbnail for IMG_2434.jpg]
IMG_2435.jpg
[Thumbnail for IMG_2435.jpg]
 
Cedric Noussan
Posts: 46
Location: Aosta valley, italy
20
  • Likes 2
  • Mark post as helpful
  • send pies
    Number of slices to send:
    Optional 'thank-you' note:
  • Quote
  • Report post to moderator
hello everybody,

after all your advices, I worked out the final project. what do you thinks?

https://drive.google.com/drive/folders/1aY4TdsXqAfZrj0VsyCEBgqp-kVv93pmE?usp=sharing

Thanks in advance
 
thomas rubino
rocket scientist
Posts: 6355
Location: latitude 47 N.W. montana zone 6A
3209
cat pig rocket stoves
  • Likes 2
  • Mark post as helpful
  • send pies
    Number of slices to send:
    Optional 'thank-you' note:
  • Quote
  • Report post to moderator
Hi Cedric;
Your link will not let me open it!
 
Cedric Noussan
Posts: 46
Location: Aosta valley, italy
20
  • Likes 2
  • Mark post as helpful
  • send pies
    Number of slices to send:
    Optional 'thank-you' note:
  • Quote
  • Report post to moderator
sorry,

Filename: stufa-1-(2).skp
File size: 1 megabytes
 
Rocket Scientist
Posts: 4530
Location: Upstate NY, zone 5
576
5
  • Likes 1
  • Mark post as helpful
  • send pies
    Number of slices to send:
    Optional 'thank-you' note:
  • Quote
  • Report post to moderator
I don't have Sketchup so can't look at your file, but I have a few comments on your last pictures.

Moving the metal plate from the side to top of the bell will direct all fast radiation at the ceiling - I don't think it will help with warming you quickly when you start a fire.

The flat part of the stovepipe is not beneficial. If you need to offset it before going through the wall, I would make it a 45 degree slope. Moving the vertical run as close as practical to the (existing?) exit hole in the wall would also be good.

For a double-skinned bell, refractory bricks for the inner layer in the upper 1/3 or 1/2 if you like would be needed. The outer skin can be all regular brick or perhaps even mostly concrete bricks; it will not get so hot as to be stressed.

Making the roof three layers thick plus fiber blanket is at odds with setting a metal plate in the roof above the riser. Either you need insulation on top or you don't. How close is it to the room ceiling, and what materials are there?
 
Glenn Herbert
Rocket Scientist
Posts: 4530
Location: Upstate NY, zone 5
576
5
  • Likes 3
  • Mark post as helpful
  • send pies
    Number of slices to send:
    Optional 'thank-you' note:
  • Quote
  • Report post to moderator
Another point is that your previous metal plate in the bell wall could be arranged as an access panel for inspection and maintenance of the heat riser. With solid walls all around, if you ever need to work on the riser, you will have to demolish the bell.
 
Cedric Noussan
Posts: 46
Location: Aosta valley, italy
20
  • Likes 1
  • Mark post as helpful
  • send pies
    Number of slices to send:
    Optional 'thank-you' note:
  • Quote
  • Report post to moderator
Thank you Glenn,

below are the photos of the sketchup file:


Thank you all
combustion-chamber.png
[Thumbnail for combustion-chamber.png]
exit-gas.png
[Thumbnail for exit-gas.png]
first-layer-ceeling.png
[Thumbnail for first-layer-ceeling.png]
inside-bell.png
[Thumbnail for inside-bell.png]
second-layer-ceeling.png
[Thumbnail for second-layer-ceeling.png]
total-2.png
[Thumbnail for total-2.png]
total.png
[Thumbnail for total.png]
 
Cedric Noussan
Posts: 46
Location: Aosta valley, italy
20
  • Likes 2
  • Mark post as helpful
  • send pies
    Number of slices to send:
    Optional 'thank-you' note:
  • Quote
  • Report post to moderator
Works in progress
Here are the pictures: https://drive.google.com/folderview?id=11KRF18mnu3nzlfhok7ixanO6ZPlgjg-S
1 and 2: place where I will build the stove
3: sheet metal above the floor and iron grate
4: Stove base finished with 5cm/2" thick concrete
5: 5 cm/2" cellular concrete walls, space between the inclined stone walls and the gasbeton part filled with leca expanded clay
6: hollow brick floor channels
7 and 8: dry-burning unit, 88 cm high riser (sorry for not leveled construction)
9: Is there enough space between the combustion unit and the bell floor?
10,11,12: gas outlet from the bell, measures 14cm/5.5"×20cm/7.8" and 14cm/5.5"×14cm/5.5" What do you think?
 
Cedric Noussan
Posts: 46
Location: Aosta valley, italy
20
  • Likes 1
  • Mark post as helpful
  • send pies
    Number of slices to send:
    Optional 'thank-you' note:
  • Quote
  • Report post to moderator
13 e 14) by pass valve
15) part of the wall channels, then I ran out of bricks :-(
16 and 17 ) the base of the bell in 6 cm thick blocks
18) first layer of concrete bricks
19 and 20) base of the combustion chamber and riser in bricks, hollow tiles and firebric (the combustion chamber will be outside the bell)
22) two exit for gas, measures 16.5cm x 15cm, about 2.5 times the riser weight, is this correct?
23) section of bell with an isa of 4.8 is this correct?
24) base of combustion unit with firebrick
25 and 26) second layer of firebrick and secondary air
 
steward and tree herder
Posts: 8507
Location: Isle of Skye, Scotland. Nearly 70 inches rain a year
4023
4
transportation dog forest garden foraging trees books food preservation woodworking wood heat rocket stoves ungarbage
  • Mark post as helpful
  • send pies
    Number of slices to send:
    Optional 'thank-you' note:
  • Quote
  • Report post to moderator
Well done Cedric, and thank you for sharing your project with us. I'm following with interest!
 
Cedric Noussan
Posts: 46
Location: Aosta valley, italy
20
  • Likes 1
  • Mark post as helpful
  • send pies
    Number of slices to send:
    Optional 'thank-you' note:
  • Quote
  • Report post to moderator
28 and 29) ceramic fiber between the combustion unit and the bricks
30,31,32,33) combustion chamber in fire brick and fireconcrete
34) top of the combustion chamber built with refractory tile, for the other side I used a cast iron plate
Sorry but in one day I forgot to bring my camera….
35) I finished the brick wall channels and lined with corrugated iron
36,38) ceramic fiber between the combustion chamber and the rest
37) the base of the riser with internal measurements of 150mm x 150mm, angles 300mm high, in firebrick and fire concrete
41) the space between the bell and the riser of 25mm for the ceramic fiber
43) floor of the bell covered with a layer of 10 mm of concrete, what do you think of the internal finish of the bell?
44,45) combustion unit finish
46,47) double layer of 13 mm ceramic fiber around the riser, tied with iron wire
48) painting with specific vimeo zirconium product
49,50,51) finished the horizontal brick layers
52) test of the successive 3 layers with the fiber in between
Don't hesitate to ask questions!
 
Cedric Noussan
Posts: 46
Location: Aosta valley, italy
20
  • Likes 1
  • Mark post as helpful
  • send pies
    Number of slices to send:
    Optional 'thank-you' note:
  • Quote
  • Report post to moderator
I am, I'm back
after months of various problems i finally found a day to build this project.
Here are pictures of my progress:

https://drive.google.com/folderview?id=11KRF18mnu3nzlfhok7ixanO6ZPlgjg-S

53,54) I built the base triangles, cut firebrick and fixed with refractary concrete

55,56,57) I built part of the last level, first I fixed the output pipe and then I will finish it

58) particular clay balls between the crooked stone wall and the cellular concrete

59) i fixed the exit pipe in the wall

60) I hope it's not a restriction?

61,62) the exit box, is closed with 2 mm sheet metal can it go?

63) test of position pipe and by-pass

64) i have a problem, how do i connect the pipe with the sheet??

thanks to whoever can help me, see you soon
 
Scott Weinberg
Posts: 290
Location: North East Iowa, USA
74
  • Mark post as helpful
  • send pies
    Number of slices to send:
    Optional 'thank-you' note:
  • Quote
  • Report post to moderator

Cedric Noussan wrote:I am, I'm back

64) i have a problem, how do i connect the pipe with the sheet??

thanks to whoever can help me, see you soon


what are you calling " the sheet"   I presume you mean the sheet of stone?  if you mortar in a small short section to the stone shelf, that your shiny pipe connects to, you won't have to effect this joining area, when taking the pipe off for inspection.

if cut precisely "the hole" it won't take much Mortar
 
Cedric Noussan
Posts: 46
Location: Aosta valley, italy
20
  • Mark post as helpful
  • send pies
    Number of slices to send:
    Optional 'thank-you' note:
  • Quote
  • Report post to moderator
Sorry,
“the sheet” for me is metal sheet…
I could use firebrick to connect the metal sheet with tube

I changed the link, it was wrong…
 
Cedric Noussan
Posts: 46
Location: Aosta valley, italy
20
  • Likes 1
  • Mark post as helpful
  • send pies
    Number of slices to send:
    Optional 'thank-you' note:
  • Quote
  • Report post to moderator
hello guys

Here's my construction progress

drive.google.com/drive/folders/11KRF18mnu3nzlfhok7ixanO6ZPlgjg-S?usp=sharing

I finished the gas exitbox:

67) the part with bricks and concrete, I added a pillar to better support the sheet metal

68) I connected the metal parts with superwool and bolts

69) closed the box with sheet metal and concrete


I created a new connection between the wall and the pipe, I made a box to which I will connect the outlet pipe, I was afraid that as I had done before it could be a restriction (photo 70,71,72)


I built the internal layer in refractory bricks with the connection for the by pass, between the pipe and the concrete I put some superwool (photo 73,74,75,76)


what do you think, if I'm wrong please correct me, I will be grateful
72)new-exit-box.jpeg
[Thumbnail for 72)new-exit-box.jpeg]
61)temporary-box-exit-gas-bell.jpeg
[Thumbnail for 61)temporary-box-exit-gas-bell.jpeg]
76)-first-layer-finish.jpeg
[Thumbnail for 76)-first-layer-finish.jpeg]
69)-the-box-exit-is-finish.jpeg
[Thumbnail for 69)-the-box-exit-is-finish.jpeg]
 
Cedric Noussan
Posts: 46
Location: Aosta valley, italy
20
  • Likes 1
  • Mark post as helpful
  • send pies
    Number of slices to send:
    Optional 'thank-you' note:
  • Quote
  • Report post to moderator
Hi, I'm finally almost finished with the build
here are the updates:
77 and 78) I finished the walls of the bell
79) the finished rough bell, after the tests I will plaster it
80,82,83,84,85) here is the ceiling of the bell, first layer with firebricks and super between them, second layer half inch superwool, third layer of bricks and concrete. I also covered the t-bars with superwool fixed with fireconcrete (photo 81)
86) half-inch cast iron combustion chamber roof
and the brick door (I will soon build an iron one)

I started the ignition tests and found several PROBLEMS,
1) whitish smoke comes out of the chimney (photos 87 and 88) could it just be water vapor due to the drying of the cement?
2) the smoke comes out from the ceiling of the bell and from the firebox when I close the by pass, could you help me? is there little draft due to a restriction? perhaps at the point where the pipe enters the wall (photo 72)

Thanks to anyone who can help me understand my mistakes

Thank you
cedric
87)-the-smoke.jpeg
[Thumbnail for 87)-the-smoke.jpeg]
79)bell-wall-finish.jpeg
[Thumbnail for 79)bell-wall-finish.jpeg]
 
Cedric Noussan
Posts: 46
Location: Aosta valley, italy
20
  • Likes 2
  • Mark post as helpful
  • send pies
    Number of slices to send:
    Optional 'thank-you' note:
  • Quote
  • Report post to moderator
i destroy this  rocket my new project: https://permies.com/t/242732/rocket-mass-oven-hob-bench#2260011
 
I agree. Here's the link: https://woodheat.net
reply
    Bookmark Topic Watch Topic
  • New Topic