posted 5 years ago
Hi all;
Due to the extended January thaw here in NW Montana.
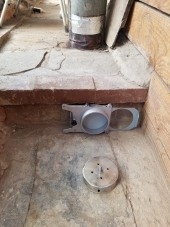
I have taken the opportunity to install a new bypass in the brick bell of my shop stove.
I had been planning on doing this job in the spring... But, you make hay when the sun shines and you drill a 4" hole thru your brick bell when its almost 40F outside on February 2nd!
For tools , I used my cordless drill, a 4" diamond core drill, a 4" bimetal drill, a 3/16" concrete drill, a tapered metal punch and a large flat screwdriver.
For parts I used a 4" bypass gate, graciously donated by Dragon technology... a 4" hvac flex 90. A hose clamp and some metal duct tape, a bit of Rutland hi temp cement.... that's it!
Cutting thru 4" of clay bricks is a slow process. The diamond core drill was the best tool to use .
The bi metal drill did work... until it got so dull, that I had trouble later getting it to cut the 8" metal stove pipe.
The concrete drill of course worked great on clay bricks and the tapered punch / screwdriver made cracking chunks much easier.
After getting a hole thru the bricks and the 8" metal stove pipe. I mounted the bypass gate using Rutland stove cement. I retained it with one tapcon masonry screw and large washer.
The 4" 90 took a bit of wiggling to get it on properly. A large hose clamp secures the bell end and metal duct tape seals up the stack side.
The bypass works with a sliding metal plate which can be positioned anywhere from full open to full shut!
The whole process from start to finish took apx. 3-4 hrs... not to bad! And after lighting the fire. I can say that it works perfectly!
An extra benefit for me. This makes my double barrel shop stove much more usable during shoulder seasons, when it might be 30 in the morning and 65 in the afternoon.
I can heat the room but not the bell! How cool is that!
20210201_101247.jpg
![Filename: 20210201_101247.jpg
Description: [Thumbnail for 20210201_101247.jpg]](/t/155372/a/131760/thumb-20210201_101247.jpg)
20210201_101253.jpg
![Filename: 20210201_101253.jpg
Description: [Thumbnail for 20210201_101253.jpg]](/t/155372/a/131761/20210201_101253.jpg)
20210201_102939.jpg
![Filename: 20210201_102939.jpg
Description: [Thumbnail for 20210201_102939.jpg]](/t/155372/a/131762/20210201_102939.jpg)
20210201_102944.jpg
![Filename: 20210201_102944.jpg
Description: [Thumbnail for 20210201_102944.jpg]](/t/155372/a/131763/20210201_102944.jpg)
20210201_104336.jpg
![Filename: 20210201_104336.jpg
Description: [Thumbnail for 20210201_104336.jpg]](/t/155372/a/131764/20210201_104336.jpg)
20210201_104837.jpg
![Filename: 20210201_104837.jpg
Description: [Thumbnail for 20210201_104837.jpg]](/t/155372/a/131765/20210201_104837.jpg)
20210201_113454.jpg
![Filename: 20210201_113454.jpg
Description: [Thumbnail for 20210201_113454.jpg]](/t/155372/a/131766/20210201_113454.jpg)
20210201_125323.jpg
![Filename: 20210201_125323.jpg
Description: [Thumbnail for 20210201_125323.jpg]](/t/155372/a/131767/thumb-20210201_125323.jpg)
20210201_125328.jpg
![Filename: 20210201_125328.jpg
Description: [Thumbnail for 20210201_125328.jpg]](/t/155372/a/131768/20210201_125328.jpg)
For all your Montana Masonry Heater parts (also known as) Rocket Mass heater parts.
Visit me at
dragontechrmh.com Once you go brick you will never go back!


