|

|
|
|
|

|

|

|

|

|


![[Thumbnail for image1.JPG]](/t/51286/a/33516/image1.JPG "Filename: image1.JPG
Description:")
![[Thumbnail for image2.JPG]](/t/51286/a/33517/image2.JPG "Filename: image2.JPG
Description:")


 1
1
Success has a Thousand Fathers , Failure is an Orphan
LOOK AT THE " SIMILAR THREADS " BELOW !
Success has a Thousand Fathers , Failure is an Orphan
LOOK AT THE " SIMILAR THREADS " BELOW !

God of procrastination https://www.youtube.com/watch?v=q1EoT9sedqY
Success has a Thousand Fathers , Failure is an Orphan
LOOK AT THE " SIMILAR THREADS " BELOW !
1
![[Thumbnail for image.png]](/t/51286/a/33535/image.png "Filename: image.png
Description:")
Success has a Thousand Fathers , Failure is an Orphan
LOOK AT THE " SIMILAR THREADS " BELOW !
![[Thumbnail for image4.JPG]](/t/51286/a/33628/image4.JPG "Filename: image4.JPG
Description:")
![[Thumbnail for image3.JPG]](/t/51286/a/33629/image3.JPG "Filename: image3.JPG
Description:")
![[Thumbnail for image1-2.JPG]](/t/51286/a/33630/image1-2.JPG "Filename: image1-2.JPG
Description:")
![[Thumbnail for image4-2.JPG]](/t/51286/a/33631/image4-2.JPG "Filename: image4-2.JPG
Description: opening to the chimney stack")
![[Thumbnail for image3-1.JPG]](/t/51286/a/33632/image3-1.JPG "Filename: image3-1.JPG
Description: view of chimney")
![[Thumbnail for image2-1.JPG]](/t/51286/a/33633/image2-1.JPG "Filename: image2-1.JPG
Description:")
God of procrastination https://www.youtube.com/watch?v=q1EoT9sedqY
Carlos Rodriguez wrote:Hi Satamax,
Are you able to point me more specifically to the relevant sketchup files? I have downloaded sketchup and am getting used to that. Am I to assume that the dimensions are to scale and accurate? I just dont know sketchup.
Thanks for all of you help!

God of procrastination https://www.youtube.com/watch?v=q1EoT9sedqY
God of procrastination https://www.youtube.com/watch?v=q1EoT9sedqY
God of procrastination https://www.youtube.com/watch?v=q1EoT9sedqY
![[Thumbnail for binnenmuur_optrekken-(1).JPG]](/t/51286/a/33643/binnenmuur_optrekken-(1).JPG "Filename: binnenmuur_optrekken-(1).JPG
Description:")
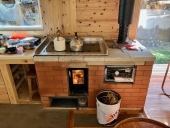
![[Thumbnail for RocketStove_interieur_in_opbouw.JPG]](/t/51286/a/33644/RocketStove_interieur_in_opbouw.JPG "Filename: RocketStove_interieur_in_opbouw.JPG
Description:")
![[Thumbnail for Rocket_Stove_Invoegen.JPG]](/t/51286/a/33645/Rocket_Stove_Invoegen.JPG "Filename: Rocket_Stove_Invoegen.JPG
Description:")

God of procrastination https://www.youtube.com/watch?v=q1EoT9sedqY
Carlos Rodriguez wrote:These are fantastic ideas. I have reviewed and will review some more. An idea is forming.........
1.) So, to clarify. I can modify the Peterberg Heat Riser stove calculation for a 6" from 43 3/16 to 24 inches.
As i said earlier in this thread, you don't need much in terms of top clearance, you could get away with 2.5 inches. Search for ring projection at the donkey's forum.Carlos Rodriguez wrote:2.) Do I still need at least a foot of clearance from the top of the heat riser to the top of the 'bell'?
Carlos Rodriguez wrote:3. Latest reading I have says the Bell size needs to be at minimum 53.8 square feet. True?
Is all this correct?
Thank you!!!
God of procrastination https://www.youtube.com/watch?v=q1EoT9sedqY
![[Thumbnail for Screen-Shot-2015-11-12-at-3.20.26-PM.png]](/t/51286/a/33741/Screen-Shot-2015-11-12-at-3.20.26-PM.png "Filename: Screen-Shot-2015-11-12-at-3.20.26-PM.png
Description:")
God of procrastination https://www.youtube.com/watch?v=q1EoT9sedqY
![[Thumbnail for Screen-Shot-2015-11-17-at-3.27.15-PM.png]](/t/51286/a/33894/Screen-Shot-2015-11-17-at-3.27.15-PM.png "Filename: Screen-Shot-2015-11-17-at-3.27.15-PM.png
Description:")
![[Thumbnail for Screen-Shot-2015-11-17-at-3.26.52-PM.png]](/t/51286/a/33895/Screen-Shot-2015-11-17-at-3.26.52-PM.png "Filename: Screen-Shot-2015-11-17-at-3.26.52-PM.png
Description:")
God of procrastination https://www.youtube.com/watch?v=q1EoT9sedqY

|
incandescent light gives off an efficient form of heat. You must be THIS smart to ride this ride. Tiny ad:
Edible Landscaping With A Permaculture Twist/ Second Edition - Kickstarter
https://permies.com/t/369458/Edible-Landscaping-Permaculture-Twist-Edition
|