• Post Reply Bookmark Topic Watch Topic
  • New Topic
permaculture forums growies critters building homesteading energy monies kitchen purity ungarbage community wilderness fiber arts art permaculture artisans regional education skip experiences global resources cider press projects digital market permies.com pie forums private forums all forums
this forum made possible by our volunteer staff, including ...
master stewards:
  • Nancy Reading
  • Carla Burke
  • r ranson
  • John F Dean
  • paul wheaton
  • Pearl Sutton
stewards:
  • Jay Angler
  • Liv Smith
  • Leigh Tate
master gardeners:
  • Christopher Weeks
  • Timothy Norton
gardeners:
  • thomas rubino
  • Jeremy VanGelder
  • Maieshe Ljin

Shoring up some old raised beds with wooden sides

 
pollinator
Posts: 351
Location: Basque Country, Spain-43N lat-Köppen Cfb-Zone8b-1035mm/41" rain: 118mm/5" Dec., 48mm/2" July
143
3
purity personal care books cooking food preservation writing
  • Likes 1
  • Mark post as helpful
  • send pies
    Number of slices to send:
    Optional 'thank-you' note:
  • Quote
  • Report post to moderator
I'm posting this in gardening for beginners because I can't think of a better place, but the problem I have is actually that I'm not a beginner anymore, and my original infrastructure is falling apart and needs some repair. I'm looking for some blue-sky thinking by people who have an eye or an imagination for repairs.

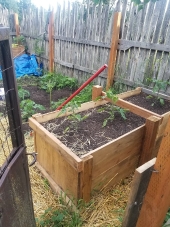
I made raised beds with wooden sides when I first started my little plot in the local community gardens about 7 years ago. Here's is a pic from around year 2 so you can see how they are constructed:

Raised bed pic from an old thread

Sides and stakes are green untreated pine from the local sawmill. I'm pleasantly surprised they lasted this long, frankly. Mostly what has happened is:
-- the soil has settled so the top boards are no longer necessary, and
-- the stakes holding up the sides, which you can see are on the inside side of the beds, have been decomposed by our friendly neighborhood decomposing organisms and turned into rich soil, but consequently making the beds start to fall apart.
The side boards are mostly in reusable shape though, I don't think I need to replace many of them.

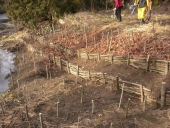
My plot is on a slope, and I built each bed to be level, so there are spots with 20 cm / 8" of nice soil on top of the ground (previously existing, untouched hard clay + rock + construction rubble)... Whereas near the public walkway on one side, and my downhill neighbor, there might be 60-80 cm (24-30") of soil above ground, standing vertically, just raring to spill all over the place.

So I'm wondering how to repair or otherwise deal with these puppies. Here are some "situations" I'm mulling over:

1) In some places soil pushing at the sides has made them bow out, narrowing the narrow aisles even more, in some places there's not even room to turn around or kneel down to work. That soil is not gonna be easy to move back where it belongs, everything existing gets in the way. I want to push the sides back where they belong, but soil is of course solid and heavy and you can't just push it.

2) Many stakes have rotted through and the sides are loose, flapping around and soil is escaping. It's not a neat edge where I can just push stuff back in place.

3) I feel like I should just take the sides off one at a time and "shave down" the soil to the line where it should be, drive new stakes and reattach the sides, then shovel the excess back on top. But I'm picturing everything collapsing as I try to do this and creating a big disaster. Especially where I border my downhill nieghbor, who has plants growing just inches from the edges of my raised beds.

4) The screws that hold the side boards to the mostly rotten or rotting stakes are difficult/impossible to back out with my drill, if I hammer or rip them out then I may destroy a bunch of otherwise usable side boards which I'll then need to also replace. Creative ideas for gentle screw removal from old weathered wood?

5) The back side of my plot borders a pretty steep embankment. A few stakes have ceded on that side too and sides are bulging out. It's awkward to work on the back side of the bed from the front side, even if that one is only 60cm / 2 ft. or so wide. Don't want to go rolling down that hillside. Can't see doing awkward work from that side on uneven, sloping, slippery terrain. Any bright ideas?

So that's about it. I've used living materials, i.e. wood, and I'm happy about that, and now it's time to replace them as happens with living materials. But I'd love some advice or ideas from people who have a good mind or a knack for doing repairs like thins becasue I am just not finding a general vision of a plan I think will work well.
 
Posts: 138
Location: eastern cape breton, 6b
49
cat fish ungarbage
  • Likes 2
  • Mark post as helpful
  • send pies
    Number of slices to send:
    Optional 'thank-you' note:
  • Quote
  • Report post to moderator
I have nothing but raised beds - mine look similar although on a flat area and i rebuilt them with a lot more space in between the second time around...

i am tempted to tell you to "reclad" them from the outside with thicker stakes... one side at a time.. you will still have to move the dirt though..

the gentle screw removal will likely prove less satisfactory and eat up time.. if you have access to an angle grinder of sawzall with a metal blade you are best off cutting the screws between boards if you can

my best suggestion would be to rebuild them one by one with more space between them and thicker stakes.. and if you can, start with a brand new empty bed... then shovel the dirt from one bed into the new one.. freeing up that bed to be dismantled, repurposed and rebuilt... then repeat from the next bed.. it is a lot of work but the completed job will be reliable and finished... this way you can also do them one by one ..

i am not trying to be a downer but trying to "fix" the beds in place will be frustrating and a band-aid at best... you will be constantly repairing the repairs and running out of room to work...

i hope this helps - best of luck!


steward
Posts: 12420
Location: Pacific Wet Coast
6991
duck books chicken cooking food preservation ungarbage
  • Likes 2
  • Mark post as helpful
  • send pies
    Number of slices to send:
    Optional 'thank-you' note:
  • Quote
  • Report post to moderator
Some pictures of what they look like now would be helpful. You said raised "beds" but don't give a number. I'll get started anyway!

1. I'm guessing those side boards are 1" thick nominal? If you can get so new wood from the sawmill, can you afford to get 2" thick?
2. Dirt is heavy! Would you consider using 2x4's with the 2" side against your planks, and the 4 inch into your garden to give you more rigidity and it would take longer to rot.
3. I like and agree with James' suggestion of emptying one bed (maybe on top of a bed that's not full to the top?), repairing it, refilling it, and then moving on to the next.
4. Stainless Robertson round head screws with a washer under the head. Screws are hard to remove if they've rusted or if they're partially embedded in the wood. Been there, done that! Ask pro's if there's an industrial fastener shop around. Stainless isn't cheap, but it's at least reasonable when you're buying it by the 1000 in a bag. If they claim you have to be a "business" try telling them you're a "farm". We actually are, and they usually accept that. However, if you're asking for a decent number, they're often reasonable. The bed in the photo has 9 stakes, likely 2 screws/board in each, 3 boards high - that's about 60 screws and washers for just that bed.
5. Personally, I would not reduce the height. I would find a place to salvage branches and wood and fill the bottom of the bed with that, and put all the great soil on top. The wood acts as a sponge just like a real hugel does, just not for as long. I have wood in the bottom of all my raised beds and despite our bad drought and heat this year, I didn't loose plants. I certainly did have to water, but whereas my friend had to water once or twice/day, I watered every 2 to 4 days during the worst of it, and I didn't have to start watering nearly as early.
Those are my ideas from what you've told us so far!
 
gardener
Posts: 742
Location: 5,000' 35.24N zone 7b Albuquerque, NM
517
hugelkultur forest garden fungi foraging trees cooking food preservation building solar greening the desert homestead
  • Likes 1
  • Mark post as helpful
  • send pies
    Number of slices to send:
    Optional 'thank-you' note:
  • Quote
  • Report post to moderator
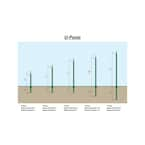
I have a similar situation and find the ideas from James and Jay very helpful. In my case, I opted for mostly 3' and some 5' for the low hill slope of the Everbilt metal powder-coated green U-posts to replace the wooden stakes:

I placed these on the outside of the planks, sunk so the top of the stake meets the top of the upper board. This gives support for the soil. Going on two years and they are like new. With the metal u-posts, the sides are fully supported: no bending.
 
gardener
Posts: 5169
Location: Cincinnati, Ohio,Price Hill 45205
1010
forest garden trees urban
  • Likes 3
  • Mark post as helpful
  • send pies
    Number of slices to send:
    Optional 'thank-you' note:
  • Quote
  • Report post to moderator
It seems like you need  different techniques for different spots.
Anywhere  that is close to vertical I would drive stakes made of rebar or electrical conduit, minimum of 1/2" for the rebar and 3/4" for the conduit.
T bar is better still , but pricey.
Do this on the outside of the boards, looks be dammed.
If  need be, another layer of boards can go on the outside of the stakes, as a facade.

This seems advisable on that slope you described.
Self tapping roofing screws will drive right through the conduit, rebar is harder to secure.
Driving one stake on the inside and another right across from it on the out side gives you the opportunity to bind them together with wire, zip ties or hose clamps.
Often the weight of the soil pressing out against the board will be enough to keep it in place, since your stakes are on the outside.

Don't leave any cut ends sticking up above your boards, falling on any stake is no joke, falling on metal stakes can be deadly.

Where you want to remove the sides and shave the bed back into shape, consider laying tarp, or cardboard down before you begin.
That way you can keep the soil separated from the path and neighboring beds, even of there is a collapse.
 
Amy Gardener
gardener
Posts: 742
Location: 5,000' 35.24N zone 7b Albuquerque, NM
517
hugelkultur forest garden fungi foraging trees cooking food preservation building solar greening the desert homestead
  • Likes 6
  • Mark post as helpful
  • send pies
    Number of slices to send:
    Optional 'thank-you' note:
  • Quote
  • Report post to moderator
Along with the new materials as indicated in the replies above, here's one more idea that could lessen the amount of deconstruction during the reinforcement process. I often grab the scissors-jack from my trunk and use it to lift heavy objects so I can bolt them in better if they sag (cabinets) or replace wood porch posts when they rot. If your side planks are bent and you want to straighten them in place, could you put extra wood on the side of your garden walls in the walking area then sandwich the scissors jack in between by placing it on its side. As the 2 bed walls get pushed back, remove soil, compress the walls some more, in a slow repetition of steps. Once in position, you can use whatever metal you've acquired and stake in place. Good luck, Dave!
 
Time is the best teacher, but unfortunately, it kills all of its students - Robin Williams. tiny ad:
Switching from electric heat to a rocket mass heater reduces your carbon footprint as much as parking 7 cars
http://woodheat.net
reply
    Bookmark Topic Watch Topic
  • New Topic