• Post Reply Bookmark Topic Watch Topic
  • New Topic
permaculture forums growies critters building homesteading energy monies kitchen purity ungarbage community wilderness fiber arts art permaculture artisans regional education skip experiences global resources cider press projects digital market permies.com pie forums private forums all forums
this forum made possible by our volunteer staff, including ...
master stewards:
  • Nancy Reading
  • Carla Burke
  • r ranson
  • John F Dean
  • paul wheaton
  • Pearl Sutton
stewards:
  • Jay Angler
  • Liv Smith
  • Leigh Tate
master gardeners:
  • Christopher Weeks
  • Timothy Norton
gardeners:
  • thomas rubino
  • Jeremy VanGelder
  • Maieshe Ljin

Tentative plans for super small space, cob rmh

 
Posts: 5
Location: Temperate New Zealand via North Carolina
  • Mark post as helpful
  • send pies
    Number of slices to send:
    Optional 'thank-you' note:
  • Quote
  • Report post to moderator
I will begin with the context of our anticipated build...we live in a fairly experimental, some might say rough, situation...it works for us...but here it is...

-My partner and I live in a technically illegal <10m2 (100ft2) wattle and cob (ish) structure we built beside our garden we've developed on a friend's property.
-The structure is comprised of four chunky green eucalypt rounds buried a meter in the ground with poplar/willow poles running horizontally (rather than vertically) at about 20-30cm spacing between the poles originally intended to support the cob, which is only about 10-20cm thick (depending on spot, highly irregularly applied, with curves in walls, etc.)
-The footprint was dug out about a spade's depth, backfilled with broken clay drainage tiles, covered with race lime, and then we put just a 100mm cob baselayer floor (next spring/summer we'll do it up a bit better, but winter was approaching and time was running out)
-We live in temperate New Zealand - we get the occasional frost but it really doesn't get below freezing very often.
-We have a roughly queen sized mattress/bed that is simply a duvet cover stuffed with straw (ie, highly combustible) and this takes up half the room.
-The ceiling/roof is simply corrugated iron sheets laid over round, hardwood pole perlins
-No electricity, absolutely no desire for anything with gas, so in search of a wood heating option

Hm, what else might be applicable...?

-Oh, yes, we don't mind the cold in the least and have no interest in a heater for our own comfort...but we'll be introducing a baby into our lovely (unheated) environment in the next couple of months and feel compelled to do what we can to bump the internal temperature up a few degrees on those odd frosty nights...

Yes, so, we obviously don't have much space. I don't even know that a mass would be workable for us. Certainly not 10m of mass-encased flue. And we don't really anticipate using this heater any more than a couple dozen times...tops (but who knows). Hopefully next winter our new addition will be all good to "rough it" with her parents (we enjoy our layers of woolen blankets).

Some concerns:

-Proximity of barrel and/or burn chamber to corner pole (which could be cobbed over or ___ to protect it) and/or walls with embedded poles
-Possibility of running flue out wall and, if so, feasibility with embedded poles
-Potential for a less mass or even mass-less heating system.
-Oh yes, it'd be great if the flue was not rising out of our "garden shed" (ie, home) like a red flag for noisy neighbors, passersby to easily conclude that it isn't actually an out-building.

We would prefer to build something that is mostly cob. I haven't been able to come across any firebricks. I ordered some perlite (only 20L as it has been difficult to come across and is quite expensive, but more could be had if need be). Um, I have two 100mm diameter, 1200mm lengths of flue pipe, one of 240mm diameter, 1000mm long, and some 150mm diameter flue pipes.

I have a 60L drum I hope to work with, measuring 380mm across by about 570mm high. According to all the research I've done over the past weeks, it seems it'd be tight, but perhaps with a raised cob core it could be workable (if I go with a J-tube design, but wouldn't mind an L-tube if you educated folks suppose it'd be better).

Yes, I will gladly post some photos of the structure and site if it might assist any of you (to assist us!).


Please, please lend us your wise suggestions. We feel like we're pretty handy folks and strive to take care of ourselves as much as possible. We entering new territory here though - with heaters...and babies - and we just want to get some advices from folks with experience.


Thanks in advance.


Cheers! Art.
 
pollinator
Posts: 4154
Location: Northern New York Zone4-5 the OUTER 'RONDACs percip 36''
67
hugelkultur fungi books wofati solar woodworking
  • Mark post as helpful
  • send pies
    Number of slices to send:
    Optional 'thank-you' note:
  • Quote
  • Report post to moderator
Art Cooley : In no particular order, and trusting that Your other fellow Members will jump in ! Right now you are getting some of the coldest temps ,in a basically

Maritime Climate ? Right ? and it will be 3-4 months until things warm up !

1st thought Casually introduce the idea in ALL conversations with neighbors and friend of Neighbors that you are Adding a simple forge into your Work space in your
garden shed, And will probably have to move it outside when it warms up !

I see about 3 rocket mass heater builds in your future ! The simplest build and easiest to live with is a J-Bend, Vertical feed, (150mm ) 6'' Rocket Mass Heater RMH.
This is the Space heater that you learn on ! After you have mastered the 6'' system it will be possible to talk about attempting to build a 4'' system - Newer adaptations
of this RMH Include a horizontal fed batch loaded 4'' that when built correctly can perform as well as the 6'' - However experience is the only way that can give you the
hands on experience that you need to move up to a 4'' system - many people who try to build a 4'' RMH (100mm) as a 1st build Fail and then we have to deal with the
" I tried that - '' ''It doesn't work'' '' Its a bunch of Tripe " fail out !

These units have been used in Tents, Teepees, and Yurts (Gers) and can be made to work for you

Now the Thermal mass Thing- I hope that I can encourage you to take another look at its practicality ! All we want to do is raise your bed up off of the floor and place a
heated Mattress Pad or possibly a futon pad ! when you want just the bed warn you keep the covers on when you want the whole space warmed say during bathing you
remove the covers and let the room warm ! Actually Elevating your bed will reduce the need for supplementary heat - Did I mention that your Thermal Mass can be
used to store Coolth for you ?

If you have not already done so Borax can be sprinkled into your bedding to reduce a fire hazard and Baking Soda makes a good fire extinguisher for wood and oil/
grease fires !

Fire bricks - O.K. Thats an issue, Our fallback position is 100 year-old dead-soft Red or orange red house bricks, This kind if rubbed on a sidewall (or concrete ) will
leave a mark behind in the same way that Chalk leaves its mark behind on a Sidewalk ! This is an adequate Feed Tube and Burn Tunnel for a Vertically fed J-Bend Style
6''RMH

Perlite : Have you checked local green houses for horticultural penlight? Vermiculite , or pumice , or expanded Clay pellets can be made to work ! ( I'm counting on
otherMembers to chime in here )

If we had two identically made RMHs with different sized barrels both would have to shed the same amount of Heat Energy to cool and as heavier denser gases Fall
verticallydown the outside of the heat riser creating the push-me pull-you magic that allows us to flow hot exhaust gases 30' horizontally through your Thermal Mass !

Counter-intuitively the smaller Barrel with a Smaller Surface Area to Mass MUST radiate off its heat energy at a higher temperature than the RMH with the larger
barrel !

So We will need to build a Heat Riser out of clay and perlite and Unicorn sweat that is well insulated and will allow you to use your 60L Barrel, again this is not optimal for
a 6'' system, but we do not want to go so small as to create failure out of success !

To make your 60 L Barrel work we have 38 cm inside diameter to work with, we need to flow gases down the inside of the Barrel and outside of the Heat riser a safe
minimum
is 1.5 '' all around so 1.5 Xs 2 = 3'' or 7.5 cm the inside diameter of the cylinder that is the center of our Heat Riser needs a circle of 6'' or 15cm . 38cm -(7.5 cm + 15 cm )
=38 cm- 22.5 cm =15.5 cm This leaves us 15.5 cm to make up the walls of our Heat riser this doughnut shape will have a final wall thickness of 15cm/2 or 3'' thick walls
with a fudge factor of .5cm This math will need to be checked !

Stove pipe, well you've got to get more - at present you don't have enough for a good chimney !

Think like Fire ! Flow like Gas ! Don't be a Marshmallow ! For the good of the Craft ! Big AL !

A late thought -Link below :


http://richsoil.com/rmh-manual.php

A.L.


pollinator
Posts: 4024
Location: Kansas Zone 6a
284
  • Mark post as helpful
  • send pies
    Number of slices to send:
    Optional 'thank-you' note:
  • Quote
  • Report post to moderator
Mass as the bed platform. Definitely. A rocket stove is a lot of work for a couple nights a year, though. If you have it, you will use it a lot more.

Rocket could be outside if you had to, but inside is easy to tend. Plus you can cook on it.

Other non rocket option is a wood boiler outside with a hot water tank inside. Hugely inefficient but if you have an unlimited supply of firewood that needs to be burned...

Lots of other tricks like heating rocks or water bottles, the old bed warmers of yore. Or sleep with you or a dog when he/she gets a little older.

Tiny metal box woodstove, like for a boat or tent, would be a quick and easy solution for a couple days a year.

 
allen lumley
pollinator
Posts: 4154
Location: Northern New York Zone4-5 the OUTER 'RONDACs percip 36''
67
hugelkultur fungi books wofati solar woodworking
  • Mark post as helpful
  • send pies
    Number of slices to send:
    Optional 'thank-you' note:
  • Quote
  • Report post to moderator
R Scott : We do this ALL the time, I know I am guilty of it and i see it every couple of days !

A Rocket Stove is a cooking device primarily intended to be used outside/ in a well ventilated area Some times this is fitted out with a range hood device
with a fan to suck out the Smoke This device is vastly superior to the 3-rock fires used by 40 % of the Families on this planet !

Next is the Pocket Rocket very efficient loved by Zombie Hunters, Preppers, People on Picket Lines and Ice fishermen ! This baby should be use outside only,
It runs so hot it will set fire to blacktop where it sits ! Very hard to use safely indoors, most of the heat goes up the chimney- no thermal mass as soon as
the fire goes out you are cold again !

And The Rocket Mass Heater which some times gets called something else ! I/O/W We all misspeak and call the RMH a Rocket Stove, or even a Pocket
Rocket \from time to time !

For the Good of the Craft ! Big AL

 
Arthur Cooley
Posts: 5
Location: Temperate New Zealand via North Carolina
  • Mark post as helpful
  • send pies
    Number of slices to send:
    Optional 'thank-you' note:
  • Quote
  • Report post to moderator

allen lumley wrote:Right now you are getting some of the coldest temps ,in a basically Maritime Climate ? Right ? and it will be 3-4 months until things warm up !


That's about right. And the temps really aren't getting below freezing at the coldest time of night/dawn.

allen lumley wrote:1st thought Casually introduce the idea in ALL conversations with neighbors and friend of Neighbors that you are Adding a simple forge into your Work space in your
garden shed, And will probably have to move it outside when it warms up !


Ha. Nice suggestion. I will most certainly consider that route.

allen lumley wrote:I see about 3 rocket mass heater builds in your future ! The simplest build and easiest to live with is a J-Bend, Vertical feed, (150mm ) 6'' Rocket Mass Heater RMH. This is the Space heater that you learn on !


The more we read, the more inclined we are towards this direction. As for the proportions Evans mentions in his book (and that are frequently mentioned elsewhere), I would like some clarification of the beginning and ending points for different lengths. The vertical feed, the burn chamber, and the heat riser. Does the length of the heat riser begin at the corner of that "J" or does it begin at an imaginary plane where the burn tunnel extends to the end of that corner? and does the burn tunnel measurement account for the entire horizontal length? or do we subtract one or both of the vertical sections (feed and/or heat riser) when calculating this measurement. (Hopefully this makes sense)

allen lumley wrote: After you have mastered the 6'' system it will be possible to talk about attempting to build a 4'' system - Newer adaptations
of this RMH Include a horizontal fed batch loaded 4'' that when built correctly can perform as well as the 6'' - However experience is the only way that can give you the
hands on experience that you need to move up to a 4'' system - many people who try to build a 4'' RMH (100mm) as a 1st build Fail and then we have to deal with the
" I tried that - '' ''It doesn't work'' '' Its a bunch of Tripe " fail out !


Whilst looking for the basic information on RMH I must admit that I have been most intrigued and impressed by all the developments and innovations folks have developed.


allen lumley wrote: Now the Thermal mass Thing- I hope that I can encourage you to take another look at its practicality ! All we want to do is raise your bed up off of the floor and place a
heated Mattress Pad or possibly a futon pad ! when you want just the bed warn you keep the covers on when you want the whole space warmed say during bathing you
remove the covers and let the room warm ! Actually Elevating your bed will reduce the need for supplementary heat - Did I mention that your Thermal Mass can be
used to store Coolth for you ?


While I appreciate the thought, in theory, the practicality of providing this sort of mass is a bit daunting right now. As mentioned, our space is only 3.5 meters by 2.5 meters, with our straw mattress on a pallet framed bed taking up almost exactly half of the room. That leaves an open rectangle of 2.5m x 1.7m. I was thinking that perhaps I could even just build the unit in the corner and then have a meter run towards the bed, then back, and then up about 1.5 meters and then out the wall. We have access to clay drainage tiles that have an internal diameter of 150mm (6in) and I was hoping these might work. They are in 450mm lengths and I was hoping it might be feasible to mold form my own elbows to connect the straight runs. I know a lot of heat is meant to be lost with each 90 degree turn, but obviously I'm suggesting dramatically reducing the runs and the mass anyway.

Also, just to make sure I understand what you're suggesting Allen, are you recommending a large mass to put the mattress on top of? So, for us it would effectively amount to 2.5m by 1.7m by however high, perhaps 500 or 600mm? And then running my exhaust through this? I was uncertain what to imagine when you suggesting removing covers to heat the space vs. just heating the bed.

allen lumley wrote: If you have not already done so Borax can be sprinkled into your bedding to reduce a fire hazard and Baking Soda makes a good fire extinguisher for wood and oil/
grease fires !


Good to know!

allen lumley wrote:
Fire bricks - O.K. Thats an issue, Our fallback position is 100 year-old dead-soft Red or orange red house bricks, This kind if rubbed on a sidewall (or concrete ) will
leave a mark behind in the same way that Chalk leaves its mark behind on a Sidewalk ! This is an adequate Feed Tube and Burn Tunnel for a Vertically fed J-Bend Style
6''RMH


How about another fallback? No thoughts or input regarding a cob mix? I was inspired by some comments made on the donkey32 boards as well as what I read about this chook brooder built out of cob. Hopefully someone emerges with some solid, useful information about taking this route.

allen lumley wrote:
Perlite : Have you checked local green houses for horticultural penlight? Vermiculite , or pumice , or expanded Clay pellets can be made to work ! ( I'm counting on
otherMembers to chime in here )


The perlite that comes in box stores (equivalent to Lowes or Home Depot) is only 5L (about .2 cubic feet) and is about $10. At 100L (about 3.5 cubic feet), it's in the $40-50 range, but one must order it at pay about half that again for shipping...alas, the price one pays for living in a nation of merely 4.5 million.

I do have 20L, so about .8 cubic feet of perlite I ordered (for nearly $40!) and was hoping to use this for the heat riser and come up with another recipe for the burn chamber.

Again, I do have collected pumice and sawdust, so perhaps these might be used?

I'll be sure to check your maths as well!

Thanks so much for the detailed reply to my query. I will keep you apprised of any progress.

Cheers.
 
allen lumley
pollinator
Posts: 4154
Location: Northern New York Zone4-5 the OUTER 'RONDACs percip 36''
67
hugelkultur fungi books wofati solar woodworking
  • Mark post as helpful
  • send pies
    Number of slices to send:
    Optional 'thank-you' note:
  • Quote
  • Report post to moderator
Arthur Cooley : Yes The Directions for dimensions in the book could be clearer ! I'll have to find my copy where I have it wrote out again for ME to understand !

(You don't really understand a subject until you can explain it to your Grandmother )

With a large bed built at or just above Comfortable with your feet flat on the floor and the horizontal ducting at Floor level you will have about 14'' of mass between
your but and the top of the horizontal ducting ! It takes time for that heat energy to travel through the mass of the cob!

Because every build is a custom build You might find that planning a couple of hours around noon willow you 24 -48 hours of Soothing Bone warming heat starting
at or about 6-10 hours later Ducting closer to Your beds surface with get warmer faster !

The combination of mattress and blankets will help hold in the heat energy trapped within Your Thermal mass. You will have the option of uncovering your Thermal
Mass and warming your Entire living space or keeping that trapped heat energy for an extended period w/out an additional fire hence the idea of one firing lasting
around 48 hours !

To use the Barrel you have now- we need to maximize the insulating effects of the Heat Riser, So a Mix of Good pliable Clay (called plastic in the craft ) and perlite
and possibly your lightest pumice is needed to keep the very hot rising stream and the cooler denser falling gas stream from equaling out and staling the Push-me
pull you that propels the gases 30' horizontally !

Because a properly made Heat Riser is infinitely recyclable, We can build a delicate Heat Riser- but not a fragile one, hopefully someone with first hand experience
with using Sawdust and a clay slurry to make a Heat riser will jump in here, A major problem with delicate Heat risers is bumping them when putting the barrel over
top !

4 th' crafts ! Big AL
 
Arthur Cooley
Posts: 5
Location: Temperate New Zealand via North Carolina
  • Mark post as helpful
  • send pies
    Number of slices to send:
    Optional 'thank-you' note:
  • Quote
  • Report post to moderator
Regarding the 30' that's so often referenced, what is the impact on the functionality of the heater if this length is cut by half or a third or even two-thirds? Is it simply that heat is being lost out of the chimney? Or will it diminish the efficiency of the combustion as well? And if one were to cut the length of of their horizontal mass-heating run, what impact will this have on the exit temperatures?

I am keen to try to have the flue exit as low as possible and have read suggestions that it is still highly advisable to have a high-reaching chimney to promote draw, but it had occurred to me that with a shorter horizontal run, perhaps the lower chimney could be more plausible?

And thank you Allen for double checking those dimensions for me! Your replies have been enormously valuable and greatly appreciated! Cheers.
 
Arthur Cooley
Posts: 5
Location: Temperate New Zealand via North Carolina
  • Mark post as helpful
  • send pies
    Number of slices to send:
    Optional 'thank-you' note:
  • Quote
  • Report post to moderator
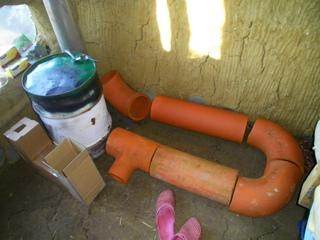
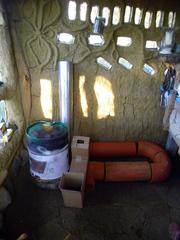
Here are a few images of the space and tentative materials to be used...feedback, critique, encouragement, etc. more than welcome!


As you see, I have acquired some 150mm (6in) ID terra cotta drainage pipe, with a T and Elbows, that I hope to use as my flue over which we will put our cob. As you see, the run will be pretty small, about a meter out and back and then I will use standard stove flue to take the exhaust up the interior wall about 1200mm and then through another terracotta elbow through the wall. The cardboard mold you see will be used to create the cavity used for the feed tube (plus ash catch below), burn tunnel, and then the base of the heat riser. My heat riser will be a clay slip mixed with perlite packed in the space between 150mm and 240mm flues. The main chamber's composition will be clay slip mixed with ash and pumice and then surrounded on all sides by cob. And the cardboard mold is 150mmx125mm (6x5inches) for each cross section. Yep. That's the direction we're heading for now.
 
allen lumley
pollinator
Posts: 4154
Location: Northern New York Zone4-5 the OUTER 'RONDACs percip 36''
67
hugelkultur fungi books wofati solar woodworking
  • Mark post as helpful
  • send pies
    Number of slices to send:
    Optional 'thank-you' note:
  • Quote
  • Report post to moderator
Arthur Cooley : Basically I like every thing but Three, The floor of your Feed Tube, and * Burn Tunnel *, needs to be resistant to the rapid wear caused by the
day to day dropping of chances of wood on it ! ( I Think ) you may get away with it if you are willing to do repairs more regularly ! I expect that with practice you will
find that you do not need an ash pit and will let it fill up with a layer of crunchy like Ash that slowly gets sintered into a near pottery glaze condition.

An alternative is to line the floor with loose brick ( Used with a cob J-bend it will have a different expansion rate), being loose with the gaps backfilled with loose ash
you should have some protection for your floor and fewer cracks to repair

The all brick J-bend gives some support to your Rocket base without it you will have to be vigilant and have a clay slurry handy to keep up on the small repairs !

Your mild climate is not an excuse to cut corners, an air gap and a reflective metal sheet barrier allowing air to circulate between the outside wall and both sides of
your shielding is necessary to keep from heating All outdoors, and we have to protect the willow wattle materials in the wall !

Clean outs -With this short run You are probably in good shape but I would replace that last Elbow with a " Tee " to allow me to get in there for inspection, even if I
had to run the horizontal leg of that tee out through the outside wall and cap it off carefully, do this even if you go with an inside chimney! This gives you proof that
a future problem is not a mysterious blockage that is intractable, and filling your house up with smoke ! In other words a safety issue !

There will be times when you have been working outside all day,maybe stopping midday to eat and finding your house pleasantly cool, if in preparation for an expected
cold night you try to build a fire with the house cold and the outside warmer your Rocket will not draft !

To get a little heat into your system and promote a draft you need to be able to lite a fire or 1 or 2 candles at the " TEE " at your Final vertical chimney to promote that
upward draft of air not including this feature in your build is a good way to fill your house with smoke ! This is bad even if it only happens a couple of times a year !

I am called away, and will be back soon For the Craft Big AL

Late Notes : We expect to get 30' of horizontal run from a nominal 6'' Rocket, but the formula we use subtracts 5' for every elbow in you system so including the final
elbow/ 'T' you will use up 15' anyway ! I totally leave to you how you embed all of your tile pieces to have nice clean tight joints in your thermal mass !

Good news, the more heavy dense rocks you use inside your Thermal mass # the more heat it will hold, the faster heat will flow through it, and the less cob you will have
to make !
I thought I had one more issue to raise but this should give you pause for thought ! Big AL
 
Obey! Obey this tiny ad!
Rocket Mass Heater Jamboree And Updates
https://permies.com/t/170234/Rocket-Mass-Heater-Jamboree-Updates
reply
    Bookmark Topic Watch Topic
  • New Topic