• Post Reply Bookmark Topic Watch Topic
  • New Topic
permaculture forums growies critters building homesteading energy monies kitchen purity ungarbage community wilderness fiber arts art permaculture artisans regional education skip experiences global resources cider press projects digital market permies.com pie forums private forums all forums
this forum made possible by our volunteer staff, including ...
master stewards:
  • Nancy Reading
  • Carla Burke
  • r ranson
  • John F Dean
  • paul wheaton
  • Pearl Sutton
stewards:
  • Jay Angler
  • Liv Smith
  • Leigh Tate
master gardeners:
  • Christopher Weeks
  • Timothy Norton
gardeners:
  • thomas rubino
  • Jeremy VanGelder
  • Maieshe Ljin

Greenhouse Rocket Stove


Posts: 18
Location: TN
  • Mark post as helpful
  • send pies
    Number of slices to send:
    Optional 'thank-you' note:
  • Quote
  • Report post to moderator
Hello!

We are in Tennessee.

I wasn’t sure where to post this.

I am planning a project this year and really need some advice.
We are building a 16’x16’ greenhouse to raise tilapia and some other typical food items.

In order to heat this greenhouse I want to use a rocket stove.
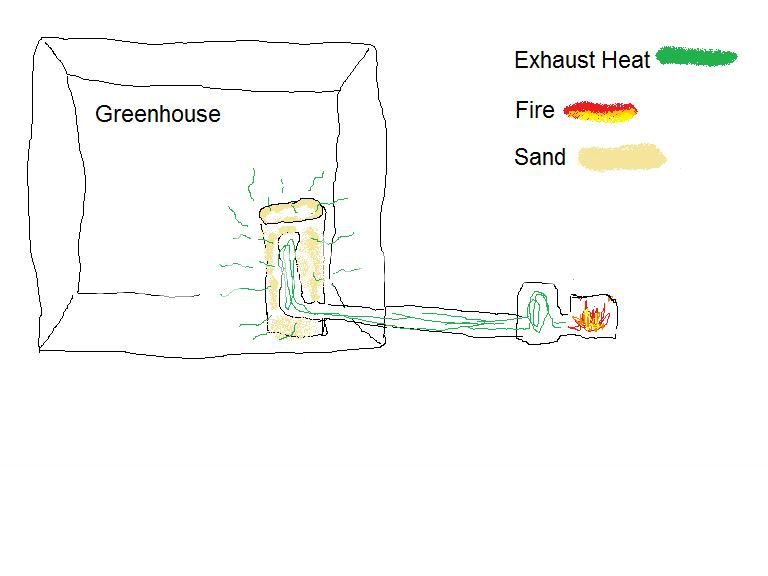
I have a 55-gallon metal drum I wanted to run the exhaust pipe through and then fill with sand. The area where we feed the rocket stove wood will be outside of the greenhouse. I wanted to run a pipe from the fire to the greenhouse drum. I was hoping the drum of sand would heat up and warm the greenhouse without catching it on fire or melting the walls, lol.
It will be vented outside of course.
Will this work?

Also,
I checked the price of heater pipe—oh my, it is expensive. What alternatives are there to using expensive steel pipe? Can I make an adobe-like pipe to guide the warm air into the greenhouse and then use a small bit of pipe to bring it into the barrel?
I have NO experience in all this building and the like.

My husband is a not thrilled with the concept of a rocket stove. He is afraid it will catch on fire, I guess. Whatever I do, I want it to go as smoothly as possible.

My expertise is with growing animals and plants, LOL.

Thanks so much!

Here's a Quick Sketch. 

Oh, I forgot to add a way for the exhaust to escape, lol. Pretend its there.


gardener
Posts: 1948
Location: PNW Oregon
41
hugelkultur forest garden duck trees books chicken food preservation
  • Likes 1
  • Mark post as helpful
  • send pies
    Number of slices to send:
    Optional 'thank-you' note:
  • Quote
  • Report post to moderator
A couple of things I notice right off are:

The distance from the fire to the green house - you'll be loosing most of your heat there.
I'm wondering what your GH walls are going to be made of?

And is that a heat riser right off the firebox, then a long exhaust to a large drum heat riser inside the GH?

Suggestion:  Put the firebox right up next to the GH wall, make the wall around this RMS out of some type of mass material, and run the exhaust tub through the wall and quickly into your drum riser, then exhaust it through tunnels running under your growing beds.

Have you seen this post about the RS set up for a yurt  https://permies.com/bb/index.php?topic=5937.0
 
                      
Posts: 18
Location: TN
  • Mark post as helpful
  • send pies
    Number of slices to send:
    Optional 'thank-you' note:
  • Quote
  • Report post to moderator
The greenhouse is going to be covered in greenhouse plastic on a wooden frame. What would I use to insulate the entry hole? I don't want to melt the greenhouse plastic.

I don't even know if a rocket stove is a good idea in a plastic greenhouse?

Yea, that is a heat riser by the fire.

The large 55-gallon drum is filled with sand with a pipe going into it.


I would much rather put it closer to the GH--would mean less cost for pipe.


Awesome link!

That is way too much pipe for my budget though. The greenhouse is 16'x16'.

I am working with supplies I mostly have. The 55-gallon drum, firebrick, sand, clay and timber are already on my property. I'll probably buy the sand though, its a long rock bluff and briar walk from the creek to the building site! LOL


If I did what you suggest and find a way to insulate the entry hole and wall, would this keep my greenhouse heated reliably through our winters? I'm in Tennessee so the winters aren't too bad.

I am trying to keep my tilapia alive. I don't want to purchase stock annually. They start dying at around 50*F.

I'll mainly have to purchase pipe for this but I have a lot of projects to get done this year so must save as much money as possible. As long as its safe and effective I'll be happy.

Thanks.
 
                            
Posts: 29
  • Mark post as helpful
  • send pies
    Number of slices to send:
    Optional 'thank-you' note:
  • Quote
  • Report post to moderator
have you thought of heating water and running the water through a radiator an old car radiator would work

heat the water pump it to the gh in insulated wrapped hose
 
                      
Posts: 18
Location: TN
  • Mark post as helpful
  • send pies
    Number of slices to send:
    Optional 'thank-you' note:
  • Quote
  • Report post to moderator
No, I didn't think of that.  How would I do it? Is it as simple and wood efficient as a rocket stove? I am aiming for no electricity with my animals and greenhouse. I love re-purposing old junk, its so much fun!
 
Jami McBride
gardener
Posts: 1948
Location: PNW Oregon
41
hugelkultur forest garden duck trees books chicken food preservation
  • Mark post as helpful
  • send pies
    Number of slices to send:
    Optional 'thank-you' note:
  • Quote
  • Report post to moderator

SilentTala wrote:
The greenhouse is going to be covered in greenhouse plastic on a wooden frame. What would I use to insulate the entry hole? I don't want to melt the greenhouse plastic.


If you read/view all the the post at the link I sent you will see that they used cob surrounding the tunnel going from the external firebox into the yurt.  Maybe you missed that in the pictures....


I don't even know if a rocket stove is a good idea in a plastic greenhouse?


I don't see any problem, other than the ones that come with plastic even without a RMS


The large 55-gallon drum is filled with sand with a pipe going into it.


The insulation (sand in your case) should be on the outside.  Putting it on the inside is going to mess up your stoves ability to function.  I don't know (Erica jump in) but it could cause serious problems, as your husband suspected.  Leave the drum open except for the heat riser in the middle of it.


I would much rather put it closer to the GH--would mean less cost for pipe.


Awesome link!  That is way too much pipe for my budget though. The greenhouse is 16'x16'.


You don't have to copy their exhaust system, and I think you mentioned using something else for the piping - yes?
You will need to do some research on what might serve your purpose for replacement materials.  Maybe someone else knows what's possible and will post here soon.


If I did what you suggest and find a way to insulate the entry hole and wall, would this keep my greenhouse heated reliably through our winters? I'm in Tennessee so the winters aren't too bad.


Yes, easily.  Take the time to read the other post, it gets into the details as it goes.  I know it's long, but it will really help get you up to speed on making your plan a reality.


Posts: 29
  • Mark post as helpful
  • send pies
    Number of slices to send:
    Optional 'thank-you' note:
  • Quote
  • Report post to moderator
coil 1/2" copper tubbing inside the barrel near the top

use  at least a 5gal can as a reservoir put the pump between the reservoir and stove so the stove coil will always be full

mount the reservoir as the highest point in the circuit and leave the reservoir vented so pressure doesn't build

use water and antifreeze

maybe not as efficient but the stove can be kept away from the gh

i'm thinking of a system like this for my house
 
Jami McBride
gardener
Posts: 1948
Location: PNW Oregon
41
hugelkultur forest garden duck trees books chicken food preservation
  • Mark post as helpful
  • send pies
    Number of slices to send:
    Optional 'thank-you' note:
  • Quote
  • Report post to moderator
Thinking about this more - you could place a metal piece around your riser in the drum, several inches larger than the riser, you could then fill this space around the riser with your sand.  Leaving the air flow inside the drum free to flow.  You may have intended to do just this, but in your picture the drum looks to be filled entirely with sand.

I wonder if you can use a section of metal pipe, cut length wise for expansion and contraction, as a mold for making your exhaust tunnels.  Cover the outside of the pipe in oil, place it where you want your tunnel and cover it in no-straw, or low-straw cob + chicken wire or wire mesh for stability.  Allow this to dry and then pull the pipe together and remove.  Move on to the next section to be constructed.  Leave the wire running out of the end of each section of cob, so where the cob sections come together there is continuous wire to help keep sections from breaking apart.  You'll need to protect this 'homemade pipe" from water and moisture, or add some lime to make it water proof.  You see why people just use the steal pipe, it's just easier.


Posts: 18
Location: TN
  • Mark post as helpful
  • send pies
    Number of slices to send:
    Optional 'thank-you' note:
  • Quote
  • Report post to moderator
Thanks for the responses guys! I'll read back through them after work today. This is all helping me come up with a good plan before fall.
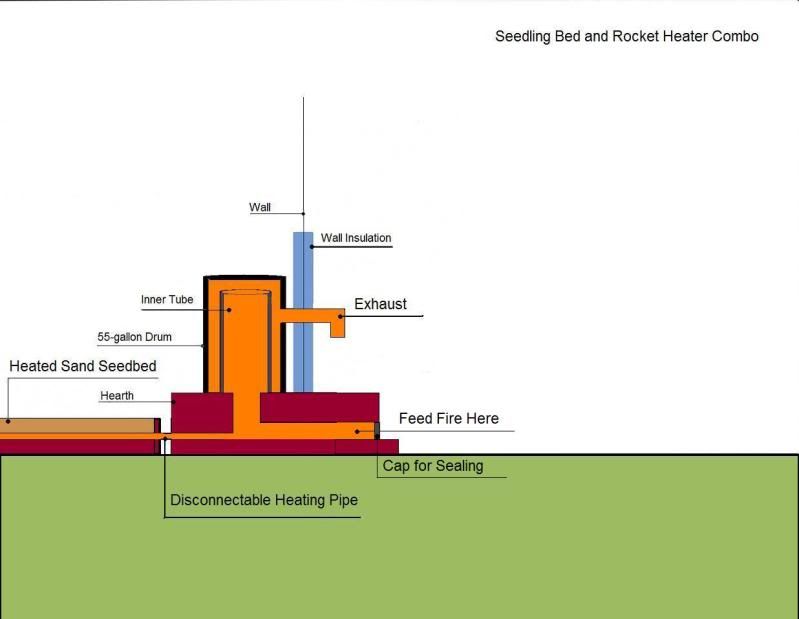

What about one of these?


Posts: 124
Location: Puget Sound
4
  • Likes 1
  • Mark post as helpful
  • send pies
    Number of slices to send:
    Optional 'thank-you' note:
  • Quote
  • Report post to moderator
I have a 14' X 16' greenhouse with plastic walls and I am building my rocket stove entirely inside the green house.  Why do you want the stove part outside the greenhouse?  The barrel puts out a lovely heat and the bench will be used to heat the soil on my starts.

Here is the link to my facebook page:  http://www.facebook.com/?ref=home#

I have been keeping a photo log of my construction.  There are also links to the 3 youtube videos I have made so far.  Take a look.

The photo album called "Green houses and Rocket Stoves" has some pics of another setup that may better match your needs.  This person had an above ground pool in his greenhouse.  He built a totally brick version of the rocket stove with the mass storage part wrapping around the pool.  He was planning to use good soil for most of the mass which would give him a heated starter bed and heat the water in his pool.  He was raising plants in the pool water, but should be able to add fish no problem.

Take a look and let me know what you think.
 
gardener
Posts: 1292
Location: Okanogan Highlands, Washington
397
4
hugelkultur cat dog books food preservation
  • Mark post as helpful
  • send pies
    Number of slices to send:
    Optional 'thank-you' note:
  • Quote
  • Report post to moderator
Tired Erica responding to fascinating topics at un-Godly hours... please excuse any lack of tact or coherence.

Jami - Sounds to me like she is talking about using 2 barrels, one for the rocket combustion unit itself, and a second barrel full of sand instead of a cob bench as the thermal mass. 

- Sand is not a great thermal mass, you will probably be happier with earthen mass or just dirt (a subsoil layer under your garden beds themselves).  I don't know that adobe would work well in a greenhouse, too much moisture, but maybe with some old concrete slabs for the tops of the tunnels you could DIY the flues.  You will need a good seal to keep smoke out of the greenhouse, not only for yourself, but certain plants don't tolerate smoke well at all.  More about tunnel-building below.

Wardd - if she can't afford steel ducting, I'm willing to bet she can't afford copper pipe either.  Different situation, different solution.

Careinke - thanks for the relevant project, I'd love to see it...
but that link takes me to _my_ facebook home page, maybe you can give it to us in a different format?  Or just paste a couple of pictures you like up on here.

SilenTaia - latest designs have some potential. 
Build this into north wall so you can put a substantial, non-flammable section of wall between the barrel and reaching above it and on both sides of the barrel for about 2-3 feet - don't attempt to drape plastic between flames and barrel.  The longer burn tunnel means it won't behave right unless you can also make the heat riser 2x as tall inside.

Building the tunnel: Can you lay bricks so they don't have air gaps?  Cob or earthen mortar?  Can you get rock, rubble, or used brick locally?  You can build a tunnel upward (two long walls with a skinny long roof), you just need something for the roof that can take a lot of weight, and that you can seal so it doesn't leak smoke into your space.

Simplest would be just send the hot gas straight under a seed bed and out the other side.  Don't worry about shutting off the heat.  Just make sure there is enough mass between seeds and flues to even out the temperature swings.  Heat penetrates cob/adobe/clay brick at about an inch an hour, would be a little faster for wet topsoil or concrete, a lot slower for dry sand.  So stack up 12-20 inches of brick, rubble, or fill dirt on top of the flue before you set the seedlings there, and you should get a nice steady warmth without burning their little roots.  And a no-bending-required seed bed.  And warm toes.

More earth or rock will also let you make a low-temperature exit from the far end.  You may have some of our favorite insulation on hand: perlite.  If not, sawdust and clay or straw and clay makes an OK insulation, even though it will rot pretty fast.

Where I live, used ducting can be bought as scrap metal, as long as it's not being used for its original purpose.  Illegal to re-sell used stovepipe as stovepipe.  But I realize some places even the scrap piles have been picked over.  Best way to explain it if you're calling junkyards is "forms for an art project, I'm making some big clay shapes," you want the shapes but don't care much about the quality of the material or seals.  (You make the seals by encasing it in cob or earth, so it really is a clay project).

I'd also suggest that if you want to be able to shut off the gas going under the garden bed, don't take the exhaust out of the barrel up high, it will be really hot and a pain to deal with.

Instead, make a loop of gas under garden bed, and an exhaust that goes out below the wall, near the stove but not where it can blow back at you or the fire.  You can add a chimney outside to get it up above head height if you like.

Put a bypass between them to shunt exhaust through loop, or allow it to take the quick escape route.
(Can rig one with 2 T- or Y-shaped ducting joints, or a cardboard box as a form for your earthen masonry; rig a hinged flap of flattened steel (coffee cans, sturdy wire or welding rod) so that it can close off the loop, or open it, but the exhaust can always reach the exit one way or the other. 

Hope that is helpful.  We did a greenhouse heater for a not-built-yet greenhouse with Paul, he may have video or pictures if you poke around his YouTube collection. -Erica Wisner
 
Clifford Reinke
Posts: 124
Location: Puget Sound
4
  • Mark post as helpful
  • send pies
    Number of slices to send:
    Optional 'thank-you' note:
  • Quote
  • Report post to moderator
Sorry about the face book link, I'm new to facebook and not sure why that did not work. If you look up Clifford Reinke on facebook I am pretty sure I am the only one.  If not my profile picture is my garden and chicken coop.

Here is my latest youtube video.


and here are the two time lapse videos showing the construction of the "Rocket and barrel" part of the construction.

http://www.youtube.com/watch?v=NtX0B00qIeA

http://www.youtube.com/watch?v=W3cs4uZpufc&feature=player_embedded

hope this helps.  I'll try to figure out how to post pics soon.
 
Erica Wisner
gardener
Posts: 1292
Location: Okanogan Highlands, Washington
397
4
hugelkultur cat dog books food preservation
  • Mark post as helpful
  • send pies
    Number of slices to send:
    Optional 'thank-you' note:
  • Quote
  • Report post to moderator

careinke wrote:
Sorry about the face book link, I'm new to facebook and not sure why that did not work. If you look up Clifford Reinke on facebook I am pretty sure I am the only one.  If not my profile picture is my garden and chicken coop.

Here is my latest youtube video.

http://www.youtube.com/watch?v=w5hNIvnZ51I

...hope this helps.  I'll try to figure out how to post pics soon.


Great, much easier to follow!
Looks like a highly functional project.  And I love your place with the spit and the chicken 'fort.'

You mentioned getting some blowback with an unusual wind direction - the chimney is in a corner that could be acting as a concentrator for that wind.  If the T alone doesn't work, you may get a better result just taking the exhaust up a couple feet above the roofline like a conventional chimney.  Then the wind will blow across equally, instead of pressurizing that corner. 
With your short bench you should have enough heat to draw well up the taller chimney, and you can include the T (or a fancy weathervane cap) on the taller version too.

Other thoughts - I like how you're working the cob gradually down to let it dry all together. 
Before you get to the far end, you might consider another cleanout at that 180 degree turn, if you don't have one already.  Not crucial since you can still get to that corner from both ends, by popping the external stovepipe - but could be handy down the road if you get a wad of half-burned newspaper well and truly jammed in the bend.  If it were convenient to put this second cleanout through the wall for easy access, you could also pop the cap when the wind is wrong and make sure your seedlings don't get smoked out.

Anybody got pics of making a pure masonry exhaust tunnel, like a hypocaust, for our original inquirer?

Thanks,
Erica
 
                      
Posts: 18
Location: TN
  • Mark post as helpful
  • send pies
    Number of slices to send:
    Optional 'thank-you' note:
  • Quote
  • Report post to moderator
Wow! Great videos! I subscribed to your channels careinke.

I thought if I had the main part outside, I could add wood to the pit without having to open the greenhouse door. Also, to prevent the whole smoke thing. My greenhouse will have animals in it--mammals, birds, fish, reptiles and pollinating insects. Oh, and a four-year old too! LOL

I think seeing your videos helped me to put Erica's advice into perspective

I think I've already figured out how to do the pipes now. Thanks for the inspiration and advice!

I cannot do copper pipes but that copper gave me a good jumping off place for hot water. Thank you for that Warrd!

I may scrap the sand idea Jami. Well see when I start building. I'm partial to sand because I'm from Florida, LOL.

I am working on an Ebook to add my finished projects and animal/plant care to, so I want to make sure to do this inexpensively and safely. The stove was a bit worrisome because I'm afraid of gas and runaway fire, lol.

Thank you all so much! I will be posting so many questions and ideas that you'll ban me from the forums!


Posts: 278
Location: Iowa, border of regions 5 and 6
  • Mark post as helpful
  • send pies
    Number of slices to send:
    Optional 'thank-you' note:
  • Quote
  • Report post to moderator

SilentTala wrote:

I thought if I had the main part outside, I could add wood to the pit without having to open the greenhouse door. Also, to prevent the whole smoke thing. My greenhouse will have animals in it--mammals, birds, fish, reptiles and pollinating insects. Oh, and a four-year old too! LOL


You might want to be careful how you plant your four-year old.  They're like pioneer trees -- if you're not careful soon they'll be overrunning the place.


Posts: 18
Location: TN
  • Mark post as helpful
  • send pies
    Number of slices to send:
    Optional 'thank-you' note:
  • Quote
  • Report post to moderator
LOL!
 
Erica Wisner
gardener
Posts: 1292
Location: Okanogan Highlands, Washington
397
4
hugelkultur cat dog books food preservation
  • Mark post as helpful
  • send pies
    Number of slices to send:
    Optional 'thank-you' note:
  • Quote
  • Report post to moderator

SilentTala wrote:
Thanks for the responses guys! I'll read back through them after work today. This is all helping me come up with a good plan before fall.


What about one of these?
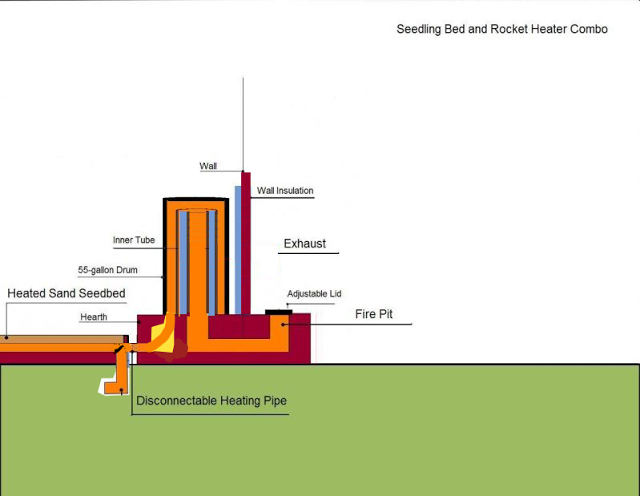


I just noticed one other thing on your images - you've drawn a heating path that comes right from the firebox itself, to under the garden beds.  That's likely to include some actual flames, and be smoky and not draw properly if you do it exactly as pictured.

The path you want, is the flames go up the 'mini-chimney' or heat riser inside the barrel, and then the barrel helps cool the exhaust a little bit to send it back downward.  From the base of the barrel, or below it, you can channel the clean exhaust under your benches.  It will be mostly steam and CO2 at that point, a nice warm thing instead of dirty flames.

Do be sure to check your dimensions with the Rocket Mass Heaters book, and built it as standard as you can.  You're already making a few changes with your long firebox to feed the fire from outside, you will want a tall heat riser, and stick with the rules for the rest of it.


This isn't to scale, but it shows a few of the ways I would make it more like the book.
 
Posts: 16
  • Mark post as helpful
  • send pies
    Number of slices to send:
    Optional 'thank-you' note:
  • Quote
  • Report post to moderator
I'm not entirely clear what purpose the heat riser serves. If no immediate heat is needed, why not just channel the flue gasses horizontally, from firebox/expansion chamber, through stove baffles/mass storage system for as long as it takes to extract the heat, and then vent out a chimney?

Draft can always be established at the firebox by inducing draft with a small amount of heat, through clean-out access, at the base of the chimney.
 
Posts: 18
1
  • Mark post as helpful
  • send pies
    Number of slices to send:
    Optional 'thank-you' note:
  • Quote
  • Report post to moderator
So what about using the stream and co2 to help raise the humidity and co2 levels in the greenhouse? Is there anything in the exhaust that could hurt the plants?
 
G. Karl Marcus
Posts: 16
  • Mark post as helpful
  • send pies
    Number of slices to send:
    Optional 'thank-you' note:
  • Quote
  • Report post to moderator
During initial start-up there will be a certain amount of unburned hydrocarbons, smoke, in the flue gas. As the fire progresses and firebox temperatures increase, the amount of unburned hydrocarbons will diminish to negligible. I believe there is always some CO present in the flue gas until the active burning phase is complete. Rule of thumb among the masonry stove builders has been to assume CO presence until the flame disappears and all you have left is glowing coals, at which point it is safe to close the damper at the stove/chimney juncture.
 
Posts: 1
10
2
  • Mark post as helpful
  • send pies
    Number of slices to send:
    Optional 'thank-you' note:
  • Quote
  • Report post to moderator
http://www.youtube.com/watch?feature=player_embedded&v=_DhCRUMxnNM

Thought this was a pretty good example of a greenhouse rocket stove build.

Sean
 
G. Karl Marcus
Posts: 16
  • Mark post as helpful
  • send pies
    Number of slices to send:
    Optional 'thank-you' note:
  • Quote
  • Report post to moderator
I would love to see some follow-up on this. Specifically, how critical is the immediate heat element to overall design function? Does the barrel overheat the air space? Is there too little mass storage being effectively charged?

Years ago I built an under-floor heater in Missoula. An article about it appeared in Fine Homebuilding magazine in the 80's. If you go to the link below, you can see a photo and drawing which, together, give a good idea of the lay-out. The system had about 40 feet of horizontal flue in five runs with four 180 degree bends, (ie. significant drag,) yet it drew and burned well. The masonry chimney, which stood in the corner of the room, was, in essence, the stove's "heat riser." I always felt, had the floor been supported by columns, rather than flue tunnels, the decreased inherent drag would have allowed for increase in overall stove size with no loss of efficiency or function.

http://www.finehomebuilding.com/how-to-articles/kang-masonry-stove.aspx?ac=ts&ra=fp
 
Posts: 3
  • Mark post as helpful
  • send pies
    Number of slices to send:
    Optional 'thank-you' note:
  • Quote
  • Report post to moderator
Awesome videos!

I am collecting materials for a polytunnel and rocket stove and have some q's.

In the Evan's and Jackson book they specify at least 1/8th and preferably 1/4 inch thick stove pipe as the main heat riser. In the vids i see regular flue pipe being used which is thinner. Is this ok to use as i have plenty laying around but am finding it hard to source thicker steel pipe...

Also i am wondering if we could vent the co2 and water vapour directly into greenhouse. I have seen a video where a commercial tomato farmer increased his yield by around 500% by recycling (from a methane digester) his co2 back into GH.

Cheers!
 
gardener
Posts: 791
Location: Tonasket washington
54
  • Mark post as helpful
  • send pies
    Number of slices to send:
    Optional 'thank-you' note:
  • Quote
  • Report post to moderator
Do not vent the results of combustion into your enclosed green house. You have to go in there as well. also some plants dont like even a little bit of smoke and the little bit of smoke you will get will kill the plants.

if you want to try to make a rocket stove with no heat riser and get it to function be my guest; please do it away from your friends and family and out side any enclosed spaces.


Barrel no radateee stove no workee! the barrel is part of the pump that allows you to push all that exhaust down and out of the little tube.

The duct is the inner lining of a three part heat riser. Duct, perlite and clay, duct; the duct will burn out and leave the perlite and clay as the heat riser. when we wrote the book we had several types of heat risers in development the thicker was to give us a little bit of thermal mass Its not really needed and pipe of that thickness is way costly.
 
G. Karl Marcus
Posts: 16
  • Mark post as helpful
  • send pies
    Number of slices to send:
    Optional 'thank-you' note:
  • Quote
  • Report post to moderator
The function of the steel drum and heat riser is purely for immediate heat, either as a space heater or for cooking. A good chimney placed at the end of masonry flue runs, with no heat riser post-firebox, will burn just fine. It won't boil a teapot, though, unless a special cook top is designed in. So, it's important to examine your needs. If you want the barrel for quick space heating and cooking, by all means, go for it. But if long term thermal storage, with slow release, is the goal, I would dispense with the heat riser and barrel. It's simply not necessary. Access to the chimney base will allow you to establish draft enough to light the main fire. Once it starts, you always have a positive draft. That was my experience.
 
Ernie Wisner
gardener
Posts: 791
Location: Tonasket washington
54
  • Mark post as helpful
  • send pies
    Number of slices to send:
    Optional 'thank-you' note:
  • Quote
  • Report post to moderator
Mr Marcus
I respectfully submit that there is no hypocaust stove anywhere that burns as clean as an RMH. The roman hypocaust and the twenty other flavors of hypocaust are to a one inefficient, wasteful and as polluting as an open fire, they either require a constant grade or a very high hot chimney. they do not reburn and they do not exhaust primarily steam and CO2. wood use is by the barrow load and the thought of a none creosote and CO producing burn is laughable. The barrel on an RMH is for the pump and reburn it is essential for the stove to function correctly and burn cleanly.
If you tried to put an 8 inch intake through an 8 inch pipe for 40 feet you had better have a 40 foot stack on your pipe cause thats the only way its going to work without forced air.
 
Bill Broon
Posts: 3
  • Mark post as helpful
  • send pies
    Number of slices to send:
    Optional 'thank-you' note:
  • Quote
  • Report post to moderator
The duct is the inner lining of a three part heat riser. Duct, perlite and clay, duct; the duct will burn out and leave the perlite and clay as the heat riser. when we wrote the book we had several types of heat risers in development the thicker was to give us a little bit of thermal mass Its not really needed and pipe of that thickness is way costly.

Awesome! So its making a mould and then it burns off. I likee very much! This gives me the motivation to get on this thing much faster. I have old bricks, ducting and plenty of hay (is this ok for cob?) and mud/soil/animal poo...

How weather proof would a standard rocket stove be? I can build the stove first and then the polytunnel around the stove. I expect heavy rain but no freezing conditions.

Thanks! Off to re-watch the videos again
 
Ernie Wisner
gardener
Posts: 791
Location: Tonasket washington
54
  • Likes 1
  • Mark post as helpful
  • send pies
    Number of slices to send:
    Optional 'thank-you' note:
  • Quote
  • Report post to moderator
While you can use hay in cob it's not recommended. hay still has nutrition for bugs to eat and small diggers will follow the bugs. this is why straw is recommended for cob. Rain is not good for cob however a cover like a tarp is fine for keeping the worst off your construction. Dung is a nice additive to cob and it makes a really good plaster A little linseed oil will make water resistant for a time but it still needs shelter. get your hoop house built as fast as you can after the stove is tested and the mass is put on.
 
Bill Broon
Posts: 3
  • Mark post as helpful
  • send pies
    Number of slices to send:
    Optional 'thank-you' note:
  • Quote
  • Report post to moderator
Yeah cool i can pick up a bale of straw.

So this clay n perlite bake... where might one find a bit more detailed info on this stage of the construction?

Also my site for the ploytunnel is on a bit of a slope. Would it be better for the ducting to run uphill from stove, downhill or better levelling off the ground first?

Thanks heaps sorry to hijack the thread for a wee bit
 
G. Karl Marcus
Posts: 16
  • Mark post as helpful
  • send pies
    Number of slices to send:
    Optional 'thank-you' note:
  • Quote
  • Report post to moderator
Ernie; The stove featured in the article found here: http://www.finehomebuilding.com/how-to-articles/kang-masonry-stove.aspx?ac=ts&ra=fp
was built by me in Missoula, Montana, in 1986. As you can see, the k'ang had a fairly large secondary burn chamber, about 40 feet of horizontal flue separated by firebrick walls and a cement block/clay liner, 8x12 chimney that stood in the corner of the room and was about 15 ft. in height. Flue runs were nine inches by approximately fifteen inches tall. Eventually, the firebox was fitted with an airtight steel door. As reported above, the stove burned vigorously, producing little smoke and no creosote. Primary and secondary pre-heated air was supplied through the door arrangement. Adding the door made the stove burn hotter and cleaner, as it offered control over excess air rushing through the system, and it allowed for some pre-heating of combustion air.

Cleanliness was never a problem, and it ate like a bird. One problem that did arise was perplexing. After a string of bad-air days, when the stove was cold, closing the door on a vigorously burning fire caused asphyxiation, and smoke problems. After repeated attempts, I finally reasoned that the bricks inside the stove, (probably 400 or so), were so cold they were absorbing all the heat from the flue gas before it got to the chimney. If the flue gas didn't rise up the chimney, fresh air would not be pulled in through the door frame. So, to solve the problem, I began burning the first fire after cold snaps with the door open. Problem solved.

Clean-out door at chimney-base offers a simple way to remedy any back-draft problems. If the stove is cold, a small wad of newspaper, or a weed burner, will easily and quickly reverse the flow. Typically what came up the chimney was clean, moist exhaust cool enough to put your face in, and a little fly ash.
 
Posts: 247
Location: Sierra Nevada mountain valley CA, & Nevada high desert
4
  • Mark post as helpful
  • send pies
    Number of slices to send:
    Optional 'thank-you' note:
  • Quote
  • Report post to moderator
I was about to start a thread RE: Greenhouse RMH and here it is. I hope you'll post what you do or have done in this area. We are planing a greenhouse at a place where there is less snow then up here, a RMH would, I think do well there. We will be watching you progress.
 
Erica Wisner
gardener
Posts: 1292
Location: Okanogan Highlands, Washington
397
4
hugelkultur cat dog books food preservation
  • Mark post as helpful
  • send pies
    Number of slices to send:
    Optional 'thank-you' note:
  • Quote
  • Report post to moderator

G. Karl Marcus wrote:Ernie; The stove featured in the article found here: http://www.finehomebuilding.com/how-to-articles/kang-masonry-stove.aspx?ac=ts&ra=fp
was built by me in Missoula, Montana, in 1986. As you can see, the k'ang had a fairly large secondary burn chamber, about 40 feet of horizontal flue separated by firebrick walls and a cement block/clay liner, 8x12 chimney that stood in the corner of the room and was about 15 ft. in height. Flue runs were nine inches by approximately fifteen inches tall. Eventually, the firebox was fitted with an airtight steel door. As reported above, the stove burned vigorously, producing little smoke and no creosote. Primary and secondary pre-heated air was supplied through the door arrangement. Adding the door made the stove burn hotter and cleaner, as it offered control over excess air rushing through the system, and it allowed for some pre-heating of combustion air.

Cleanliness was never a problem, and it ate like a bird. One problem that did arise was perplexing. After a string of bad-air days, when the stove was cold, closing the door on a vigorously burning fire caused asphyxiation, and smoke problems. After repeated attempts, I finally reasoned that the bricks inside the stove, (probably 400 or so), were so cold they were absorbing all the heat from the flue gas before it got to the chimney. If the flue gas didn't rise up the chimney, fresh air would not be pulled in through the door frame. So, to solve the problem, I began burning the first fire after cold snaps with the door open. Problem solved.

Clean-out door at chimney-base offers a simple way to remedy any back-draft problems. If the stove is cold, a small wad of newspaper, or a weed burner, will easily and quickly reverse the flow. Typically what came up the chimney was clean, moist exhaust cool enough to put your face in, and a little fly ash.


I was about to respond to an earlier post you made about the chimney-vs-heat-riser idea, then read through the rest. As you may be able to tell from Ernie's comment, we have not seen any masonry heaters (hypocaust or chimney-channel) that can burn as clean as a good rocket-mass-heater. It sounds like yours worked quite well. Is it still in operation?

G. Karl Marcus wrote:I'm not entirely clear what purpose the heat riser serves. If no immediate heat is needed, why not just channel the flue gasses horizontally, from firebox/expansion chamber, through stove baffles/mass storage system for as long as it takes to extract the heat, and then vent out a chimney?

Draft can always be established at the firebox by inducing draft with a small amount of heat, through clean-out access, at the base of the chimney.


It's important to notice that many of the assertions we make about Rocket Mass Heaters do not apply to any other wood-fired device.
Even the easily-confused Rocket Stove (cooking rocket) or the idea of a Rocket Water Heater, or Rocket Masonry Heater made with concrete. The clean burn and minimal environmental impact are a just-so combination of earthen materials, J-shaped fire box, and principles derived from experience to make these systems DIY-buildable by a novice with no previous masonry experience.

Your under-floor heater (Kang stove) would operate by a different set of proportions and principles. Access to historic successful designs, or principles, and proper materials, would be needed to get the kind of performance you describe. I would love to learn more about these traditional Chinese designs, and what are the limits of proportion, size, and cleanliness of burn. I'd also love to know if you are aware of any other traditional hypocaust or 'house-stoves' in other parts of the world. The European ones are basically a fancy, convoluted vertical chimney, and the load requirements to add a vertical masonry column in an existing structure are costly. It sounds like the Kang still needs a tall chimney, and high floor temperatures, so the materials for it might be costly too. Can they be made of adobe? How are the channels cleaned and sealed?

Ernie and I speak to what we know, which is the Rocket version, designed to be DIY-buildable without firebrick, refractory materials, or other expensive parts. The original question on this forum was about a very low-cost greenhouse heater, can't afford ducts even.

So with respect to rocket mass heaters only:

Regarding the heat riser, and why you can't eliminate or replace it with just horizontal tubing:

1) In a RMH, the heat riser is the insulated, high-temperature chimney that gives draft for the entire system.

2) Not every RMH even includes a chimney somewhere downstream. To replace the heat riser, such a chimney would need to be both tall and insulated, to maintain high temperatures. High temperatures in a distant chimney constitute a significant heat loss, one which must be made up with extra fuel.

3) The farther the vertical chimney is from the flame path, the cooler it is. Draft is roughly proportional to temperature x height. No matter how tall your cold vertical chimney is, it will have trouble out-drafting a hot fuel feed or the hot lip of a firebox near the flames themselves. The vertical, self-feeding wood feed on the J-tube RMH smokes like a devil if you move the heat riser farther away.

4) The RMH is designed to self-regulate a good balance of fuel and air for combustion. Systems that are struggling to pull smoke and flame through a long horizontal path to a distant chimney must have arbitrarily-enhanced draft, e.g. a super-tall chimney, electric fans, etc. This often causes imbalances between fuel and air, and results in a dirtier fire.

5) You need clean fire to safely run a heat-exchanger through relatively cold channels or ducts.
Running smoke through cold pipes will condense creosote, creating potential for deadly chimney fires. Pipes in a damp greenhouse bed are likely to be much cooler than a conventional chimney which must be at least 350 degrees F.
How hot do the hypocaust channels need to be, to prevent creosote buildup? Is there an insulated section to ensure complete combustion in the initial burn? How do you regulate heat distribution throughout the floor?
RMH's get away with chimney temperatures that would be deadly accidents waiting to happen on a woodstove or furnace, because the exhaust is clean and not smoky. It also helps in both cases that the exhaust is buried under a lot of earth, making it hard for a creosote fire to do much harm, even if one should occur.

6) Priming a chimney is not an acceptable way to run an RMH heater; it is only a crutch for cold starts, and even then there are better options.
The best is to design a decently-drafting system in the first place. Both the priming fire, and the artificially-drafted and struggling main fire, can deposit smoke as creosote in the channels. We 'prime' our cold-starts at the heat riser itself, cleanly and conveniently for an indoor heater, by placing a small candle under the heat riser and using it to check for draft until proper flow has been established. We also have built a "bypass" which allows the clean exhaust to exit the bell directly into a vertical chimney, priming the chimney, before the user diverts the flow to a heat-exchange loop to warm the cold thermal mass.

I'm hammering this point about RMH design, and asking for more info, at the same time.
I recognize that this may strike you as rude. It probably is.

But part of our role here, self-appointed to be sure, is to help people recognize that each masonry heater or combustion device has a carefully-worked-out balance of draft and heat-exchange features.
Mixing and matching is a good way to cripple the success of your first project. Thorough testing is the only way to determine whether a mixed (hybrid) system will operate successfully and give you the features you want from each. Each ancient and modern design has a certain range of performance that is known to work from experience, and a certain range of things that are known not to work, based on experience or principles. Moving the heat riser or initial chimney farther from the flame, in a bell-stove or rocket mass heater, is known not to work well from experience.

It sounds like there is an alternative that you know, from experience, can be done in a different way.

If someone can't afford ducting, they probably can't afford new greenhouse plastic or seed starts if the stove burns out their seedlings, either.
Bringing new ideas into the discussion is handy for those of us who like to tinker.
So I stomp out the distinctions to try to reduce the learning curve for people who are about to build something, with weird and impractical features, that show they still find the whole thing incomprehensible.

Do you have a straightforward diagram for a Kang-type mass heater, showing the proportions for chimney and length (and temperature) of burn tunnel?
Showing how it is different from a rocket mass heater, and how to make this type of furnace for those who want to experiment, could be useful.
We might want to start a separate thread, "Ancient Secrets Revealed: Paul almost reinvented a Chinese Kang stove before Ernie and Erica led him astray."

Or just post it on Paul's original butt-warming thread, where the design sketches started with a long horizontal bench before the chimney.


I hope my use of italics to distinguish the Kang 'heresy' from Rocket Mass Heater gospel didn't irritate too many people.

Thanks,

-Erica
 
Erica Wisner
gardener
Posts: 1292
Location: Okanogan Highlands, Washington
397
4
hugelkultur cat dog books food preservation
  • Mark post as helpful
  • send pies
    Number of slices to send:
    Optional 'thank-you' note:
  • Quote
  • Report post to moderator
I lost track of who originally posted it, but thank you.

This is an AWESOME first project video of someone's RMH in a dome greenhouse.
http://youtu.be/_DhCRUMxnNM


Very clear, nice pace, easy to see what he's doing.
There are a couple of deviations from our recommended RMH procedure, but he lets you know when he's improvising. Some of the improv is simply brilliant - it's all been done before I think, but he combines some of the best ideas and manages to escape the worst. Drainage and a wind-blocking T for the exit flu, double-height heat riser. He uses Paul's favorite thermal mass (sand) and simplified chimney-to-firebox design. Ernie and I have recently come to favor exactly the same double-barrel setup with band clamp, and he also uses one of the barrel tops to improvise a non-combustible thimble (escutcheon?) for the exit through the dome wall.
The only thing I haven't seen before, and wouldn't try myself, is mineral wool insulation in the heat riser. It has coatings that may offgas even before the mineral fibers themselves start to melt, and the thin-walled heat riser may not stay intact long to protect it. But he acknowledges this as an experiment.

And he includes an animated diagram at the end to sum it all up.

Go pat the guy on the back.

I think we'd better get one of our greenhouse designs out on the market before somebody does a better one
But of course, I couldn't publish without double-checking that our previously-built designs also work in this climate.
And if I build myself a heated greenhouse with all kinds of greenery deliciousness to hang out in next winter, I won't be sitting here on the computer bantering with you all and peddling my expertise.

-Erica
 
Erica Wisner
gardener
Posts: 1292
Location: Okanogan Highlands, Washington
397
4
hugelkultur cat dog books food preservation
  • Mark post as helpful
  • send pies
    Number of slices to send:
    Optional 'thank-you' note:
  • Quote
  • Report post to moderator

G. Karl Marcus wrote:Ernie; The stove featured in the article found here: http://www.finehomebuilding.com/how-to-articles/kang-masonry-stove.aspx?ac=ts&ra=fp
was built by me in Missoula, Montana, in 1986. As you can see, the k'ang had a fairly large secondary burn chamber, about 40 feet of horizontal flue separated by firebrick walls and a cement block/clay liner, 8x12 chimney that stood in the corner of the room and was about 15 ft. in height. Flue runs were nine inches by approximately fifteen inches tall. Eventually, the firebox was fitted with an airtight steel door. As reported above, the stove burned vigorously, producing little smoke and no creosote. Primary and secondary pre-heated air was supplied through the door arrangement. Adding the door made the stove burn hotter and cleaner, as it offered control over excess air rushing through the system, and it allowed for some pre-heating of combustion air.

Cleanliness was never a problem, and it ate like a bird. One problem that did arise was perplexing. After a string of bad-air days, when the stove was cold, closing the door on a vigorously burning fire caused asphyxiation, and smoke problems. After repeated attempts, I finally reasoned that the bricks inside the stove, (probably 400 or so), were so cold they were absorbing all the heat from the flue gas before it got to the chimney. If the flue gas didn't rise up the chimney, fresh air would not be pulled in through the door frame. So, to solve the problem, I began burning the first fire after cold snaps with the door open. Problem solved.

Clean-out door at chimney-base offers a simple way to remedy any back-draft problems. If the stove is cold, a small wad of newspaper, or a weed burner, will easily and quickly reverse the flow. Typically what came up the chimney was clean, moist exhaust cool enough to put your face in, and a little fly ash.


That's a gorgeous project, by the way. Would love to see more pictures or reference materials - I can't imagine the article will cover the questions I'll have.

-EKW
 
Posts: 32
Location: De Pinte, Belgium
  • Mark post as helpful
  • send pies
    Number of slices to send:
    Optional 'thank-you' note:
  • Quote
  • Report post to moderator
I have an idea for a rocket stove for an aquaponics greenhouse which I would like you all to criticise with your expertise:
as water is the best medium for stocking heat,
and as heat transfer to water is very fast and efficient
and as when the sun is out, it easily gets too hot in a greenhouse,

I would suggest not heating the air at all, but heating only and directly the water
which can then slowly transfer it's heat to the air

there are many advantages to this option:
having a carefully adjustable mass is only one of them
heating the fish water to the right temperature for the fish,
warming the growbeds,
buffering solar heat in the same system,
better conservation of an even temperature in the greenhouse during day and night,
... etc ...

If I have understood anything at all from rocket mass heaters,
the most important part is the heat riser,
which must be insulated in order to create adequate draft for optimal combustion
and that the complex "chimney" must always keep the same section

As I do not wish to heat the air,
I think I can completely eliminate the barrel,
which leads to enormous simplification:
gain in width and in weight of the construction:
a truly portable rocket mass heater
you can easily separate the heating part from the buffering part
which is water and can be drained and easily replaced
building an open top water pressureless tank (to avoid any possible steam hazards)
is cheap and easy

as my heat exchanger is in contact with the fish and plant water,
I would opt for stainless steel for both rocket heater and heat exchanger:
off the shelve, not difficult to cut and weld (TIG)

for insulation, I would pick semi-hard rockwool plates (easy to cut to size)

find attached the complete Sketchup 3D drawing
click on the scene tabs on top of the main window to see the upbuild
or click on view, animation, play

for those of you who are not yet familiar with Sketchup:
just download it, it's free, and very intuitive

Frank
Filename: rocket-stove.skp
File size: 471 Kbytes
 
gardener
Posts: 1054
Location: +52° 1' 47.40", +4° 22' 57.80"
447
woodworking rocket stoves wood heat
  • Mark post as helpful
  • send pies
    Number of slices to send:
    Optional 'thank-you' note:
  • Quote
  • Report post to moderator
@Frank,
If you don't mind me criticising your sketch: you're missing one very important point. There ought to be a profound temperature difference between riser and downer. Downer normally being the barrel, dissipating lots of heat. In your design, both riser and downer are the same size and insulated. As such, this stove won't start at all without a primer fire under the chimney stack. And when it do start, as soon as the temperature equalize between riser and downer the draft will stop.

Another point, less important: rockwool can't withstand the heat of a rocket stove, the binder will burn away.
Been there, done that.
 
Frank De Block-Burij
Posts: 32
Location: De Pinte, Belgium
  • Mark post as helpful
  • send pies
    Number of slices to send:
    Optional 'thank-you' note:
  • Quote
  • Report post to moderator
thank you, Peter,

it is indeed positive criticism that I seek
and yours turns out to be extremely helpful
so don't apologise !

strange:
from what I find, rockwool is resistant to 1100° C
I understand it is not the rockwool, but the binber that deteriorates

but since your experience with rockwool is one of "been there, done that",
I will replace the rockwool insulation with the recommended perlite or vermiculite
apparently these can be bonded with sodium silicate (liquid glass)
so maybe I can make my own boards

next there is the question of downer temperature:
I seem to have seen other designs where the downer was insulated

but I will still heed your warning,
as I understand how the insulated riser creates updraft
and how cooling down the gases in the downer would in it's turn create downdraft
both combined improving draft, thus adequate oxygen supply for the fire

I guess I could easily expose the downer and leave it at that,
to make me some tea )
but I would like to stick with trying to get as much energy as possible into the water

so I have worked hard at changing my design:
I added one IBC tank (there may be more), just to show that mass can be adjusted,
(tube section should probably be larger for thermosyphon, which avoids a pump

I rotated the rocket stove 90° to the heat exchanger,
for better, sideways access and wood filling,

I lowered the burning chamber and channel, which were too high anyway,
and I heightened the water tank

the nice result is that I can make this rocket watermass heater even more compact
and still have more contact surface with the water for the heat exchanger

much less sideways pressure, in spite of the heightened water column,
made the water tank much more compact,
which allowed me to reduce the housing from 22 to 12 mm thick
only the back wall might need optional strengthening, I suggest not

see attached my new drawings

Frank
PS the ash cleanout would be at the top of the downer (heat exchanger)
made that more clear
Filename: rocket-mass-water-heater.skp
File size: 2 megabytes
 
Peter van den Berg
gardener
Posts: 1054
Location: +52° 1' 47.40", +4° 22' 57.80"
447
woodworking rocket stoves wood heat
  • Mark post as helpful
  • send pies
    Number of slices to send:
    Optional 'thank-you' note:
  • Quote
  • Report post to moderator

Frank De Block-Burij wrote:I will replace the rockwool insulation with the recommended perlite or vermiculite apparently these can be bonded with sodium silicate (liquid glass) so maybe I can make my own boards


When you use the insulation as a loose dry fill, vermiculite is OK. When you intend to use clay slip or water glass, take perlite. This won't take up as much liquid as vermiculite. Reducing the trouble of getting rid of all that moist.

Frank De Block-Burij wrote:next there is the question of downer temperature: I seem to have seen other designs where the downer was insulated


Could be, but it's utterly wrong. Mind you, a lot of people are very happy when their stove is burning, at all.

Your concept of the draft generator is a bit too complex. Try to see it as a thermosyphon system, much like old central heating installations without a pump and wide pipes. When one side is heated, the other side will come down. Hydrodynamics and aerodynamics do share common laws, it's largely just a different medium.

The sketch do show a 4x4 inch system, a bit too cramped for a stove that need to heat lots of water. Go for a 6" square instead, the riser etc could be the same length as you've drawn.
 
Frank De Block-Burij
Posts: 32
Location: De Pinte, Belgium
  • Mark post as helpful
  • send pies
    Number of slices to send:
    Optional 'thank-you' note:
  • Quote
  • Report post to moderator
Brooks Miller wrote me this on another tread in this forum:
hi frank - thats awesome - looks like you've spent some time with sketchup!

i have a few questions/critiques.

my only immediate concerns with putting the pipe directly into the water would be water tight welds/unions, loss of volume (space for fish to live in considering size of an aquaponics greenhouse), and how you would control the heat.

my idea with heating a tank of water and then moving it was because you'd be able to put the circulation loop in the pond on a thermostat so you don't go overboard on heat....but maybe you kinda can't go overboard?? i think the cool part to me about heating the water is that then whe you use water to irrigte, you're irrigating and spreading that heat out into the whole greenhouse more evenly.

questions:
1. how hard is it to cut rock wool plates, where do you get them, and how good are they at insulating?
2. whats up with leaving the top of the first piece of the heat exchanger uninsulated?
3. how would you make the stainless below the surface watertight? do you have access to a TIG welder onsite? what size pipe wall?
4. are the pipes in the bottom of the water representing your irrigation pipes?

looks great, and thanks for sharing.

answers:
1. cutting rockwool plates to measure is very easy with a simple cutter knife, but see the remarks above about rockwool
2. nothing really, except that this would lose heat to the air that I want in the water
later this heat can migrate to the air
3. basic Tig welding is really easy, it resembles simple lead soldering very much, I could teach you in an hour, but you need (at least to borrow) the equipment
perfect TIG welding asks for lots of practice, but as we are talking completely pressureless, anybody with this basic skill can do it in order to be watertight if the cuts are precise and everything fits well
I have much simplified the welds in my latest drawing (attached)
4. no, they are the in- and out connections to more water mass, a thermostatically regulated circulator pump might be needed, but I guess not
from there, such a pump is advisable to get the fish water to the exact temperature

having some pc problems, probably minor, but need to restart, will post the new drawings later
done, am adding the drawing now

Frank
Filename: rocket-mass-water-heater.skp
File size: 2 megabytes
 
Frank De Block-Burij
Posts: 32
Location: De Pinte, Belgium
  • Mark post as helpful
  • send pies
    Number of slices to send:
    Optional 'thank-you' note:
  • Quote
  • Report post to moderator

Peter Berg wrote:

Frank De Block-Burij wrote:I will replace the rockwool insulation with the recommended perlite or vermiculite apparently these can be bonded with sodium silicate (liquid glass) so maybe I can make my own boards


When you use the insulation as a loose dry fill, vermiculite is OK. When you intend to use clay slip or water glass, take perlite. This won't take up as much liquid as vermiculite. Reducing the trouble of getting rid of all that moist.

Frank De Block-Burij wrote:next there is the question of downer temperature: I seem to have seen other designs where the downer was insulated


Could be, but it's utterly wrong. Mind you, a lot of people are very happy when their stove is burning, at all.


with the new setup, I guess I could and will use dry fill vermiculite, which I prefer to perlite
tipping the whole contraption on the other side than shown in the drawing for filling in the insulation should make this simple

Peter Berg wrote:

Frank De Block-Burij wrote:Your concept of the draft generator is a bit too complex. Try to see it as a thermosyphon system, much like old central heating installations without a pump and wide pipes. When one side is heated, the other side will come down. Hydrodynamics and aerodynamics do share common laws, it's largely just a different medium.


I would have thought my setup to be extremely simple, so please explain

Peter Berg wrote:

Frank De Block-Burij wrote:The sketch do show a 4x4 inch system, a bit too cramped for a stove that need to heat lots of water. Go for a 6" square instead, the riser etc could be the same length as you've drawn.


100 x 100 mm is what I happen to have in stock
besides, my temporary greenhouse will be small
and I am breeding burbot, a cold water species
so I only need to heat up the water to max 18°C or even much less in winter
Frank

 
Something about .... going for a swim. With this tiny ad ...
Rocket Mass Heater Jamboree And Updates
https://permies.com/t/170234/Rocket-Mass-Heater-Jamboree-Updates
reply
    Bookmark Topic Watch Topic
  • New Topic