• Post Reply Bookmark Topic Watch Topic
  • New Topic
permaculture forums growies critters building homesteading energy monies kitchen purity ungarbage community wilderness fiber arts art permaculture artisans regional education skip experiences global resources cider press projects digital market permies.com pie forums private forums all forums
this forum made possible by our volunteer staff, including ...
master stewards:
  • Nancy Reading
  • Carla Burke
  • r ranson
  • John F Dean
  • paul wheaton
  • Pearl Sutton
stewards:
  • Jay Angler
  • Liv Smith
  • Leigh Tate
master gardeners:
  • Christopher Weeks
  • Timothy Norton
gardeners:
  • thomas rubino
  • Jeremy VanGelder
  • Maieshe Ljin

I did it! I finally have a pond that is sealed with clay

 
Sheri Menelli
pollinator
Posts: 166
16
  • Likes 2
  • Mark post as helpful
  • send pies
    Number of slices to send:
    Optional 'thank-you' note:
  • Quote
  • Report post to moderator
I'm so excited. I wanted to share. Maybe my success will inspire others to try
building a small pond in their backyard.

Last week I dug out a pond. It was going to be about 5 x 7 feet. I just wanted
something to relax around, have a few fish that I could eat on occasion and
attract a lot of wild life. (I figured that it my suck the kids away from computer or tv!)

I dug it but I was really unsure what to do next.

I had met Jacob Hatch before but saw him recently at Finch Gardens in Fallbrook, CA.
He had helped make a really large pond for them a few years ago and it was amazing.
Jacob has has a lot of experience with ponds and also with doing it without a liner so,
I decided to host a workshop at my house in Carlsbad, CA. and have him teach it.
We called "How to Build a Small Backyard Pond"

Although we only advertised it on the meetups on Sunday, I was able to get 10 more people to come.

Under the mulch and old grass, it is almost pure clay.

It was really easy to seal it.

Basically remove all dark good soil even a few feet from the edges. Put clay around that area. Tamp it down
and start filling up the pond. Then plant lots of water loving plants around the edges, in the middle or throw
the ones that float in the water.

Got to run but I can explain more if any one is interested and post pictures.

 
Dale Hodgins
Posts: 9002
Location: Victoria British Columbia-Canada
707
  • Mark post as helpful
  • send pies
    Number of slices to send:
    Optional 'thank-you' note:
  • Quote
  • Report post to moderator
Yes, post pictures. My mix of gravel and rock flour is not at all suitable for a pond. I'm seeking clay from excavation companies.
 
Rebecca Norman
gardener
Posts: 2514
Location: Ladakh, Indian Himalayas at 10,500 feet, zone 5
838
trees food preservation solar greening the desert
  • Mark post as helpful
  • send pies
    Number of slices to send:
    Optional 'thank-you' note:
  • Quote
  • Report post to moderator
Would clay work as a sealer on an irrigation pond? Being an irrigation pond, it will be emptied regularly and may sit empty for days before being filled again. Would clay shrink and crack and lose its sealing properties? In this case, what might work?
 
Myron Weber
Posts: 72
Location: Orange County, CA, USA
2
2
  • Mark post as helpful
  • send pies
    Number of slices to send:
    Optional 'thank-you' note:
  • Quote
  • Report post to moderator
Go Sheri! Thanks for posting, and I'd love more details. I'll be getting started on my pond within the next couple weeks if all goes well, so I'd love to learn from your experience.
 
Sheri Menelli
pollinator
Posts: 166
16
  • Mark post as helpful
  • send pies
    Number of slices to send:
    Optional 'thank-you' note:
  • Quote
  • Report post to moderator
Myron, You are welcome to come down and take a look at mine if you'd like. I know you aren't too far away (call me at 760-522-2829

Rebecca, I am not experienced enough to really say for sure but I suspect that you can do that for an irrigation pond. Jacob mentioned that one of
the reasons you need to have clay on the banks and throughout is because if you use another material you'll have problems when it expands and contracts.

The clay reminds me of when I've done pottery. It really seals the surface. I now see that really what I created was a bowl of water. The clay really holds water!
 
Lorenzo Costa
steward
Posts: 809
Location: Italy, Siena, Gaiole in Chianti zone 9
226
3
forest garden trees books woodworking
  • Mark post as helpful
  • send pies
    Number of slices to send:
    Optional 'thank-you' note:
  • Quote
  • Report post to moderator
hi yeah post some pictures I'm interested too in small pond excavating. going to have to start sooner or later.
waiting to hear more about your story, congrats!!!
 
Sheri Menelli
pollinator
Posts: 166
16
  • Likes 1
  • Mark post as helpful
  • send pies
    Number of slices to send:
    Optional 'thank-you' note:
  • Quote
  • Report post to moderator
Sheri's Pond before Picture:

Here is Jacob discussing something but you can see the pond in the background. I had taken mostly video until I ran out of space on my phone.

I think some of the other participants have pictures to share and I'll post those

(I think the file is attached here).

I had started this project on my own. I dug out a 5 x 7 foot area. Once I got past the top layer (which I put aside to use in my garden), it was all clay.

When Jacob got here, he said we needed to make it bigger (because when it was done it would be smaller).

More to come.
photo(73).JPG
[Thumbnail for photo(73).JPG]
Jacob Hatch - Pond Workshop Sept 2, 2014
 
Sheri Menelli
pollinator
Posts: 166
16
  • Mark post as helpful
  • send pies
    Number of slices to send:
    Optional 'thank-you' note:
  • Quote
  • Report post to moderator
Pictures from day 2.

photo-1(2).JPG
[Thumbnail for photo-1(2).JPG]
photo-2(2).JPG
[Thumbnail for photo-2(2).JPG]
photo-3(1).JPG
[Thumbnail for photo-3(1).JPG]
 
Sheri Menelli
pollinator
Posts: 166
16
  • Mark post as helpful
  • send pies
    Number of slices to send:
    Optional 'thank-you' note:
  • Quote
  • Report post to moderator
It was very easy to seal.

We put clay along the banks and tamped it down.

We took the clay that was on the bottom, filled pond with a bit of water and smeared the clayey water up along the sides. Since I'm almost 100% clay, it is pretty easy.

If you don't have clay and can find someone who does, you could take a few buckets of it, add water and use that. Doesn't take too much clay for a pond this size.

 
Adam Moore
Posts: 125
Location: Mansfield, Ohio Zone 5b percip 44"
3
3
  • Mark post as helpful
  • send pies
    Number of slices to send:
    Optional 'thank-you' note:
  • Quote
  • Report post to moderator
Great pictures Sheri. I have been thinking about trying this after finding out I had a corner in my yard that was clayish with lots of standing water. I think I'm going to go for it this month. Thanks for the inspiration.
 
Levente Andras
pollinator
Posts: 239
Location: Le Marche, Central Italy
27
  • Mark post as helpful
  • send pies
    Number of slices to send:
    Optional 'thank-you' note:
  • Quote
  • Report post to moderator
I built a clay-lined pond that looks almost exactly like yours in size and shape. However, I can't say it was a success.

Our subsoil is very permeable - lots of stones and pebbles; when digging the pondI tried to remove the bigger stones that protruded from the bottom and sides, but of course the results were not very satisfactory (there were more stones underneath). My wife said I was mad to try to make a pond in a soil like this using any other method than the plastic liner - but I'm obstinate so I stuck to my plan.

After I dug the pond I poured in some water and tamped down the bottom and sides. Then threw in lots of dry clay (I have pure clay from earthworks done on another property of ours) and mixed it with the mud and continued to tamp it down. Then applied a "mortar" (a thick paste obtained by mixing the clay with water) as thickly as I could on the entire surface, placing a thicker layer on the bottom. I estimate the thickness of the lining itself varied between 3 and 6 centimetres.

Obviously it wasn't thick enough - I filled the pond, and after as little as 24 hours, there was already a visible loss of a few centimetres of water. After 4 days the volume fell to 1/2. But as days passed, the bottom 1.5 feet of the pond kept holding water. So I thought all I had to do was re-treat the sides (it turned out I was wrong - the bottom held water better because the pressure fell as the water depth diminished). I applied another layer of "mortar" on the sides, and refilled the pond. No significant change - the pond still leaked at about the same rate as before.

At that point I realised that I also had to re-treat the bottom - so I said to myself, OK, let's wait for the water to seep away so we can then re-do the lining of the whole pond... And at that moment there came a full month of heavy rain. With the pond half-empty and the sides mostly exposed, the rain pounded the clay lining and washed it down onto the bottom of the pond...! So I now had a half-empty pond with a muddy sludge on the bottom, and the lining on the sides significantly weakened.

After the rains I removed all the water / sludge, and reapplied the clay lining. In order to protect the clay lining from another wash-out, after it dried out a little I added a thin layer of sand on top of it, and covered the whole area with flat stones. This has definitely worked in that the rain doesn't wash out the clay any more and the water is crystal clear. However... the pond still leaks (though not as much as before). The clay lining is still not thick enough to compensate for the porousness of the subsoil. I guess it will stay a kind of "seasonal pond", with more constant water levels during wet periods

With hindsight, if I were to do it again, I would dig deeper, wet and tamp down the sides harder, apply a layer of clay followed by a thick layer of overlapped newspaper followed by another layer of clay. Then immediately throw a thin layer of sand on top and finally flat stones for stabilisation / protection from rain.


Sheri Menelli
pollinator
Posts: 166
16
  • Mark post as helpful
  • send pies
    Number of slices to send:
    Optional 'thank-you' note:
  • Quote
  • Report post to moderator
Pond Update:

Pond planted September 1, 2014

These pictures were taken today, September 4, 2014 - day 3

Planning on taking pictures daily to see how it changes over the next few weeks

pondDay3Sept4-2014-up-close.JPG
[Thumbnail for pondDay3Sept4-2014-up-close.JPG]
PondDay3Sept42014.JPG
[Thumbnail for PondDay3Sept42014.JPG]
 
Victor Johanson
Posts: 425
Location: Fairbanks, Alaska
48
  • Mark post as helpful
  • send pies
    Number of slices to send:
    Optional 'thank-you' note:
  • Quote
  • Report post to moderator

Levente Andras wrote:I estimate the thickness of the lining itself varied between 3 and 6 centimetres...The clay lining is still not thick enough to compensate for the porousness of the subsoil. I guess it will stay a kind of "seasonal pond", with more constant water levels during wet periods


From what I've read online about sealing with clay, the appropriate thickness is six to twelve inches, and the clay should be "puddled"-- basically stomped down until all the air is squeezed out. This technique has been used in the past to seal canals (in that case the bottom layer was made about three feet thick), and is somewhat different from the typical sodium bentonite clay seal. It's pretty material and labor intensive.
 
Levente Andras
pollinator
Posts: 239
Location: Le Marche, Central Italy
27
  • Mark post as helpful
  • send pies
    Number of slices to send:
    Optional 'thank-you' note:
  • Quote
  • Report post to moderator

Victor Johanson wrote:

Levente Andras wrote:I estimate the thickness of the lining itself varied between 3 and 6 centimetres...The clay lining is still not thick enough to compensate for the porousness of the subsoil. I guess it will stay a kind of "seasonal pond", with more constant water levels during wet periods


From what I've read online about sealing with clay, the appropriate thickness is six to twelve inches, and the clay should be "puddled"-- basically stomped down until all the air is squeezed out. This technique has been used in the past to seal canals (in that case the bottom layer was made about three feet thick), and is somewhat different from the typical sodium bentonite clay seal. It's pretty material and labor intensive.


I'm aware of the recommendation of 6...12 inches, but the way I read it, I think it was with reference to much, much larger & deeper ponds (I may be wrong). The rate of seepage will be dependent on the depth of the pond.

Mine was an experiment - and besides I only had that much material (clay) and that much time to dig (thicker layer of clay = need for deeper pond = more digging)
 
Sheri Menelli
pollinator
Posts: 166
16
  • Mark post as helpful
  • send pies
    Number of slices to send:
    Optional 'thank-you' note:
  • Quote
  • Report post to moderator
Day 4 of the pond

I swear of few of these plants look bigger now.

You'll notice the water level is really low. We found a few irrigation pipes in the yard and
we were going to move them. Then we discovered one is larger, for a drain so we decided not
to do anything about it. I think the water is leaking into that area now.

I'll talk to Jacob soon to figure out what to do about it.

photo-1-2.JPG
[Thumbnail for photo-1-2.JPG]
photo-2(3).JPG
[Thumbnail for photo-2(3).JPG]
 
Victor Johanson
Posts: 425
Location: Fairbanks, Alaska
48
  • Mark post as helpful
  • send pies
    Number of slices to send:
    Optional 'thank-you' note:
  • Quote
  • Report post to moderator

Levente Andras wrote:I'm aware of the recommendation of 6...12 inches, but the way I read it, I think it was with reference to much, much larger & deeper ponds (I may be wrong). The rate of seepage will be dependent on the depth of the pond.
Mine was an experiment - and besides I only had that much material (clay) and that much time to dig (thicker layer of clay = need for deeper pond = more digging)


Experimentation is good--conventional wisdom is often wrong. I think most of the stuff I've seen on puddled clay sealing had to do with canals. I've also seen reference online to sealing with clay via the process of colmation, or the "Brazil nut effect," where soil pores are progressively clogged by smaller and smaller particles until the water can't penetrate anymore. I think that's the rationale for sealing with pigs and Sepp Holzer's excavator vibrating technique. That would take way less clay than puddling.
 
Sheri Menelli
pollinator
Posts: 166
16
  • Mark post as helpful
  • send pies
    Number of slices to send:
    Optional 'thank-you' note:
  • Quote
  • Report post to moderator
Day 5 of my pond

I'm still losing a lot of water - I'm sure it is because we were trying to dig up another pipe close by before we decided not to do that.

Hoping that we get rain on Monday - we might get 1/2 inch!!! That would be amazing.

I'm starting to dig around all of my raised beds so that when I get water coming off the roof and I eventually get the gutters (in a few months hopefully) that the water
will move through the swales around the yard and all the beds and finally into the pond area.

I saw my first flower today in the bond. Not sure what kind it is but I saw it open over the course of 30 min. It is closing a bit when I took this photo.

This was a total kid magnet this morning. (as well as mom and dad magnet).

Hopefully I'll get my greywater going soon from the laundry and move that water into the pond as well

More pictures from Day 5
photo-3(2).JPG
[Thumbnail for photo-3(2).JPG]
photo-2(4).JPG
[Thumbnail for photo-2(4).JPG]
photo-1(4).JPG
[Thumbnail for photo-1(4).JPG]
 
Adam Moore
Posts: 125
Location: Mansfield, Ohio Zone 5b percip 44"
3
3
  • Likes 1
  • Mark post as helpful
  • send pies
    Number of slices to send:
    Optional 'thank-you' note:
  • Quote
  • Report post to moderator
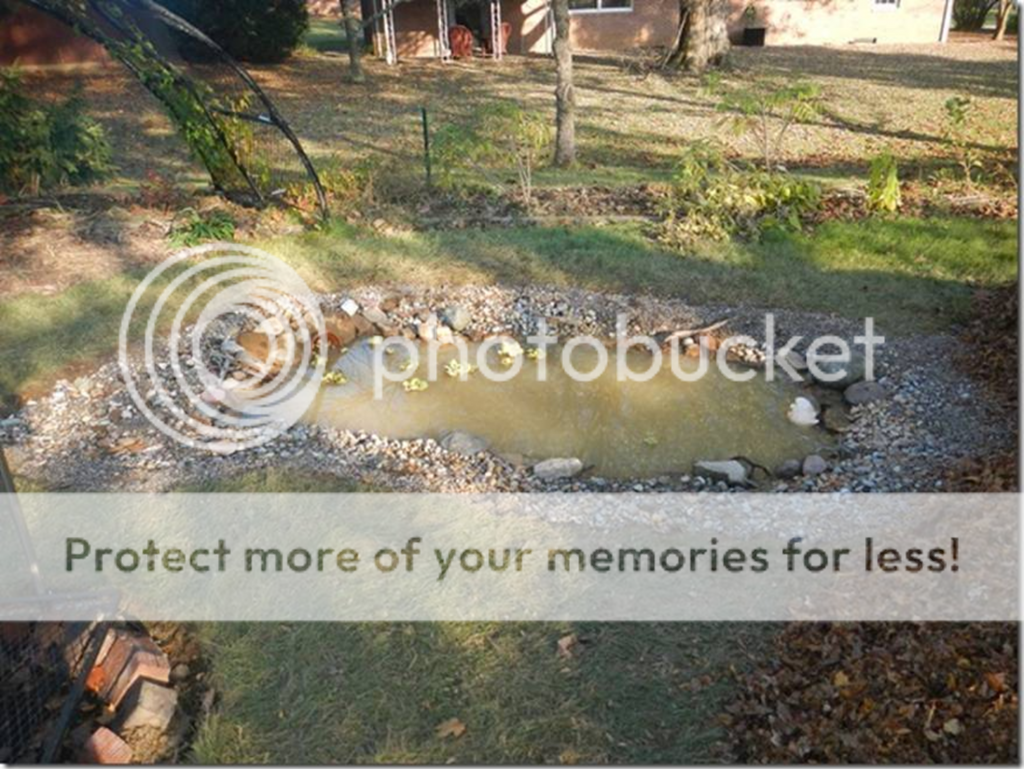
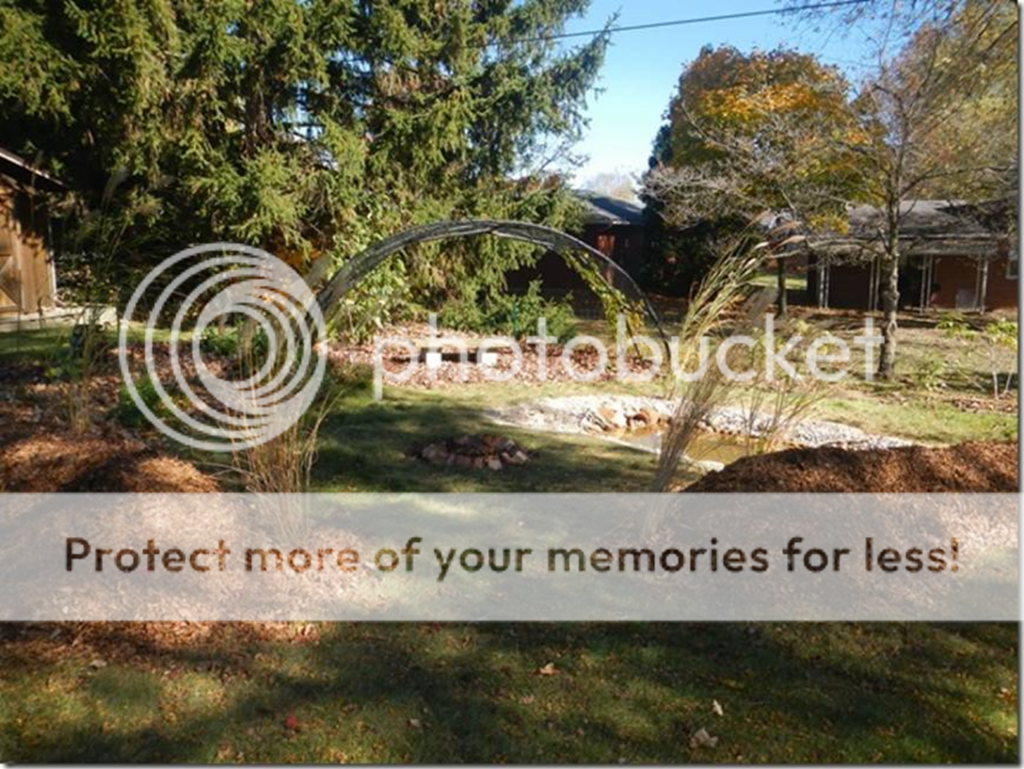
Sheri, thank you for posting about your pond. It motivated me to finally try it. I have a back corner of my yard that was clay after I dug out 8 inches of topsoil. I dug out a 5' x 10' rough hole 3 feet deep. Filled it with water and waited for two weeks to see if it would hold. It did so no liner! I used the extra dirt to cover some hugle mounds to add some texture around the ponds. It turned out great after landscaping it. Thanks again for the inspiration!


Always respect your superiors. If you have any. - Mark Twain / tiny ad
GAMCOD 2025: 200 square feet; Zero degrees F or colder; calories cheap and easy
https://permies.com/wiki/270034/GAMCOD-square-feet-degrees-colder
reply
    Bookmark Topic Watch Topic
  • New Topic