• Post Reply Bookmark Topic Watch Topic
  • New Topic
permaculture forums growies critters building homesteading energy monies kitchen purity ungarbage community wilderness fiber arts art permaculture artisans regional education skip experiences global resources cider press projects digital market permies.com pie forums private forums all forums
this forum made possible by our volunteer staff, including ...
master stewards:
  • Nancy Reading
  • Carla Burke
  • r ranson
  • John F Dean
  • paul wheaton
  • Pearl Sutton
stewards:
  • Jay Angler
  • Liv Smith
  • Leigh Tate
master gardeners:
  • Christopher Weeks
  • Timothy Norton
gardeners:
  • thomas rubino
  • Jeremy VanGelder
  • Maieshe Ljin

Building rainwater catch system for irrigation

 
Posts: 70
Location: Issaquah, WA
8
  • Likes 7
  • Mark post as helpful
  • send pies
    Number of slices to send:
    Optional 'thank-you' note:
  • Quote
  • Report post to moderator
Hi again everyone, been a great summer and things are just winding down for winter.  Things got so busy once plants went into the ground that i didn't do much more posting.   I'll try to post more to cover the upgrades we're doing to the system, here are some updates.

UPDATE:  The water system worked FLAWLESSLY this summer!  We had some issues with our choice of soil, it drained WAY to well so we ended up using a lot more water than we probably should have but the tanks, pumps, irrigation controllers, drip irrigation and everything worked perfectly.  We ended up with decent harvests for our first garden season ever, especially tomatoes (well over 200 lbs harvested).  The water meter we put on the output side of the system reads around 15,000 gallons used for the season!

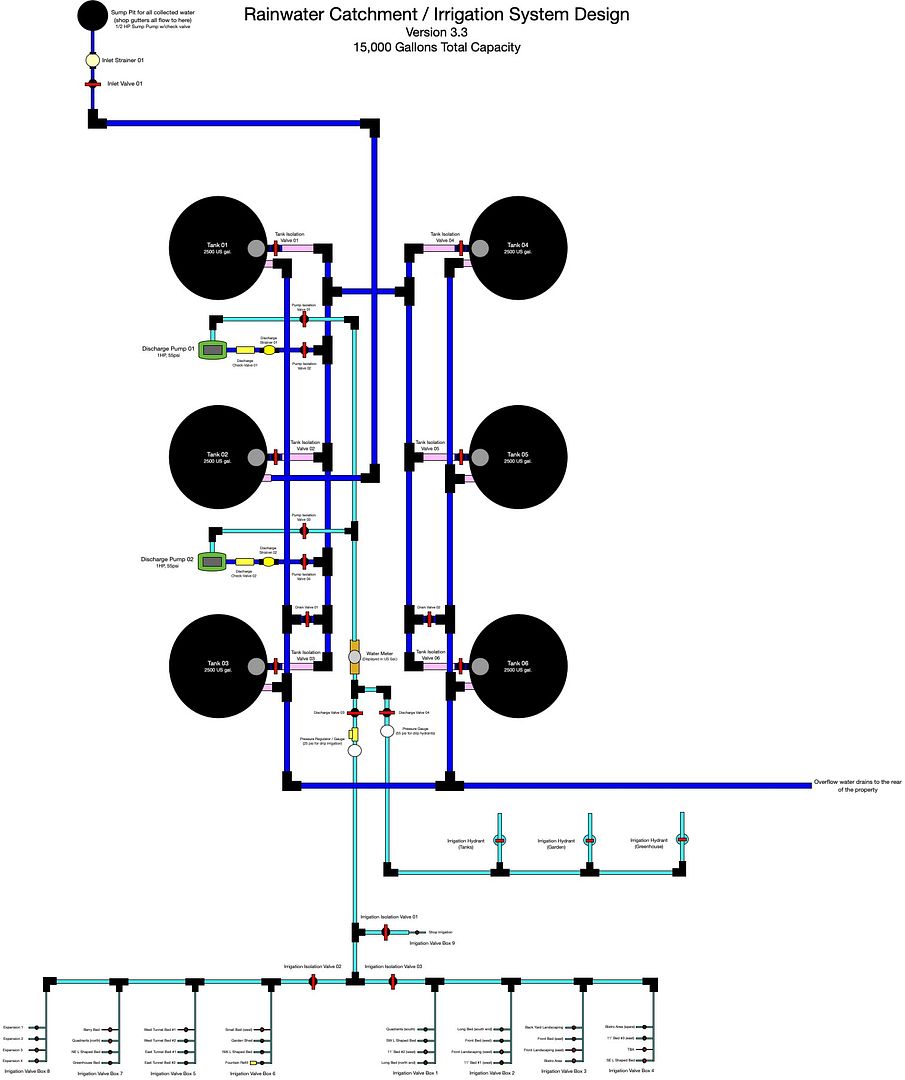
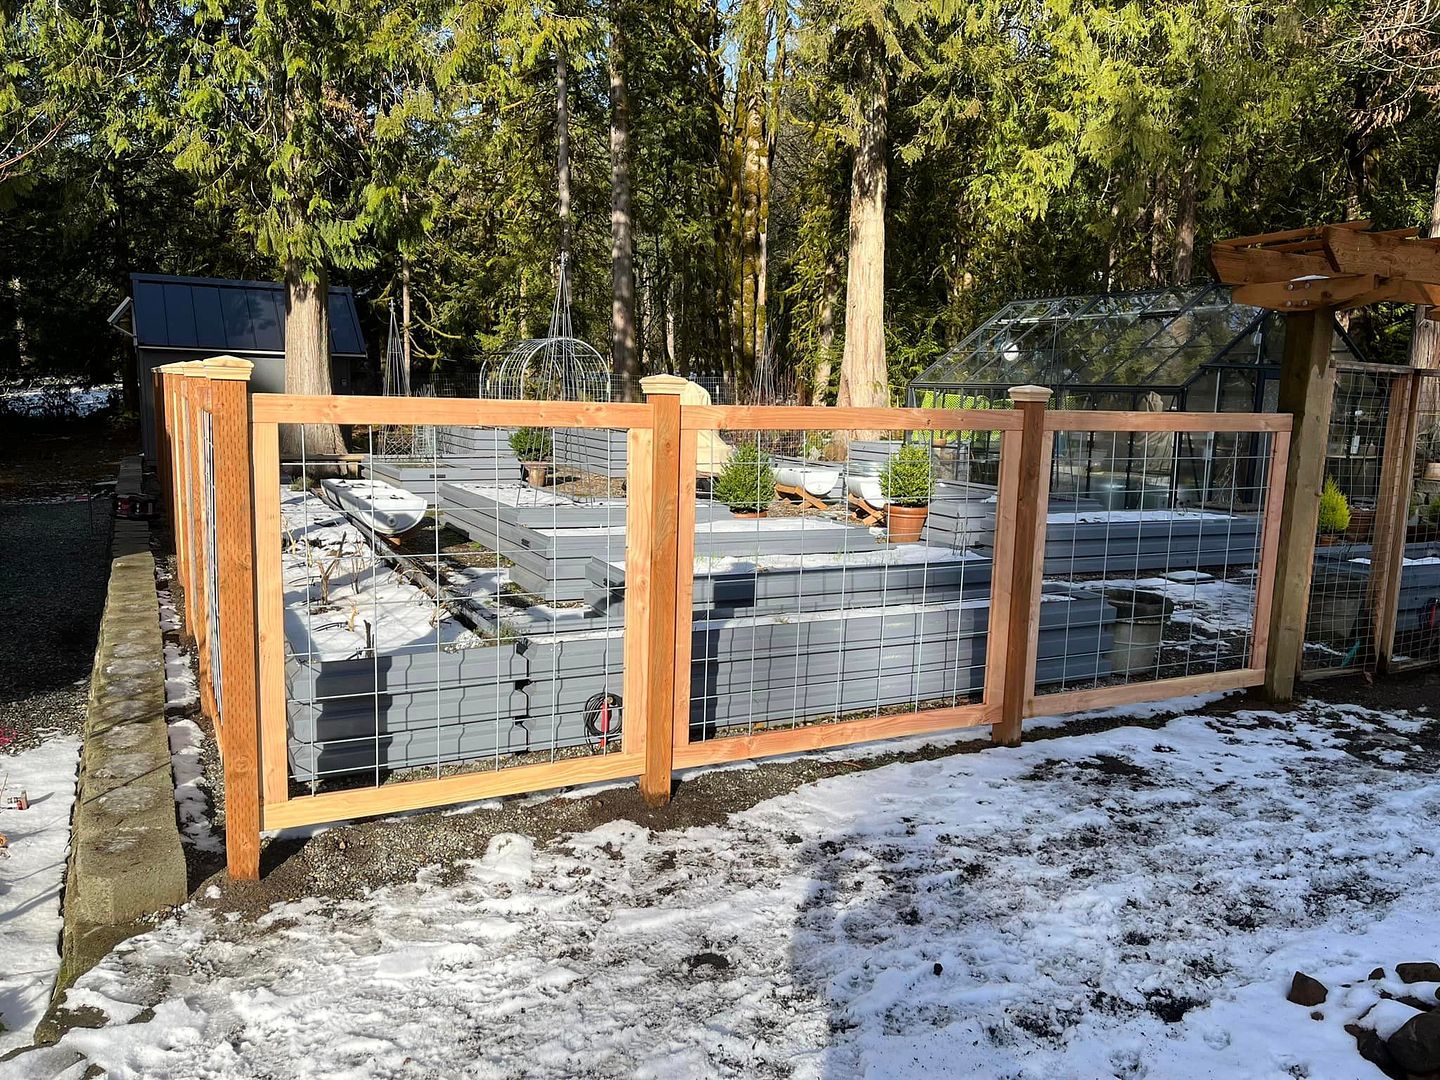
UPCOMING CHANGES: We added a small garden shed to the space and are about to build a permanent fence around it to keep the deer out.  We are also adding another couple hundred sq ft of growing space for things like corn and pumpkins, and extending the irrigation system into that new expanded area.  We are also making one last HUGE change to the water system, we will be adding another 7500 gallons of rainwater storage, 3 more tanks.  I added an updated design drawing as well as some photos of the garden below.


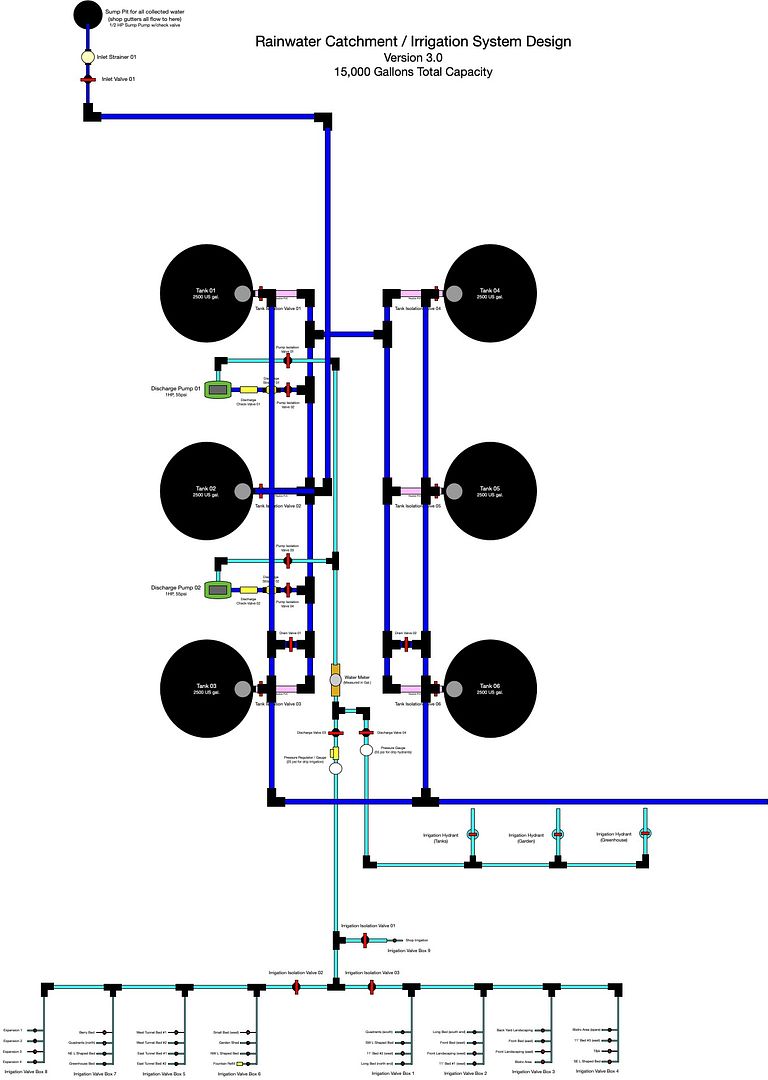
The new design, just added the new tanks for additional capacity and the new valve box for the expanded area.


This was taken a couple weeks after everything was moved from the greenhouse to the raised beds.


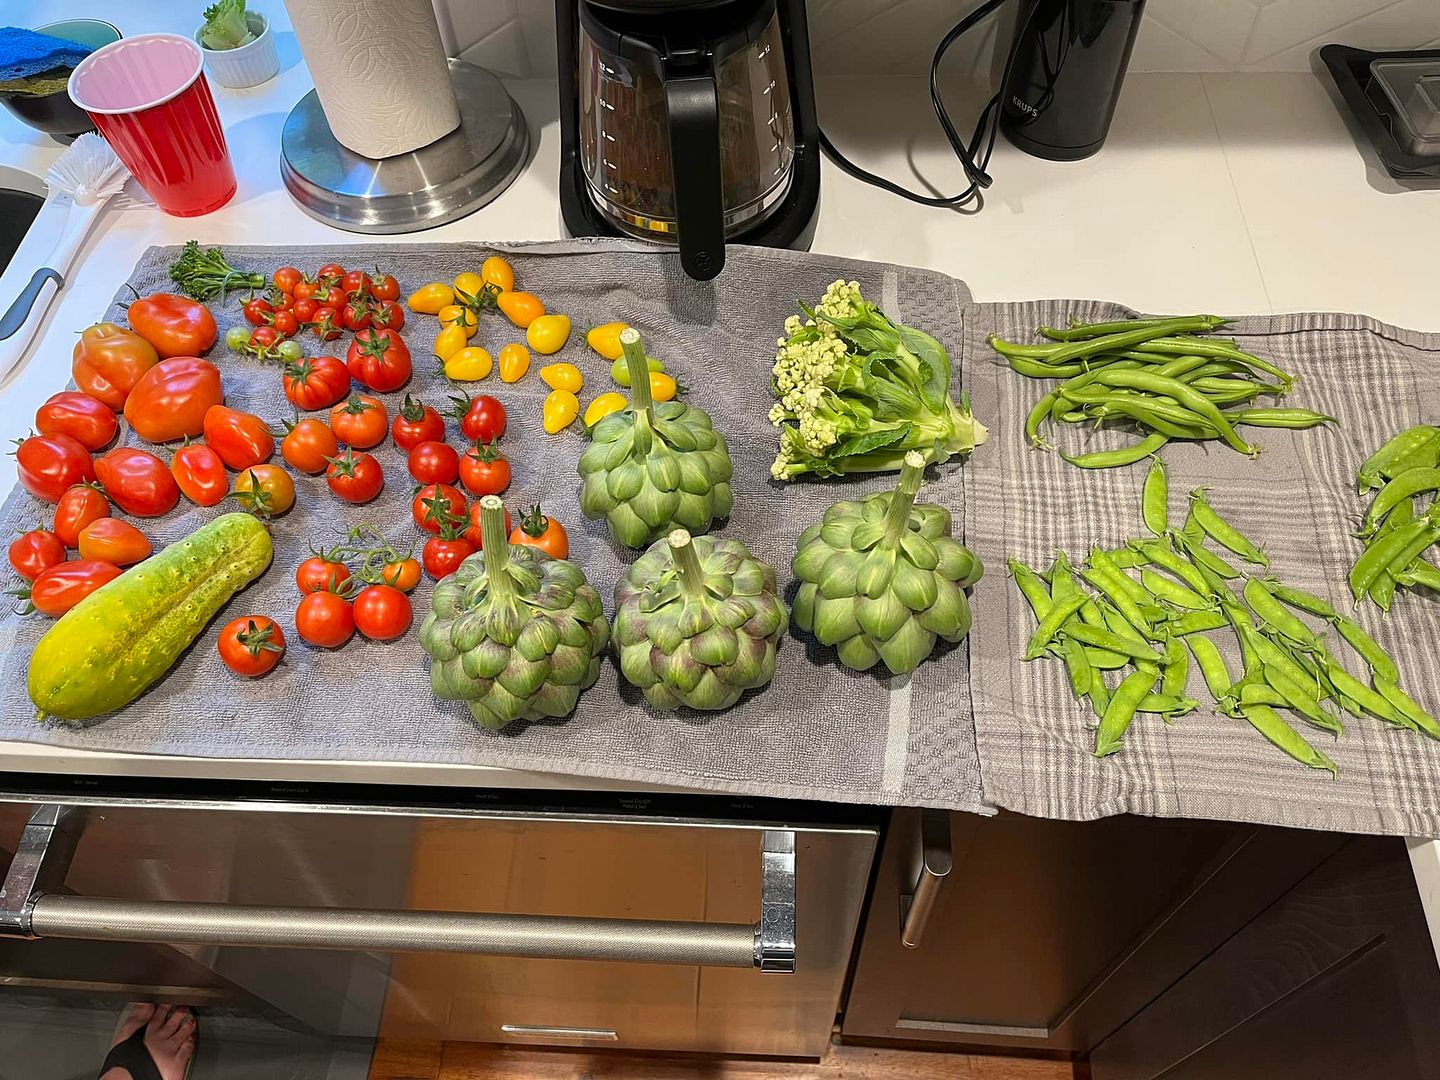
Just a small harvest one day


Jason Nault
Posts: 70
Location: Issaquah, WA
8
  • Mark post as helpful
  • send pies
    Number of slices to send:
    Optional 'thank-you' note:
  • Quote
  • Report post to moderator
I was able to remove an old cedar stump that was in the spot that the 3 new tanks will be going.  I have gathered up all the necessary plumping parts (valves, fittings and pipe) and have 12 yards of gravel arriving tomorrow to level the space where the tanks will sit.  The tanks are being ordered today and i'm told are in stock (and only about 300 miles away) so they should be delivered soon.  Once they're here I'll get them all plumbed in and they'll be ready for filling in the spring.  I'll be sure to grab some photos.
 
Posts: 4
Location: Pukemiro New Zealand
  • Likes 1
  • Mark post as helpful
  • send pies
    Number of slices to send:
    Optional 'thank-you' note:
  • Quote
  • Report post to moderator
Hi you dont mention the vertical position of the tanks relative to the barn down spout level. I would do everything i could to plumb the water from the roof direct to the tanks. We call it here an inverted siphon, where the 4"  down pipe is buried and then rises up to dump in the top of the tank . That means that you have to have clear outs on the buried parts as they will get crud building up in them, secondly i dont think the 1/2 horse pump has a snowballs chance of handling that much water especially as its only 55gal  sump and in my view it would be better if you must stick with that system to put the spare  redundant 1hp pumps on that end and let the 1/2 horse do the pressure side. I understand your wish not to have aerial pipes every where but buried systems in my view are not ideal . I have mine like that and i am considering shifting my tank so that i can go direct from the roof . and my tanks are 1, 25000 litre About 6,000 US  Plastic tank and a approx 10,000 US gal Concrete one, so its a major. Once the water is in the tanks it is easy to plumb the pressure side to wherever you need it, Alkathene farm water piping is great and goes around curves  as against the PVC drainage/ down spout pipe that has to be in strait lines with glued fitting at the corners.
Just my thoughts
 
Jason Nault
Posts: 70
Location: Issaquah, WA
8
  • Likes 2
  • Mark post as helpful
  • send pies
    Number of slices to send:
    Optional 'thank-you' note:
  • Quote
  • Report post to moderator
I didn't mention any of that in my last post but this thread is a year old and this recent post was an update on how things have been going and to mention that we are adding an additional 7500 gallons of storage to the system.  All of the things you mentioned were covered in previous posts but I'll answer them here as well.

The tanks are at the same level as the floor of the building they collect water from. All the gutter downspouts were already underground and tied together to a single 4" pipe that ran out to the back of our property.  If I had to tie all the downspouts together with arial pipe it would be a lot to look at, one of them is at least 100ft from the tanks and around multiple corners. Further out into the property where gravity has taken that pipe away from the building I added a diverter valve and the sump with a sump pump iniside.  In case you don't know what a sump pump is (maybe a local thing for me) it's a 1/2 HP pump with a float switch and check valve and it's made to exist in a half buried "sump" to collect and remove ground water from basements, etc.  It is made to cycle a lot and handles quite a bit of head very well.  It has performed flawlessly at it's task of shifting all the rainwater to the tanks for the last year.  This is in the Seattle, WA area and though most of the world knows it rains a lot here it's more of a consistent rain than a super heavy one.  We get about 60" per year but spread out, steadily and almost constantly, over 9 months. The larger pumps in the system are pressure pumps and they bring the 2 irrigation loops around the garden (1 for yard hydrants and 1 for all the automated drip irrigation) up to a set pressure and then shut off until the pressure drops, where they will run again until the pressure is back to the set point.  

I got the area leveled over the long weekend and the first of the new 3 tanks arrives today, woo hoo!


Peter Roberts wrote:Hi you dont mention the vertical position of the tanks relative to the barn down spout level. I would do everything i could to plumb the water from the roof direct to the tanks. We call it here an inverted siphon, where the 4"  down pipe is buried and then rises up to dump in the top of the tank . That means that you have to have clear outs on the buried parts as they will get crud building up in them, secondly i dont think the 1/2 horse pump has a snowballs chance of handling that much water especially as its only 55gal  sump and in my view it would be better if you must stick with that system to put the spare  redundant 1hp pumps on that end and let the 1/2 horse do the pressure side. I understand your wish not to have aerial pipes every where but buried systems in my view are not ideal . I have mine like that and i am considering shifting my tank so that i can go direct from the roof . and my tanks are 1, 25000 litre About 6,000 US  Plastic tank and a approx 10,000 US gal Concrete one, so its a major. Once the water is in the tanks it is easy to plumb the pressure side to wherever you need it, Alkathene farm water piping is great and goes around curves  as against the PVC drainage/ down spout pipe that has to be in strait lines with glued fitting at the corners.
Just my thoughts

 
Jason Nault
Posts: 70
Location: Issaquah, WA
8
  • Likes 3
  • Mark post as helpful
  • send pies
    Number of slices to send:
    Optional 'thank-you' note:
  • Quote
  • Report post to moderator
Well, the tank that was supposed to arrive last week didn't make it on the day it was scheduled.  By the time they were able to schedule another delivery the 2nd tank had arrived at the shipping terminal so they ended up delivering 2 tanks.  We had gotten a bit of snow so that made it MUCH easier to get the tanks in to place.  These are currently a foot or so from their final location, once I get the piping done i will slide them into place (about 2' closer to the other tanks) and make the final connections.  The 3rd and final new tank is scheduled to arrive tomorrow so fingers crossed I'll be able to get started with the piping later this week!

 
Jason Nault
Posts: 70
Location: Issaquah, WA
8
  • Likes 2
  • Mark post as helpful
  • send pies
    Number of slices to send:
    Optional 'thank-you' note:
  • Quote
  • Report post to moderator
Well after another week of phone calls, being on hold for hours and actually telling the manufacturer to refund our money for the last tank it finally arrived.  The freight company held it hostage for 8 days and beat it all up moving it around their yard.  Thankfully it appears to not have any holes all the way through it but I won't be testing it for a few weeks with the weather we have heading our way.  With some help from a neighbor I got them roughly in place and over the last couple days I was able to get the plumbing finished.  Even though the pumps are all removed and the system is winterized everything is tied in and it's ready to go when the weather allows it.

 
Jason Nault
Posts: 70
Location: Issaquah, WA
8
  • Likes 2
  • Mark post as helpful
  • send pies
    Number of slices to send:
    Optional 'thank-you' note:
  • Quote
  • Report post to moderator
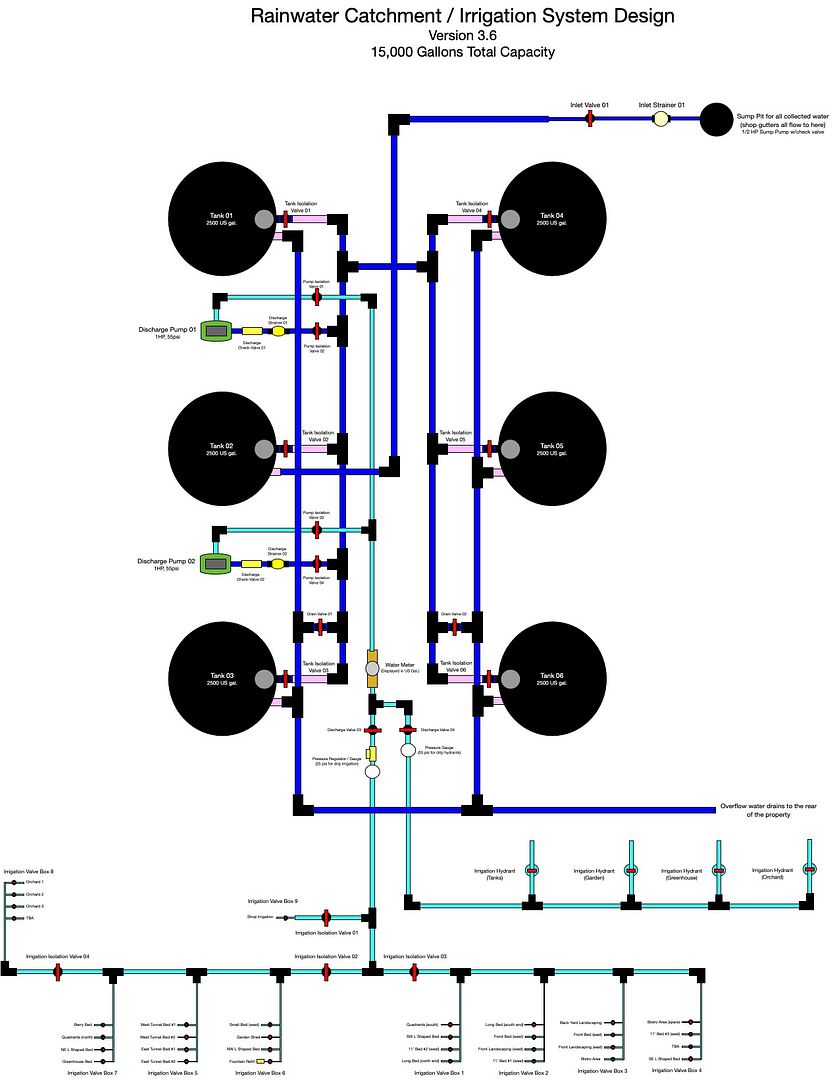
For anyone interested this is the official "as-built" design for the water system.  The previous one I posted was too difficult to read and had a couple mistakes

 
Posts: 42
Location: Whidbey Island, WA 8b. Clay, hardpan, high winds.
16
  • Likes 4
  • Mark post as helpful
  • send pies
    Number of slices to send:
    Optional 'thank-you' note:
  • Quote
  • Report post to moderator
Very, very nice systems, Jason.  We're not too far away (Oak Harbor, WA), so your designs are especially interesting for us.  We're doing similar projects, though almost completely differently (as we're kinda hacks).

We're wrestling with the freezing ball valve issue right now.  We bought Apollo valves rated 0-400 F, so I thought we were safe, as it never goes below 10F here.  Stupid me.  I confirmed with Apollo just now that that rating is only good for media that does not freeze.  According to them, all brass/bronze ball valves burst below the freezing temperature of water.

One solution I saw online was to drill a 2mm hole in the side of the closed ball valve, allowing that plug of water to drain when in the closed position.  That little hole will also spurt a bit during both of the open<-->close transitions, but I can take that.

Another solution is to plug the valve output, leave the valve in the open position, and wrap it with insulation, relying on the large thermal reservoir in the tank's water (2500 gallons in both of our systems) to keep the valve body above freezing.  However, it surprised me to find that the thermal conductivity of water is only about 0.6 W/m-K.  Polyethylene is around 0.4, so still water is a comparably crap thermal conductor.  Aluminum, by comparison, is around 150!  Given still water's low thermal conductivity, the wrapping method may be questionable.

A third solution (or component of a combined solution) is to wrap some pipe heating tape around the valve during especially cold nights.  I imagine both of us only use the tank's lower output valve in the dry months to source irrigation, so not accessing it all winter is not a problem.  Just wrap it and leave it.  This solution seems to me inelegant, though, and totally impractical for my supply tank way up on the hill, far from any outlet.

Then there's the freeze-proof ball valve noted in an earlier comment.  Well it freezes and bursts, it's just that the part that bursts is very easy to replace.  Maybe, but that effort and additional cost seems to me to make the one-time 2mm drill idea better.

"Vented ball valves", as I read them, are for expanding liquids and gasses, like in cryogenic applications where a plug of liquid nitrogen might warm and expand.  I read what I could find of them, and no where did it mention them as a solution for freezing water, so my guess is they're not.

And finally on my list of worries is the least:  As noted above, there's also a bit of water between the ball and valve body when the valve is in the open position.  That's why folks all say leave ball valves empty, in the 1/2-open position, giving both volumes an expansion route.  Ball valves thus seem great for systems that can be emptied over the winter (like irrigation lines), but for water storage tanks, notsomuch.

So what are folks' experiences with this issue?  Is this a non-problem at 10F?  Ours have survived 27F overnight, no issues, but I get the feeling I'm living on borrowed time.  The temp's going lower soon and I would like to get ahead of this (or should I say, not be so far behind).


Roy Therrien
Posts: 42
Location: Whidbey Island, WA 8b. Clay, hardpan, high winds.
16
  • Likes 2
  • Mark post as helpful
  • send pies
    Number of slices to send:
    Optional 'thank-you' note:
  • Quote
  • Report post to moderator
Sometimes you get the right person for the job.  This time, I spoke by phone with Jim Bondi of Apollo Valves, and talk about getting the right guy!  Knowledgable, nice, patient, and generous with his time.

First off, he recommended a gate valve for this application.  No hidden spaces for water to freeze and rupture.  He further recommended a "Forged steel" gate valve, as the metal is crazy strong and willing to give a tiny bit before failing.  It may rust a little on the outside, but no harm there.

Regarding ball valves, he said the smaller volumes of water hidden away in the valve body (as opposed to the plug of water in the ball itself) usually cause a freeze-rupture first.  So solving just the main slug problem gives you nothing.  (My instincts were all backward on that.)

Regarding a 2mm drill hole in the side of the valve to allow the water in the ball to exit in the closed position, he said he would be concerned that burrs from the "exit wound" might score the ball and cause a failure of the teflon seats.  He would instead recommend a "center drain" ball valve.  It's made to do precisely that, and of course no stray burrs to wreck your teflon seats.

Overall, in the case where one is stuck with a non-center-drain ball valve and freezing temps, the best option is to insulate the valve well, and if you can, apply a heating cable when it gets really cold.

Given my conversation with Jim, for my storage tank on the hill in direct sun, I chose to plug the downstream end of the valve, open the valve fully to the upstream 2500 gallon tank (thus conveniently aligning the handle with the axis of the valve body), insulate the valve with 18"x6" strips of R13 fiberglass wall insulation, and bag it to keep it dry.  For the collection tank next to the house, which is in the shade and conveniently located adjacent to an electrical outlet, I also wrapped a seed mat between the two strips of R13.  I figure I can turn it on for a couple hours here and there during serious cold spells.  

I chose to leave the valve in the open position on both tanks to maximize thermal conductivity with the water reservoir, and also because it made it 10 x easier to insulate.  Wrapping insulation on a lever at a 45 degree angle was too problematic.

Time will tell!
 
Jason Nault
Posts: 70
Location: Issaquah, WA
8
  • Likes 2
  • Mark post as helpful
  • send pies
    Number of slices to send:
    Optional 'thank-you' note:
  • Quote
  • Report post to moderator
We are pretty close and I would consider myself a "hack" with this stuff as well, I'm learning as I go.  My only slight advantage is that my father was a union pipe fitter in a paper mill for 40 years so I have a good resource to ask questions (he's located in New Hampshire).  My distinct advantage is that the whole system stays empty until we're past the freezing temps (mostly).  We start collecting at the end of February and when we only had 7500 gallons of capacity we would fill the tanks in 2-3 days, so I expect to have the system completely full now in about a week.  I actually bought a spare ball valve for the lower outlet valve so I could drill a hole in the ball from the discharge side as a test but never did it, just decided to keep it dry instead.  All that said, this is still the first winter with the system so we'll know more when the weather warms and i start filling things up
 
Roy Therrien
Posts: 42
Location: Whidbey Island, WA 8b. Clay, hardpan, high winds.
16
  • Likes 5
  • Mark post as helpful
  • send pies
    Number of slices to send:
    Optional 'thank-you' note:
  • Quote
  • Report post to moderator
Thanks for the update, Jason.  I will watch the rains and consider maybe delaying our collection until later in the year also, to avoid freezing temps.  In the Olympic rain shadow, we sometimes don't get much rain here -- as little as 18"/yr -- so we kinda take it when we can get it.

Knocking on the side of the tank has proven a reliable level indicator:  Where empty, you get an echoing, throaty boom;  where there's water, it's muffled.  Where there's ice, it sounds like you're knocking on metal.  I can see the last week of off/on freezing temps has created about 4" of ice in the 1/2-full tanks.

I had another call with Apollo valves, just to sort out what happens to these valves when they freeze.  Does a "center drain" on a valve also drain the hidden spaces?

After quite a lot of very nice back and forth, I believe we decided we don't know.  The best bet is the 45 degree solution, ensuring all spaces have an out, he said.  Then he gave me a brilliant idea:  With the downstream end plugged, I can put the valve at 45 degrees, remove the handle, then easily wrap the whole thing in insulation and a plastic bag.  No "center drain" needed!

He also noted that drilling the side will most certainly relieve the pressure from the freezing water in the ball part of the valve, but since teflon seats contract in the cold and the valve is meant to seat by upstream pressure forcing the ball against the downstream teflon seats, that little drill hole could easily create a slow leak, open, closed, or at 45 degrees.  Best not to mess with it.

That's what the man said.  I followed his guidance:  Opened up the insulation, moved the valve to 45 degrees (1/2 open), removed the valve handle, and re-wrapped the insulation (which was really easy without the handle on the valve).

So the long and short of it is, drained or not, a ball valve is best left in the 45 degree position.  Plugging the downstream end during freezing temps allows one to do that.  Water can freeze, but it has a path out back into the tank.

If any of mine fail, I'll let you know.
 
Posts: 17
Location: Middle of Oklahoma
4
2
hugelkultur forest garden urban
  • Likes 4
  • Mark post as helpful
  • send pies
    Number of slices to send:
    Optional 'thank-you' note:
  • Quote
  • Report post to moderator
I just bought my first house and am planning my first "big" garden and talking lots with my brothers about rain catchment and irrigation ideas they have.  Stumbled upon your post and literally sat here with my coffee anxiously reading each post, studying each design, and excited by every picture!  I feel like I've been reading an exciting novel  ...now I'm waiting for the sequel - your final details and more pictures! ha ha!  I hope you had a great Summer with lots of growth!!  Can't wait to hear all the deets now that you've had (hopefully) a full grow season in there!  All you permies are so dang talented - looking forward to getting active building my skills!!  Happy New Year to all!
 
master steward
Posts: 6992
Location: southern Illinois, USA
2552
goat cat dog chicken composting toilet food preservation pig bee solar wood heat homestead
  • Likes 1
  • Mark post as helpful
  • send pies
    Number of slices to send:
    Optional 'thank-you' note:
  • Quote
  • Report post to moderator
Hi Michele,

Welcome to Permies.
 
Michele Morken
Posts: 17
Location: Middle of Oklahoma
4
2
hugelkultur forest garden urban
  • Likes 1
  • Mark post as helpful
  • send pies
    Number of slices to send:
    Optional 'thank-you' note:
  • Quote
  • Report post to moderator

John F Dean wrote:Hi Michele,

Welcome to Permies.


Thanks so much Dean, I've been lurking in here for some time, always amazed by all there is to learn from all the amazing permies!!  Thank you all for sharing your experience and so much knowledge and encouragement.  
 
pollinator
Posts: 5355
Location: Bendigo , Australia
477
plumbing earthworks bee building homestead greening the desert
  • Mark post as helpful
  • send pies
    Number of slices to send:
    Optional 'thank-you' note:
  • Quote
  • Report post to moderator
Michelle, have a look at the link in my signature, it has more details.
 
Posts: 9
  • Likes 1
  • Mark post as helpful
  • send pies
    Number of slices to send:
    Optional 'thank-you' note:
  • Quote
  • Report post to moderator
Arkansas, zone 7b. May I ask where you get your 2500 gallon tank? Your property is so beautiful. Thanks for sharing.
 
Jason Nault
Posts: 70
Location: Issaquah, WA
8
  • Mark post as helpful
  • send pies
    Number of slices to send:
    Optional 'thank-you' note:
  • Quote
  • Report post to moderator
Thanks Mandie!  Tanks came from Quadel Industries in Oregon

Quadel Industries Tank Sizes

Mandie Garrett wrote:Arkansas, zone 7b. May I ask where you get your 2500 gallon tank? Your property is so beautiful. Thanks for sharing.

 
Jason Nault
Posts: 70
Location: Issaquah, WA
8
  • Likes 2
  • Mark post as helpful
  • send pies
    Number of slices to send:
    Optional 'thank-you' note:
  • Quote
  • Report post to moderator
We've had a slightly colder winter than normal but more importantly we've gotten a lot less rain.  We haven't started filling the tanks yet as it's been too cold but it looks like the forecast looks better after next week's incoming freeze.  I was able to get a bit more than half of the permanent fence built last weekend.  Next is to cut a few dead trees down and prepare a new area to be more garden space and get a couple loads of compost spread out into the beds for the summer.  My wife has a few things started in the greenhouse already, spring is coming!
 
Jason Nault
Posts: 70
Location: Issaquah, WA
8
  • Mark post as helpful
  • send pies
    Number of slices to send:
    Optional 'thank-you' note:
  • Quote
  • Report post to moderator
Hi again!  The new garden space is coming along nicely, the dead trees have been removed and the stumps pulled.  We have most of the permanent fence up, just a couple access gates remain.  I will be tackling the additions to the plumbing system in the next couple weeks.  Essentially we'll be adding another yard hydrant in the new space as well as another valve box with 4 more zones.  The new space will have corn, pumpkins and some other ground grown items as well as a mini orchard.  The orchard will have apple trees, pear trees and a nectarine tree.  There is a lot going on out there on a daily basis but nothing exciting to look at yet, will post pics when we have something interesting to show.  So far I have modified the plumbing design for the changes, more to come soon!

 
Jason Nault
Posts: 70
Location: Issaquah, WA
8
  • Mark post as helpful
  • send pies
    Number of slices to send:
    Optional 'thank-you' note:
  • Quote
  • Report post to moderator
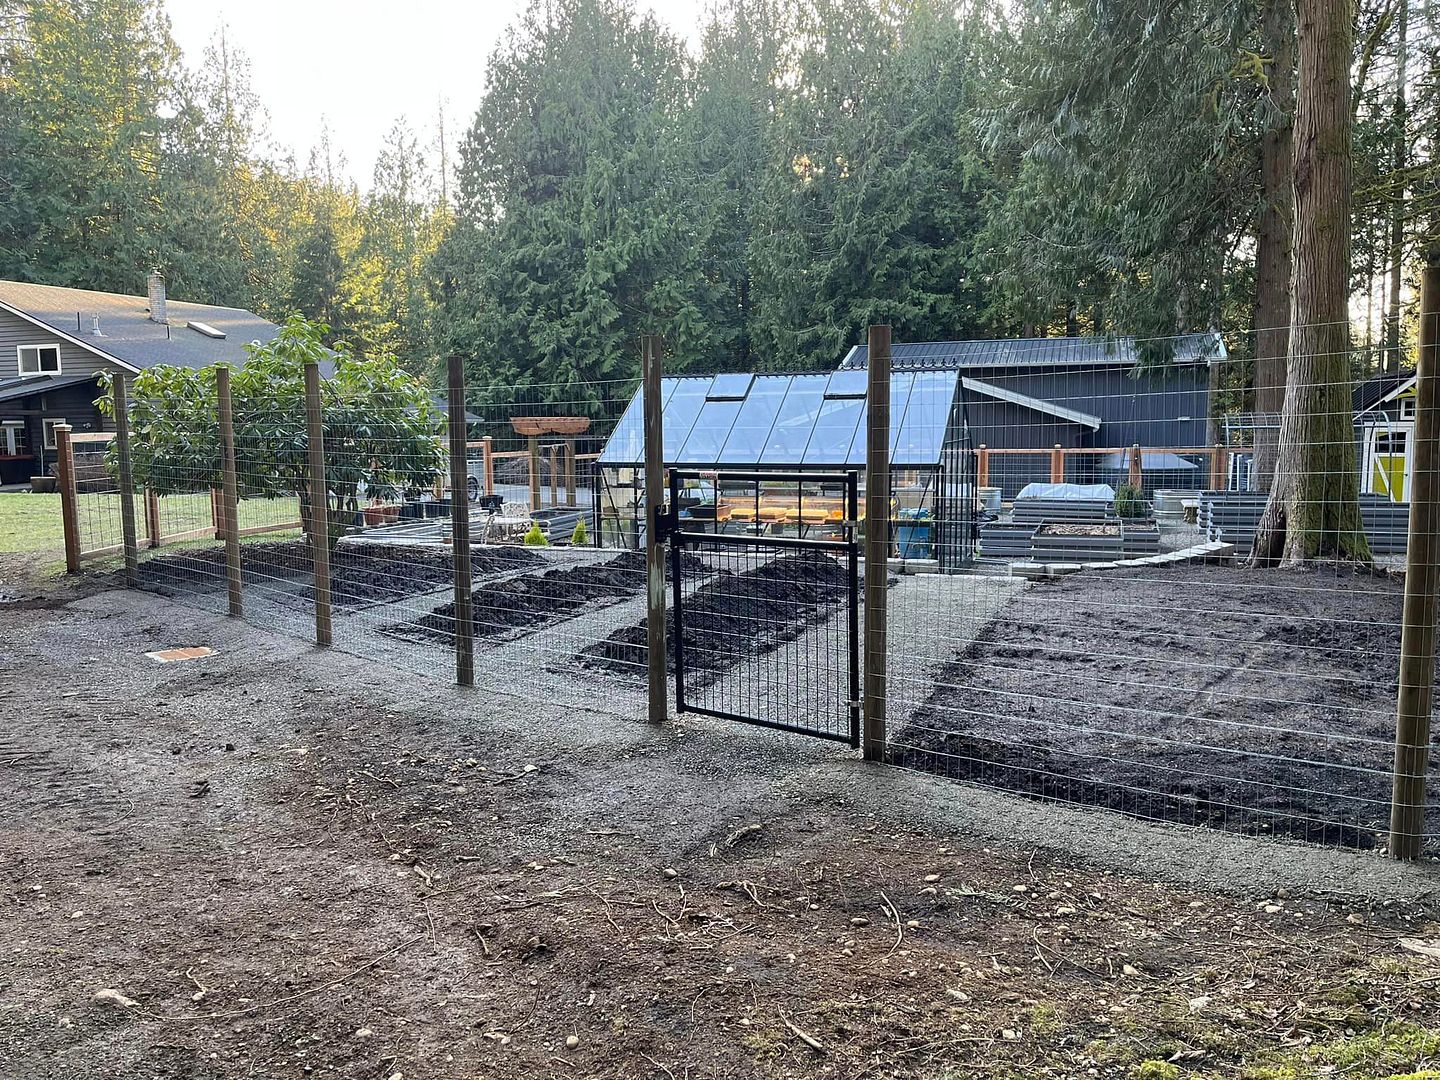
The fencing is finally done!  It's been a busy few weekends lately, we had 5 dead cedars that were hanging over the greenhouse removed and the stumps pulled.  We backfilled and leveled the area as well as added a small set of stairs up to the area from the original lower garden.  We put in 3 rows to grow things like corn, pumpkins and zucchini as well as an area for fruit trees, all behind a 6' deer fence.  The fencing near where the fruit trees will be planted are NOT set in concrete so they can easily be pulled up and moved as the trees grow.  The fence and gates went in last and now the entire garden is finally enclosed in a total of about 250' of fencing.  Extending the irrigation and low voltage lighting into the new space is next on the agenda.  I will be adding a single valve box with 4 valves (zones), one for each row and one for the orchard, drip will be connected to each zone when the plants are added.  Also a yard hydrant will be added to have a standard garden hose in that area for general use.  Here are a couple pictures for now.


Jason Nault
Posts: 70
Location: Issaquah, WA
8
  • Likes 2
  • Mark post as helpful
  • send pies
    Number of slices to send:
    Optional 'thank-you' note:
  • Quote
  • Report post to moderator
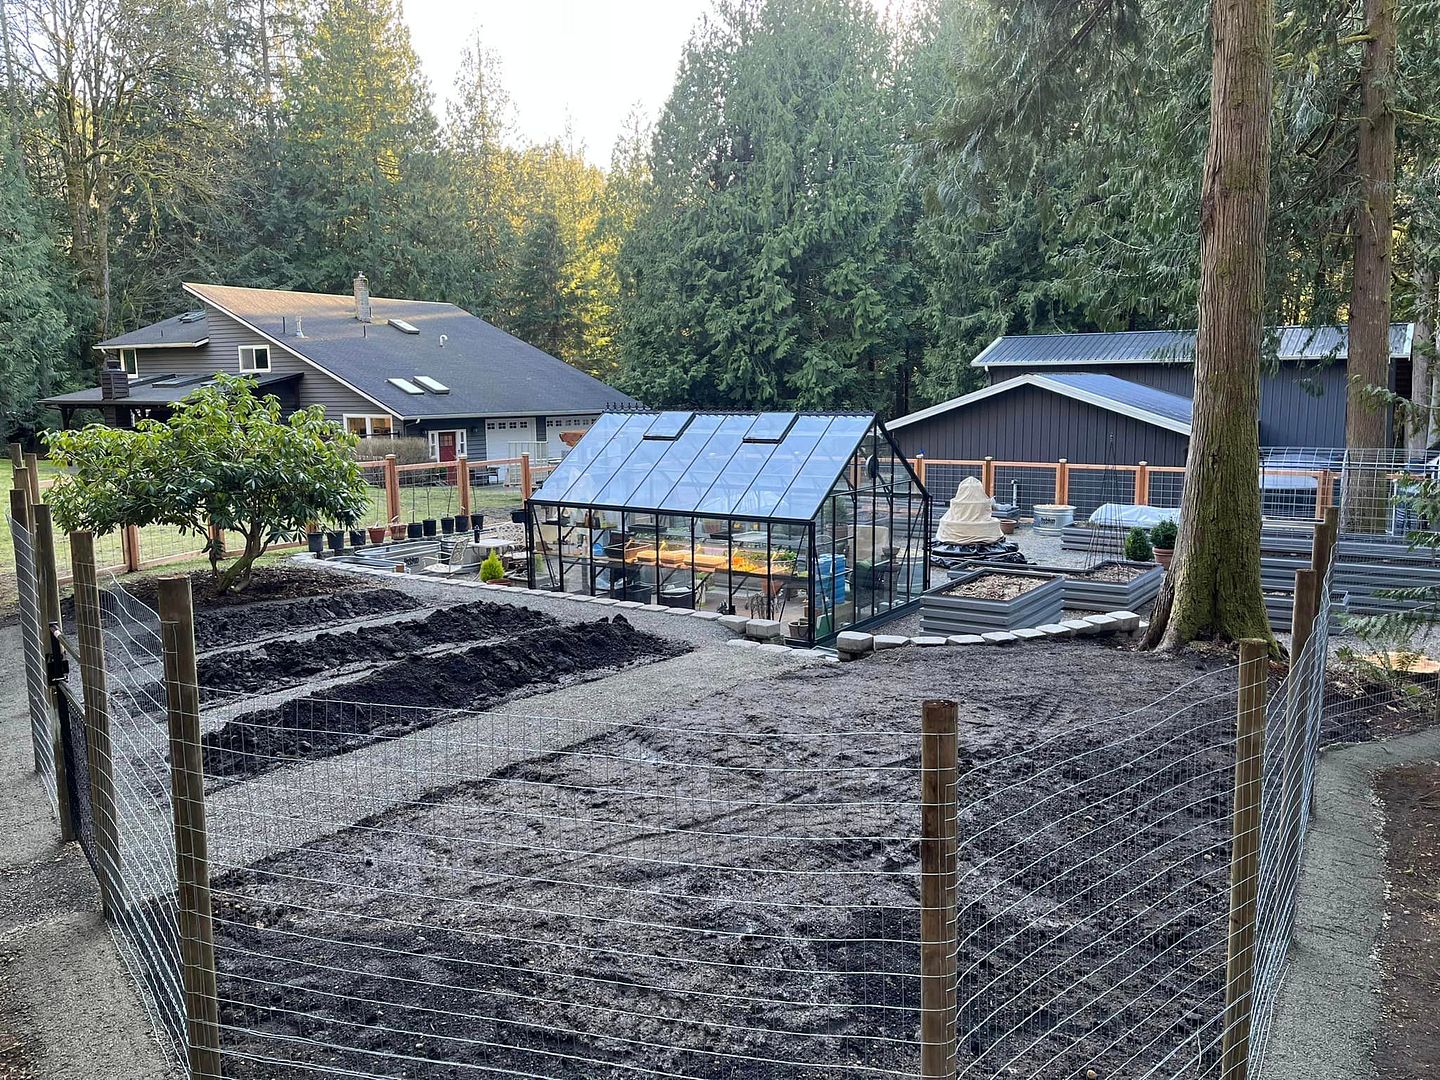
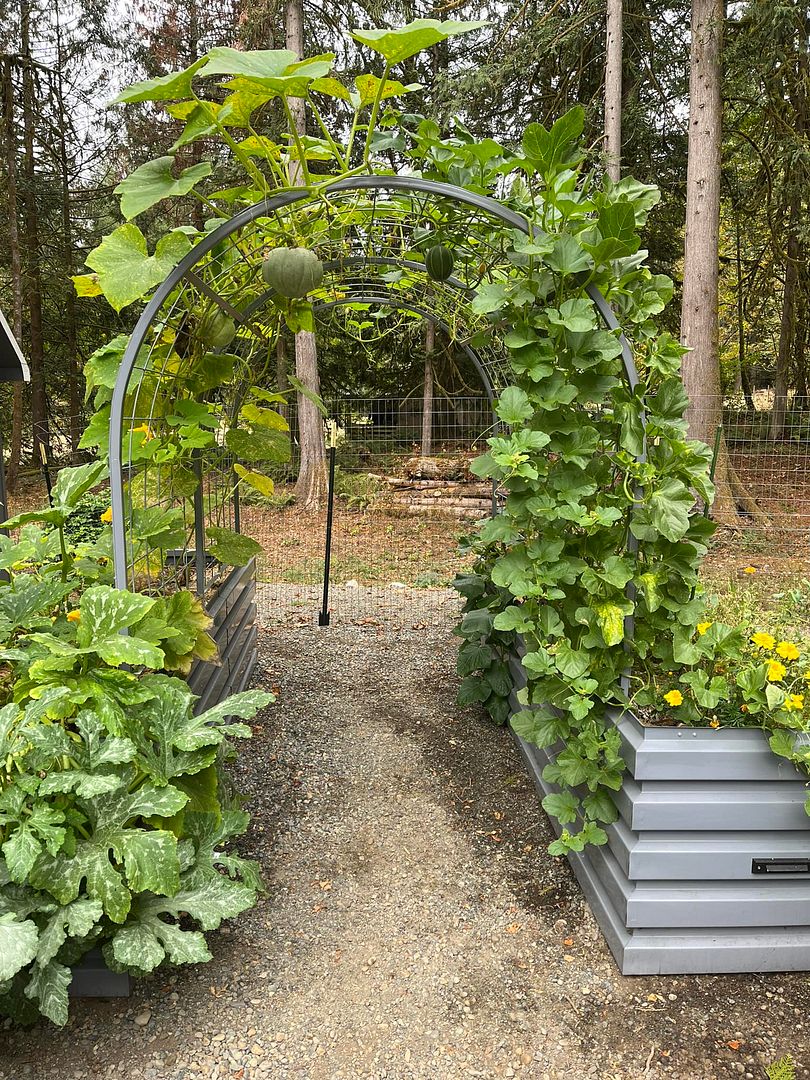
Hope you all had a great summer and good winter so far, seeds are germinating and  the rainwater tanks are filling as I type this, spring is coming! No changes to the systems this year. We had a concrete sidewalk poured from the driveway to the garden entrance so I will be building proper gates for the entrance and maybe another tunnel to grow on. The area outside the entrance will be landscaped, irrigated and lit up soon, need to get some soil to build up that space. Here are a few pics from last summer, anxious to see what the wife grows this year!


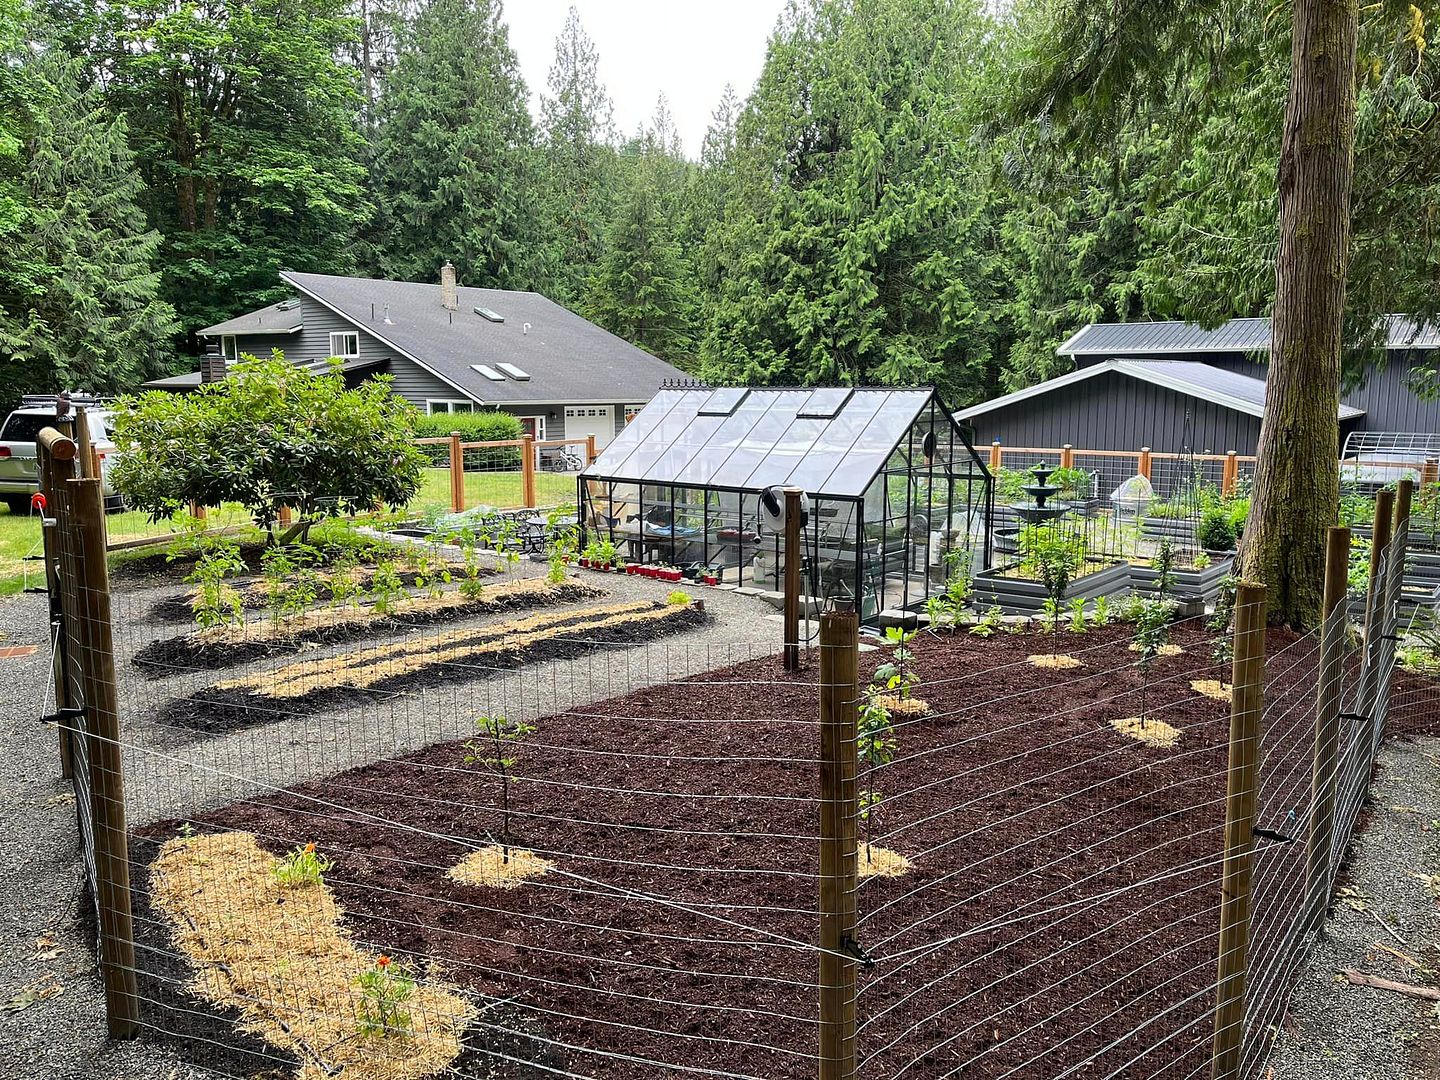
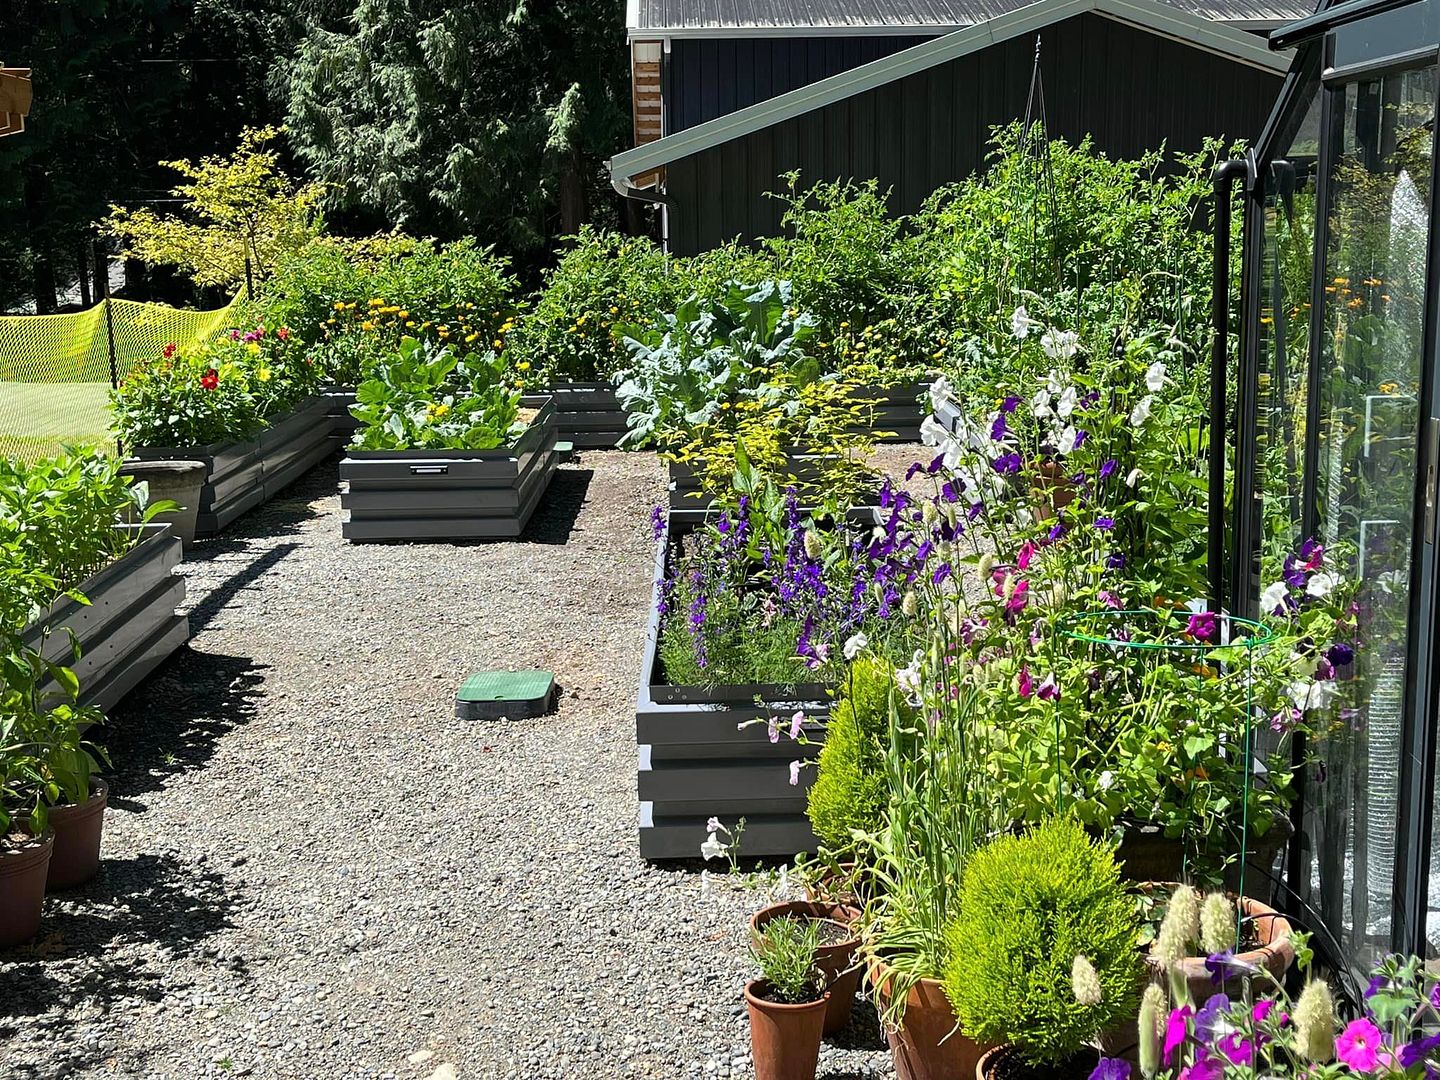
The rows and some of the dwarf fruit trees are planted and now fully irrigated including a hydrant for manual watering


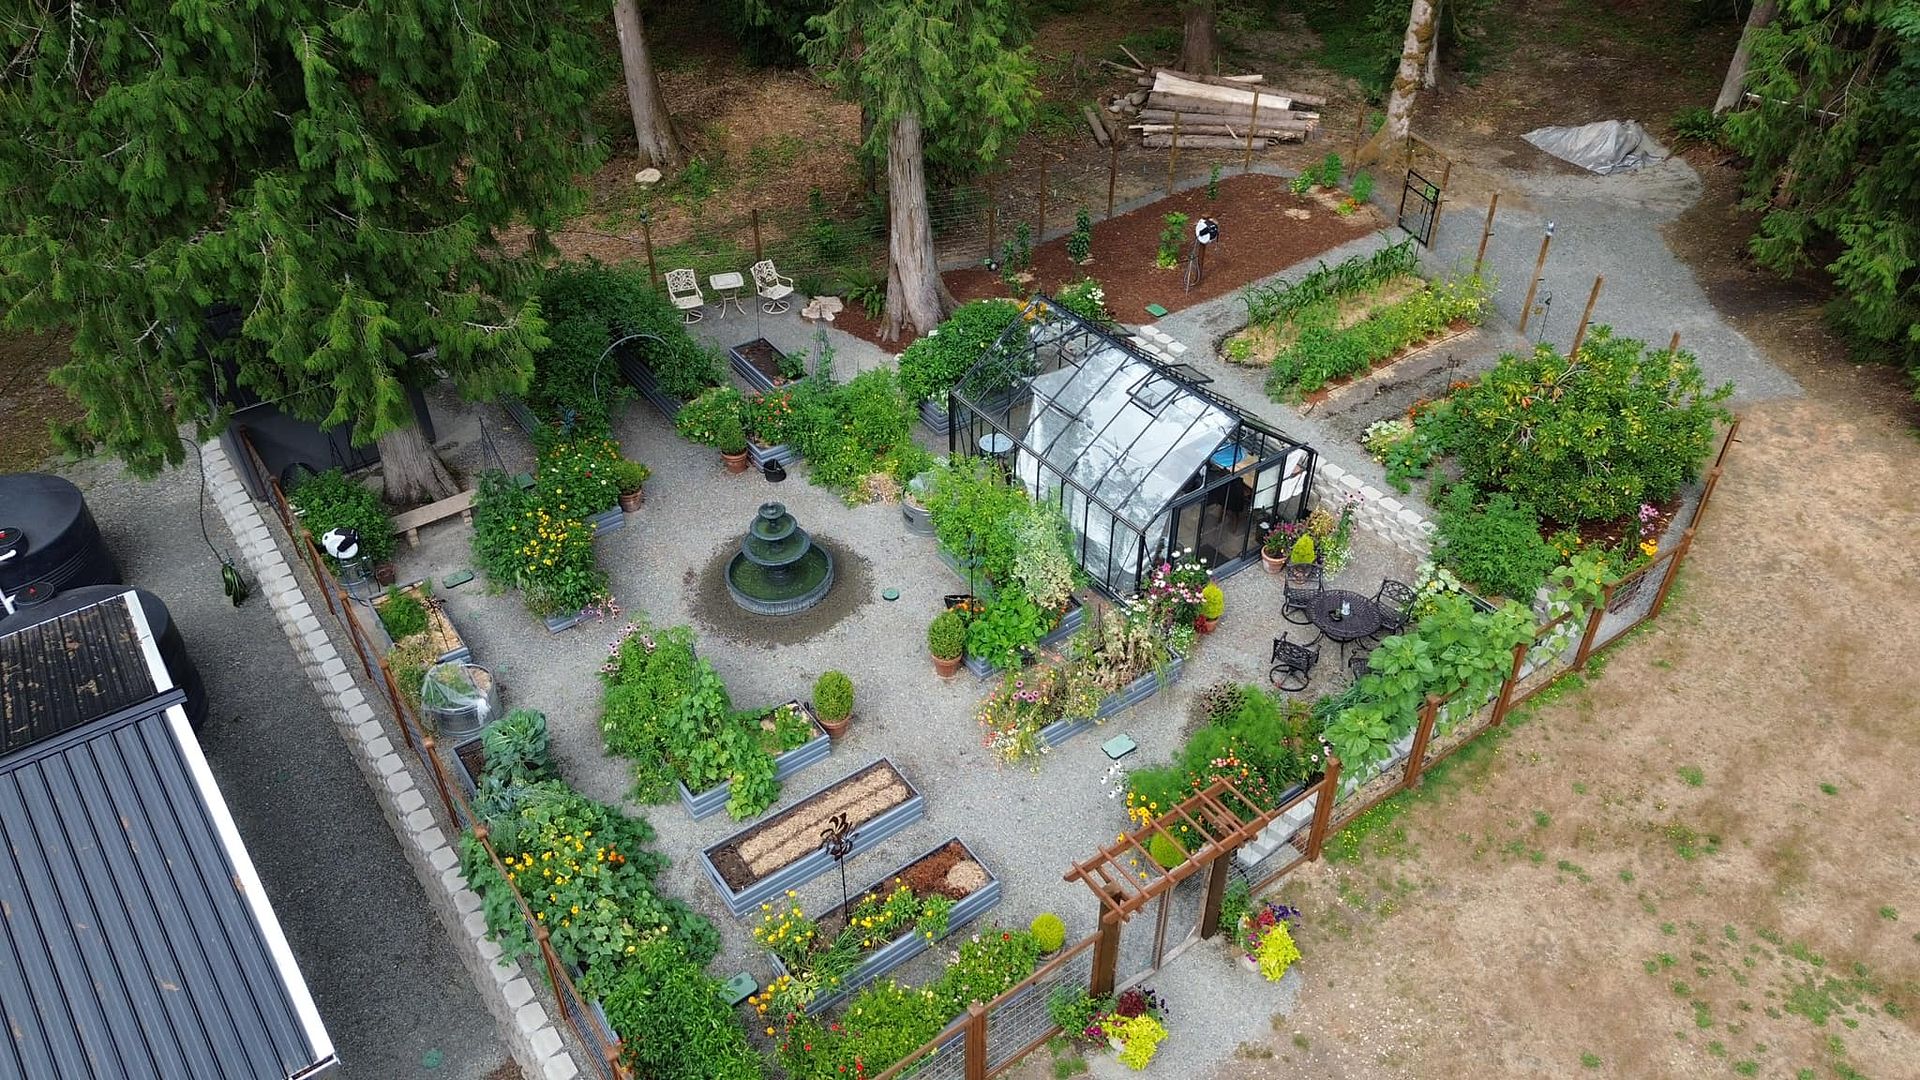
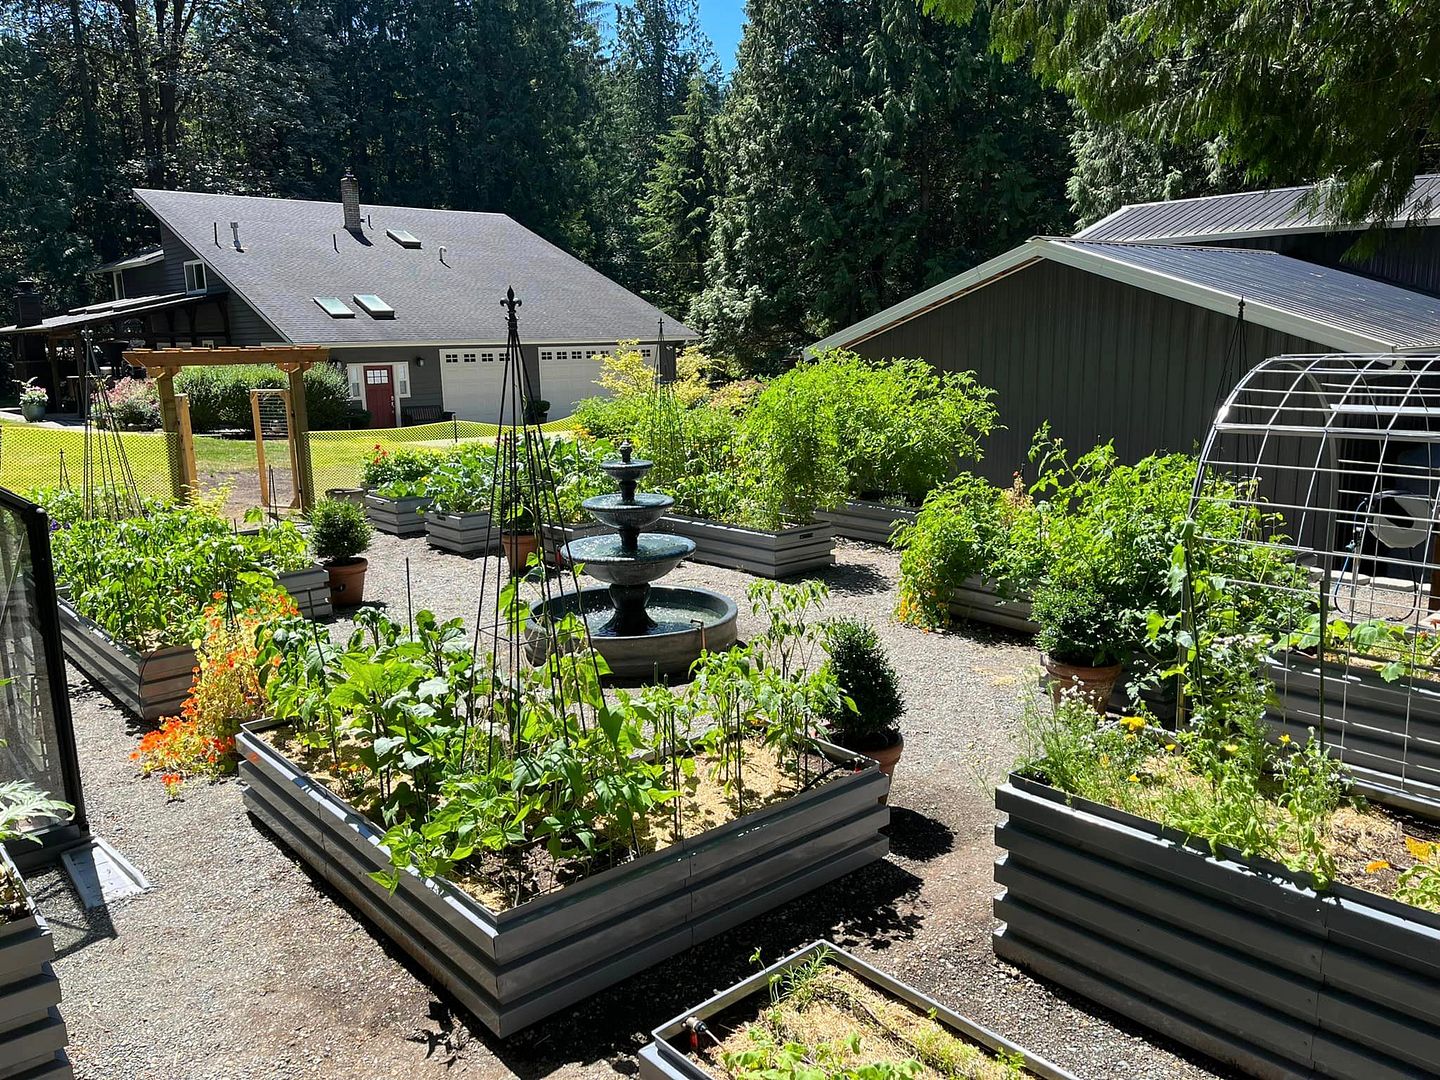
An overhead view of the whole garden, the water tanks are on your left and the new area we just added with the orchard is to the right.


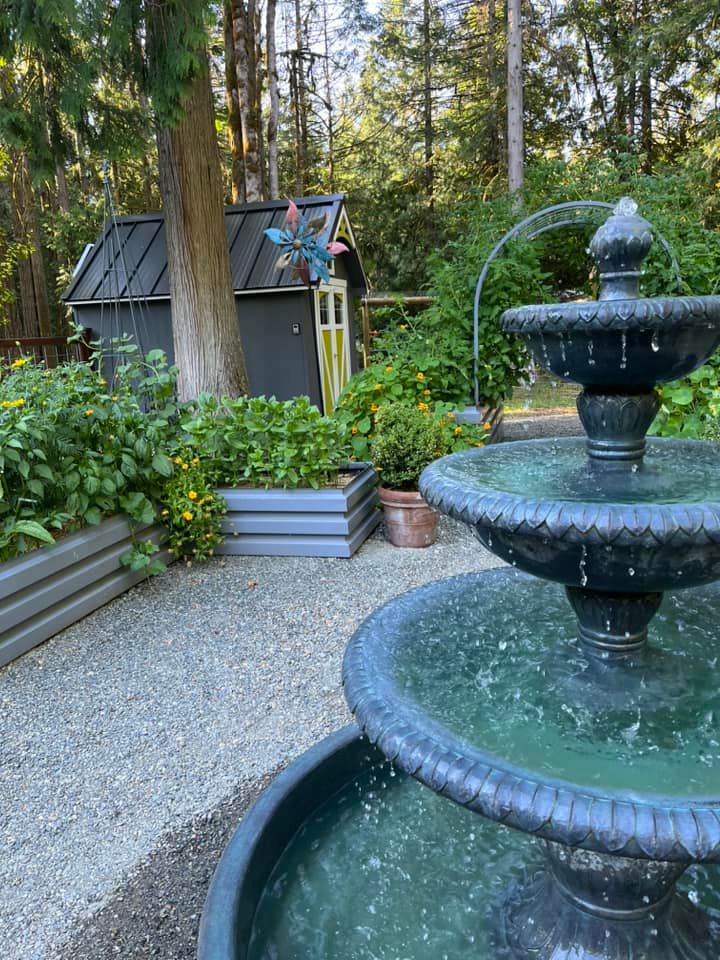
The little shed has been invaluable, so nice to keep everything close to where it gets used


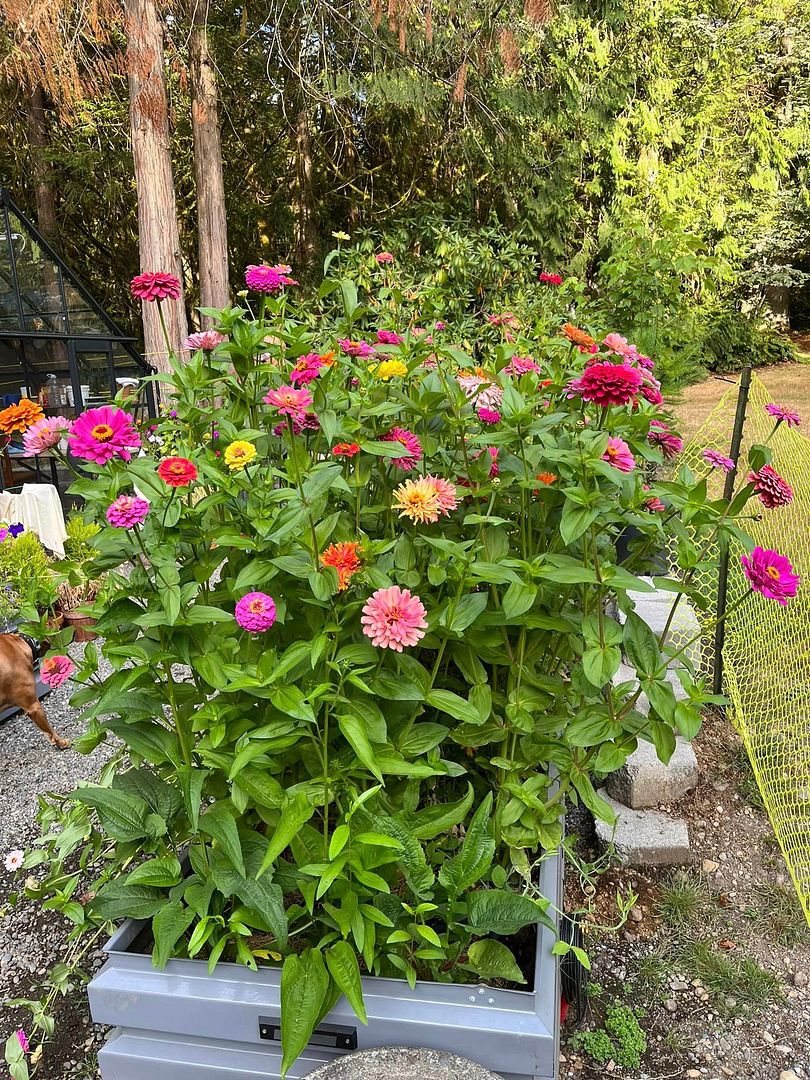
Lots of bees and butterflies this year!
 
Posts: 1
  • Mark post as helpful
  • send pies
    Number of slices to send:
    Optional 'thank-you' note:
  • Quote
  • Report post to moderator
You must be growing rice or sugarcane with that much capacity!!!
 
John C Daley
pollinator
Posts: 5355
Location: Bendigo , Australia
477
plumbing earthworks bee building homestead greening the desert
  • Mark post as helpful
  • send pies
    Number of slices to send:
    Optional 'thank-you' note:
  • Quote
  • Report post to moderator
well done
 
Jason Nault
Posts: 70
Location: Issaquah, WA
8
  • Likes 2
  • Mark post as helpful
  • send pies
    Number of slices to send:
    Optional 'thank-you' note:
  • Quote
  • Report post to moderator
We grow quite a mix of things including a lot of flowers. We can and freeze dry a lot of it. 2024 we got 27 quarts of pasta sauce, 15 pints of salsa, 20 lbs of sting beans and at least 30 lbs of cherry tomatoes. Also 60 or so heads of garlic and lots of other stuff I'm not remembering. We're making some changes this year to the "upper" grow space. The row space will be converted to blueberry bushes, the main isle will get another tunnel for growing kiwi fruits.

Due to the massive cyclone we got late in 2024 we have to replace one of the pear trees and a couple sections of fence that were taken out by a fallen tree. Thankfully we lost no structures as our neighbors did. The housing development 1/4 mile south of us has over 100 homes that aren't inhabitable. We lost 4 trees that were over 125 ft tall that blocked us on our street for 2 days, with no power or water for 6 days. After a month of hard work the property is about 50% cleaned up, there are still 7 down trees to clear but they aren't in the way of anything so not in a hurry. During the night (without saying anything until later) we both wrote off the green house thinking, "well there is the insurance claim for the storm" and that by morning it would be a pile of broken metal and glass. Falling trees shook the house all night and some how against the odds there wasn't a crack in the greenhouse the next morning!

My wife is already planning out the garden for next hear, here's to the 2025 garden season!
 
I just had the craziest dream. This tiny ad was in it.
2024 Permaculture Adventure Bundle
https://permies.com/w/bundle
reply
    Bookmark Topic Watch Topic
  • New Topic