• Post Reply Bookmark Topic Watch Topic
  • New Topic
permaculture forums growies critters building homesteading energy monies kitchen purity ungarbage community wilderness fiber arts art permaculture artisans regional education skip experiences global resources cider press projects digital market permies.com pie forums private forums all forums
this forum made possible by our volunteer staff, including ...
master stewards:
  • Carla Burke
  • Nancy Reading
  • r ranson
  • Jay Angler
  • John F Dean
  • Pearl Sutton
stewards:
  • Nicole Alderman
  • paul wheaton
  • Anne Miller
master gardeners:
  • Christopher Weeks
  • Timothy Norton
gardeners:
  • thomas rubino
  • Jeremy VanGelder
  • Matt McSpadden

The flue is very hot, why?

 
pollinator
Posts: 4154
Location: Northern New York Zone4-5 the OUTER 'RONDACs percip 36''
67
hugelkultur fungi books wofati solar woodworking
  • Mark post as helpful
  • send pies
    Number of slices to send:
    Optional 'thank-you' note:
  • Quote
  • Report post to moderator
Bacon Lee : We can take our time and figure out how to fine tune your RMHs performance ! Lets look at the way we mix air and Wood fuel during a burn.

We always want to be using the driest wood we can, fine split wood both dies faster and burns hotter, green wood will burn cooler and leave ashes !

I am sure if your dad still has good hearing he has taught himself exactly how to load the right amount of wood when compared to the size of the Feed

Tube opening. Your well fed rockets roar is its #1 clue everything is burning great !

With the coil at the mouth of your feed tube you are stealing a little heat away that might have led to More Smokeback as the wood got hot and your fire

tried to burn up the sticks ! Because your flue is running hot we know that you are rarely in danger of feeding to much air to your fire. If you were feeding

too much air you would be cooling the fire and you could tell by the way your rockets roar changed.


Next spring as it warms up you will need to burn less wood ( Dry Wood ) during a burn to heat your greenhouse and your water. This is the time to put

less wood into the mouth of the Feed Tube this will gradually reduce the Temperature of your flue !

This is where we partially close off the top of the Feed tube to match the amount of air to the fuel being burned, And do a better job of channeling the

Flow of Air directly over the wood being burned! Again when you have it right your 1st clue is in your Rockets Roar !


Also why can covering the entire feed tube during a burn be Dangerous ! If your Dad is firing your rocket correctly the fire brick that line your Burn

Tunnel should be glowing red ( You may not see it on a bright day - you should see it on a very overcast day) If at that time the feed tube is covered

tight the freaky high temperatures of the burn tunnel will continue to create Highly flammable Wood Gas. These Wood Gas hydrocarbons have no air

and that means they can not burn, and with no flow of air to cary them away they will collect directly under the Covered Feed Tube !

When your dad comes back to remove the cover from the Feed Tube Oxygen rich Air mixes with Hot Highly Flammable Wood Gases, already at or

above their ignition temperatures !

This can cause a flash back !!! and your children will be asking what happened to all of Grandfathers Hair !

So, Actually I think you are doing well, try and split and store as much wood ahead of your daily use/needs to give it all the drying time you can !

Continue to burn lots of fine spit pieces at a time, the more wood, the more individual air channels between wood pieces mixing in the right amount of air.


When we get warmer temps next spring your Dad can discover how to burn less wood at a time to get the temperatures you want, this is when you close

off part of the top of your Feed tube to supply joust enough air to the amount of wood you are burning - Your ears will tell you when you have it right !

For the Good of the Crafts ! Big AL
 
Posts: 146
3
  • Mark post as helpful
  • send pies
    Number of slices to send:
    Optional 'thank-you' note:
  • Quote
  • Report post to moderator

Ok then, forget about cover the feed tube.

I am pretty sure the firewood not so dried give a lot of ashes. Yesterday I had the awesome dried scrap wood again, and I see no ashes at all. This year I will prepare a lot of firewood for use next year so they will be 2 seasons, should burn awesome with no ash.

I have this kind of dried scrap wood for two weeks. I will keep you posted after two if I see any ashes at all. Yesterday and this morning, no, no ashes, totally clean, so nice.

Thank you everyone for your helps, explanations, and advises. Have a great day and great holiday
 
Rocket Scientist
Posts: 4567
Location: Upstate NY, zone 5
590
5
  • Mark post as helpful
  • send pies
    Number of slices to send:
    Optional 'thank-you' note:
  • Quote
  • Report post to moderator
And in response to your last question, using green wood will cause the fire to burn less hot, and likely tend to leave more coals or partially burned ash. Also, if the wood is green, you will need to burn more of it per day to keep the heat up (it wastes a lot of heat boiling off the water in the wood).

It would probably help if you put the next week's worth of wood near the barrel (not too near ) so it can be dried out more before burning.
 
Diana Lee
Posts: 146
3
  • Mark post as helpful
  • send pies
    Number of slices to send:
    Optional 'thank-you' note:
  • Quote
  • Report post to moderator

Glen, so that's it then. The not so dry wood really produce lot of ashes. Some time I see good clean no ashes for a few days and then suddenly full of ashes. I start realized that the amount of ashes associate with the wood dried or not dried. Yes I can do that. I can put wood on the bench near the barrel so they will be more dried for use after next week.

Thank you Allen for your long post explanation. I will have to read it again and again to understand it.

Thank you all for your helps
 
Diana Lee
Posts: 146
3
  • Mark post as helpful
  • send pies
    Number of slices to send:
    Optional 'thank-you' note:
  • Quote
  • Report post to moderator

The cob dried off, now flue is 160 - 170, tomorrow I will added 2 more feet of cob to the flue
 
Glenn Herbert
Rocket Scientist
Posts: 4567
Location: Upstate NY, zone 5
590
5
  • Mark post as helpful
  • send pies
    Number of slices to send:
    Optional 'thank-you' note:
  • Quote
  • Report post to moderator
A bare stovepipe will actually radiate more heat than a cobbed-over one. While the cob is damp, it is absorbing heat to evaporate water, so stays relatively cool, but when the cob is dry, it will slow the heat loss out of the pipe. When you cob over a RMH barrel, it no longer radiates as much heat, as numerous people have found and shared.
 
Diana Lee
Posts: 146
3
  • Mark post as helpful
  • send pies
    Number of slices to send:
    Optional 'thank-you' note:
  • Quote
  • Report post to moderator
Glenn, I don't understand what you really mean in this post. Did you mean we should not added cob? I already did this morning for 2 more ft.

I put cob on the flue because I would think about it as though I extended my thermal mass, my horizontal flue was only 12 ft, 2 ft added last week and 2 ft added this morning would make 16 ft. I would think the longer thermal mass, the more heat absorb into it and less heat left over to the chimney. I heard horinzotal flue should be 20 ft.

I think the extended mass did absorb a lot of heat. The 2 ft I added last week, they are 6" and 8" around the flue, and the temperature on the cob is 120-125. It is hotter than the bench itself. The bench is only 100 and 110. The bench is thicker, 10 inches to the surface.

Also, the scrap wood I use right now is very good, totally dried leaves no ashes and produces more heat I think, that's why the flue is hot. However, I already did the cob before I read your post, I think it did help absorb a lot of heat
 
Glenn Herbert
Rocket Scientist
Posts: 4567
Location: Upstate NY, zone 5
590
5
  • Mark post as helpful
  • send pies
    Number of slices to send:
    Optional 'thank-you' note:
  • Quote
  • Report post to moderator
Adding more length of duct, horizontal or vertical, inside the greenhouse will give more area for heat to radiate to your space. Converting a length of bare stovepipe to cobbed-over will store more heat for later, but the cobbed area will not absorb as much heat from the exhaust as a bare metal pipe will. The bare metal lets the heat get away immediately, while the cob holds the heat near the pipe.

Adding a barrel bell near the end of your bench run as Max advised would give more internal surface area for heat to be extracted from the exhaust, and increase your total heat kept in the greenhouse.
 
allen lumley
pollinator
Posts: 4154
Location: Northern New York Zone4-5 the OUTER 'RONDACs percip 36''
67
hugelkultur fungi books wofati solar woodworking
  • Mark post as helpful
  • send pies
    Number of slices to send:
    Optional 'thank-you' note:
  • Quote
  • Report post to moderator
Bacon Lee : I agree with Glen! The best explanation for your reduced temps so far are the fact that the cob is still wet! As your cob dries out it will become more insulating

If this is accurate by the time you get this message Your Chimney Temperatures should be slowly returning to their higher levels.


We need to talk about how you are checking temperatures in various locations, and what tool you are using ( If I missed this I am sorry )! The Infrared type thermal gun

can only measure the surface temperature of the stove pipe (flue) / Cob / water plumbing . The temperature of the hot exhaust gases Will be higher ! The magnetic type

of Thermostat is also a surface reading tool and does not measure the temperatures at the center of your Stove pipe that will be hotter .


This brings us up to the Boiling temperature of water at your Flue (final Vertical Chimney ) I can not recommend a new coil of water pipe at that location, it is just so very close

to scary temperatures !

I think that a simple ''bell'' as an addition at your Flue ( Final Vertical Chimney ) will be your Simplest/ cheapest way to Extract more heat from your system ! Big AL !
 
allen lumley
pollinator
Posts: 4154
Location: Northern New York Zone4-5 the OUTER 'RONDACs percip 36''
67
hugelkultur fungi books wofati solar woodworking
  • Mark post as helpful
  • send pies
    Number of slices to send:
    Optional 'thank-you' note:
  • Quote
  • Report post to moderator
Bacon Lee : I think that we have covered the topic of capping off the top of the Feed Tube -very well ! However- I am including a link to a single picture of exactly

how to cover Part of the Feed Tube to allow burning less wood Without introducing too much air ! Again your number #1 Clue to an efficient burn is by listening to

the strength of Your Rockets Roar !

See link below :


http://s65.photobucket.com/user/mremine/media/NYC%20Rocket%20Stove%20Build/P1030331.jpg.html?sort=3&o=6


For the good of the Crafts ! Big AL
 
Diana Lee
Posts: 146
3
  • Mark post as helpful
  • send pies
    Number of slices to send:
    Optional 'thank-you' note:
  • Quote
  • Report post to moderator
I used infrared thermal heat gun. So it is true that it's on surface only and hotter in middle of duct

Glenn, Allen:

Oh my goodness, now if I have to redo the duct, which means beside breaking down the new cob, I also have to break partial of the original bench in order to bring out the duct to extend it... I feel sick from tiredness already. I think I will take away the new 4 ft added cob to expose the duct again and here is what I think I would do (coil Allen, yes), please see if it works:

As you see in this attached photo: The end of the tube of the returning water from the coil to the pond, is above the surface of water. So in case power's out, if the water in coil heat up with steam, the steam does have way to exhaust. Would that eliminate chance of explosion from steam burst? No? not yet? Ok, I don't have a way to make detachable coil or slip-in coil for the vertical flue because both end of the flue are locked off. So once we have coil around the flue, it will be permanent. So in case of power out, the only way we can deal with permanent coil is stop burning the RMH.

As I notice that the RMH is cooling down quite quickly if we stop burning. I think tomorrow I will run a test, a simulation of power out. In the middle of burning when RMH is hot, I stop the burning, pull out all the burning wood from the feed and turn off the pump on one of the coil and then I will monitor to see if the coil getting hot to dangerous or it getting hot a little and then cooling down as the RMH cooling down. If it getting hot a little and then cooling down with the RMH then there is no danger there. I will let my dad know when power out then stop burning RMH and pull out all the burning woods and dip them in a bucket of water. I already have a bucket of water next to him anyway. Then I can have coil around the flue to get some hot water. I will use pex tubing instead of copper. Pex is plastic but pex endures heat up to 220 degree. Plastic will not explode right? It just melt if it too hot, right? So in term of safetyness, pex is better than copper. So, for permanent coil, I think we can only stop burning the RMH if the power is out

What do you think? please let me know
20151218_185744_resized.jpg
[Thumbnail for 20151218_185744_resized.jpg]
 
Diana Lee
Posts: 146
3
  • Mark post as helpful
  • send pies
    Number of slices to send:
    Optional 'thank-you' note:
  • Quote
  • Report post to moderator

Allen, you said many times listen to the sound of the RMH to see if is working fine or burning fine. My RMH never makes sound. I told myself because I use the full size brick so it didn't make sound. But I wonder if something is wrong with it having no rocket sound
 
Diana Lee
Posts: 146
3
  • Mark post as helpful
  • send pies
    Number of slices to send:
    Optional 'thank-you' note:
  • Quote
  • Report post to moderator
Pex is not that simple, we have to buy tools for it. Also when it's cold and we need to burn RMH, with this permanent pex coil we can't burn then it's not good. I think I will break down partial of the bench to extend the duct (extend the thermal bench).

I think of what Glen said, any kind of duct extend can help radiate heat. I was thinking of extend the duct in the open section where the 3rd clean out is, so I don't have to break the bench. Look at the photo where my dad falling into sleep, the third clean out. If I can take out that T and extend the duct to the left then u-turn ... That would be the easiest, but how do I take out that T since everything is tighten up and inline. Look like I still have to break out the bench just to take out that T, right? Do you know any way to take that T out?
 
Glenn Herbert
Rocket Scientist
Posts: 4567
Location: Upstate NY, zone 5
590
5
  • Mark post as helpful
  • send pies
    Number of slices to send:
    Optional 'thank-you' note:
  • Quote
  • Report post to moderator
You're talking about the cleanout that is about 5 feet above the floor, right? Is the lower part of that covered with cob now? If not (and maybe if so), I think the easiest and probably best solution would be to cut the duct just above benchtop level, run it into the lower side of a barrel sitting on the benchtop, and out of the lower side of the barrel and connecting to the existing chimney. You can cover the barrel with as much cob as makes sense to you for heat storage versus radiation.

I wouldn't remove the cob that you just put on unless you still find that you can't radiate enough heat to cool down the final exhaust.

If the copper tubing is open at the end, all that is likely to happen in case of overheating is that it spits out boiling water and steam. As long as that will not hit people, you should be safe.
 
Diana Lee
Posts: 146
3
  • Mark post as helpful
  • send pies
    Number of slices to send:
    Optional 'thank-you' note:
  • Quote
  • Report post to moderator

Glenn, I didn't fully understand your description of how to do it, I already don't like it. A barrel on my bench? How ugly. I want a pretty thermal mass. I had a second barrel at the end of the bench before, but it's so ugly and bulky so I took it out threw it away

I decided to break the bench and extend the duct. Here is gut picture. Tomorrow I will cob it

I don't want to make the brick box. Brick boxs make it easier for me to cob and form the bench. But at this location it's not that hot. Do you think it is ok to have brick for the outside wall, and the inside, i pour cob to the wall of the house. Is it ok?
20151221_160529_resized.jpg
[Thumbnail for 20151221_160529_resized.jpg]
 
Diana Lee
Posts: 146
3
  • Mark post as helpful
  • send pies
    Number of slices to send:
    Optional 'thank-you' note:
  • Quote
  • Report post to moderator

I am done cob the new section. I am so glad I extended my thermal bench. I shot at the cap of the new clean out, which is 5 ft away from the old bench, and it was 175 degree with wet cob on top of it. Imagine how much heat waste if I don't extend it.

At the bottom of vertical flue after the last elbow, 125, at the top before go out the roof is 110 (90 at the beginning, 100 after 2 hours burn, 110 after 4 hours burn). This is too low right? But the cob is wet. I will give it a few days for the cob to dry off to see what is the real temperature. If it too low at the top before going out the roof, does it mean I have no draw? What happen if I have no draw? What is the symtom and how is it going to effect my RMH?

I attached clip of burn, please see if I have draw or not.

The RMH is still normal. Cap of barrel is above 630 after 1 hour burn (Before it was like this too). I burn for 4 hours and don't see any problem, no burn up, no building up of red charcoal, and I heard rocket sound too. Since my dad took over the burning job, I didn't hear the rocket sound even I was in the GH. Today I burn to see if everything is normal, and I heard the rocket sound once in a while. Seem ok right? But I just want to learn, what is the symptom if I don't have draw and how is it effect my RMH please

https://www.youtube.com/watch?v=o9T1afd1sR8
20151224_124724_resized.jpg
[Thumbnail for 20151224_124724_resized.jpg]
 
Diana Lee
Posts: 146
3
  • Mark post as helpful
  • send pies
    Number of slices to send:
    Optional 'thank-you' note:
  • Quote
  • Report post to moderator
I mean draft, not draw
 
Diana Lee
Posts: 146
3
  • Mark post as helpful
  • send pies
    Number of slices to send:
    Optional 'thank-you' note:
  • Quote
  • Report post to moderator
Hello everyone

I just want to let you know, the cob in my extended bench is dried out. The flue got better temperature. At the top of the flue before going out the roof runs from 110 to 130. I don't see any thing different with the RMH's performance when added 5 feet bench, except that my flue is now has reasonable temperature, and the extended bench is hot enough for me to dried my firewoods on it, 110 -135 degree normally (I made this part of the bench with only 3 inches of cob above of the duct).

This should be it for now. I mean I wont' bother you any more, because I consider I am successfully done with my RMH. I won't do any more change to my RMH for now.

Thank you every one for helping me so far. Thank you Glenn, Allen, Shillo, Satamax, Thomas, Eric ... and Erica and everyone else. Thanks for being patient with me, someone who has no idea what she's doing. Looking back into when I first built my RMH by learning on youtube , I really cracked myself up. I went back to the old thread and read my post when I first reported here my problem and my reading, I really had rediculous numbers. Back then, after I burned my RMH for half an hour, with no cob or thermal mass yet. measurement was on bare duct, and below was the temperature reading which I reported:

Where connected to barrel: 88
At the U-turn: 87
After U-turn: 77
Verticle duct up the roof: 71

Hahah, that's how my RMH performed back then.

It is such a long way for me but I am so happy I stick to it to the end. I think, from now on, I will get by winter just fine with out using the electric water heater. In my area, every year we have less than 10 days below 30 degree, and those days normally are at the end of Nov and beginning of Dec. The rest of December normally from 30-35 degree. January mostly from 35-40 degree. So I already went through the coldest days of the year with no problem at all. And my fishes this year, never a day that they quit eating. The pond water temperature pretty much around 68 -70, lowest water temperature was above 63 degree so far, except for some days I didn't burn RMH due to holiday and due to reworked on my duct to extended my bench, the water temperature went down to 60 degree.

However, I think the best thing about RMH at all is the electric bill. Last year, from Nov to Feb, I got more than $100 increased in my monthly electric bills due to electric water heater. Last year I have only 1 pond. Even so, with electric water heater, my pond normally below 60 degree, and for many days it was dropped lower than to 55 degree. My fishes quit eating very often last year. It was a tough battle for a 1000W and a 300W electric water heaters to heat a 450 gal pond in a GH which was ice cold.

Also, the other good thing about RMH is, with RMH my GH always warm and nice and firewood is free. Electric water heater can only heat the water, the GH is cold all the time.

Again, thank you everyone, and I wish you all a very happy new year

By the way, I coppied F Styles and cemented the top of my bench. I just cemented the top, not the side. For a GH, I think that this is pretty enough!


20151231_113223_resized.jpg
[Thumbnail for 20151231_113223_resized.jpg]
20151231_113236_resized_1.jpg
[Thumbnail for 20151231_113236_resized_1.jpg]
 
gardener
Posts: 1292
Location: Okanogan Highlands, Washington
397
4
hugelkultur cat dog books food preservation
  • Mark post as helpful
  • send pies
    Number of slices to send:
    Optional 'thank-you' note:
  • Quote
  • Report post to moderator
Bacon:
I love this thread.
I'm glad your dad likes his job. We have only had a few stoves where people wanted to run them all day, too often. It can be a problem what to do with the extra heat.

Ashes: We normally recommend cleaning a scoop or two out of the firebox every time you light the fire, or maybe since you are doing it twice a day, scoop out some ash each morning (when the fire box is at its coolest). We have sometimes been lazy and waited a week or two, but we almost never go a whole month. The ash in our firebox can be 1/4" to 3/4" without a problem, but if it is more than 1" then the wood won't feed right and it can choke on embers a little bit.

Different ashes with different wood:
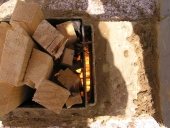
Mineral ash, from stuff that can't burn, is usually white or pale - can be brownish, yellowish, or even pink. Charcoal is black, and the "ash" from wood that is not burning well is dark grey or black.
So is your ash black, or white? If it's white it's the material, if it's black, the problem is how the fire is burning.

- Drying depends on climate. In some dry climates the wood is dry in 3 to 6 months. In a very wet climate you need a very good wood shed, like a food dehydrator almost, and it can take years. There are some good ways to check how dry your wood is on the online chimney sweep, www.chimneysweeponline.com. If the wood is too wet, the effect is similar to air restriction: it doesn't burn well, makes a lot of smoke, charcoal, and creosote. The most obvious sign is if you see water bubbling from the cut ends of the wood while it's in the fire - that's definitely too-wet wood, it is taking energy from the fire to steam-boil it dry.

- Some types of orchard wood make a lot of ash because the trees are sprayed with clay in spring to stop some crop pests. Over the years, the orchard tree bark has a LOT of clay. It makes a lot of ash. Your dried lumber would be a lot cleaner, and should make less ash. Also, color printer paper has clay in it, so if you burn a lot of paper or colorful cardboard wrappings, you get a lot of ash.


Chimney temperature:
When the bench is cold, especially when it is cold and wet, the chimney is cooler. When the bench is already warm enough, then more heat reaches the chimney. Some of our chimneys that registered about 115 F when the bench was first built, will now operate at over 150 F in the main part of the cold season. I agree with Peter that 200 F is not unreasonable for a heater that is run so often. The 100-120 guideline is so you know if you've built it right; if it's colder than that while the heater is new (and the bench is made of wet mud), you can expect some problems over time.
Because the chimney temperature can get hotter in some conditions, we now tend to recommend installing the chimney as a proper High Temperature (HT) chimney, like you would do for a woodstove or masonry heater. If the hot chimney is too close to something combustible (like where it passes through the wall), you can get a small piece of insulated Class A HT chimney, which is safe in a much tighter space. It will be about 1" bigger on all sides, and the insulation will protect the surroundings from the heat.

Safety:
Creosote and flashbacks are big concerns.
The opening can be covered partly while burning the fire. But if it is covered completely, so that no air gets in, it could make a lot of smoke and later cause a chimney fire. If you had a chimney fire, I think it would be a LOT hotter than 210 F (more like 600 or 800 F, and could be glowing red-hot). I would suggest checking for creosote (sticky tar inside the pipes), and if you find any, let your dad know that he needs to make sure there's enough air. He can check by looking at the chimney from outside - if it makes any smoke (grey, yellow, blue, any color at all), then it can make creosote, and it is time to adjust the air. Sometimes more, sometimes less. If the smoke will not go away in 10 minutes or so, then maybe the wood is too wet. However, even clean exhaust can make white clouds of steam. If the cloud coming out of the chimney is clear, turns white, and then disappears again, that is steam and that is OK.

Water heater: I probably should just say "this is not safe."
I am always nervous about water-heater pipes and wood heat; they are not safe, but sometimes they are important enough to be worth the risk. It seems like you have decided it's important.
The position at the top of the wood feed seems like it is working for you; however it does seem important that it is in the cool part of the burn feed, which is achieved because there is always cool air coming in. If these pipes got too hot, there could be steam explosion problems.
Is there a safety release in case the water in the pipes starts to boil? I am not an expert, but there are some very cheap ways to make a safety release, such as cutting the pipe and connecting it with a silicone-rubber tube that is just slipped on. If it boils, the steam will pop the tube off. Note that if this happens, you will have a pipe spraying scalding water and steam all over the place. It is still not safe, but it may be easier to direct the release in a safe direction, and safer than an explosion which cannot be directed.
I like Tim Barker's hot water design, which can be found on permaculturenews.org. It has several layers of protection so that it is not as easy for the water to cause an explosion. Maybe this would be useful to you. I would encourage you to ask his opinion, or even hire him to review your system. He might be able to help you design a safer water-heating option which would also let you re-direct excess heat when the bench is too hot, but the water needs more heat.

I could also refer you to Ernie for advice about fish species which do not need water heated all winter long. It would save a lot of wood and trouble if you can raise fish in normal, sun-heated water, or at whatever temperature keeps the greenhouse plants happy.

But then, your dad would lose his favorite job.

Maybe you could encourage him to sit or lie on the bench while he is firing the stove - he will feel the heat sooner and more deeply, and not be as tempted to over-fire the stove.

Also, I like the idea someone else pointed out, that the real need for the most heat is in the night and early morning. This means the evening fire should be the longest one. The morning fire is only if needed, to bring the tanks or greenhouse back up to temperature if the night was very cold. If your dad ever is willing to reduce his hours, you might have him reduce the morning hours but keep the evening ones.

Yours,
Erica W
 
Erica Wisner
gardener
Posts: 1292
Location: Okanogan Highlands, Washington
397
4
hugelkultur cat dog books food preservation
  • Mark post as helpful
  • send pies
    Number of slices to send:
    Optional 'thank-you' note:
  • Quote
  • Report post to moderator
Sounds like the bench extension was a good solution for you. I wonder why I didn't think to ask about your bench length before I saw your latest pictures?
With the chimney near the barrel, it should not be too hard to start even with the low exhaust temperature.

Do continue to keep the wood as dry as you can. With dry wood, you can also burn larger pieces, which makes it burn slower (and prevents the coals choking the stove which is a problem you mentioned). Maybe your dad can still run it 4 hours, but burn a little less wood by burning it in larger pieces (which burn slower and longer).

And if you ever have trouble starting the fire when the benches are cold, remember you can heat up the chimney some other way, to boost the draft.

Yours,
Erica
 
And that's when I woke up screaming. What does it mean tiny ad?
permaculture bootcamp - learn permaculture through a little hard work
https://permies.com/wiki/bootcamp
reply
    Bookmark Topic Watch Topic
  • New Topic