• Post Reply Bookmark Topic Watch Topic
  • New Topic
permaculture forums growies critters building homesteading energy monies kitchen purity ungarbage community wilderness fiber arts art permaculture artisans regional education skip experiences global resources cider press projects digital market permies.com pie forums private forums all forums
this forum made possible by our volunteer staff, including ...
master stewards:
  • Carla Burke
  • Nancy Reading
  • John F Dean
  • r ranson
  • Jay Angler
  • paul wheaton
stewards:
  • Pearl Sutton
  • Leigh Tate
  • Devaka Cooray
master gardeners:
  • Christopher Weeks
  • Timothy Norton
gardeners:
  • thomas rubino
  • Matt McSpadden
  • Jeremy VanGelder

newbie here with RMH questions

 
Posts: 36
Location: Queen Charlotte islands, PNW, Canada- zone 6 marine.53.6878° N
3
dog hunting woodworking
  • Mark post as helpful
  • send pies
    Number of slices to send:
    Optional 'thank-you' note:
  • Quote
  • Report post to moderator
hiya all, wayne here from north west canada. awesome forum- sure glad i found it.
we currently use wood to heat our home- burning about 6 cords a winter- i want to change all that.
these rocket heaters look like the deal.
we have a 2400 sq. foot home on two floors- so 1200 per floor,what kind of info is there out there for building a stove of this size.
as we progress with this- i will do a sketch of the floor plan of the house- and see what ya'll have in the line of suggestions for placement and build ideas etc. been kind of getting a picture- while i have been snooping around on here the last few days.
awesome info here
many thanks and much gratitude
cheers
wayne
ps: ask any and all questions- any critique is accepted- good, bad or indifferent- just want to learn as much as possible about all this- i am a clean slate- no adulteration's- so guide me!!
 
Posts: 567
Location: Mid-Michigan
43
duck forest garden trees hunting books food preservation bee solar
  • Mark post as helpful
  • send pies
    Number of slices to send:
    Optional 'thank-you' note:
  • Quote
  • Report post to moderator
Welcome, Wayne!

First question- what's your chimney setup like?

(To be more specific: where in the house is it located, what's it made of on the inside and on the outside, how satisfied are you with its draft, and is installing a new chimney possible for you if you discover that's best, or would that be out of the question?)
 
Rocket Scientist
Posts: 4530
Location: Upstate NY, zone 5
576
5
  • Mark post as helpful
  • send pies
    Number of slices to send:
    Optional 'thank-you' note:
  • Quote
  • Report post to moderator
Welcome to Permies, Wayne!
If you can heat your house satisfactorily with wood, you should be able to keep it at least as comfortable with a RMH (or maybe two for a two story house).

First, your climate and house. By northwest, do you mean coastal? How cold does it get and for how long? How well insulated is your house? What do you currently have for heat, and is it oversized, undersized, or just right? Where is it located in the house? How strong is the floor, and what are the possibilities for strengthening if needed? Do you currently have a central chimney, or external? What diameter and how tall?
 
pollinator
Posts: 4154
Location: Northern New York Zone4-5 the OUTER 'RONDACs percip 36''
67
hugelkultur fungi books wofati solar woodworking
  • Mark post as helpful
  • send pies
    Number of slices to send:
    Optional 'thank-you' note:
  • Quote
  • Report post to moderator
Wayne Nicol : Our Adam (and Eve ) is Ianto Evans, barely 2 generations ago; his Rocket Mass Heaters, is to date ''The Book" ! Simply, it has no equal,

all future Books/Manuals will be measured against " The Book "

Have you been to Rocketstoves.com to download your copy of the New 3rd Edition?* This book will save you Time, Effort, Money/materials, and frustration

from "Re-inventing the wheel'' It also ensures that when you come back here we all ,You and your Fellow Rocketeers will be using the same words to describe the

core need for a Constant Cross-Sectional Area; C.C.-S.A.

And the Size Shape and Orientation of the Parts both to themselves and the whole ! The math is all 4th, 5th grade stuff, not a problem !

A little more information on location and elevation will allow us to better help you find your best in house RMH location !

See the link just below for a Ernie and Erica Wisner Build, ernieanderica.info This one is quite likely to serve your heating needs. Link Below :


https://permies.com/t/25435/rocket-stoves/video-great-rocket-mass-heaters


The 1st Video is of a working RMH going into its 2nd winter at the time the Video was made; It is now in its 5th winter with No Major renovations !

You can see that the house is 2 story, with a large open stairway to help heat the upstairs. This has worked well !


Modern adaptation of some RMH Designs, includes having a radiator located remotely ( usually called a Bell ) from the Rocket Burner Base /

Thermal Mass !

We have all started out where you are today, and are full of (mostly good ) advice, we can propose building ideas- ultimately the build will be

Yours !

I hope you find this helpful and timely, for the good of the Crafts ! Big AL !

* As many copies as you want, one to use, one to lose, and a third copy for your library and to lend to close friends! al just one price !


wayne nicol
Posts: 36
Location: Queen Charlotte islands, PNW, Canada- zone 6 marine.53.6878° N
3
dog hunting woodworking
  • Mark post as helpful
  • send pies
    Number of slices to send:
    Optional 'thank-you' note:
  • Quote
  • Report post to moderator
awesome!!
thanks folks- great start
yup coastal north wes wet winters - not very col righ now it about 8 degrees Celsius outside- some snow in the winter but not much- none this year ye will get down to freezing, but on average its around freezing or just a tad below on colder nights- maybe -10 c on colder nights.
house is well insulated and of solid construction, wooden floors, could get in the 4' crawlspace and certainly add additional support if needed. masonry chimney- draws and works very well- obviously 2 stories tall- external chimney- well external to the house bit it goes up the inside wall of the adjoining garage- which we are turning into a suite- so have some ideas about that.
the wood stove is down stairs- and heat is carried up stairs via the staircase and some open vents in the top floor- above the wood stove.
i am happy to do whatever is needed to try this sytem- a new chimney if needed etc- am a bit of handy person- so can do most things.
house is standard stick frame house with vinyl siding- insulated 6" walls.
current heating set up is great - keeps the house warm on the coldest nights- just want to move away from a system that uses so much wood and maintenance stoking it all the time- even if it is damped down( which it usually is)- it takes attention sporadically all day.
i will be looking into that book- many thanks
wayne
 
Glenn Herbert
Rocket Scientist
Posts: 4530
Location: Upstate NY, zone 5
576
5
  • Mark post as helpful
  • send pies
    Number of slices to send:
    Optional 'thank-you' note:
  • Quote
  • Report post to moderator
That's a good base to start from. The chimney being partially within the garage is helpful, as that part at least will not be exposed to outdoors, and even moreso if you turn it into living space. Do you know how thick the chimney is, and if there is any insulation or airgap between liner and exterior face? What is the interior size of the chimney? (Too large and you can get the exhaust losing all its heat while meandering up and get a cold plug.) If the draft is very good now, you will probably be fine using it as is.

A floor plan with some dimensions and thoughts on how you want to use the space would be the next step. For a standard style RMH, you will have a long bench or couch type of mass, and you need to decide where it can fit and be useful, maybe replacing a current couch or chair(s).

If floor space is tight, you can make a vertical masonry/cob "bell" which will have a smaller footprint (possibly not more than a woodstove with its required clearances to walls). That would lose the warm seating and absolutely require a real footing and solid foundation piers. It is even possible to make a two-story bell or a second bell upstairs if radiant heating in the upper floor would be preferable. If heat migrates upstairs easily now you may be okay keeping the source all downstairs.
 
wayne nicol
Posts: 36
Location: Queen Charlotte islands, PNW, Canada- zone 6 marine.53.6878° N
3
dog hunting woodworking
  • Mark post as helpful
  • send pies
    Number of slices to send:
    Optional 'thank-you' note:
  • Quote
  • Report post to moderator
thanks,
space is not too much of an issue- should be able to build quite a big mass- whatever is needed.
currently the stove heats the upsairs quite well- so will try just the one rocket stove for the moment downstairs.
the chimney seems to draw just fine- it is masonry- no liner, about 8 or 10 " inside dimensions - square and the walls are at least 3" thick

i will work on a floor plan this evening and post it on here
many thanks
 
Glenn Herbert
Rocket Scientist
Posts: 4530
Location: Upstate NY, zone 5
576
5
  • Mark post as helpful
  • send pies
    Number of slices to send:
    Optional 'thank-you' note:
  • Quote
  • Report post to moderator
An unlined brick chimney partially exposed to the outdoors will lose a bunch of heat, and may cause difficulty on cold starts. 8" x 8" would be a good size, 10" x 10" would be big enough that you might have issues keeping the chimney warm in cold weather, given the reduced amount of heat that will be going up it compared to the woodstove. It won't hurt to try using it as is, but I would consider a backup plan of putting an 8" diameter stainless steel liner in and insulating around it with perlite, if you find you have draft issues down the road.
 
wayne nicol
Posts: 36
Location: Queen Charlotte islands, PNW, Canada- zone 6 marine.53.6878° N
3
dog hunting woodworking
  • Mark post as helpful
  • send pies
    Number of slices to send:
    Optional 'thank-you' note:
  • Quote
  • Report post to moderator
that sounds like a good, and very do- able solution- i will need to get up there and do some measuring
thanks
 
gardener
Posts: 3471
Location: Southern alps, on the French side of the french /italian border 5000ft elevation
194
  • Mark post as helpful
  • send pies
    Number of slices to send:
    Optional 'thank-you' note:
  • Quote
  • Report post to moderator
Wayne, i think, for a two storey 2400sqft building, i would consider to make a brother to this build.

http://donkey32.proboards.com/thread/1330/story-bells-20cm-batch-proposal?page=3#scrollTo=15600
 
wayne nicol
Posts: 36
Location: Queen Charlotte islands, PNW, Canada- zone 6 marine.53.6878° N
3
dog hunting woodworking
  • Mark post as helpful
  • send pies
    Number of slices to send:
    Optional 'thank-you' note:
  • Quote
  • Report post to moderator
great videos all- really enjoyed watching them- really love the pic that Satamax posted. so heres a few dummie questions :
1. we ( read: my wife- as a happy wife is a happy life) really like the ambiance of the glass fronted wood stoves- we currently have a blaze king
can one create a true rocket stove with a glass " view " panel somewhere in it- i understand that these stoves dont burn all day- but for when they are burning- it would be really great
2.so if its the "rocket effect" that allows the exhaust to be longer- and thus create the heating for the mass core- a. can the chimney simply extend out horizontally from the end of the ducting.
b. currently my chimney is 2 storeys high- can i not simply just have the chimney come out and only go up one story or some similar type solution.- as wouldnt this great long chimney that i have- detract from the ducting that i can put in the heating core- as some heat would be needed to draw up this long chimney- and that would be robbing from the heating core.
3. how feasible is it to be built on the second floor of the building- in a standard stick frame house- could be a lot smaller- as it would only be heating 1200 sq feet. i mean the stick frame structures hold up a bath tub full of water. i guess i could put some aesthetically pleasinf support posts under where the stove is , and right through to the crawl space and a good concrete footing.

thanks all
 
allen lumley
pollinator
Posts: 4154
Location: Northern New York Zone4-5 the OUTER 'RONDACs percip 36''
67
hugelkultur fungi books wofati solar woodworking
  • Likes 1
  • Mark post as helpful
  • send pies
    Number of slices to send:
    Optional 'thank-you' note:
  • Quote
  • Report post to moderator
Wayne Nicol : Let me take a small piece of this ! Counter-intuitively, The Taller chimney will always draw better than the shorter one !

You can prove this yourself with a couple of funnels, Take a funnel with a very long hose end, like for adding transmission oil to your car, and another

funnel with a shorter hose-end of the same ( or very close ) Diameter !

If you have a helper to hold the funnels and use a couple of fingers for stoppers, you can start your flows at the same time and check it out !

The 'longer funnel' will have much less friction loss due to a smoother less turbulent flow - as compared to the 'shorter Funnel' .

Inside the combustion core we want three things, a good mix of Time, Temperature, and Turbulence to assure a good clean burn! The presence of

Turbulence is clearly announced in Your Rockets Roar !

Latter throughout the gases flow through Your Horizontal and your Vertical Chimneys we what as little turbulence as possible, That is the main reason

we assess a 5' penalty to every Elbow and " T" we build into our system !

This effect is independent of the draw producing effects of the Temperature of the Hot Exhaust Gases

Your question #3, possibly, You will need to google "Stack effect'' and "Whole house Stack Effect'', the other issues would be the safety and ease of use

problems you run into with placing your rocket In an"Remote location !''


I hope that this was clear and helpful , fur the Good of the Craft ! Big AL
 
wayne nicol
Posts: 36
Location: Queen Charlotte islands, PNW, Canada- zone 6 marine.53.6878° N
3
dog hunting woodworking
  • Mark post as helpful
  • send pies
    Number of slices to send:
    Optional 'thank-you' note:
  • Quote
  • Report post to moderator
now i just need someone to help me with the glass door issue, then to point me in the direction of a good proven design- then i can get my wife right onto building it
 
Satamax Antone
gardener
Posts: 3471
Location: Southern alps, on the French side of the french /italian border 5000ft elevation
194
  • Mark post as helpful
  • send pies
    Number of slices to send:
    Optional 'thank-you' note:
  • Quote
  • Report post to moderator
Hi Wayne.

So, i'll try to keep it short.

The history of the batch or horizontal load rocket is here.

http://donkey32.proboards.com/thread/511/adventures-horizontal-feed

Dimensions are here

http://donkey32.proboards.com/thread/734/peterberg-batch-box-dimensions

The one showed earlier on, has two stacked bells, so the chimney is on the second floor, at the bottom of the bell. I'm not too keen about using flues with batch rockets. They are high draw systems.

But anyway, having a tall chimney, as Allen said, is better, and would rather increase the lengh of horizontal flue you can use, than substract from it.

With most of the rockets, except if you have an ideal situation, you can't have an horizontal exhaust. Better keep the chimney. Why would you want to build just on top floor of the building? You're not using the bottom? If that's the case; keep the rocket where you live, lounge or kitchen. You could always use posts. But remember, a good 24 hours mass is around 4 or 5 metric tons.

If you want to see more,

Check this post

https://permies.com/forums/posts/list/52643#427013
 
wayne nicol
Posts: 36
Location: Queen Charlotte islands, PNW, Canada- zone 6 marine.53.6878° N
3
dog hunting woodworking
  • Mark post as helpful
  • send pies
    Number of slices to send:
    Optional 'thank-you' note:
  • Quote
  • Report post to moderator
awesome Satamax- thank you!!
i thought about the possibility of using two small stoves one up and one down- but i think the bigger one below is fine- besides the current wood heater heats the house just fine up the stairwell, and through the passive vents above the fireplace.
the 4 to 5 tons is a good indicator!!! many thanks
good info on the chimney
thanks
wayne
 
wayne nicol
Posts: 36
Location: Queen Charlotte islands, PNW, Canada- zone 6 marine.53.6878° N
3
dog hunting woodworking
  • Mark post as helpful
  • send pies
    Number of slices to send:
    Optional 'thank-you' note:
  • Quote
  • Report post to moderator
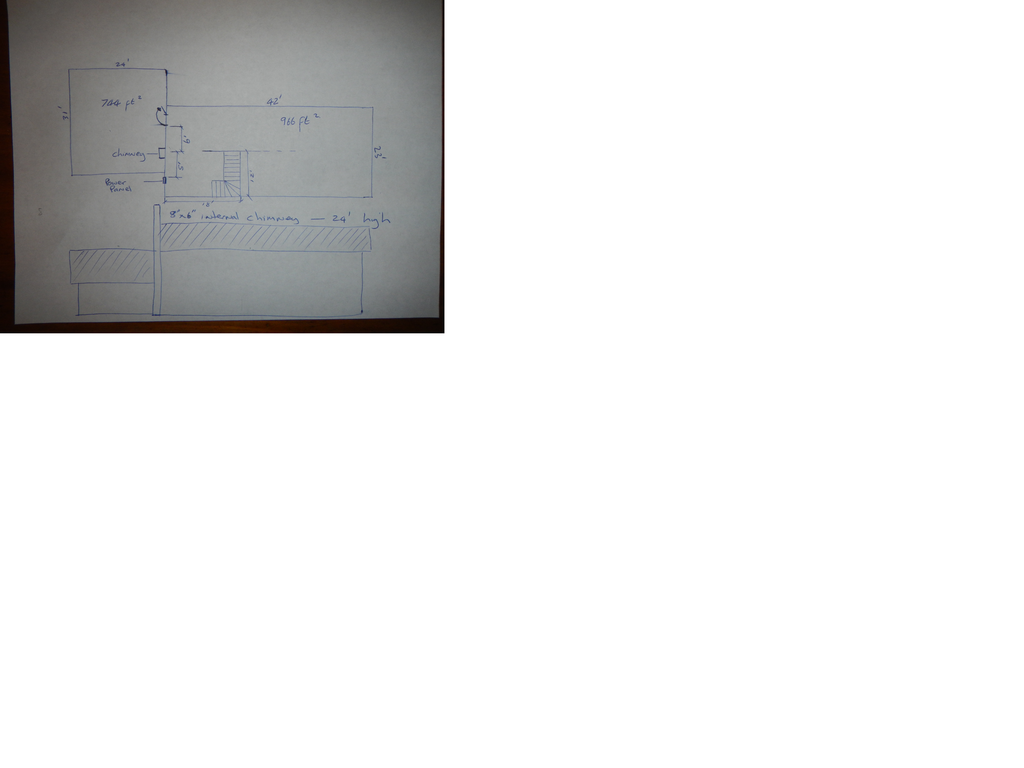
ok - so here is the floor plan of the house.


bearing in mind that the 966 sq.ft. side is double volume- so it becomes a total of just under 2000 sq.ft. ( a bit smaller than i originally assumed)

this is what i would like to do- you smart fellas tell me how to do it
1. a horizontal wood feed with glass door- is thats what called a batch stove?
2. i would like to have the stove at the current chimney- i have the 5' one way ( between the chimney and the power panel) and the 6' the other way( between the chimney and the door to the suite- could easily move the door if i needed to) to place the heating mass- can i go both ways with the stove in the middle
3.if only one way- then i will go the 5 foot side, as that way is closer/ more direct to the stairwell- for transferring the heat up stairs. would be great if it is kinda day bed/ couch type mass.
4.on the suite side building( 744 sq. ft) wonder if i could have a mass in there too, heated from the same , single stove. as anytime i am needing heat in the main house- i will be needing it there too.
5. otherwise i could build an independent and smaller RMH in the suite- but i would rather only heat from one fire source


what is the best/most cost effective material for the mass. masonry is too costly- read about the pressure made adobe bricks- can one also make bricks from the same cement compound that the fireboxes etc are made from- or can one purchase a suitable type of brick- whats best??


what i really need here is a solid. proven design- i really dont want to get into all the testing and experimenting. i like to build from scratch, thats no problem.
make the molds- build a vibrating table- make everything- i just dont have the expertize to monkey around with all the testing and experimenting that you wiser fellas do.

many many thanks all
cheers
wayne
 
Glenn Herbert
Rocket Scientist
Posts: 4530
Location: Upstate NY, zone 5
576
5
  • Likes 1
  • Mark post as helpful
  • send pies
    Number of slices to send:
    Optional 'thank-you' note:
  • Quote
  • Report post to moderator
First off, you are not going to find a single "proven design" that you can just drop into your space. Even Ernie & Erica's published designs would have to be adapted somewhat for any particular house. The best you can do is find a set of proven components that are known to work well together. As a bowyer, you obviously have the skill make an intricate assembly just right with all the elements complementing each other.

Given your total square footage (2500+-) and length of the house, I think you would want an 8" batch box. The firebox does not need to be near the chimney, so I would think about putting that next to the doorway with a tall bell maybe 4' x 3' around it, and a bench height bell extension off toward the panel. If you need to stop the bench short of the panel, that could still give you 7' of bench. If the bench can pass below the panel and wrap around the corner, you would have a big cozy nook.

We need a more detailed view of the area between chimney and stairs to work in specifics, with an idea of context - where does traffic go, any special uses, etc. Is the foot of the stairs next to the outside wall? Any other doors nearby?

With an 8" batch box, you should have enough power to run a duct through the wall to another bench in the suite, and from there to the chimney. I would try to work it so you can have a bypass channel from the top of the first bell straight to the chimney, to make starting easier.
 
Satamax Antone
gardener
Posts: 3471
Location: Southern alps, on the French side of the french /italian border 5000ft elevation
194
  • Mark post as helpful
  • send pies
    Number of slices to send:
    Optional 'thank-you' note:
  • Quote
  • Report post to moderator
Wayne, I'm not sure I've understood everything about your floor plan.

But following what Glen said. And if you want to save space; May be transforming the stairs into your batch box and mass could be an option. I'm on the tiny laptop now. So can't see much. And can't comment.
 
Mike Cantrell
Posts: 567
Location: Mid-Michigan
43
duck forest garden trees hunting books food preservation bee solar
  • Mark post as helpful
  • send pies
    Number of slices to send:
    Optional 'thank-you' note:
  • Quote
  • Report post to moderator

wayne nicol wrote:what is the best/most cost effective material for the mass. masonry is too costly- read about the pressure made adobe bricks- can one also make bricks from the same cement compound that the fireboxes etc are made from- or can one purchase a suitable type of brick- whats best??


The BEST mass is soapstone. Hands down. It's just magnificent for this purpose. (This chart is from Ken Matesz's book, Masonry Heaters: Designing, Building, and Living With a Piece of the Sun.)


The most COST EFFECTIVE material, and still plenty, plenty fine, I'd say is adobe. We're talking about the mass here, right? For the combustion areas- the box, the port, and the riser- your materials need to be capable of reaching extreme temperatures without melting or cracking. That is to say, you need to use refractory materials. But once we're in the mass, that's no longer true. For the mass, you want something that's:

- Inert, so that it doesn't cause trouble when you heat it up and
- Pretty dense, so that your 4 metric tons don't consume your entire living space
- Pretty cheap, because buying 4 metric tons of almost anything is expensive

What's that tell you? Adobe!

The equipment you need to make blocks (some wooden forms) costs less than $10 full retail, but you've probably got the tools and materials laying around.

The equipment you need to process your raw material, the ground, into usable material (a shovel, a wheelbarrow, some hardware cloth to screen out roots and rocks), costs less than $100 full retail, and really, you've probably got a shovel and a wheelbarrow, don't you?


So make the blocks! Cavemen could do it, literally.
 
wayne nicol
Posts: 36
Location: Queen Charlotte islands, PNW, Canada- zone 6 marine.53.6878° N
3
dog hunting woodworking
  • Mark post as helpful
  • send pies
    Number of slices to send:
    Optional 'thank-you' note:
  • Quote
  • Report post to moderator
thanks guys.
yea- forgive the rough sketch- sorry!
and will do a better detailed sketch of the area-
sure could go around under the panel- just dont know what the regs are in that regard-with permanent structures near panels- will find out.
so far i like what i hear.
sorry for the misrepresentation,but what i meant by a proven plan is essentially the proven firebox design- i read( on here) about so much experimentation with "trip wires" and all sorts of other very specific factors. i dont have the indepth knowledge that "fire lovers' on here seem to have- but i am more than prepared to adapt the overall design to suit my specific needs.
like the bypass idea for firing up!
really like the "cozy nook" idea- that would really suit our needs.
thanks all so far!
wayne
 
wayne nicol
Posts: 36
Location: Queen Charlotte islands, PNW, Canada- zone 6 marine.53.6878° N
3
dog hunting woodworking
  • Mark post as helpful
  • send pies
    Number of slices to send:
    Optional 'thank-you' note:
  • Quote
  • Report post to moderator
thanks Mike- we were posting at the same time
everything we buy here on island, besides the actual purchase price- also needs to be barged onto the island- pushing the prices up even more.
read about the adobe bricks being made in a mold that was pressurized- kind of like a rammed earth type brick. with the possibility of even adding some form of cement in small quantities to really up the quality.

oh yea- heres probably the single most important thing- that will effect everything- we live in a bit of an earthquake zone

how do i need to reinforce everything for this- the bell would be my concern.
what does one "stucco" the adobe benches with to make them more durable
 
Mike Cantrell
Posts: 567
Location: Mid-Michigan
43
duck forest garden trees hunting books food preservation bee solar
  • Mark post as helpful
  • send pies
    Number of slices to send:
    Optional 'thank-you' note:
  • Quote
  • Report post to moderator

wayne nicol wrote:thanks Mike- we were posting at the same time
everything we buy here on island, besides the actual purchase price- also needs to be barged onto the island- pushing the prices up even more.
read about the adobe bricks being made in a mold that was pressurized- kind of like a rammed earth type brick. with the possibility of even adding some form of cement in small quantities to really up the quality.

oh yea- heres probably the single most important thing- that will effect everything- we live in a bit of an earthquake zone


Yes, you're thinking of Compressed Earth Blocks, CEBs.
I built a CEB press- there are some photos in my thread: https://permies.com/forums/t/33406/cob//built-Cinva-Ram-CEB-press

CEBs are great for a couple of purposes:
- Yielding really crisp, smooth, consistent bricks
- Being ready to build with very quickly (like the next day)

That's what makes them better than adobes. Adobes tend to be rougher, and adobes need to to dry for... probably a couple of weeks in NW Canada, since it's not especially hot or dry there.

But the other side of the coin is, CEBs require a CEB press!

So, if you're in Bolivia and maybe don't have much money, or you're on an island and don't want to spend all your money getting brick from the mainland... do it the simple way! Like this guy:


Oh, also, re:cement. I've done that. Cement serves to make the blocks waterproof. Great idea for exterior walls, absolutely unnecessary for something inside the house.


Oh, wait, that video didn't show using the simple wooden form.
How about this one:


As far as earthquake-readiness, I confess I'm no expert. We get very few significant earthquakes in Michigan.

Two ideas that come to mind:

1. You'll want to plaster the outside of the bell, I imagine, for the sake of looks. When you do, it would be easy to lay a metal mesh into the base layer of plaster.
2. You could use rebar. As you make your bricks, poke two oversized holes into the wet brick, so that they'll line up (I'd build a little jig to locate the holes) when they're stacked. Then put rebar vertically through the lined-up holes in your stacked wall. Just like they do with cinder blocks/concrete blocks/CMUs.
 
wayne nicol
Posts: 36
Location: Queen Charlotte islands, PNW, Canada- zone 6 marine.53.6878° N
3
dog hunting woodworking
  • Mark post as helpful
  • send pies
    Number of slices to send:
    Optional 'thank-you' note:
  • Quote
  • Report post to moderator
awesome!!! thanks!
 
Glenn Herbert
Rocket Scientist
Posts: 4530
Location: Upstate NY, zone 5
576
5
  • Likes 1
  • Mark post as helpful
  • send pies
    Number of slices to send:
    Optional 'thank-you' note:
  • Quote
  • Report post to moderator
I think the principal factor in earthquake preparedness is not making anything too tall and narrow. There are all kinds of code requirements for anchoring and reinforcing in seismic zones; you should find the building code applicable to your locality and see what it says. It will probably be difficult to follow exactly because those codes probably don't cover adobe structures, or cob either. I wonder if cob (same material as adobe except built up wet in one continuous mass) would be stronger, as the straw reinforcing will all be interlocking without joints. At any rate, I think for peace of mind if nothing else I would limit the height of your bell to not more than 5' or so, so there is less to fall on someone. Benches will pose no threat if they did collapse, and their low height makes them less likely to collapse. But you need at least one enclosure that is 4' or more in height for the heat riser. You also need a certain area of absorbing and radiating surface in your mass(es) in order to get the heat to the house effectively and not have dangerously hot surfaces. This means longer/wider benches or bigger bells. I second the notion of reinforcing mesh or wire, though rebar may be so much stronger than the adobes that it just tears them apart in the event of an earthquake. I think smaller reinforcing widely distributed would be more effective. Welded wire mesh, the heavier and wider spaced the better, running all around the bell top to bottom and built into cob a couple inches inside the outer surface would be really good. If you want to use adobes for the main structure, keeping them a couple inches narrower than your desired wall thickness, wrapping loosely in WWM, and plastering with straw-laden cob should work. Earthbag domes are supposedly recognized by California seismic code, and they are just reinforced with barbed wire between the bags to prevent slippage.

Oh, and just because cob structures in pictures are generally all curvy and organic doesn't mean they have to be that way - you can build cob as crisp and rectilinear as you want if that is your esthetic.
 
wayne nicol
Posts: 36
Location: Queen Charlotte islands, PNW, Canada- zone 6 marine.53.6878° N
3
dog hunting woodworking
  • Mark post as helpful
  • send pies
    Number of slices to send:
    Optional 'thank-you' note:
  • Quote
  • Report post to moderator
we dont actually have a full building code on island here- in fact the only one we have is setbacks from property boundaries.
so it really is not a code issue- but just building something that will hold up. that was all good info- and lots of ideas
and yes our aesthetic is more structured and crisper- than more "organic" and curvy- not that that really matters i s'pose.
many thanks
wayne
 
I was born with webbed fish toes. This tiny ad is my only friend:
2024 Permaculture Adventure Bundle
https://permies.com/w/bundle
reply
    Bookmark Topic Watch Topic
  • New Topic