That's a brilliant wheel and looks complete (although, the legs look a bit off, could we get a glamour shot of the full wheel front and back?). It wouldn't take much to make it fully functional. A bottle of sewing oil and possibly some sandpaper will do most of the work for you. I don't know what your spinning skills are so I'll write this for the general reader who possibly doesn't know much about spinning wheels.
What you have is a double drive Saxony wheel (my absolute favourite!). Double drive means it has two drive bands, one goes to the flyer the other to the bobbin (more on that in a moment). Saxony wheels have the drive (larger) wheel off to one side, unlike a Castle wheel that has the drive wheel above or below the motherofall.
The other gadget is called a 'click reel' or 'weasel'. We wind the yarn onto it and after so many revolutions, it makes a click. That way every skein (bundle) of yarn is the same length. If you measure one circle of the reel by wrapping a bit of yarn around it, then measuring how long that yarn is. Then times that length by how many clicks, you'll see how much yarn goes into one click. Mine is 80 yards. This is the real value of your find. Antique wheels are easier to find than click reels.
The origin of the wheel is not my strong suit, but I'm thinking East Coast of America. The way this is put together reminds me of New England. Many elements remind me of wheels from Amish (or similar) communities, especially the lack of fancywork on the spindles. You have a makers name which is a huge help in discovering the origins of the wheel. If you are on Ravelry
the antique spinning wheels group can help narrow it down. Sorry, it's hidden behind a login wall, but those guys really are the best at this.
It's difficult to tell as it's been painted at a later date, but the axel and other metal work put it somewhere in the late 19th to early 20th century. That red paint is a bit unfortunate as it might get in the way of using it. It looks like it was painted on after anyone spun yarn on it, as it covers the yarn grooves in the flyer.
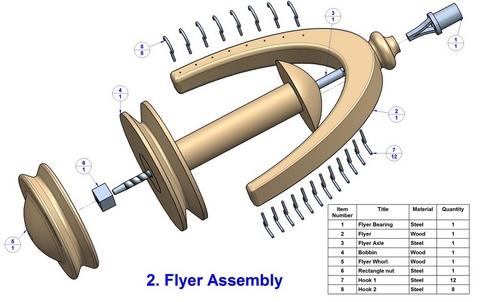
This is your basic double drive flyer assembly. This is also the part that gets broken or lost most and is the hardest to fix as it needs to be custom made to fit your wheel. The U-shaped thing is the flyer. You have the bobbin that fits on a shaft. On one end of the bobbin is a grove that the drive band goes on. Affixed to the flyer shaft (probably by a reverse screw - righty loosey, lefty tighty) is the whorl. This also has a grove for the drive band. I worry that the paint will have made this a bit slippery, but let's get it working first. See if you can gently remove and disassemble the flyer assembly. To remove, one might turn a maiden (upright that holds the flyer) or more likely there is a small wooden peg holding the leather bearing in place at the front maiden. See if you can untwist the whorl (it may untwist right or left, so go gently) and remove the bobbin. Then with a touch of WD40 or something like that, clean the shaft of any ancient gunk. Then coat with a light machine oil like sewing machine or better still,
spinning wheel oil. This might take a bit of doing. Please be patient as if this bit breaks, it's not easy or cheap to fix.
I'm a bit worried that they may have painted over some of the moving parts here. Even if they haven't, the old oil builds up and acts like glue. If it's really not coming, try putting it in a warm room for a day or so (I put it in the same room as the woodstove) and the warmth usually loosens it.
Let me know how you get on. Once that bit's done, the rest is fairly easy.


 2
2


![[Thumbnail for image.jpg]](/t/70814/a/54641/image.jpg "Filename: image.jpg
Description:")
![[Thumbnail for image.jpg]](/t/70814/a/54642/image.jpg "Filename: image.jpg
Description:")
![[Thumbnail for image.jpg]](/t/70814/a/54643/image.jpg "Filename: image.jpg
Description:")
![[Thumbnail for image.jpg]](/t/70814/a/54644/image.jpg "Filename: image.jpg
Description:")
![[Thumbnail for image.jpg]](/t/70814/a/54645/image.jpg "Filename: image.jpg
Description:")
![[Thumbnail for image.jpg]](/t/70814/a/54646/image.jpg "Filename: image.jpg
Description:")
![[Thumbnail for image.jpg]](/t/70814/a/54647/image.jpg "Filename: image.jpg
Description:")

Skill verified by gir bot")

Skill verified by Nicole Alderman")

Skill verified by Mike Haasl")

Skill verified by Ash Jackson")
![[Thumbnail for IMG_0734.JPG]](/t/70814/a/54667/IMG_0734.JPG "Filename: IMG_0734.JPG
Description:")
![[Thumbnail for IMG_0732.JPG]](/t/70814/a/54668/IMG_0732.JPG "Filename: IMG_0732.JPG
Description:")
![[Thumbnail for IMG_0731.JPG]](/t/70814/a/54669/IMG_0731.JPG "Filename: IMG_0731.JPG
Description:")
![[Thumbnail for IMG_0729.JPG]](/t/70814/a/54670/IMG_0729.JPG "Filename: IMG_0729.JPG
Description:")
![[Thumbnail for IMG_0727.JPG]](/t/70814/a/54671/IMG_0727.JPG "Filename: IMG_0727.JPG
Description:")
![[Thumbnail for IMG_0726.JPG]](/t/70814/a/54672/IMG_0726.JPG "Filename: IMG_0726.JPG
Description:")
![[Thumbnail for IMG_0725.JPG]](/t/70814/a/54673/IMG_0725.JPG "Filename: IMG_0725.JPG
Description:")
![[Thumbnail for IMG_0723.JPG]](/t/70814/a/54674/IMG_0723.JPG "Filename: IMG_0723.JPG
Description:")


Skill verified by Opalyn Rose")

Skill verified by Nicole Alderman")

![[Thumbnail for grooves.JPG]](/t/70814/a/54813/grooves.JPG "Filename: grooves.JPG
Description:")
![[Thumbnail for IMG_1433.jpg]](/t/70814/a/56984/IMG_1433.jpg "Filename: IMG_1433.jpg
Description:")
![[Thumbnail for IMG_1434.jpg]](/t/70814/a/56985/IMG_1434.jpg "Filename: IMG_1434.jpg
Description:")
![[Thumbnail for IMG_1436.jpg]](/t/70814/a/56986/IMG_1436.jpg "Filename: IMG_1436.jpg
Description:")
![[Thumbnail for IMG_1437.jpg]](/t/70814/a/56987/IMG_1437.jpg "Filename: IMG_1437.jpg
Description:")
![[Thumbnail for IMG_1439.jpg]](/t/70814/a/56988/IMG_1439.jpg "Filename: IMG_1439.jpg
Description:")
![[Thumbnail for IMG_1440.jpg]](/t/70814/a/56989/IMG_1440.jpg "Filename: IMG_1440.jpg
Description:")
![[Thumbnail for IMG_1441.jpg]](/t/70814/a/56990/IMG_1441.jpg "Filename: IMG_1441.jpg
Description:")
![[Thumbnail for IMG_1443.jpg]](/t/70814/a/56991/IMG_1443.jpg "Filename: IMG_1443.jpg
Description:")
![[Thumbnail for IMG_1442.jpg]](/t/70814/a/56992/IMG_1442.jpg "Filename: IMG_1442.jpg
Description:")
![[Thumbnail for IMG_1436.jpg]](/t/70814/a/56993/IMG_1436.jpg "Filename: IMG_1436.jpg
Description:")
 And english is obviously not my native language, but I hope it answers your question, if not somebody else may feel free to help.
![[Thumbnail for Het-Spinnewiel-2-928x1024.jpg]](/t/70814/a/57015/Het-Spinnewiel-2-928x1024.jpg "Filename: Het-Spinnewiel-2-928x1024.jpg
Description: spinning wheel parts")
![[Thumbnail for Het-Spinnewiel-3-1024x829.jpg]](/t/70814/a/57016/Het-Spinnewiel-3-1024x829.jpg "Filename: Het-Spinnewiel-3-1024x829.jpg
Description: whorl, snare and bobbin")


