• Post Reply Bookmark Topic Watch Topic
  • New Topic
permaculture forums growies critters building homesteading energy monies kitchen purity ungarbage community wilderness fiber arts art permaculture artisans regional education skip experiences global resources cider press projects digital market permies.com pie forums private forums all forums
this forum made possible by our volunteer staff, including ...
master stewards:
  • Carla Burke
  • Nancy Reading
  • r ranson
  • John F Dean
  • Pearl Sutton
  • paul wheaton
stewards:
  • Jay Angler
  • Anne Miller
  • Nicole Alderman
master gardeners:
  • Christopher Weeks
gardeners:
  • Maieshe Ljin
  • Benjamin Dinkel
  • Jeremy VanGelder

CHEAP AND EASY BRICK FLOORS

 
Posts: 1502
Location: Chihuahua Desert
  • Mark post as helpful
  • send pies
    Number of slices to send:
    Optional 'thank-you' note:
  • Quote
  • Report post to moderator


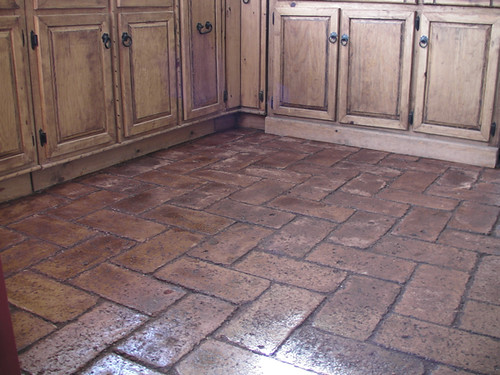
When considering what material to use for a floor, few people look beyond a concrete slab, with something like tile or carpet as a finish. For us, however, there were several factors that made a stabilized compressed earth brick (SCEB) floor far more appealing, including cost, skill, and time required.

MATERIALS
Compressed Earth Blocks
Screened sand
Sealer – acrylic or oil based concrete sealer or varnish


TOOLS
Circular saw with masonry blade (optional)
2 levels, one small, one longer
Rubber mallet
2 boards to stand on. You do not want to stand on the sand as your feet will make large dents. If you stand on a board, your weight is spread out and the smooth surface of the sand is not compromised.
Surgical tape. The person laying the brick should consider taping their fingertips with surgical tape. This helps protect them without compromising dexterity.
Roller and brush


PREPARATION
Prepare and level your sub-floor, adding if you wish any vapor barrier, heating system, and insulation. Put a 1 inch layer of fine screened sand over the whole area. Compact and level the sand. The easiest way to do this is to bury and level a piece of square tubing in the sand on either side of the room, so that the top of the metal is flush with the level you want the sand to be.

You then bridge another piece of metal between the 2 pieces of square tubing, so that it sits on top of them, and drag it backwards and forwards over the area until it is smooth.

Choose your pattern before you start, and estimate the amount of bricks you will need. Running bond is often the easiest pattern to get your feet wet, but none of them are hard. The Herring bone can be difficult to visualize, but once you get going, it's not nearly at intimidating as it seems.


CUTTING BRICKS
No matter which pattern you decide to use, you will need some cut bricks. Try and work out roughly how many you will need for your starting edge and cut those ahead of time. The ones needed at the other end of your rows, you can do once the rest of the floor is laid. Cut the bricks using a circular saw with masonry blade. If you are not too particular about the edges of your cut bricks, it is far easier to break them instead of cutting.


LAYING THE FLOOR
Place each brick, one by one, where you want it to go.

With the long level, check it is level with previous bricks or existing floors. With the short level, make sure the brick itself is level in all directions. You also want to check that it is lined up well with the wall.

Use the rubber mallet to tap the brick tight against its neighbors. And tap down on it to get the level correct.

When you get to the opposite end of the wall from where you started, and you do not have a brick to fit in the space, leave it. You should do all the edge bricks at the end. Even before the floor is finished, you are able to walk on it. Do not tread near to unfinished edges.

For the edges, you may have to measure each space and cut or break bricks to fit. Alternatively, you can fill the gaps with  a very fine concrete when you do the perimeter.


PERIMETER
Once you have all the bricks laid, you can fill the perimeter, in between the bricks and walls, with concrete. This does not use much concrete, and can be done in half an hour. Screen your sand and then trowel the concrete smooth and level with the tops of the bricks.


FILLING CRACKS
Once all your bricks, including your edge bricks, are in place, sweep fine sand into the cracks.

Allow the floor to settle a couple of days, and then sweep more sand into the cracks. Repeat this several times until the sand no longer settles.


SEALING
To seal the bricks so that you can sweep and mop them, use an acrylic or oil based concrete sealer or varnish, at least two coats. Until this is done, the bricks will be coated in a fine dust (as you gradually wear them down). This is okay for a patio or outside floor, but for inside it's not as acceptable.

Use a small can and/or brush to drip sealer in all the cracks first.  Once that has set up, use a roller to spread the varnish on the brick surface.

The sealer will darken the natural color of the bricks. Most concrete sealers and varnishes smell strongly. Always provide adequate ventilation, and plan to keep those windows open for a few days.

Photos: http://www.flickr.com/photos/velacreations/sets/72157622051279853/

More Information: http://www.velacreations.com/cebfloors.html
 
Posts: 79
Location: Maine, USA
  • Mark post as helpful
  • send pies
    Number of slices to send:
    Optional 'thank-you' note:
  • Quote
  • Report post to moderator
Groovy

I dig compressed Earth blocks
 
Posts: 631
Location: NW MO
10
  • Mark post as helpful
  • send pies
    Number of slices to send:
    Optional 'thank-you' note:
  • Quote
  • Report post to moderator
That sure is a nice looking floor Vela...(Cabinets look great too!)
 
Abe Connally
Posts: 1502
Location: Chihuahua Desert
  • Mark post as helpful
  • send pies
    Number of slices to send:
    Optional 'thank-you' note:
  • Quote
  • Report post to moderator
thanks!  it was super easy to make, too.
 
Posts: 78
1
  • Mark post as helpful
  • send pies
    Number of slices to send:
    Optional 'thank-you' note:
  • Quote
  • Report post to moderator
Did you make the bricks or buy them.? Details please

velacreations wrote:
thanks!  it was super easy to make, too.

 
Craig Conway
Posts: 79
Location: Maine, USA
  • Mark post as helpful
  • send pies
    Number of slices to send:
    Optional 'thank-you' note:
  • Quote
  • Report post to moderator
I'd like to find an inexpensive manual brick making machine in USA
 
                                      
Posts: 1
Location: Florida
  • Mark post as helpful
  • send pies
    Number of slices to send:
    Optional 'thank-you' note:
  • Quote
  • Report post to moderator
That a good and some unique idea. Its good to use in our house but for limited rooms, because it has  some gaps so difficult to clean.
 
Abe Connally
Posts: 1502
Location: Chihuahua Desert
  • Mark post as helpful
  • send pies
    Number of slices to send:
    Optional 'thank-you' note:
  • Quote
  • Report post to moderator
It is a sealed floor, so cleaning is very easy.  Sweep and mop.

We bought our blocks from a local producer. They cost us somewhere around $.15 each, delivered. They are 1/2 square foot each.  So, for the bricks, you are looking at $.30 per square foot.  They are stabilized, which means they have cement and/or lime (small percentage, like 5%) to make them waterproof.


Posts: 5
  • Mark post as helpful
  • send pies
    Number of slices to send:
    Optional 'thank-you' note:
  • Quote
  • Report post to moderator
So did I get this straight? The sand that goes in the cracks between the bricks is varnished over with the roller? Doesn't the sand get stuck to the roller?


Sorry. I might just be dumb and missing something obvious
 
Abe Connally
Posts: 1502
Location: Chihuahua Desert
  • Likes 1
  • Mark post as helpful
  • send pies
    Number of slices to send:
    Optional 'thank-you' note:
  • Quote
  • Report post to moderator
sand goes in the crack, then we pour sealer on the cracks, let it set up, and then roller over everything. 
 
Posts: 202
Location: Zone 5b - 6a, Missouri Ozarks
1
  • Mark post as helpful
  • send pies
    Number of slices to send:
    Optional 'thank-you' note:
  • Quote
  • Report post to moderator
Hoping to find out who the local source was for blocks.  Haven't been able to find anyone yet. 
 
Jamie Jackson
Posts: 202
Location: Zone 5b - 6a, Missouri Ozarks
1
  • Mark post as helpful
  • send pies
    Number of slices to send:
    Optional 'thank-you' note:
  • Quote
  • Report post to moderator
After hours of reading and phone calls yesterday, my entire afternoon, all I found was mention that people have bought them in Missouri outside of Kansas City and how the homes built from them by numerous home builders make it through tornadoes.  But NO ONE lists contact info.  I have one name and his number is unlisted.  So I'm beyond frustrated and wondering why this info wouldn't be listed on any of the articles.  Why are they so hard to find?!
 
Abe Connally
Posts: 1502
Location: Chihuahua Desert
  • Mark post as helpful
  • send pies
    Number of slices to send:
    Optional 'thank-you' note:
  • Quote
  • Report post to moderator
http://openfarmtech.org/ makes them, and they are in Missouri.  If all else fails, you could buy/build a machine and make your own.

 
Posts: 9002
Location: Victoria British Columbia-Canada
708
  • Mark post as helpful
  • send pies
    Number of slices to send:
    Optional 'thank-you' note:
  • Quote
  • Report post to moderator
    You had me at cheap and easy .  I definitely want a few thousand square feet of these blocks. If nobody sells them in BC I may have to buy a machine.
 
Jamie Jackson
Posts: 202
Location: Zone 5b - 6a, Missouri Ozarks
1
  • Mark post as helpful
  • send pies
    Number of slices to send:
    Optional 'thank-you' note:
  • Quote
  • Report post to moderator
I talked to someone who has a compressed earth block machine today and rents it.  He said for the small about of blocks we need, the machine really isn't necessary.  He said the blocks don't have to be compressed, but using the machine to compress it helps get the straw in easier and you can make bricks faster.

For our needs, he said we could just make forms of 2x6s and make them 18x10" and fill with the mud slurry.  We have the book the cobber's companion and several books on building an earthen floor.  So I feel that we have the information we need to make a good mixture that would create strong and attractive bricks.  The bricks would dry much faster than a poured adobe floor because of increased surface area and the ability to have them in the sun.

Unfortunately summer is now gone, wish I had started on this earlier. 
 
Abe Connally
Posts: 1502
Location: Chihuahua Desert
  • Mark post as helpful
  • send pies
    Number of slices to send:
    Optional 'thank-you' note:
  • Quote
  • Report post to moderator
actually, for earthen bricks that are not compressed, you want them to dry slowly.  It should take at least 4 weeks for them to really completely dry out.

That size of form with a mud slurry is going to make a heavy bricks, probably 50-60 lbs. They are basically adobes (mud slurry brick), and they are heavy.

You could compress blocks by hand.  Make a form, like 12" x 6", get a decent mix of sand/clay, and barely wet it.  It should be the consistency of fresh baked cookies.  Soft and crumbly, but not wet.

Fill your form 2" at a time, and then tamp it with a weight. Add more earth, tamp again, etc.  Then press the brick out, let it sit for a few days (keep it moist), and you're done.  You could also add a bit of lime (5% by weight), and they'd be even better.


Jamie Jackson
Posts: 202
Location: Zone 5b - 6a, Missouri Ozarks
1
  • Mark post as helpful
  • send pies
    Number of slices to send:
    Optional 'thank-you' note:
  • Quote
  • Report post to moderator
Thanks for the tips!  We don't have 4 weeks.  We will tamp as you said!  Plus we don't have to make the blocks so big as I said originally, that was just someone's suggestion.  We'll make them smaller.
 
Abe Connally
Posts: 1502
Location: Chihuahua Desert
  • Mark post as helpful
  • send pies
    Number of slices to send:
    Optional 'thank-you' note:
  • Quote
  • Report post to moderator
make a test block, 12" by 6" by 3.5" tall (use 2X4's for the form).  See how long it takes and if it cracks a bunch. If it does crack a bunch, you will need a longer drying time or a different method (tamping).

Also, if you are going to tamp, consider doing earthbags.  It is the same thing, but the form is a bag, and you tamp them right in place on the wall.  It will end up being faster than blocks:
http://earthbagbuilding.com/
http://earthbagbuilding.wordpress.com/
 
Jamie Jackson
Posts: 202
Location: Zone 5b - 6a, Missouri Ozarks
1
  • Mark post as helpful
  • send pies
    Number of slices to send:
    Optional 'thank-you' note:
  • Quote
  • Report post to moderator
Thanks Vela will do.  It's raining today, so hopefully I'll get to work on forms.  This is for the floor only though.  The walls are already up. 
 
Jamie Jackson
Posts: 202
Location: Zone 5b - 6a, Missouri Ozarks
1
  • Mark post as helpful
  • send pies
    Number of slices to send:
    Optional 'thank-you' note:
  • Quote
  • Report post to moderator
Our handy man neighbor is going to make us a brick press.  How large do you think the blocks can be before the risk of breaking comes into play? We don't need "tall" blocks since this is for a floor and a larger surface would mean laying more quickly.  Any thoughts?
 
Abe Connally
Posts: 1502
Location: Chihuahua Desert
  • Mark post as helpful
  • send pies
    Number of slices to send:
    Optional 'thank-you' note:
  • Quote
  • Report post to moderator
for a floor, you don't need them thicker than 2", even 1.5" could work (make a test by hand, first!).

For that thickness, you should be able to make a 12" by 12" pretty easily (it should weigh about 20 lbs). You could go bigger, but a square foot is easy to work with.  If I were doing it, I'd make it a division of the size of the room.  So, if you room is an clean 10 feet, no problem, but if it is 10ft 3", you should make the bricks fit without much cutting.

I would definitely add a bit of lime, like 5%.  They'll be much more durable and water resistant.

Alternatively, you could do a monolith tamped floor:
http://www.grisb.org/publications/pub11.htm
 
Jamie Jackson
Posts: 202
Location: Zone 5b - 6a, Missouri Ozarks
1
  • Mark post as helpful
  • send pies
    Number of slices to send:
    Optional 'thank-you' note:
  • Quote
  • Report post to moderator
Thanks Vela!
 
Jamie Jackson
Posts: 202
Location: Zone 5b - 6a, Missouri Ozarks
1
  • Mark post as helpful
  • send pies
    Number of slices to send:
    Optional 'thank-you' note:
  • Quote
  • Report post to moderator
I feel like I've highjacked this thread, if I should start a new one please tell me.

I re-read the cobber's companion and as many websites as I could find. This one was very handy too:
http://www.cd3wd.com/cd3wd_40/vita/cinvaram/en/cinvaram.htm

My dirt was sifted months ago and even though is covered by 3 layers of a new tarp, is still damp.  So I'll say off the bat, that may be my problem.  When I pick up what used to be this clay powder that I screened, it easily forms a clay ball because of it's dampness.  My sand was also a bit damp, but neither material was wet.

I did 75% sand, 20% clay powder, 5% lime.  In the first go round, I added 2 cups of water, but after my drop test wouldn't work. I doubled then tripled the "dry" ingredients without adding water, and still the drop test doesn't work.  Then I started a whole new batch with zero added water and doesn't work.

When I pick up just the clay, squeeze it into a ball and drop it, it looks perfect for the drop test.  The ball remains intact.

In the batch where I added water, it just falls apart like there is too much sand or water.  In the batch with no added water, it does the same.

So I'm thinking more clay less water?

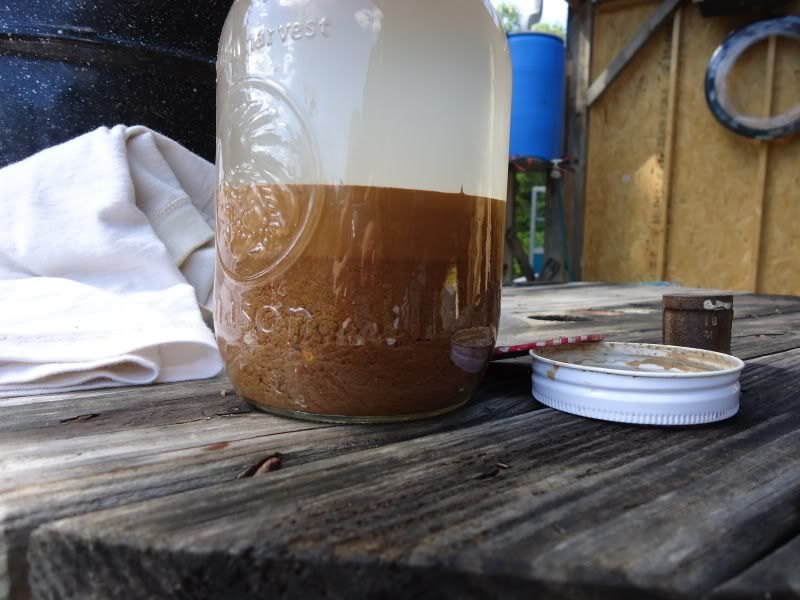
Here is a picture of my shake test, looks to me like mostly clay with some silt on top. 


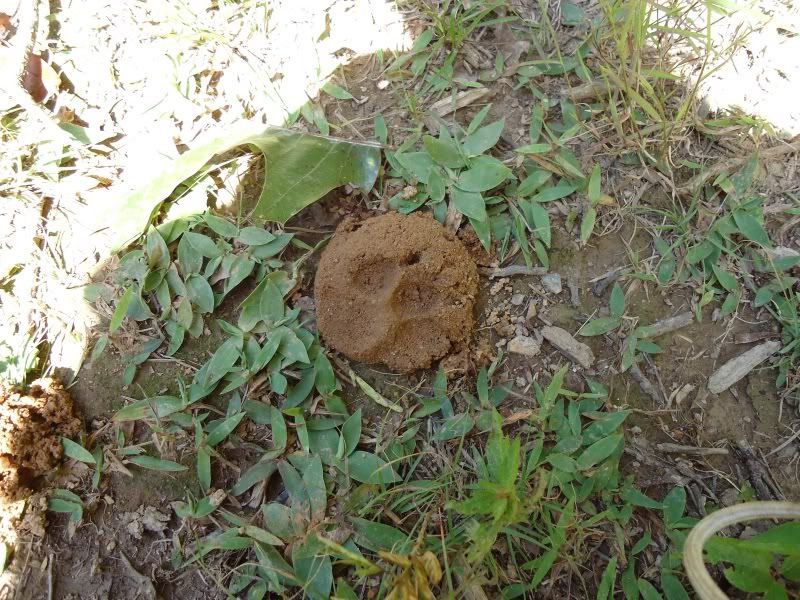
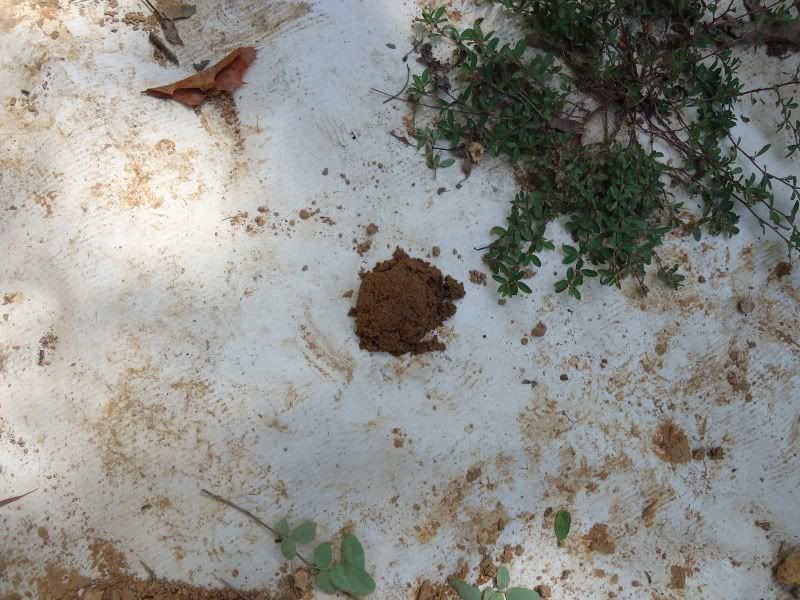
Here is a picture where I think maybe too wet ?


Here is a picture maybe I need more clay?

 
Jamie Jackson
Posts: 202
Location: Zone 5b - 6a, Missouri Ozarks
1
  • Likes 1
  • Mark post as helpful
  • send pies
    Number of slices to send:
    Optional 'thank-you' note:
  • Quote
  • Report post to moderator
I finally got a mixture that "passed" the drop test, my worry is that it's about 50% clay.  It should be 25%?
 
                                
Posts: 14
Location: Toronto, ON, Canada. USDA Zone 5
  • Mark post as helpful
  • send pies
    Number of slices to send:
    Optional 'thank-you' note:
  • Quote
  • Report post to moderator
Hey permies!

First post here. Long time lurker but I've finally decided to speak up about this as I've been looking into CEB and SCEB for a bit now.

For interiors this method seems great. I think a few applications of linseed oil might be nice too as opposed to the chemical sealant.

For CEBs my biggest concerns are two pronged.

1) Sealing exterior walls made out of CEBs.
I know there are certain concrete waterproofing additives but that gets costly. Nice roof overhangs help but I imagine they require something more. (especially in a rainy climate). I know a lot of adobes use a few coats of lime but on the west coast of Canada (where I eventually plan to live) the rainy winters would probably render the lime useless.

2) The real cost of that 5% lime, fly ash, portland cement addition.
In theory CEB's, if you have some consistent source of dirt, seem to be one of the cheapest building materials in terms of bang for your buck (straw bales are most definitely cheaper but in the long term, with maintenance factored in, a good solid brick house is probably gonna beat it).

Vela – I've checked out your site a while back and you seem to know your stuff so I was wondering if you might have any suggestions for the sealing?

Anyone else have any experience with large CEB projects. Any insights into the cost of all that cement?


Also very related...
Found this http://opensourceecology.org/wiki/CEB_Press
which is a very interesting network in and of itself.

Thanks and hope to start contributing to forums more often from now on.
Cheers all
 
Posts: 2
  • Mark post as helpful
  • send pies
    Number of slices to send:
    Optional 'thank-you' note:
  • Quote
  • Report post to moderator
for people interested in straw and clay construction, check out the Canelo Project.  Bill and Athena Steen, and now their sons have been doing straw and clay construction for years including earthen floors and cob walls/benches, and using natural clay finishes to paint and plaster walls.  they are a great resource.  
 
Eat that pie! EAT IT! Now read this tiny ad. READ IT!
Learn Permaculture through a little hard work
https://wheaton-labs.com/bootcamp
reply
    Bookmark Topic Watch Topic
  • New Topic