• Post Reply Bookmark Topic Watch Topic
  • New Topic
permaculture forums growies critters building homesteading energy monies kitchen purity ungarbage community wilderness fiber arts art permaculture artisans regional education skip experiences global resources cider press projects digital market permies.com pie forums private forums all forums
this forum made possible by our volunteer staff, including ...
master stewards:
  • Nancy Reading
  • Carla Burke
  • r ranson
  • John F Dean
  • paul wheaton
  • Pearl Sutton
stewards:
  • Jay Angler
  • Liv Smith
  • Leigh Tate
master gardeners:
  • Christopher Weeks
  • Timothy Norton
gardeners:
  • thomas rubino
  • Jeremy VanGelder
  • Maieshe Ljin

Show me your composting setups! (pretty please)

 
Posts: 56
5
  • Likes 4
  • Mark post as helpful
  • send pies
    Number of slices to send:
    Optional 'thank-you' note:
  • Quote
  • Report post to moderator
Awesome move! Congrats
I have two 5’x5’ bins both made out of hardwire and a tarp for totally encasing compost while cooking. They are down a slope from my chicken coop. One is for catching chicken coop waste. My method is pretty simple. 2 thirds Carbon(leaves, paper, etc.), then food waste and chicken poop, layer so on and so forth ... and green. I wouldn’t worry about frozen scraps ... just stick em in gradually ...they add good nitrogen from they ice. Cover the big pile tight with a tarp. Some folks turn after two days. I don’t always do that.
I start out keep food waste in sealed buckets where the food breaks down just a bit break down a little. I put rotten yogurt or other products like that in the center sometimes. If you want to speed up the compost process, put in a little meat ( I’m talking an 1/8 cup or less). The maggots will come in and break it down quick. Compost is all about layering for me ... alcohol and vinegar added to buckets of food waste is a nice touch.
I enjoyed living in a cold climate when composting ... the compost was really rich. I had to relearn layering when we moved to a warm climate.
 
Posts: 27
Location: Zone 6b
11
kids homestead
  • Likes 5
  • Mark post as helpful
  • send pies
    Number of slices to send:
    Optional 'thank-you' note:
  • Quote
  • Report post to moderator
Had an old fence that was falling apart and needed to come down anyway. So I repurposed the gateway part for a clothesline and the fence portion for our compost bin.
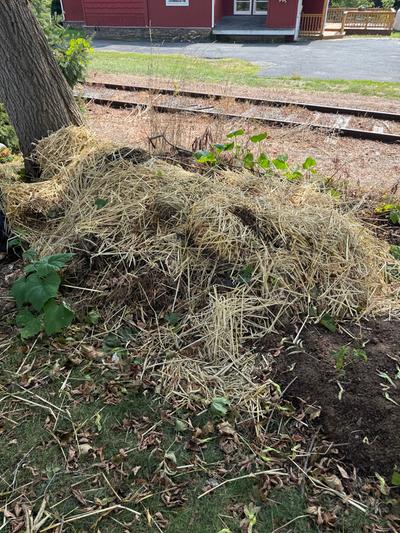
After reading the Humanure Handbook (freely available to read online.) I’ve taken his approach to composting. I don’t turn it. Instead whenever I add I just dig into the center add then cover. The left side is cover material (lawn debris). The right side is the compost. Every time I add to the right I cover with more from the left.
Picked up a compost thermometer which has been reading between 60-80F all winter long. This pile was started in September.
Honestly I question if it’s too small. This summer will decide that.
EC0F8BE4-C485-41F3-83EC-42E4ABEF62FA.jpeg
[Thumbnail for EC0F8BE4-C485-41F3-83EC-42E4ABEF62FA.jpeg]
 
Posts: 2
Location: Ellsworth, United States
  • Likes 5
  • Mark post as helpful
  • send pies
    Number of slices to send:
    Optional 'thank-you' note:
  • Quote
  • Report post to moderator
Winter composting is instant composting out of a dedicated blender under the sink. When full, zip it through, then open window out to garden and throw it on the bed.  Have employed this method in the summer, depositing it below mulch.  In a week or two it’s gone. Lovely, healthy soil results.  Leaving city apt. for country farmhouse WILL feel like getting out of jail. Enjoy your newfound freedom. Have lived New England wilderness life all my adult life and no freedom like it anywhere. After 16+ years this old farmhouse is about to be completely restored, as well as 175 yr. old barn.  The kids will fight over it😊
 
pollinator
Posts: 845
Location: 10 miles NW of Helena Montana
504
hugelkultur chicken seed homestead
  • Likes 3
  • Mark post as helpful
  • send pies
    Number of slices to send:
    Optional 'thank-you' note:
  • Quote
  • Report post to moderator
I live in the mountains outside of Helena MT and we have lots of animals that visit our homestead-in-progress.  (bears, coyotes, wolves, deer, elk, hide-and-seek champions, and plenty of smaller ones also).

I screwed together 4 pallets for a temporary compost bin last fall.  So far birds and deer like it the most.  We add whatever does not go to the chickens to it all the time.  Strange winter with lack of snow so far and warm temps.
But the compost seems to like it.

Will be starting a new garden this spring so, unfortunately, will be purchasing organic composted garden soil, (local place has it, $450 for a 15 yard dump truck full).  I will mix this with what I call dirt here and add kitchen scraps to it directly during the growing season.  I have done this many times during the past decades of gardening and it works well.

oldcompostingsystem.jpg
[Thumbnail for oldcompostingsystem.jpg]
2020-2021-compost.jpg
screwed together 4 pallets for a temporary compost bin
 
Posts: 293
Location: rural West Virginia
60
  • Likes 4
  • Mark post as helpful
  • send pies
    Number of slices to send:
    Optional 'thank-you' note:
  • Quote
  • Report post to moderator
First of all, I am in West Virginia, zone 6.
I have about ten piles, in four categories. The most conventional are two bins above my garden, made of concrete blocks. For these: I start a pile in one bin, eventually turn it over into the other, and the one that has already been forked into a second bin gets turned out onto the ground, where my free range chickens sometimes do some additional turning (unfortunately, also worm removal). I moved this pair of bins from the side of my garden for two reasons: because the side is on a slope and the blocks kept separating, and it's flatter above the garden, and because this way any nutrients draining out of the pile are running down into my garden. The other thing is that taking advice from permaculture, this area is near my chicken coop. So when it's time to clean the coop, I drag the proceeds on a tarp a short distance downhill to the piles, and I time cleaning the coop for when I'm going to turn a pile. That way I can layer chicken bedding in with other ingredients.
I have two garden spaces besides my main garden, and each often has a pile just heaped in one corner. Often this includes sunflower plant parts or cornstalks; sunflowers have allellopathic properties and both benefit from being chopped into one foot pieces (makes the pile much easier to turn)...after a year or so the toxins from the sunflowers are gone and I can spread the compost.
In the woods that surround my one acre clearing, I have several piles of half rotted logs, branches, etc. The thing I learned here is not to remove branches on a slope, as they hold leaves--I had a bare slope below my house for a couple of years before I figured this out.
The fourth category is a pair of wire bins in which I put shredded leaves. I gather these from our mile-long lane; this reducing the softening of our gravel road from organic matter, as well as giving it to me for garden use. It isn't necessary to shred the leaves, but if you do you have leaf mulch in one year; if you don't it takes two. Another thing I learned when I experimented with a bin in the woods was --not to do that. Dunno about the difference in composting rate in shade but what happens is that the local trees, run their greedy feeder roots up into your leafmold and make such a tangled mess you can't collect the finished leafmold.
Maybe the most important key is that while I do have a composting outhouse (this involves four buckets which I dump into one of two more concrete, covered bins, alternating each year; I use the proceeds in my orchard and flowerbed. This is a fifth category come to think of it), we also have what I call a pisseria in the house. Did you know that most of the nitrogen and potassium that passes through you comes out in your pee, which is also nearly always sterile? So I dump the pee bucket every few days on a compost pile, cycling around my clearing to the next pile whose turn it is each time. I'm sure this helps the piles decompose; I rarely get hot compost.
 
pollinator
Posts: 1354
Location: zone 4b, sandy, Continental D
383
  • Likes 3
  • Mark post as helpful
  • send pies
    Number of slices to send:
    Optional 'thank-you' note:
  • Quote
  • Report post to moderator
Well, Hawley, you seem worried that your landlord may not approve of the look of your composting, which is odd. If you are planning to have chickens, your composting will be much easier: Any veggie scraps and meat scraps you may have and will be converted quickly into delicious eggs. As far as freezing  stuff you plan to compost, that freezer uses a fair amount of energy, so it might be better to reserve it for other goodies, like stuff to make veggie stock, or improve chicken stock, but stuff that will get composted, no. I'm in zone 4b, and every day, my hens get some goodies. sometimes it is not much. [They still need grain anyway, but less]. The other day, I discovered that a bunch of potatoes that I was keeping in the unheated garage froze. Normally, it would go directly to the compost pile, if I didn't have chickens. I took the soft potatoes and brought them in, boiled them and gave them to the chickens. I still have a few [I'm stretching the pile.

As far as adding to the pile during the winter, of course, do it. If the pile is already working, it will just work better because of the insulation caused by the stuff you put on top. If it is *not* working, just pile it up anyway: It will start working when it is ready: when it warms up a bit. But I'd rather not mess around with compost that has to be turned over: My back told me not to, and I always listen to my back.
My main source of compost is the chicken litter, which I remove whenever it needs to, and also comfrey tea: Both are weed-free, so I don't have brambles growing in a pile. I'd rather compost "in situ", which for me is the alleys of the garden. I have raised beds in most places, and so I get some large quantities  of bark and wood chips. I place them in the alleys, and when they start allowing weeds, that is my cue to turn the alleys into the beds. But I don't care to walk in the gooey messes that you may be thinking of composting, so back to the chickens: I give it to them and they turn all that into eggs. No fuss, no muss, no odors, no turning the pile... When there is no snow on the ground, I have to cart their litter to my fruit trees, with the 4-wheeler and a 4 cu.ft. cart. That is a chore. In the winter, I have an enormous shovel. Here, they call it a Yooper Scooper. I guess our friends in Michigan are fond of the tool. They use it for snow. You just shove it under the pile, then drag the pile where you want and tip it empty. They use it for snow, but there is no rule that you can't use it for manure. Just make sure you get the biggest heaviest metal one. These plastic things made in china will break on the first try! It is fantastic for moving the manure in the cold of winter because it glides over the snow like a sled! I actually *prefer* cleaning the coop in winter. Here are some pictures of Yooper scoopers:
https://www.google.com/search?q=yooper+scooper+metal&sxsrf=ALeKk01pvxOF0_TnOtnZ4ujvY14MOzUPRw:1612488400181&source=lnms&tbm=isch&sa=X&ved=2ahUKEwjm-6-yy9HuAhWOK80KHWUUBQIQ_AUoAnoECAgQBA&biw=1106&bih=560
If you are hellbent on making a compost pile, keep it close to the garden: It may be a chore to take the stuff to the garden, pile it, turn it, wait till it's done, weed it, transport it where you want to once it is done,  but you will have less flies, less odors, less mice if you keep it away from human quarters. You may want to get familiar with comfrey: You put it in a barrel, add water and stand back. It will reek something awful but if you want to quick start a pile of compost, it is great!
Good luck on your project.
 
gardener
Posts: 2167
Location: Olympia, WA - Zone 8a/b
1041
5
hugelkultur kids forest garden fungi trees foraging books bike homestead
  • Likes 4
  • Mark post as helpful
  • send pies
    Number of slices to send:
    Optional 'thank-you' note:
  • Quote
  • Report post to moderator
My compost setup has 4 bins made from pallets. I only fill 2 of the bins at a time. That lets me turn them easily since there is always an empty bin next to a full bin. Very quick and easy. Then I have an area on the downhill side of the bins where I store the finished compost. Works well and can produce a lot of compost fairly quickly. I'm still working through the compost I made during the summer.
IMG_20200824_083419.jpg
4 bin compost setup.
 
pollinator
Posts: 224
42
  • Likes 3
  • Mark post as helpful
  • send pies
    Number of slices to send:
    Optional 'thank-you' note:
  • Quote
  • Report post to moderator
Hayley, if you live in Ontario, you must check out redwormcomposting.com...Bentley Christie has several articles on cold weather composting/vermicomposting. He too, lives in Ontario. He's a great reference!
 
Posts: 94
Location: Zone 9, CA
20
books urban
  • Likes 4
  • Mark post as helpful
  • send pies
    Number of slices to send:
    Optional 'thank-you' note:
  • Quote
  • Report post to moderator


We remodeled our bathroom and removed the tub, and replaced it with a shower. It was a rather Extra Large 1950's tub. I commandeered it as a bin for my worms years ago. I also have 2 concrete mixing tubs that complete my bin setup (not pictured). It has the built in drain, but that's all the drainage it has, so I work very hard on keeping moisture levels right where they need to be. It's sturdy and does the job. I keep a screen that's wrapped in plastic over the top as a lid to keep the rain out.
 
Megan Abdallah
Posts: 56
5
  • Likes 1
  • Mark post as helpful
  • send pies
    Number of slices to send:
    Optional 'thank-you' note:
  • Quote
  • Report post to moderator
How do send pictures from phone in this forum?
 
gardener
Posts: 1806
Location: Zone 6b
1126
forest garden fungi books chicken fiber arts ungarbage
  • Likes 4
  • Mark post as helpful
  • send pies
    Number of slices to send:
    Optional 'thank-you' note:
  • Quote
  • Report post to moderator
Update on new garden bed built with on site composting here:

I got the area done in Nov, covered with 6" of compost. I planted some garlics and potatoes. I have harvested garlics and potatoes are producing. In spring, I broadcast ed Asian greens but they did just so so. I guess the seeds were too small to make soil contact. Squashes are doing great, less than 7 weeks past last frost day, I have harvested several summer squashes and there are over a dozen winter squashes growing.

So far I don't need to water the plants even when they sit in fun sun over 12hr a day with a 90 degree high temperature.

I built more garden areas the same way throughout the winter/spring. Next I am going to move on into the front yard, but i will be using a green camouflage print tarp to make the pile less noticeable.
mmmmmmmmmmm.JPG
Garden 7 week past last frost day
P1130673.JPG
2 weeks past last frost day
P1140206-(2).JPG
Same site one month later
 
Posts: 39
Location: Southeast Idaho
16
4
goat rabbit ungarbage
  • Likes 5
  • Mark post as helpful
  • send pies
    Number of slices to send:
    Optional 'thank-you' note:
  • Quote
  • Report post to moderator
I don't turn my compost. I pack it in my lined pallet hotbeds and then put some potting soil on the top. It heats up and grows our cold weather crops in the winter and hot weather crops in the summer to give us an extra 60 days of growing weather for sweet potatoes in our Idaho zone 4. https://youtu.be/7X2gSpwzV9Q
 
pollinator
Posts: 528
Location: Finland, Scandinavia
402
trees
  • Likes 6
  • Mark post as helpful
  • send pies
    Number of slices to send:
    Optional 'thank-you' note:
  • Quote
  • Report post to moderator
I use the compost very little. The chickens get most food scraps, I have no lawn and leaves are left where they fall.
I needed a place for the outhouse material, so built this. I add leaves and other brown material  to cover the outhouse muck.
No smell at all. Some flies, though.
20230427_160120.jpg
I add leaves and other brown material to cover the outhouse muck.
 
steward
Posts: 16058
Location: USDA Zone 8a
4272
dog hunting food preservation cooking bee greening the desert
  • Likes 1
  • Mark post as helpful
  • send pies
    Number of slices to send:
    Optional 'thank-you' note:
  • Quote
  • Report post to moderator
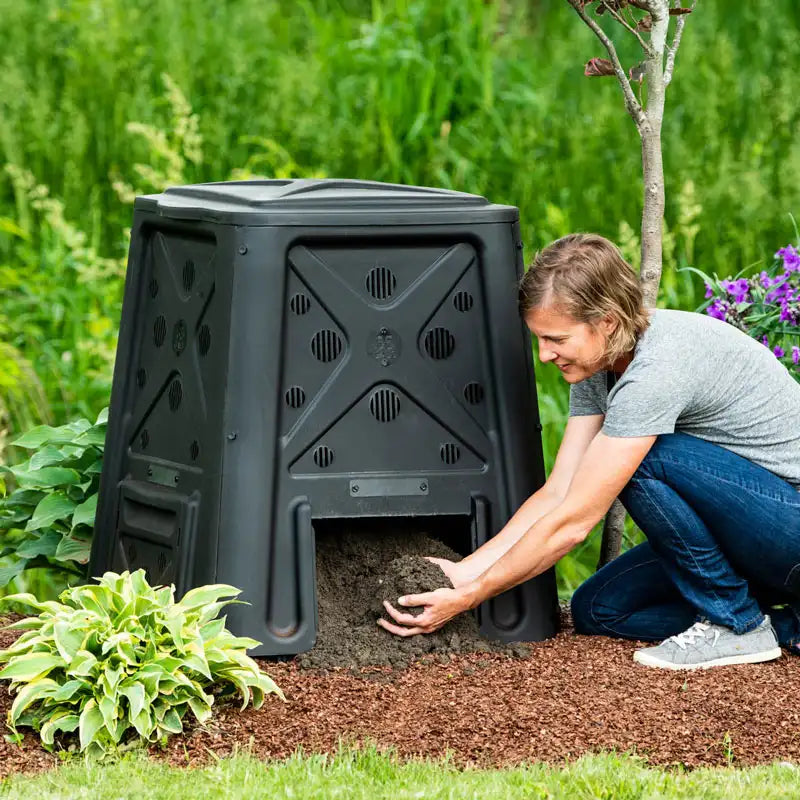
When we lived at our other place, dear hubby composted all the grass clipping in a Tumbler similar to what John posted.

That tumbler made wonderful rich black compost.

We left it there when we moved so our daughter could continue to compost the grass.

I use various methods where we live now.

I feed the wildlife veggie scraps so the wildlife can compost them, mother nature style.

I bury the coffee grounds in the garden.
 
Cécile Stelzer Johnson
pollinator
Posts: 1354
Location: zone 4b, sandy, Continental D
383
  • Likes 4
  • Mark post as helpful
  • send pies
    Number of slices to send:
    Optional 'thank-you' note:
  • Quote
  • Report post to moderator
Well, Hayley, since you are moving to a farm, I would make most use of animals on the farm. I am quite lazy, so the idea of turning the compost pile once in a while just has zero appeal. I don't have much, but I have chickens, and all our food scraps go to them, so I can't say that I really compost with a proper compost pile and a thermometer, or that I know the art. Remember that any vegetation that is not growing is dying or dead and will eventually turn into good comport, or at least darn good soil. I'm in zone 4b, so colder than yours, and the chickens' litter goes out too, yes, in the middle of winter.
They have a "winter run" in which I slip all their food, all our leftovers. Their litter ends up outside where it gets trashed some more.
Also going in the yard where they run free is leftover leaves [I put most of them in the garden, but I get at least 100 bags, so there is more to the chickens' delight. When I need a few shovelfuls of good dirt [like when I plant trees] I just go in their yard and help myself: they will make more! [Now, I really wish I had the coop closer to the garden!
When there are storms, the county crew goes around and chips a lot of trees/ branches etc. They will give the chips away if you are nice. [A couple cases of beer, pizza... whatever. Those ugly chips smother the alleys between the beds. You could say they compost "in situ", which saves me the pile turning; where I drop it is where I want it eventually, so I will not have to move it a second time! the chips/ leaves are thick enough that grass/ weeds do not come through. When they start growing through, that's my sign that it is useable: I fork/ shovel the alleys into the beds and re-fill the alleys for a couple of years.
I hear that some folks have arrangements with local restaurants and baristas. Here, it is against the law for restaurants to give away table scraps. I offered paying, but they were scared! They are forced to get that stuff in dump trucks and get that hauled to a dump. Of course, they have to pay for that service, and because dumps are getting full fast, it is expensive. Finally, the dumps stated doing the composting themselves, which is OK, but you are at the mercy of folks that use herbicides and other -ides: You don't know what you get.. [Stupidity has no limit here!] To save myself some work, I had a batch of chickens slaughtered [professionally] You tell them what you want to save and how you want it packaged. I said I wanted the feathers [which take a long time decomposing but are quite rich in nitrogen].
You should have seen their face: "No, we no can do. It is against the law: We must pour bleach on it and get it hauled to the dump". Can you believe that?!
I am presently looking for a machine that could cut feathers over and over until I get  nice feather meal.  With this last batch, I dumped the feathers into the [not quite legal] outhouse. It is moveable, so when it is ready, I will move it and plant a tree there, in memoriam of my chickens but I would prefer a machine that clips feathers really fine: It would decompose faster. Permies, Help please if you have an idea for a feather chipper!
 
pollinator
Posts: 726
Location: Clemson, SC ("new" Zone 8a)
161
10
  • Likes 5
  • Mark post as helpful
  • send pies
    Number of slices to send:
    Optional 'thank-you' note:
  • Quote
  • Report post to moderator

Matt Todd wrote:My current compost scheme is to not compost. Sorta.

Food waste:
Anything that can go to chickens turns into eggs.
Anything that cannot go to chickens goes in what I call the "refuse bin." Essentially a cage that sits near the woods where I put all the biological nasties, including moldy foods and cat waste (I use pine pellets rather than litter.) That keeps the chickens and wildlife out while letting bugs and soil contact do the breakdown work.

Yard waste:
Currently all yard stuff is going into piles near the garden for soil building. AKA "composting in place." When I have the right materials, I'll put them in play. For example, yesterday I had grass clippings, woodchips, and chicken poo that I spread between plants. That way I'm blocking weeds, feeding plants, and building soil all at once. The chicken poo was pretty fresh, which is a no-no, but I used sparingly and mixed with the other materials.

The stuff above is my current strategy. A similar strategy was earlier this year when I accumulated material and made two huglekulturs with the additional input of wood.

A past strategy was an active compost cage where I layered grass, leaves, and chicken poo. But that was too much work for me, turning it and keeping it moist for little reward. Plus a tree ate it, which is a lesson in itself. https://permies.com/t/139281/Tree-Ate-Compost#1091920 . The cage from this misadventure became my refuse cage.

So needless to say, there's a LOT of different ways to compost. The best way for you is whatever you feel is the least effort and easiest rewards.


I highly endorse Matt's post.  And I award an apple!  In most situations, I don't really believe in composting.  Unless you have a particular love of shoveling piles around, that is.  In that case, go for it!  Otherwise, I prefer to mulch with all of my compostable materials.  Let them become topsoil as nature intended and via natural processes - a continual addition of raw organic bulk from the top down, a continual creation of hummus via worms and fungi and whatnot from the bottom down - as opposed to my own labor.

The only downsides of this approach that I will admit are:
1) Composting via mulch takes longer.  But in most homesteading scenarios, who cares?
2) If you are tending to an ornamental garden bed where aesthetics are a key concern, then having already-finished compost you can spread beneath a layer of decorative mulch may be preferable.  But frankly, if that is you, you probably aren't reading this forum to begin with.
3) If you are tending to potted plants, then finished compost is an important convenience.
 
gardener
Posts: 219
Location: East Beaches area of Manitoba, Zone 3
90
hugelkultur purity trees medical herbs writing ungarbage composting
  • Mark post as helpful
  • send pies
    Number of slices to send:
    Optional 'thank-you' note:
  • Quote
  • Report post to moderator

Grace Barrett wrote:Winter composting is instant composting out of a dedicated blender under the sink. When full, zip it through, then open window out to garden and throw it on the bed.  Have employed this method in the summer, depositing it below mulch.  In a week or two it’s gone. Lovely, healthy soil results.  Leaving city apt. for country farmhouse WILL feel like getting out of jail. Enjoy your newfound freedom. Have lived New England wilderness life all my adult life and no freedom like it anywhere. After 16+ years this old farmhouse is about to be completely restored, as well as 175 yr. old barn.  The kids will fight over it😊


Love this! Simple and elegant.
 
steward and tree herder
Posts: 8385
Location: Isle of Skye, Scotland. Nearly 70 inches rain a year
3974
4
transportation dog forest garden foraging trees books food preservation woodworking wood heat rocket stoves ungarbage
  • Likes 4
  • Mark post as helpful
  • send pies
    Number of slices to send:
    Optional 'thank-you' note:
  • Quote
  • Report post to moderator
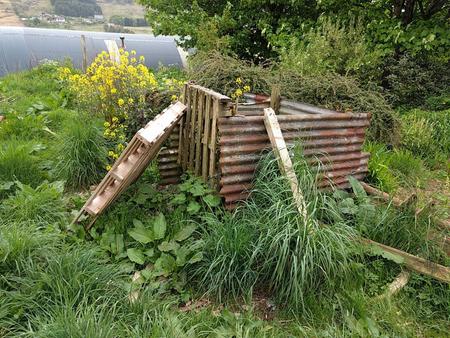
I just rebuilt my compost bins, so this seems like a good place to share the before and after pictures. The old bins are going to be in the way of where our drains go when the new house extension is built, so needed relocating. After some thought I've put the new bins a bit more out of the way behind my shed. I need them to be a bit more dog and bird proof than the old bins, but they are nearly finished now.
First the old bins:
old compost bins

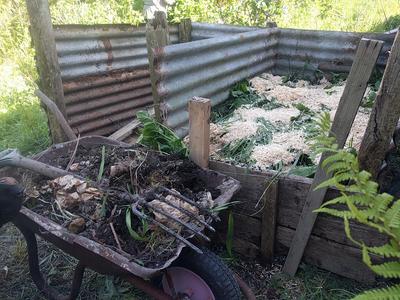
Made out of old corrugated steel roofing sheets and fence posts with pallets at the front, the bins were a simple pile up the stuff in one side till full, then restart in the other side whilst the original is maturing. It never got noticably hot, but seemed to produce a reasonable compost eventually, albeit full of weed seeds. I'm now going to do more chop and drop and avoid putting weedy material in the new bins, so it will be mostly kitchen waste. I've just been given several bags full of clean wood sawdust and shavings, so this will help to keep the new bin aerated. The old bin also got a bit too much stove ash put in it. One of our stoves burns mostly waste paper and card, so the ash is full of clay, which makes the compost white and heavy. A little from the wood stove is fine, but I'm going to use paper waste less in future. Dismantling the old bin you can see the nice compost at the bottom and the raw kitchen waste at the top.
cross section through working compost bins

There were obviously loads of worms working away. Some of which I have relocated into my wheelie worm bin to make a fresh start there. These just made their own way into the old bins. Because it is slow compost, they always have a comfortable temperature there.
compost bins worms

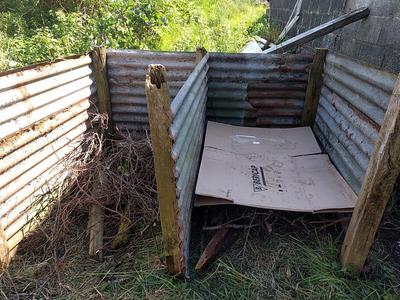
I built the new bins in a similar style with most of the original materials. I had to find a couple of replacement posts and new fronts to the bins. I'm also intending to build a roof a bit like my little wood drying shelters, extend the sides and put a flap curtain at the front to try and stop the birds from fishing titbits out and encouraging the dogs to scavenge in the bins....As well as making a mess, I'm worried about the dogs getting sick.
So this is the new bins before filling:
empty new compost bins

I put a layer of twigs and wood at the bottom and decided to layer in the uncomposted material from the old bins into one side of the new bin. As well as the old compost I cut some weeds from the garden - dock, grass and nettles mainly -  and layer those with the wood shavings with the old compost to help get it all off to a good start.
layering materials in compost bin

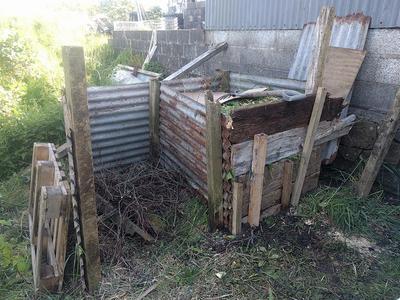
The bottom of the old bin seems to have some pretty good compost in so I've left that to use elsewhere. After layering up all the materials there was still a few inches left at the top of the new bin. I think I can continue adding in new compost layers for a few weeks yet therefore, before starting the other side.
compost bin almost full


As a side note, the old compost bin had grown the most ginormous potatoes last year!
so that's lunch tomorrow sorted

 
The City calls upon her steadfast protectors. Now for a tiny ad:
turnkey permaculture paradise for zero monies
https://permies.com/t/267198/turnkey-permaculture-paradise-monies
reply
    Bookmark Topic Watch Topic
  • New Topic