• Post Reply Bookmark Topic Watch Topic
  • New Topic
permaculture forums growies critters building homesteading energy monies kitchen purity ungarbage community wilderness fiber arts art permaculture artisans regional education skip experiences global resources cider press projects digital market permies.com pie forums private forums all forums
this forum made possible by our volunteer staff, including ...
master stewards:
  • Nancy Reading
  • Carla Burke
  • r ranson
  • John F Dean
  • paul wheaton
  • Pearl Sutton
stewards:
  • Jay Angler
  • Liv Smith
  • Leigh Tate
master gardeners:
  • Christopher Weeks
  • Timothy Norton
gardeners:
  • thomas rubino
  • Jeremy VanGelder
  • Maieshe Ljin

Dimensions for small metal rocket stove

 
Posts: 3
rocket stoves wood heat homestead
  • Mark post as helpful
  • send pies
    Number of slices to send:
    Optional 'thank-you' note:
  • Quote
  • Report post to moderator
I have a piece of 100mm round tube, and I wanted to try to make a small portable rocket stove for cooking, would probably like to use it for 30min to 1h. I know the steel tube wont last too long but I still want to try it.

I would like to make something like these:


But after some reading I found the recommended ratio for the tubes is 1:2:4, and most of these small rocket stoves doesn't seem to use that ratio.

Does anyone know the dimensions or plans for a tested design for these kind of stoves?
 
Rocket Scientist
Posts: 1809
Location: Kaslo, BC
525
building solar woodworking rocket stoves wood heat greening the desert
  • Likes 2
  • Mark post as helpful
  • send pies
    Number of slices to send:
    Optional 'thank-you' note:
  • Quote
  • Report post to moderator
Hi Mark,   Welcome to the forums.  The ratio 1:2:4 is broken down as follows :   1 means feed tube, 2 means burn chamber and 4 means heat riser. Since all the photos (minus the top middle) one doesn't have a burn chamber, the ratio is kind of irrelevant from the start. I don't have any experience with making a modified L tube like these ones but I do know that I've heard several people complain that they don't consistently feed the wood very well at a 45 degree angle - The wood doesn't slide good and gets caught up more easily than a 90 degree feed tube.
Perhaps someone with more experience with making one can chime in to help you.
 
Posts: 46
2
  • Likes 1
  • Mark post as helpful
  • send pies
    Number of slices to send:
    Optional 'thank-you' note:
  • Quote
  • Report post to moderator
I have made a rocket cook stove from metal, then from different masonry products, and finally from firebrick splits.  I can tell you that the metal ones work really well, until you realize that the spalling metal (tiny fragments being eroded away by heat and oxidation) has to go somewhere.
 
Mark Tamp
Posts: 3
rocket stoves wood heat homestead
  • Mark post as helpful
  • send pies
    Number of slices to send:
    Optional 'thank-you' note:
  • Quote
  • Report post to moderator

Gerry Parent wrote:Hi Mark,   Welcome to the forums.  The ratio 1:2:4 is broken down as follows :   1 means feed tube, 2 means burn chamber and 4 means heat riser. Since all the photos (minus the top middle) one doesn't have a burn chamber, the ratio is kind of irrelevant from the start. I don't have any experience with making a modified L tube like these ones but I do know that I've heard several people complain that they don't consistently feed the wood very well at a 45 degree angle - The wood doesn't slide good and gets caught up more easily than a 90 degree feed tube.
Perhaps someone with more experience with making one can chime in to help you.


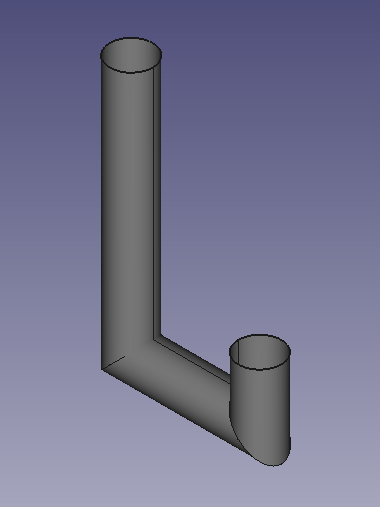
Yes that's what confused me, that they have no burn tunnel, even the top middle one seems minimal since the feed tube is at an angle. Maybe they work in a different way, idk I couldn't find much info about them.

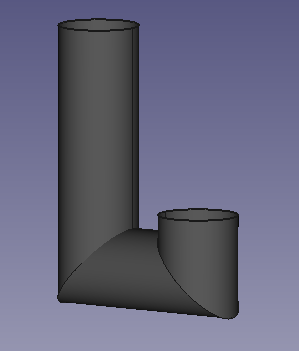
I guess the simplest design would be something like this:


60cm x 30cm x 15cm (measured from center line), I would like to have the feed tube closer to the heat riser, but keeping the proportions 1:2:4, results in a really small stove, I am not sure it would work:


30cm x 15cm x 7.5cm, tube diameter is 100mm in both.

And being a circular tube, the J design makes it harder to add an ash tray, and the fuel shell/air intake to the feed and burner tubes.

So, still looking for designs I could try.
 
Gerry Parent
Rocket Scientist
Posts: 1809
Location: Kaslo, BC
525
building solar woodworking rocket stoves wood heat greening the desert
  • Likes 2
  • Mark post as helpful
  • send pies
    Number of slices to send:
    Optional 'thank-you' note:
  • Quote
  • Report post to moderator
Mark,   Seeing as you are using it just for cooking with nothing to slow or add friction to the exhaust (barrel or mass), the burn tunnel can be shorter without any problems. The ratios are mostly guidelines as there are so many factors with every build that can affect what you can get away with in modifying them.
Have you considered a square tube rather than round? This is what I used for my first RMH build and had an ash tray (made from a recycled cooking oil can) and a metal grate that I made from 1/2" rebar that worked quite well.
Ash-pit-metal-grate-rebar.JPG
[Thumbnail for Ash-pit-metal-grate-rebar.JPG]
 
Rocket Scientist
Posts: 4527
Location: Upstate NY, zone 5
575
5
  • Mark post as helpful
  • send pies
    Number of slices to send:
    Optional 'thank-you' note:
  • Quote
  • Report post to moderator
Rather than depend on the iffy feeding character of a slanted feed tube, I would go with a simple L-tube. A grate in the bottom like Gerry's, or even just a bent piece of metal that gives an air path to the back of the burn tunnel, would help.
A J-tube needs no grate or air channel. A 4" system is small enough that cleaning ash becomes difficult, and an ash cleanout would be needed.

Are you looking for a stationary outdoor cooking stove, or a portable one, or a traveling/camping one? That makes a big difference in what will be most practical.
 
Mark Tamp
Posts: 3
rocket stoves wood heat homestead
  • Mark post as helpful
  • send pies
    Number of slices to send:
    Optional 'thank-you' note:
  • Quote
  • Report post to moderator

Gerry Parent wrote:Mark,   Seeing as you are using it just for cooking with nothing to slow or add friction to the exhaust (barrel or mass), the burn tunnel can be shorter without any problems. The ratios are mostly guidelines as there are so many factors with every build that can affect what you can get away with in modifying them.
Have you considered a square tube rather than round? This is what I used for my first RMH build and had an ash tray (made from a recycled cooking oil can) and a metal grate that I made from 1/2" rebar that worked quite well.


Yes I will only use it for cooking, at home but outdoors. The L shape sounds good, would make it easier to make a grate/ash tray. I would prefer using square tube, but the round one is all I have right now. Found it while cleaning at home and that triggered the idea of making a stove.

Glenn Herbert wrote:Rather than depend on the iffy feeding character of a slanted feed tube, I would go with a simple L-tube. A grate in the bottom like Gerry's, or even just a bent piece of metal that gives an air path to the back of the burn tunnel, would help.
A J-tube needs no grate or air channel. A 4" system is small enough that cleaning ash becomes difficult, and an ash cleanout would be needed.

Are you looking for a stationary outdoor cooking stove, or a portable one, or a traveling/camping one? That makes a big difference in what will be most practical.


I want something to use outdoors, and to be able to pick it up easily and store it in a corner of the shed, so looking for something small.


How do the L-tube works? The fire is directly on the bottom of the heat riser? Or you don't put the wood all the way in?

Are there any recommended dimensions or a good specific design for a small L-tube?
 
Gerry Parent
Rocket Scientist
Posts: 1809
Location: Kaslo, BC
525
building solar woodworking rocket stoves wood heat greening the desert
  • Likes 1
  • Mark post as helpful
  • send pies
    Number of slices to send:
    Optional 'thank-you' note:
  • Quote
  • Report post to moderator

Mark Tamp wrote:How do the L-tube works? The fire is directly on the bottom of the heat riser? Or you don't put the wood all the way in?

Are there any recommended dimensions or a good specific design for a small L-tube?


Yes, the fire is generally at the bottom of the heat riser.
An L tube means you will constantly be pushing the wood in as it burns away whereas a J tube helps reduce the amount of tending by gravity feeding the wood in as it burns. Something to consider if you go the L route.
Both 6" and 8" are the most popular sizes for a RMH. Not sure what sizes people use for an L tube.
 
Glenn Herbert
Rocket Scientist
Posts: 4527
Location: Upstate NY, zone 5
575
5
  • Mark post as helpful
  • send pies
    Number of slices to send:
    Optional 'thank-you' note:
  • Quote
  • Report post to moderator
You can make an L-tube whatever size you want - it doesn't require specific proportions like a J-tube.

I have made 6" L-tubes with a horizontal over 2' long, so you can have a considerable amount of wood contained and burning at once. A 4" L-tube 18" long x say 18" to 24" high would give you good working and reasonable tending requirements, in my opinion.You could always put a perforated floor in an inch above the bottom of the pipe if you are concerned about air supply. I have found that using the largest wood that will fit comfortably in the feed (around half the size of the feed so you can put two in at once) gives the best performance if you want a lasting fire. If you want a short, hot fire, lots of thin pieces will do that, at the cost of crumbling into coals quickly and potentially making a pile that chokes the bottom coals. Bigger sticks/logs mostly burn up before collapsing, so air gets to more of the coals more of the time. I have kept a fire going for 8 hours full tilt in a maple syrup evaporator (8" x 9" x 30" feed, 8" x 8" x 30" riser, 8" diameter stovepipe 10' tall.) Using mostly larger logs, I didn't get coal buildup beyond a stable bed, and when raking out the next day, there was nothing but powdery white mineral ash.
 
Posts: 1
  • Likes 1
  • Mark post as helpful
  • send pies
    Number of slices to send:
    Optional 'thank-you' note:
  • Quote
  • Report post to moderator
For the record. I'm the one that makes the top middle one. I like it way better then a L shape. I got tired of having to feed it the whole time versus having wood/sticks at a angle works much better. The air plate I out in is welded the whole length of the throat and then grinded smooth to get the most air flow. I didn't like the 45 directly to the vertical and wanted a larger bottom room for wood to burn so put the space in between. But the L does work just as good also. I enjoy using them when I camp and the kids think it's neat and something they master quickly.
 
Posts: 7
  • Likes 1
  • Mark post as helpful
  • send pies
    Number of slices to send:
    Optional 'thank-you' note:
  • Quote
  • Report post to moderator
Here is a 1st gen. cooker I whipped up in an afternoon to try a proof of concept. The air holes I added up the side were to induce a vortex in the exhaust.  Originally 5 holes with 2 of them below the top of the feed tube junction were muddling the air path. Once I filled in the ones below the joint then enlarged & added one it worked noticeably better. I probably could have done just one or even no holes but it was a test project so. (Shrug) This shot was after it had just gone out & before my mods. The tube was 3" since that was what I had & the riser was about 18" tall. The top were just offcuts of the same with bits of bar to hold them together in an open grid.
20190514_230513.jpg
[Thumbnail for 20190514_230513.jpg]
 
Posts: 5
  • Mark post as helpful
  • send pies
    Number of slices to send:
    Optional 'thank-you' note:
  • Quote
  • Report post to moderator

Rob Millard wrote:Here is a 1st gen. cooker I whipped up in an afternoon to try a proof of concept. The air holes I added up the side were to induce a vortex in the exhaust.  Originally 5 holes with 2 of them below the top of the feed tube junction were muddling the air path. Once I filled in the ones below the joint then enlarged & added one it worked noticeably better. I probably could have done just one or even no holes but it was a test project so. (Shrug) This shot was after it had just gone out & before my mods. The tube was 3" since that was what I had & the riser was about 18" tall. The top were just offcuts of the same with bits of bar to hold them together in an open grid.


Can you help me with what i can do to help mine
20241014_123351.jpg
[Thumbnail for 20241014_123351.jpg]
 
Glenn Herbert
Rocket Scientist
Posts: 4527
Location: Upstate NY, zone 5
575
5
  • Likes 1
  • Mark post as helpful
  • send pies
    Number of slices to send:
    Optional 'thank-you' note:
  • Quote
  • Report post to moderator
Probably best to focus your questions in the thread you already started. Making a rocket stove - help! We will be happy to continue advising there.
 
When all four tires fall off your canoe, how many tiny ads does it take to build a doghouse?
Rocket Mass Heater Jamboree And Updates
https://permies.com/t/170234/Rocket-Mass-Heater-Jamboree-Updates
reply
    Bookmark Topic Watch Topic
  • New Topic