• Post Reply Bookmark Topic Watch Topic
  • New Topic
permaculture forums growies critters building homesteading energy monies kitchen purity ungarbage community wilderness fiber arts art permaculture artisans regional education skip experiences global resources cider press projects digital market permies.com pie forums private forums all forums
this forum made possible by our volunteer staff, including ...
master stewards:
  • Nancy Reading
  • Carla Burke
  • r ranson
  • John F Dean
  • paul wheaton
  • Pearl Sutton
stewards:
  • Jay Angler
  • Liv Smith
  • Leigh Tate
master gardeners:
  • Christopher Weeks
  • Timothy Norton
gardeners:
  • thomas rubino
  • Jeremy VanGelder
  • Maieshe Ljin

PAHS High Tunnel Batch Box Rocket Mass Heater

 
Posts: 31
Location: Kenai & Nikiski Alaska, Zone 4B
22
  • Likes 12
  • Mark post as helpful
  • send pies
    Number of slices to send:
    Optional 'thank-you' note:
  • Quote
  • Report post to moderator
I just wanted to say thank you to all of the fine rocketeers on Permies, my build would never had happened if it wasn't for your posts, sharing of knowledge and encouragement to others to build these beautiful engines.

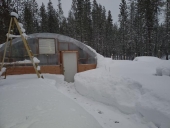
I built my high tunnel in anticipation of adding a rocket mass heater into the system when I could afford to. The tunnel itself was designed with PAHS and annualized geo solar in mind. I couldn't afford to do everything that I was hoping to, but the results far exceeded my expectations.

That being said I decided to build my BBRMH in late winter this year, beginning around the start of March. I was able to plant seeds in the masonry stratification chamber raised bed March 26th, far earlier than almost everyone around here. I'm talking about Kenai Alaska zone 4B/5A.

I'll add photos and descriptions as I can.
IMG_20230619_205143_127-01.jpeg
[Thumbnail for IMG_20230619_205143_127-01.jpeg]
 
Jacob Klingel
Posts: 31
Location: Kenai & Nikiski Alaska, Zone 4B
22
  • Likes 4
  • Mark post as helpful
  • send pies
    Number of slices to send:
    Optional 'thank-you' note:
  • Quote
  • Report post to moderator
The masonry bed is a mix of a rammed earth thermal battery in the back, and the stratification chamber is in the front, facing towards the center of the high tunnel. I placed soil above both the battery and the stratification chamber. The masonry bed was built with solid concrete blocks on the outside of the chamber, and hollow cinder blocks on the inside of the chamber, with rock board below and on top of the chamber. I topped the chamber with clay from my property with a slope in the hopes that water from the soil would drain back towards the thermal battery. The system is not insulated from the back wall of the high tunnel, nor the ground. Everything is built on compacted sand with a dash of clay mixed in.

IMG_20230314_143828_797.jpg
[Thumbnail for IMG_20230314_143828_797.jpg]
IMG_20230318_162054_819.jpg
[Thumbnail for IMG_20230318_162054_819.jpg]
 
Jacob Klingel
Posts: 31
Location: Kenai & Nikiski Alaska, Zone 4B
22
  • Likes 4
  • Mark post as helpful
  • send pies
    Number of slices to send:
    Optional 'thank-you' note:
  • Quote
  • Report post to moderator
Here is an idea as to what I was shooting for when building the heater as well as the raised bed.

BBRMH_6_Double_Bubble_12.png
[Thumbnail for BBRMH_6_Double_Bubble_12.png]
 
Jacob Klingel
Posts: 31
Location: Kenai & Nikiski Alaska, Zone 4B
22
  • Likes 6
  • Mark post as helpful
  • send pies
    Number of slices to send:
    Optional 'thank-you' note:
  • Quote
  • Report post to moderator
And here is another look. If you've ever worked in the construction business everything looks great on paper...

BBRMH_6_Double_Bubble_11.png
[Thumbnail for BBRMH_6_Double_Bubble_11.png]
 
Jacob Klingel
Posts: 31
Location: Kenai & Nikiski Alaska, Zone 4B
22
  • Likes 5
  • Mark post as helpful
  • send pies
    Number of slices to send:
    Optional 'thank-you' note:
  • Quote
  • Report post to moderator
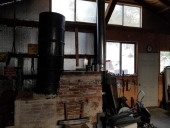
The heater itself is two full sized fifty-five gallon drums stacked on each other. It's a six-inch batch box based on Peter's website. Thank you Peter for everything you have done. The riser is a six minute riser, and there is kaowool lining both of the barrels so that I didn't fry the plastic of the high tunnel. I experimented a lot with the idea behind the secondary air supply and ended up with an okay system. It's definitely not standard, and probably not nearly as efficient as it could be, but I am very happy with the results. This thing really does sound like a rocket when it takes off!!

Dehydrator.jpg
[Thumbnail for Dehydrator.jpg]
 
gardener
Posts: 500
Location: Victor, Montana; Zone 5b
228
hugelkultur forest garden composting toilet building rocket stoves
  • Likes 3
  • Mark post as helpful
  • send pies
    Number of slices to send:
    Optional 'thank-you' note:
  • Quote
  • Report post to moderator
Great fun Jacob, thanks for posting.

I was curious as to what your total ISA is with that large stratification chamber. Looked huge for a six inch, but with the bypass you seem to not be having an issue.
 
Jacob Klingel
Posts: 31
Location: Kenai & Nikiski Alaska, Zone 4B
22
  • Likes 5
  • Mark post as helpful
  • send pies
    Number of slices to send:
    Optional 'thank-you' note:
  • Quote
  • Report post to moderator
Thanks Daniel! If my quick math is correct I believe my ISA is approximately 80 square feet. It's definitely over sized for a six-inch, but it seems to work well once the system starts to draft.

1687299328376.jpg
[Thumbnail for 1687299328376.jpg]
1687308578465.jpg
[Thumbnail for 1687308578465.jpg]
 
Jacob Klingel
Posts: 31
Location: Kenai & Nikiski Alaska, Zone 4B
22
  • Likes 1
  • Mark post as helpful
  • send pies
    Number of slices to send:
    Optional 'thank-you' note:
  • Quote
  • Report post to moderator
The bed itself is approximately 25 feet long, 32 inches tall and 28 inches wide. The chamber is a fuzz over 6 inches wide. It's not optimal, but it fit into some base dimensions that I was working with.
 
Daniel Ray
gardener
Posts: 500
Location: Victor, Montana; Zone 5b
228
hugelkultur forest garden composting toilet building rocket stoves
  • Likes 1
  • Mark post as helpful
  • send pies
    Number of slices to send:
    Optional 'thank-you' note:
  • Quote
  • Report post to moderator
That’s great. I know that the max isa is drastically different when using a bypass to warm the system. Can one of the experts chime in on if there is a magic number that applies?  80square feet is over a 30% increase from peters recommendation.

Thanks for the detailed info this is great stuff.
 
gardener
Posts: 1054
Location: +52° 1' 47.40", +4° 22' 57.80"
447
woodworking rocket stoves wood heat
  • Likes 4
  • Mark post as helpful
  • send pies
    Number of slices to send:
    Optional 'thank-you' note:
  • Quote
  • Report post to moderator
I know of some bells that are oversized, all with a bypass. No idea what the limit would be, the largest oversize I know about is 50%, so 150% of the recommended values.
 
gardener
Posts: 5169
Location: Cincinnati, Ohio,Price Hill 45205
1010
forest garden trees urban
  • Likes 4
  • Mark post as helpful
  • send pies
    Number of slices to send:
    Optional 'thank-you' note:
  • Quote
  • Report post to moderator
Thank you jacob for sharing this.
It is very inspiring!
The combination of a GAHT battery with a greenhouse RMH makes so much sense.
I especially love the use of off the shelf concrete block and cement board.

I was wondering how you vented into that chamber without damaging it.
From your cad diagram, it seem like you suspend the exhaust duct down the center of the stratification chamber, cooling the gasses before they encounter the concrete.
This seems like big win for bell construction.
Did you dry stack or use mortar on the blocks?

Are you up for posting some more information on your PAHS system, like what kind of controls and sensors you use and what temperature settings?
Are you building any more PAHS beds in the green house?

Thanks again for sharing your work!

 
Jacob Klingel
Posts: 31
Location: Kenai & Nikiski Alaska, Zone 4B
22
  • Likes 5
  • Mark post as helpful
  • send pies
    Number of slices to send:
    Optional 'thank-you' note:
  • Quote
  • Report post to moderator
Thank you for your kind words William! I just hope that my post can inspire some folks into thinking outside the "box" when it comes to building these amazing engines. Living in Alaska is absolutely wonderful, but it comes with many problems as well. One of the major problems is sourcing all of the materials for such a build. My main goal was to see if I could create this unit with as much locally available materials as possible, hence the use of concrete blocks and rock board. I even went so far as to use high temp ceramic paint from the automotive parts store on the inside of the firebox to see if it would work as an alternative to sourcing exotic materials not available locally. So far it seems to be working a treat, although time will tell.

As far as the other systems at play in regards to the PAHS properties there's some ideas that I had in mind based on many years of research. The start of the build began with scraping away the eighteen inches of solid red clay and silt to get to the base of sand underneath the miniscule amount of loam we have here. That's when I discovered that I would have to partially bury the high tunnel in the ground. I added three feet of straight pipe to the hoops so my eight foot tall tunnel is actually closer to twelve feet tall in the center. I added metal roofing to the straight section so that I could backfill up to the high tunnel. When the backfilling was done I topped the exterior of the tunnel with two inch EPS film coated rigid foam with the reflective side facing downwards. It extends horizontally approximately four feet around the tunnel. I then covered the entirety of the insulation with 6 mil black poly of which tied into the wiggle wire channel underneath the clear greenhouse plastic. I also angled the landscape around the tunnel to shed rain water away from the foundation. Basically I gave the tunnel a massive dry source of insulated sand around the entire perimeter.

As far as any sensors I kept it as simple as possible. I installed an Inkbird temp controller into one of the ducts feeding from the corrugated black drain pipe that runs the length of the tunnel at the roof. I then split that into two six inch inline fans that feed into corrugated and perforated drain pipe that is buried in the rammed earth thermal batteries underneath my soil. The Inkbird kicks on at about 60 degrees, as well as shuts off at the same 60 degrees. I could modify that but I was being lazy when it comes to the controls. As a side note, when the BBRMH is in a full burn the high tunnel really warms up tremendously over ambient temps so I used the GAHT system to collect a little bit more heat instead of letting it leak out through the single wall plastic.

IMG_20230619_090637_540.jpg
[Thumbnail for IMG_20230619_090637_540.jpg]
 
Jacob Klingel
Posts: 31
Location: Kenai & Nikiski Alaska, Zone 4B
22
  • Likes 3
  • Mark post as helpful
  • send pies
    Number of slices to send:
    Optional 'thank-you' note:
  • Quote
  • Report post to moderator
Hey William, I realized that I never answered some of your questions about the stratification chamber.

The bed itself was all dry stacked blocks for the stratification chamber, and then I used a construction adhesive to hold the blocks above the chamber together. I used a 3M Fire Barrier mastic to fill the gaps between blocks, and then painted the blocks with ultra black latex paint. I would have liked to cover the blocks with plaster, but time didn't allow for that.

As far as the duct work is concerned, yep, you got it right. I ran fifteen feet of six-inch duct into the chamber, with a short piece of duct below that for the return. I cannot remember where I read the recommendation about the ducting but it made sense to push the heat into the chamber further before allowing it to actually fill the chamber.

IMG_20230316_173510_747.jpg
[Thumbnail for IMG_20230316_173510_747.jpg]
 
Jacob Klingel
Posts: 31
Location: Kenai & Nikiski Alaska, Zone 4B
22
  • Likes 3
  • Mark post as helpful
  • send pies
    Number of slices to send:
    Optional 'thank-you' note:
  • Quote
  • Report post to moderator
I capped the ends of the stratification chamber with one inch kaowool, plus an outer layer of half-inch rock board using tapcon screws into the masonry.
IMG_20230318_162217_436.jpg
[Thumbnail for IMG_20230318_162217_436.jpg]
 
Jacob Klingel
Posts: 31
Location: Kenai & Nikiski Alaska, Zone 4B
22
  • Likes 1
  • Mark post as helpful
  • send pies
    Number of slices to send:
    Optional 'thank-you' note:
  • Quote
  • Report post to moderator
https://youtu.be/2p_ntGmKLd4?si=kP_lisV0RrgxGm-O
 
Posts: 240
Location: Manotick (Ottawa), Ontario
17
  • Likes 1
  • Mark post as helpful
  • send pies
    Number of slices to send:
    Optional 'thank-you' note:
  • Quote
  • Report post to moderator

Jacob Klingel wrote:... The tunnel itself was designed with PAHS and annualized geo solar in mind...


I had to look it up, but I think PAHS in this context means passive annual heat storage (not polycyclic aromatic hydrocarbons). Am I right?
 
Jacob Klingel
Posts: 31
Location: Kenai & Nikiski Alaska, Zone 4B
22
  • Likes 2
  • Mark post as helpful
  • send pies
    Number of slices to send:
    Optional 'thank-you' note:
  • Quote
  • Report post to moderator
You are correct David! Gotta love acronyms;) Since I was not able to provide a big hat I decided to build the biggest boot possible in the hopes of shedding as much rainwater from the foundation as I could. Below the 6 mil poly there is a tremendous amount of clay that is angled in such a way to shed water towards the wetlands.
 
Jacob Klingel
Posts: 31
Location: Kenai & Nikiski Alaska, Zone 4B
22
  • Likes 2
  • Mark post as helpful
  • send pies
    Number of slices to send:
    Optional 'thank-you' note:
  • Quote
  • Report post to moderator
Here is a photo from about April 12th. Our cold hardy crops were planted March 26th. You can see how much snow we received that winter on the right side of the image. I'm a freak when it comes to snow maintenance, and that's why ours was still standing when a lot of folks lost their tunnels this last winter. I was also using biochar as a snow melt up against the side of the tunnel, and then I'd dig that snow up and toss it on my raised masonry bed. You might also be able to see where the 6 mil poly stops and the expansive clay starts as the ground swelled several inches during the winter, but my tunnel didn't budge an inch.
IMG_20230407_145402_219.jpg
[Thumbnail for IMG_20230407_145402_219.jpg]
 
Jacob Klingel
Posts: 31
Location: Kenai & Nikiski Alaska, Zone 4B
22
  • Mark post as helpful
  • send pies
    Number of slices to send:
    Optional 'thank-you' note:
  • Quote
  • Report post to moderator
April 16th I changed the chimney to a vertical one. There was a substantial change in draft.

IMG_20230416_153256_834-01.jpeg
[Thumbnail for IMG_20230416_153256_834-01.jpeg]
 
A magnificient life is loaded with tough challenges. En garde tiny ad:
Rocket Mass Heater Jamboree And Updates
https://permies.com/t/170234/Rocket-Mass-Heater-Jamboree-Updates
reply
    Bookmark Topic Watch Topic
  • New Topic