• Post Reply Bookmark Topic Watch Topic
  • New Topic
permaculture forums growies critters building homesteading energy monies kitchen purity ungarbage community wilderness fiber arts art permaculture artisans regional education skip experiences global resources cider press projects digital market permies.com pie forums private forums all forums
this forum made possible by our volunteer staff, including ...
master stewards:
  • Carla Burke
  • Nancy Reading
  • John F Dean
  • r ransom
  • Jay Angler
  • Timothy Norton
stewards:
  • paul wheaton
  • Pearl Sutton
  • Tereza Okava
master gardeners:
  • Christopher Weeks
  • M Ljin
gardeners:
  • thomas rubino
  • Jeremy VanGelder
  • Megan Palmer

Harry the boot (BEL)

 
Posts: 25
117
homeschooling kids roundwood hunting plumbing earthworks bike building woodworking rocket stoves homestead
  • Likes 16
  • Mark post as helpful
  • send pies
    Number of slices to send:
    Optional 'thank-you' note:
  • Quote
  • Report post to moderator
BEL Post #10 (double digits!)

Happy "hump day" Permies! It is odd to think that in my past life only a few months ago, Wednesdays held more significance as it represented having more than half the work week done. When the stress was high (which it often was), finishing Wednesday was a significant work week milestone. Why do jobs have to be only about looking forward to getting past the halfway point and the (hopeful) "glide" to the weekend. Let's just say that one of my motivations for my significant life change was driven by these thoughts. I can't say I have experienced the same longing here at WL -- honestly, I find it harder to keep track of the days of the week of the time of the day. I think my only anchor, right now, when it comes to time is looking forward to being reunited with my family before we all collectively take this journey together.

This "hump day" also happened to be the half-assed holiday Johnny Appleseed Day. So while the second half of our day was to be focused on activities aligned to the holiday, we started our morning up at the Abbey feeding the cats and moving forward the repair of the floor. Specifically, today was the start of repairing the cob earthen floor. Given the depth of the majority of the repairs, we decided that the fix was going to need to take place over the next few days. Today, we reconstituted some of the cob we removed from the damaged floor and started to fill in the gaps between the new hickory plank as well as the tool access cuts we had to make in order to pin the plank to the log. I would estimate that we have two more days of working on the cob floor to get to a finish top layer that will eventually go through the linseed treatment.

Next, as an alternative to costly (and disposable) sandpaper, Stephen introduced us to the card scrapper. The best way to think of it is a piece of steel that you can drag across the surface of wood to scrap (and in some cases plane) the surface similar to a drawl knife but much less material is removed. The reason why this works is all in the preparation of the scrapper. First, it requires a clean and "squared" edge to be established. This can be done with a file, but in watching a video on YouTube University, we discovered that a jig can help to significantly improve this step. So, when we got to the workshop, I made the jig that holds the file and establishes a right angle to assist in the steps to prepare the scrapper. After filing the edge, it must be further polished to a very fine finish, so fortunately, the jig made for the file can also be used to assist in this step to hold the established right angled edges. Finally, the scrapper gets burnished on either side with a burnishing rod (which can be any rod-like tool as long as it is harder than the scrapper) by running the rod at a slight angle along the edge of the scrapper with it lying flat on the table. This creates a microscopic burr along the edge of the scrapper. Finally, the burnishing rod is used across the narrow edge of the scrapper to bend down the burr established in the previous step causing it to "hook over" (you can feel it with your fingernails) and create the feature used to scrap fine wood shavings from surfaces. As a budding wood worker, I was glad to have the opportunity and learn to use the card scrapper. There is nothing like causing beautifully curled shavings when using a well prepared tool . I even came back down after the day was done and redid the preparation process for the scrapper and played around more with using it.

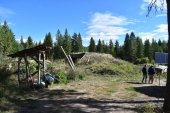
For Johnny Appleseed Day (JAD), Stephen planned for us to head up to the Labs and start a fruit tree "nursery" at Dances with Pigs Meadow. We identified a spot, raked back last season's dried grasses, removed established grass roots and exposed the soil, collected mulch in the form of the dried grasses from around the area, planted our seeds (apple, apricot, and plum),  mulched around the seeded area (for wind protection and water retention), and then put up a fence around it to keep out the deer. Given that we have plenty of precipitation in the forecast, no watering was necessary . The plan will be start these fruit trees off here in the Meadow and once established, move them to locations behind fences around the Labs.

Next up on JAD, we regrouped at basecamp and worked together to cut apples and start an apple cider vinegar fermentation. The hope is that in 6-8 weeks that we have our own homemade apple cider vinegar to add to the pantry!

Lastly, we prepared more apples and pancake batter to make apple pancakes! I was able to enjoy mine with some honey that Stephen brought home from his travels earlier this year where he visited Permies friends in North Carolina. Thanks for the wonderful and tasty gift!

I am looking forward to more progress at the Abbey on the floor tomorrow and the other efforts I can help move forward! Thanks for reading!!
20260311_075647.jpg
I don't usually post cat pictures, but I saw this on the way to the Rav to head to the Lab... too cute!
20260311_095953.jpg
Our workspace for the next few days up at the Abbey - the first layer of the new cob is in place.
20260311_100441.jpg
Stephen (and YouTube university) explained card scrappers to the team.
20260311_113149.jpg
I made a jig (for the card scrapper prep) and I liked it...
20260311_113710.jpg
Used the file jig to file the card scrapper to a clean right angle edge...
20260311_114512.jpg
then very fine grit sandpaper applied to a glass surface was used to further polish the filed surface...
20260311_115914.jpg
then the edge was burnished and the burrs formed were burnished over to create "hooks" on the edge.
20260311_120221.jpg
The result is a seemly flat piece of metal acting like a planing tool.
20260311_170736.jpg
Here is a close up of the curled shavings from the card scrapper.
20260311_140451.jpg
At Dances with Pigs Meadow to plant our fruit tree nursery.
20260311_141124.jpg
Getting acquainted with a fokin hoe (innuendo can commence) :)
20260311_145244.jpg
The completed "nursey" in the Meadow -- apple (of course), apricots, and plums planted.
20260311_152530.jpg
Chopping apples for apple cider vinegar...
20260311_153227.jpg
... and the clock starts on the apple cider vinegar ferment.
20260311_155738.jpg
Apple pancakes to end the half-assed holiday -- not sure of the face is smiling but it tasted good!
 
Harry Malecki
Posts: 25
117
homeschooling kids roundwood hunting plumbing earthworks bike building woodworking rocket stoves homestead
  • Likes 14
  • Mark post as helpful
  • send pies
    Number of slices to send:
    Optional 'thank-you' note:
  • Quote
  • Report post to moderator
BEL Post #11

We had a rainy Thursday here at WL, so tasking was limited to mostly indoor activities. The day started with a trip up to the labs. Stephen did some straightening up and started a fire in Cooper Cabin to bring the temperature up to 60 deg F (which he was successful doing). While Stephen was at Cooper Cabin, Esteban and I went over to the Abbey, fed the cats, and then started to prepare and reconstitute the cob to continue the Abbey floor fix. The preparation was more in breaking down the old cob as much as possible before adding water. By doing this, we had a much easier time mixing the batches. First, we focused around the front door where I had previously replaced the threshold and the lower door jamb. The cob had to be broken away from the old threshold, so we needed to fill in the spaces to close the seam with the new threshold. Then we worked on filling in more cob around the new hickory plank that I fit into the floor. The previous layer was still damp, but this meant we could lay the new layer on top without having to re-wet it (each time you add layers to cob, you need to ensure that the previous layer is dampened before you can apply more). We completed the morning by getting the last layer of cob on the floor before we install the top smoothed layer.

At lunch, our new SEPper shared that Samantha brought hard boiled goose eggs with her and made deviled eggs with them. The SEPper offered to prepare me a couple to try and I graciously accepted. When she handed me the plate, the two halves of the deviled goose eggs was like eating a second lunch (with how large they were!! See picture below). The eggs were delicious! Thanks Samantha!

While Stephen was in Cooper Cabin the whole morning, he noticed that additional end tables would be helpful in the bunkroom. As a result, for the afternoon, he gave use all a challenge to each make a end table using round wood construction -- the table top was "artist's choice". We had basic dimensions as a starting point, but the key was to each exercise and build skills while making functional furniture for Cooper Cabin. I decided to use a slab of WL pine that I had my eye on last weekend as my table top surface. I chose some dry wood for my cross braces and then was able to fell my first tree at WL, debark, and then start shaping those for the table legs. We are planning to finish up the effort tomorrow, so I will discuss more about details for my approach/design and how I executed it. I will share that I am going to attempt to use draw bores for all of my tenon joints (with the offset which is going to be the challenging part), and all of my mortises will be blind holes (meaning they will not go through the other side). While I did use the tenon drill tool here at WL, I am following up after cutting the tenons and rasping away at the curve left by the tool to establish a more distinct "shoulder" in the tenon as well.

It looks like we are going to finish the top layer on the Abbey floors tomorrow and finish our end table builds, so stay tuned!
20260312_100657.jpg
Abbey front door threshold ready for some cob to fill in the gaps...
20260312_102549.jpg
...threshold with the cob filed in -- ready for a top layer after some drying.
20260312_110546.jpg
Abbey floor with the next layer of cob in -- also ready for the top layer!
20260312_121630.jpg
Looking at the photo, I realize there needs to be a reference to show just how large these goose eggs are.
20260312_130319.jpg
The basic design guidelines for our Cooper Cabin end tables.
20260312_142736.jpg
The tree I selected for my first ever felling...
20260312_142852.jpg
...and it dropped exactly where I wanted :)
20260312_150336.jpg
Delimbed and cut to length...
20260312_153121.jpg
Debarked with a drawknife, ...
20260312_162715.jpg
Mortises and tenons being cut -- test fitting
20260312_170325.jpg
Test fitting legs into table top... cross brace mortises will be cut tomorrow as well as pinning it together.
 
gardener
Posts: 709
Location: 6a; BSk; Suburbia; 0.35 acres
391
6
kids forest garden foraging bike medical herbs rocket stoves
  • Likes 5
  • Mark post as helpful
  • send pies
    Number of slices to send:
    Optional 'thank-you' note:
  • Quote
  • Report post to moderator
Fun!! I bet you're loving the joinery projects!

Do the automated cat feeders no longer work?

I'm curious about how you'll merry the cob finish on the flooring. Will you use a finer cob mix for the top?

<3
 
Harry Malecki
Posts: 25
117
homeschooling kids roundwood hunting plumbing earthworks bike building woodworking rocket stoves homestead
  • Likes 6
  • Mark post as helpful
  • send pies
    Number of slices to send:
    Optional 'thank-you' note:
  • Quote
  • Report post to moderator

Alexandra Malecki wrote:Fun!! I bet you're loving the joinery projects!
<3


Yes!! Round wood joinery was something that I was hoping to do here at WL. Enjoying the projects thus far.

Alexandra Malecki wrote:Do the automated cat feeders no longer work?<3


I believe the cat feeders still work but are not currently being used. I need to ask why, but it may be due to the winter time impacting them?

Alexandra Malecki wrote:I'm curious about how you'll merry the cob finish on the flooring. Will you use a finer cob mix for the top?

<3


The plan will be use use a finer mix to blend the top layer to get it to merge with the existing layer. I think this will be the hardest part of the cob floor project because of the existing top layer being oiled already. I guess we will see early next week!
 
Harry Malecki
Posts: 25
117
homeschooling kids roundwood hunting plumbing earthworks bike building woodworking rocket stoves homestead
  • Likes 8
  • Mark post as helpful
  • send pies
    Number of slices to send:
    Optional 'thank-you' note:
  • Quote
  • Report post to moderator
BEL Post #12

Hello Permies! It was a snowy day here at WL, so we had to adjust our plans for the morning to keep things indoors.

So, to start the day, Esteban and I continued our round wood table builds (while Stephen did some shoveling outside -- we were really appreciative to Stephen for letting us work our projects while he took care of things at Basecamp). Since yesterday we a lot of prep of the materials and getting the legs in place on the table top, firstly, I worked to size the leg supports and get the mortises cut for them. I decided to have one support going across the back of the table and one along the each side. My thought was, given the height of the table, no support on the front would allow for the table to act as a desk if so desired. However, because I did not have a support across the front, I wanted to make sure the three leg supports I was installing were snugly fit to the legs, so I decided to bore and peg each support. You may ask why not draw bore these supports? In thinking through those joints, I decided not to draw bore them because the legs are greenwood and the supports are dry. As a result, the legs will experience some shrinkage which will help to tighten the mortise around the tenon but will also do the same for the peg, so I didn't think the draw bore was necessary here. On the contrary, when I finally got the leg assembly completed and went to "fasten" it to the table top, I decided to deploy the draw bore, because the legs are green and the table top is not. Therefore. I needed a fastening method that would provide retention as the tenon on the legs are going to shrink some inside the mortises in the table top. To achieve the draw bore with the round wood, I ensured that all of my tenons had a distinct "shoulder" (the flat part at the bottom of the tenon) to snugly seat against the table top when the legs were installed. Next, I removed the legs and drilled bores perpendicular to each of the four legs' mortises. After reinstalling the legs, I then used a drill bit that was 3/64th smaller than the original bore bit and match drilled the bore hole through the tenon by drilling each hole's center closer to the shoulder of the tenon. I then removed the legs from the table top and drilled the bore holes in the tenons to the full size of the peg (3/8 inch). The resulting bore hole in the tenon is a fraction of an inch offset to the tenon shoulder, so once reinstalled in the table top and after a tapered pin is driven through the bore, the tenoned leg is "drawn" tightly into the table top mortise and therefore keeping a very secure fit. I know my description above may be hard to follow, so I will share a link below to anyone interested in seeing draw boring being explained in video and with a squared mortise and tenon. The round wood element of the work I did today caused me to invent some ways to make it work given that you don't typically see "round wood" and "draw boring" being used together much on the web. Today ended with some surface prep (planing) and initial checks of level (some work to finish there). I am planning on spending some time this weekend finishing this up, so I will share the final photos when it is done!

Draw Bore Video

For the second half of the day, we went up to the Labs. Stephen ran the tractor to plow the roads getting into and around the labs. Esteban and I fed the cats at the Abbey and got the RMH and cook top started up at Cooper Cabin and began chopping wood to replenish the stockpile. The starting temperature in the Cabin was 42 deg F and after about 3.5 hours, we got the temperature up to 65 deg F. After leaving a generous woodpile in the Cabin, walkways shoveled and roads cleared, we headed back to Basecamp for dinner. We were all surprised to see that Samantha and our SEPper had made a small feast for us all to enjoy. The "spread" included lamb prosciutto and cheese, roasted sunchokes and onions (with lots of cayenne pepper which I loved ), mashed sunchokes, almonds, dried mango, peanut butter and oat cookies (can't believe there are a couple left still!), and a lamb burger (not pictured, but so delicious - thanks Samantha!). It was a great way to end a snowy, wet, and cold day .
20260313_091837.jpg
Joinery on the table started with simple bore an peg on the leg supports...
20260313_100805.jpg
...with it all installed - since the leg is green wood, I elected to not us draw boring for these joints.
20260313_102947.jpg
Working the rasp to get the mortises in the legs sized just right :)
20260313_105507.jpg
Table leg supports coming together...
20260313_112951.jpg
Putting the bore in the size of the table top for the legs...
20260313_113252.jpg
Accomplishing the draw bore by using a but 3/64 smaller and putting it closer to the tenon shoulder...
20260313_114244.jpg
... so that once match drilled, I can drill the full bore diameter with the bore offset in the tenon...
20260313_114954.jpg
... and draw the bores together with a tapered peg...
20260313_115002.jpg
... tapped into place to create a very snug fit for the legs and the table top...
20260313_115029.jpg
... and then the remaining peg was trimmed off.
20260313_170030.jpg
With the assembly complete -- I just need to continue to work the table top surface and level everything.
20260313_140805.jpg
Up to Cooper Cabin to shovel and get the RMH heating things up before guests arrive.
20260313_134514.jpg
One goal -- get the Cabin up to 65 deg F -- starting temperature is 42 deg F.
20260313_143327.jpg
Start with a log...
Start with a log...
20260313_143506.jpg
,,, split the log...
20260313_144517.jpg
... split a lot more logs a lot of times...
20260313_155434.jpg
... to get a good stockpile.
20260313_150658.jpg
RMH and cooktop were heating to allow us to get to our goal in the afternoon...
20260313_155402.jpg
...with a final temp at about 65 deg F!
20260313_181827.jpg
Spread made by Samantha and our SEPper -- yum!
 
Well behaved women rarely make history - Eleanor Roosevelt. tiny ad:
rocket mass heater jamboree 2026
https://permies.com/t/369866/rocket-mass-heater-jamboree
reply
    Bookmark Topic Watch Topic
  • New Topic