• Post Reply Bookmark Topic Watch Topic
  • New Topic
permaculture forums growies critters building homesteading energy monies kitchen purity ungarbage community wilderness fiber arts art permaculture artisans regional education skip experiences global resources cider press projects digital market permies.com pie forums private forums all forums
this forum made possible by our volunteer staff, including ...
master stewards:
  • Nancy Reading
  • Carla Burke
  • r ranson
  • John F Dean
  • paul wheaton
  • Pearl Sutton
stewards:
  • Jay Angler
  • Liv Smith
  • Leigh Tate
master gardeners:
  • Christopher Weeks
  • Timothy Norton
gardeners:
  • thomas rubino
  • Jeremy VanGelder
  • Maieshe Ljin

my RMH on rolling 60" x 30" steel platform, 22 foot long bench/bed

 
Posts: 18
Location: Valcourt, Quebec, Canada
  • Mark post as helpful
  • send pies
    Number of slices to send:
    Optional 'thank-you' note:
  • Quote
  • Report post to moderator
Hi everyone

I am in the process of finishing Wood Burning Stove DVD #3
I have the book Rocket Mass Heaters, by Ianto Evans and Leslie Jackson.
(I have not completely finish reading it yet)

I live near Valcourt, Quebec the birthplace of the snowmobile.
The building I live in is the largest building constructed with bales of straw in the world. (It was 20 years ago) on 300 acres with a sugar shack.


Part of the reason I am posting this is so when I have questions (posted separately)
I can refer to this post for the background to my build.
Of course ideas, suggestions and comments are always welcome.

My situation is unique in that I will make the Rocket Stove separate from the mass.
The bench will be set up with an entrance hole to connect the rocket stove and an exhaust as per usual.
In the summer (or when inspector is coming around) I can roll it out of the way into storage.
I also had the idea building a wood structure overtop of the Rocket stove to mask it when not in use.
To be installed only when cold of course.

Here is a "Google street view" like view of the studio apartment I will put it in.
Photosynth 3D view

Here are some screen shots of the 3D view of my studio with description.
You may need to see the 3D view to understand these screen shots better.

Here is the wall upon which I will build the mass bench/single bed.
It is 22 feet from the patio style window to the short wall with a closet on the left.
The wood floor was set directly on the concrete so weight is not an issue.
For the exhaust I was hoping that it would be cool enough so that I can use the dryer/bathroom ventilation to exhaust the RMH.
The Bathroom is not too far away from the left hand side of the bench/bed.
I was also thinking alternatively to exit like a dryer vent via patio door on the right side, like an air conditioner through a window.


I can pass the vent pipes through the wall and ceiling without it being seen.
The bathroom is not far and the dryer vent is behind the refrigerator.
Most of the holes in the wall I would need to make (and then patched up) would be hidden.


Here you see the ventilation shaft for dryer and two bathrooms.


Here is the platform made of steel with the 55 gallon barrel I will use.


Here is a view of my first mock up for 8" duck work.
I added an extra layer of bricks to make sure the platform does not get hot.
My first trial burn was a failure in that I could not get a draw (uninsulated heat riser was used during test).
I saw in the videos that there is a special way to start it when its cold. (looking forward to seeing that)
I plan to make a wood frame around the steel platform like the mobile RMH built in DVD #2


Will continue posting as my build progresses.
 
Rocket Scientist
Posts: 4526
Location: Upstate NY, zone 5
574
5
  • Mark post as helpful
  • send pies
    Number of slices to send:
    Optional 'thank-you' note:
  • Quote
  • Report post to moderator
I sympathize with your need to be inconspicuous with this, but I have to caution you that you may not be able to get away with just a "dryer vent" type exhaust. Ianto's situation is unique in that he can depend on prevailing winds from one consistent direction; you probably cannot. Also, the loft/second floor adds the possibility of whole house stack effect influencing your draft. Your exhaust needs to be higher than any operable windows, and for reliable operation in all wind conditions, several feet higher than the roof.

The mobile core idea seems sound as long as you have a secure method of locking it to the mass ducting when in use. But I do have to ask if inspectors only come around in warm weather...
 
Glenn Herbert
Rocket Scientist
Posts: 4526
Location: Upstate NY, zone 5
574
5
  • Mark post as helpful
  • send pies
    Number of slices to send:
    Optional 'thank-you' note:
  • Quote
  • Report post to moderator
Your picture of the core mockup shows part of the reason you could not get a good draft: the burn tunnel is too long, unless your heat riser is extraordinarily tall. For an 8" system, a four brick length for the top of the burn tunnel gives approximately correct proportions. Don't just fill the cart length because you can. A 1:2:4 proportion between feed tube, burn tunnel and heat riser will give best operation. This can be measured along centerlines or outside edges of the passages, depending on who you talk to.

Also, (not a current problem, just for reference) you have a good impulse to add another layer of bricks at the base, but they should be spaced apart a bit to allow airflow between them. Air is a much better insulator than brick, and it will carry away excess heat quite nicely. This is a good place to minimize mass. You also want some insulation below the burn tunnel, not just brick.

You can build the core from old soft brick as it looks like you have, but you will get better life from firebrick in the flame-exposed areas. The lighter weight and better insulated the combustion core is, the more efficiently it can burn (and the easier it will be to move around). Does the brick leave a red streak like sidewalk chalk? If so, it is safe to use in hot areas.
 
Ramzez Imaginative
Posts: 18
Location: Valcourt, Quebec, Canada
  • Mark post as helpful
  • send pies
    Number of slices to send:
    Optional 'thank-you' note:
  • Quote
  • Report post to moderator

Glenn Herbert wrote:I sympathize with your need to be inconspicuous with this, but I have to caution you that you may not be able to get away with just a "dryer vent" type exhaust. Ianto's situation is unique in that he can depend on prevailing winds from one consistent direction; you probably cannot.
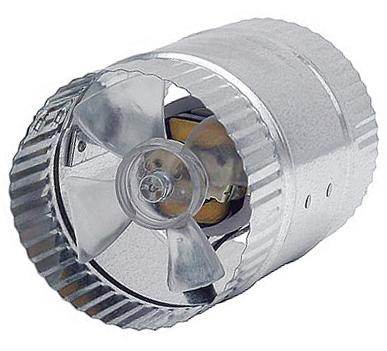


I was thinking of using a fan like this with a dimmer switch to assist when necessary.
Maybe I can use Arduino with sensors that can automatically adjust the speed of the fan.
Once I know what the draw speed is supposed to be, when there is no smoke back I can program it to kick in when the draw is too low like when starting the RMH.
(I just got this idea while replying to this)

Another question that came to mind is the safety issues regarding using the existing duct system for dryer and bathroom.
I did a search in the forum but didn't find any answers.
BTW it does exit the house at the top of my roof.
I know there is a leakage and temperature issue.


Arduino


5 min Intro
 
Ramzez Imaginative
Posts: 18
Location: Valcourt, Quebec, Canada
  • Mark post as helpful
  • send pies
    Number of slices to send:
    Optional 'thank-you' note:
  • Quote
  • Report post to moderator

Glenn Herbert wrote:Also, the loft/second floor adds the possibility of whole house stack effect influencing your draft. Your exhaust needs to be higher than any operable windows, and for reliable operation in all wind conditions, several feet higher than the roof.


What do you mean by "whole stack effect influencing your draft"?

If I can connect my RMH to the existing duct it would exit at the top of my roof.
 
Ramzez Imaginative
Posts: 18
Location: Valcourt, Quebec, Canada
  • Mark post as helpful
  • send pies
    Number of slices to send:
    Optional 'thank-you' note:
  • Quote
  • Report post to moderator

Glenn Herbert wrote:A 1:2:4 proportion between feed tube, burn tunnel and heat riser will give best operation. This can be measured along centerlines or outside edges of the passages, depending on who you talk to.


Erica gave similar but different proportions. 1:1.5:3 in the DVD
I did build the mock up before I saw this video.
I thought I used the measurements from the book but maybe I made a mistake.
I also read that there is a cold startup technique which I didn't see in the video yet.


No copyright infringement is intended.
I screen captured for reference.
 
Ramzez Imaginative
Posts: 18
Location: Valcourt, Quebec, Canada
  • Mark post as helpful
  • send pies
    Number of slices to send:
    Optional 'thank-you' note:
  • Quote
  • Report post to moderator

Glenn Herbert wrote: Does the brick leave a red streak like sidewalk chalk? If so, it is safe to use in hot areas.


Yes it does leave a streak.
The person that sold me the bricks at $0.25 each told me they were from a 80 year old wall that was falling over.
In the good old days all bricks where fire bricks by the nature of the way the bricks were made.
Any truth to that?
 
Glenn Herbert
Rocket Scientist
Posts: 4526
Location: Upstate NY, zone 5
574
5
  • Mark post as helpful
  • send pies
    Number of slices to send:
    Optional 'thank-you' note:
  • Quote
  • Report post to moderator
Firebrick is a specific formulation that does not expand or contract with temperature changes, as well as being able to withstand higher temperatures than ordinary brick. There are different grades, but anything that is firebrick should work for most RMH situations. The soft old brick can resist thermal shock well enough because they are not as rigid and therefore brittle as new brick.

The most recent common practice for proportioning is 1:2:4, as that gives a stronger draft and is more forgiving of errors or minor adjustments. The original recommendation was 1:2:3, which usually works but with less tolerance for error or site conditions.
 
Glenn Herbert
Rocket Scientist
Posts: 4526
Location: Upstate NY, zone 5
574
5
  • Likes 1
  • Mark post as helpful
  • send pies
    Number of slices to send:
    Optional 'thank-you' note:
  • Quote
  • Report post to moderator
A tall, warm space with a window, vent or leak at the top will act like a chimney ("stack"), competing with any actual chimneys for incoming air at the bottom. If the house stack is taller or more open than the chimney, it may suck air/smoke back through the chimney and its appliance.

As you have clarified that you have an exhaust vent through the roof, using that path should work fine, countering any stack effect. You cannot use the same chimney another appliance is using, though. That would have unpredictable but probably negative effects. You would need to run a new vent up through the roof. The exhaust from your RMH *should* be at a low enough temperature (150 F or so) to be safe in a dryer vent duct, but you can't know what it will be like until you build and test it.
 
Ramzez Imaginative
Posts: 18
Location: Valcourt, Quebec, Canada
  • Mark post as helpful
  • send pies
    Number of slices to send:
    Optional 'thank-you' note:
  • Quote
  • Report post to moderator
Thanks Glenn.

My house is kind of weird. If you saw the 3D view there is only two possible ways for air and humans to get in.
The front door and the patio door.

For the bathroom and dryer vents I guess I could put a flap to close them off.
Then when needed open the flap and use the vent....and see what happens.
Also if I set up the additional duct fan I can counteract any problems with the bathroom vent or the dryer being on.
Like you said I will know when I test it.

 
Glenn Herbert
Rocket Scientist
Posts: 4526
Location: Upstate NY, zone 5
574
5
  • Mark post as helpful
  • send pies
    Number of slices to send:
    Optional 'thank-you' note:
  • Quote
  • Report post to moderator
The most important thing is to be sure the exit from the bench does not get over 150 or so, before sending it through a vent that is not designed to take real heat.

A flap to close off one appliance while using the other could function, but is decidedly not a good way to work. If you have to remember to do it, you are sure to forget sometime, and anybody else is more likely to have a problem. Also, what if someone turns on the bathroom fan while the heater is running? They shouldn't, but if it can happen, it will.
 
Ramzez Imaginative
Posts: 18
Location: Valcourt, Quebec, Canada
  • Likes 2
  • Mark post as helpful
  • send pies
    Number of slices to send:
    Optional 'thank-you' note:
  • Quote
  • Report post to moderator
I got the core to work!!!

 
Ramzez Imaginative
Posts: 18
Location: Valcourt, Quebec, Canada
  • Mark post as helpful
  • send pies
    Number of slices to send:
    Optional 'thank-you' note:
  • Quote
  • Report post to moderator
I decided to take a step back.

I am now going to build a cast core based on broaudio two videos.


Posts: 140
1
  • Mark post as helpful
  • send pies
    Number of slices to send:
    Optional 'thank-you' note:
  • Quote
  • Report post to moderator
i did a cast core with just clay sand and perilite. worked great and ill do it again. the only part that was questionable was the durability. the wood chunks eroded it pretty fast over the season. if you use refractory it mite be a lot better though? the next configuration will be brick feed tube and tunnel with the riser cast on it. i want the next one to be as permanent as cob can be.


Did Steve tell you that? Fuh - Steve. Just look at this tiny ad:
Rocket Mass Heater Jamboree And Updates
https://permies.com/t/170234/Rocket-Mass-Heater-Jamboree-Updates
reply
    Bookmark Topic Watch Topic
  • New Topic