• Post Reply Bookmark Topic Watch Topic
  • New Topic
permaculture forums growies critters building homesteading energy monies kitchen purity ungarbage community wilderness fiber arts art permaculture artisans regional education skip experiences global resources cider press projects digital market permies.com pie forums private forums all forums
this forum made possible by our volunteer staff, including ...
master stewards:
  • Nancy Reading
  • Carla Burke
  • r ranson
  • John F Dean
  • paul wheaton
  • Pearl Sutton
stewards:
  • Jay Angler
  • Liv Smith
  • Leigh Tate
master gardeners:
  • Christopher Weeks
  • Timothy Norton
gardeners:
  • thomas rubino
  • Jeremy VanGelder
  • Maieshe Ljin

Daron's projects - big and small

 
gardener
Posts: 2167
Location: Olympia, WA - Zone 8a/b
1041
5
hugelkultur kids forest garden fungi trees foraging books bike homestead
  • Likes 6
  • Mark post as helpful
  • send pies
    Number of slices to send:
    Optional 'thank-you' note:
  • Quote
  • Report post to moderator
Hey all,

I thought it would be fun to create a thread where I could share all my homesteading projects (big and small) with you all. I will be updating this thread on and off with my various homesteading projects. To see some of my existing projects check out these threads:

The results of 2+ years of wild homesteading and permaculture - showing how things have changed on my homestead. I will be updating this one with more comparison pictures as time goes.
Building a beaver dam - My attempt to build a beaver dam. I will be posting some updates later this fall once the rains come back enough to fill up the pond again. I'm also going to be expanding the dam soon and making some improvements to hold more water.
Introducing the Wild Ride Homestead - one of my early posts on permies that I'm not really updating.

The first new project I want to share with you all is a new shed I built over the weekend! This shed (see attached pictures) was built using mostly salvaged wood from various demolition jobs from my restoration sites and from a couple construction sites. I did have to buy some wood for the door but the rest of the shed (including the metal roof) is all salvaged material. This is the first time I have ever built a shed from scratch and I did it without using any existing designs/plans. It was fun figuring it all out and the shed will provide some nice extra storage for my family.

More projects coming soon!

Thanks all!
Shed-built-from-salvaged-lumber.jpg
Shed built from salvaged lumber
Inside-the-shed.jpg
Inside the shed
Inside the shed
 
pollinator
Posts: 465
Location: Athens, GA Zone 8a
113
2
  • Mark post as helpful
  • send pies
    Number of slices to send:
    Optional 'thank-you' note:
  • Quote
  • Report post to moderator
Daron, will you now come over to my place and build that exact same shed for me? It's exactly what I need to go beside my rain barrels. What are the rough dimensions of this shed?
 
Daron Williams
gardener
Posts: 2167
Location: Olympia, WA - Zone 8a/b
1041
5
hugelkultur kids forest garden fungi trees foraging books bike homestead
  • Mark post as helpful
  • send pies
    Number of slices to send:
    Optional 'thank-you' note:
  • Quote
  • Report post to moderator

Diane Kistner wrote:Daron, will you now come over to my place and build that exact same shed for me? It's exactly what I need to go beside my rain barrels. What are the rough dimensions of this shed?


lol, I think you are a little far from my place The shed is approximately 5.5 feet high, 2 feet deep and 3.5 feet wide.
 
pollinator
Posts: 4958
1195
transportation duck trees rabbit tiny house chicken earthworks building woodworking
  • Likes 5
  • Mark post as helpful
  • send pies
    Number of slices to send:
    Optional 'thank-you' note:
  • Quote
  • Report post to moderator
I did something similar this weekend as well. I live in a Tiny House, but need some tools now and then. I like to have them close by so I repurposed a duck coop to hold some common tools. Like you I used salvaged materials so it did not cost me anything.

Duck-Coop-Closed.jpg
Duck Coop Closed
Duck Coop Closed
DSCN0591.JPG
Duck Coop Opened
Duck Coop Opened
 
Posts: 1510
110
  • Likes 2
  • Mark post as helpful
  • send pies
    Number of slices to send:
    Optional 'thank-you' note:
  • Quote
  • Report post to moderator
i like your duck koop, looks like the perfect design to be built with the scraps that contractors discard when building houses.
i guess  duck eggs will be on menu soon.
 
Travis Johnson
pollinator
Posts: 4958
1195
transportation duck trees rabbit tiny house chicken earthworks building woodworking
  • Mark post as helpful
  • send pies
    Number of slices to send:
    Optional 'thank-you' note:
  • Quote
  • Report post to moderator

bruce Fine wrote:i like your duck koop, looks like the perfect design to be built with the scraps that contractors discard when building houses.
i guess  duck eggs will be on menu soon.


We designed it so that it is 3x5 feet, exactly the size of a piece of concrete board. With that in the bottom, it i easy to scrape out. But the 3 foot depth is ideal because you do not have to reach in very deep to get out the muck, or grab a duck/chicken.

Ducks go in by themselves at night, so we just have to go out and shut the door...if we remember. It would hold 5 ducks at most, but it was cheap and easy, and indestructible. To move it I usually just roll it around.
 
Daron Williams
gardener
Posts: 2167
Location: Olympia, WA - Zone 8a/b
1041
5
hugelkultur kids forest garden fungi trees foraging books bike homestead
  • Likes 1
  • Mark post as helpful
  • send pies
    Number of slices to send:
    Optional 'thank-you' note:
  • Quote
  • Report post to moderator
Nice Travis! I'm going to be using an old mailbox to make a little mini-shed for a food forest so I can store some basic tools. Like you said it is nice to have the tools close by and using salvaged materials and re-purposing existing structures is always a good idea when you can do it. Thanks for sharing!
 
Daron Williams
gardener
Posts: 2167
Location: Olympia, WA - Zone 8a/b
1041
5
hugelkultur kids forest garden fungi trees foraging books bike homestead
  • Likes 8
  • Mark post as helpful
  • send pies
    Number of slices to send:
    Optional 'thank-you' note:
  • Quote
  • Report post to moderator
The "beaver pond" I made last year and improved this year is just the start of a new water system that I'm slowly developing. My hope is to one day be able to store around 100,000 gallons of water on my wild homestead as surface water when the whole system is full. Much more would be stored in the ground and of course the system would fill up and then the water would soak into the ground multiple times throughout a given year. Ultimately this means the water system would store far more than 100,000 gallons of water over the course of a year.

Doing all of this will require swales, ponds, mulch pits, and adding meanders and pools to my seasonal stream. Some of these are very large tasks and others are fairly small. Last weekend I took on one of the smaller tasks--digging some new pools and a new meandering channel for my seasonal stream. Attached are some pictures showing this work--one of the pictures shows the old stream channel in yellow and the new path of the water is marked with blue.

I'm going to need to dig out the pools after it all goes dry next summer and improve the edges of the new channel/pools plus eventually I want to add rocks to enhance the new waterfalls and prevent erosion. But even without that work the new channel with its pools and waterfalls are already holding a fair bit of water and bringing a lot of beauty to the land. Plus I just love hearing the sound of that the waterfalls make--the falling water also helps to add oxygen to the water!

I have already found frogs using the new pools!

Eventually, I want to do this sort of work in between a series of medium to large ponds. Together this will hold a lot of water and add a large amount of "edge" to the stream.

I might do some more digging this weekend. If I do I will post some updates!
new-water-way-sketch.jpg
new water way sketch
A sketch showing some future work I plan to do. This will involve expanding an existing pool and adding a new channel to the stream.
Stream-before-improvement-work.jpg
Stream before improvement work
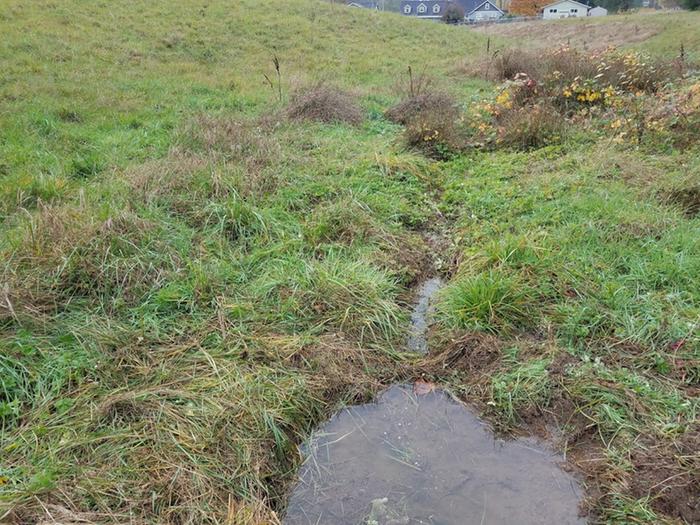
Looking downstream from the work I just did this picture shows what the stream looked like before I did my work. Just disappears in the grass.
Improved-stream.jpg
Improved stream
Old channel in yellow and the new marked in blue.
Improved-stream.jpg
Improved stream
Just a picture showing the work as it currently stands. lots of work left to do around the edges of the pools and in the pools once they go dry in the summer.
New-waterfall.jpg
New waterfall
I love the new waterfalls! Later I want to improve these with rocks.
 
Diane Kistner
pollinator
Posts: 465
Location: Athens, GA Zone 8a
113
2
  • Mark post as helpful
  • send pies
    Number of slices to send:
    Optional 'thank-you' note:
  • Quote
  • Report post to moderator

Daron Williams wrote:Doing all of this will require swales, ponds, mulch pits, and adding meanders and pools to my seasonal stream. Some of these are very large tasks and others are fairly small. Last weekend I took on one of the smaller tasks--digging some new pools and a new meandering channel for my seasonal stream. Attached are some pictures showing this work--one of the pictures shows the old stream channel in yellow and the new path of the water is marked with blue.


Daron, it is so helpful to me to see how you have drawn the lines on the existing photos. I have a very hard time visualizing what to do, and these pictures are worth a thousand words!

About those mulch pits. Can you elaborate on how you do those?
 
Daron Williams
gardener
Posts: 2167
Location: Olympia, WA - Zone 8a/b
1041
5
hugelkultur kids forest garden fungi trees foraging books bike homestead
  • Likes 1
  • Mark post as helpful
  • send pies
    Number of slices to send:
    Optional 'thank-you' note:
  • Quote
  • Report post to moderator
Glad those pics help! At the moment I only have 1 mulch pit but I may be installing more later on. The one I have captures water that flows off a dirt road I share with my neighbors. At times a lot of water flows into it.

Basically the mulch pit is just a big hole I dug into the ground with a ramp leading water into it, a berm around one side of it, and a spillway for excess water to flow out into a field. Eventually I want to have this spillway direct the water into a series of swales/ponds.

Once the hole was dug I just filled it with mulch up to the level of the spillway. I have willows growing around it that I planted at the edge of the mulch line.

I like mulch pits for capturing water from sources like the road that might not be clean. Seems to work well and I plan to build one more that will capture water from my driveway during large rain events. The new mulch pit once I built it will be connected to a rain garden area. When the rain garden fills up the excess water will flow out and into the mulch pit through a pipe that will go under one of my hugelkultur hedgerows. If the mulch pit fills up the water will slowly flow out over my eco-lawn. But that would take a ton of rain--likely record breaking rainfall.
 
Daron Williams
gardener
Posts: 2167
Location: Olympia, WA - Zone 8a/b
1041
5
hugelkultur kids forest garden fungi trees foraging books bike homestead
  • Likes 2
  • Mark post as helpful
  • send pies
    Number of slices to send:
    Optional 'thank-you' note:
  • Quote
  • Report post to moderator
I thought it was about time I give you all an update on some of my new/ongoing projects. The first is a new garden area for my kids! But it's not just a garden--it's also an area for family walks, an area for wildlife, and an area for perennial food growing.

This garden is along the bottom of my eco-lawn and is broken into a couple different areas. Starting along the chain fence this first long growing bed is going to be planted with mostly perennial food plants. At the moment there is a thornless blackberry, a serviceberry, a silverberry, and a grape. But I will be adding a lot more plants including some asparagus later on. I will also be adding a bench to make it a nice place to hangout. I will also be adding ground cover plants and other herbaceous plants but I'm not sure which yet.

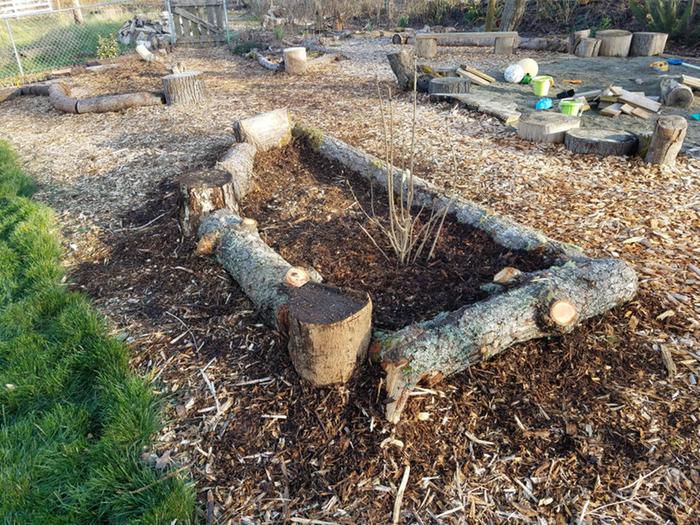
Next to the perennial growing area is a winding mulched path. The edge of this path is lined by logs I salvaged from a prairie restoration site. These logs make it easy for visitors to know where to walk but they also provide great habitat for beneficial critters. I'm always finding centipedes under logs like these! Centipedes eat a lot of the pests that cause problems in gardens! I also added some large rounds for extra places to sit and to mix things up a bit.

The next bed is the future garden bed for my kids. This bed is fairly small and will be a small hugelkultur bed--at the moment I have the wood down but I still need to get soil to finish it. While small this garden should work well--I wanted to make it small enough that my kids could reach everything. I grew up with my own garden beds and I want my kids to have the same experience. I loved planning out my own garden and harvesting from it each year. My daughter is too young to engage with it right now but I'm sure she will enjoy it and my son who will be 3 in February is super excited about this garden!

Next to the garden bed is what will be another small hugelkultur bed but this one will be filled with flowers. The flowers will provide beauty and cut flowers but also provide habitat for pollinators and help attract beneficial insects to help keep pests under control. This bed is the closest to the lawn and will make a nice boarder that will be beautiful to see.

I also put in a couple habitat features. In one area the beds were getting too wide so I made a third bed in the middle that I just mulched and then added logs and rocks to make a great little habitat area for beneficial critters like garter snakes. I also added 2 tall snags which mark the extent of the kids garden area but also serve as perches for birds. I see birds using our existing snags a lot! I'm thinking about attaching some mason bee boxes to these 2 snags.

I got more work to do on this new growing area but I'm really excited about it! Once it's all in and growing good I think this will add a lot to my wild homestead!

Check out the first 3 attached pictures to see what this new garden area looks like.

-----------------------------------

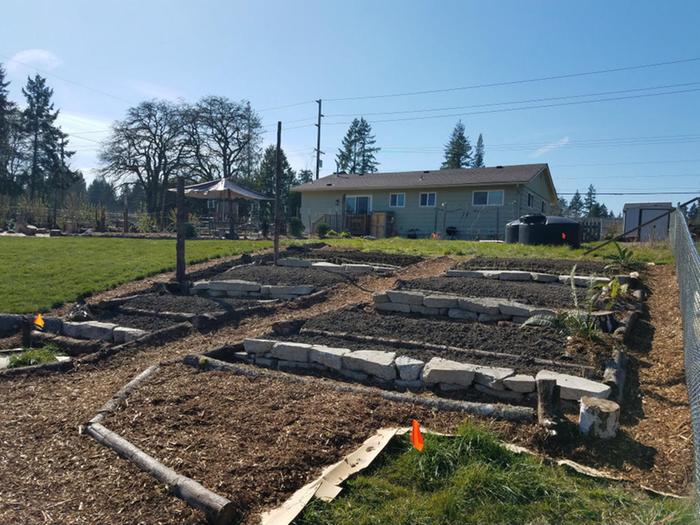
Moving on from that garden bed... to another new garden bed! This new garden bed (4th attached picture) is located along the south side of my house. It is a modified key-hole bed and a hugelkultur bed.

This garden bed is raised a fair bit which will help keep it warmer and since it's along the south side of my house it should stay nice and warm. I have noticed that this area tended to frost late and warm up much early in spring than other areas of my land. Frost tender plants kept growing here much longer than they did in other areas. This was why I decided to completely redo this area and build a large raised garden bed.

The garden bed will be used for growing peppers, tomatoes, egg plants and basil. But I will also be using it to get an early start on other plants like snap peas and various greens.

While it's not a big growing area it adds to my other garden beds and should give me early and late harvests compared to my other beds. I like having different growing areas that have their own micro-climates so I can use those micro-climates to get harvests over a longer time period.

Right along the house I have a couple purple tree collards that are doing okay but were a bit neglected. I finally got them tied up so they won't be falling down all the time. But I may need to prune them up a bit. I will be adding a bunch of flowers next to the tree collards to help fill in that area and attract beneficial insects. I have had some issues with caterpillars eating my tree collards so I'm hoping the flowers will help attract insects that will eat the caterpillars. Plus the flowers will add a lot of beauty to this area!

I got to add soil to this new garden bed and some additional wood. But it's moving along and I'm excited to have this new growing area!

-----------------------------------

The last attached picture is an old but ongoing project and that is my little water catchment channel that I built to get runoff from a shared dirt/gravel driveway. This channel captures most of the water from around 220 feet of driveway and the runoff from the roof of my neighbors house. At times this is a lot of water!

I created this feature a couple years ago but I recently improved it and I will be making this channel larger and making it look like a dry streambed. This will make it look nice and make it where I don't need to dig out grass from it every year.

The channel goes into a deep mulch pit surrounded by willows. This pit overflows into an old pasture area. Eventually it will overflow into a swale which will be part of a whole swale system and a pond or natural swimming pool. Around this swale system I will be building a series of large garden beds for high vegetable production plus some fruit trees and hedgerows. I'm also planning on establishing a decent size native meadow--I will be adding some bee hives to this meadow area too but that is a ways off.

This project is still in it's early stages but is already capturing a lot of runoff!

-----------------------------------

Lots of work but also lots of fun and I can't wait to have more growing areas! I'm also working on a series of terraces which will be used to grow corn, squash and other crops that need more room plus a couple potato beds. More on that soon!
starting-new-garden.jpg
Sheet-mulching a new growing area
Just getting the new garden area sheet-mulched
making-progress.jpg
Mulch down over cardboard plus logs!
Got the logs down, mulch down, and wood for hugelkultur beds in
habitat-area.jpg
Habitat area made from logs and rocks
Up close look at the habitat area for this garden
new-warm-garden.jpg
Creating a warm micro-climate
Working on a new warm micro-climate garden bed
water-catchment.jpg
Capturing water runoff from a dirt road
Catching water from a shared dirt road
 
rocket scientist
Posts: 6320
Location: latitude 47 N.W. montana zone 6A
3191
cat pig rocket stoves
  • Mark post as helpful
  • send pies
    Number of slices to send:
    Optional 'thank-you' note:
  • Quote
  • Report post to moderator
Hi Daron;  Looking good.  
To bad your seasonal stream currently drys up in the summer. Possibly your improvements will keep it around longer.
Looking at your photos, it appears you are in a housing development area. I have to wonder what your neighbors think of your projects ?
Are they interested , indifferent , or pissy about their property value's ?
 
Daron Williams
gardener
Posts: 2167
Location: Olympia, WA - Zone 8a/b
1041
5
hugelkultur kids forest garden fungi trees foraging books bike homestead
  • Likes 1
  • Mark post as helpful
  • send pies
    Number of slices to send:
    Optional 'thank-you' note:
  • Quote
  • Report post to moderator

thomas rubino wrote:Hi Daron;  Looking good.  
To bad your seasonal stream currently drys up in the summer. Possibly your improvements will keep it around longer.
Looking at your photos, it appears you are in a housing development area. I have to wonder what your neighbors think of your projects ?
Are they interested , indifferent , or pissy about their property value's ?


Thanks! Yeah, I hope the seasonal stream becomes year-round some point in the future. Once I seal up the lower pond it should last a lot longer--I'm going to use clay and gleying to seal it up.

As far as my neighbors... I'm actually out in a semi-rural area that is zoned 1 house per 5 acres. But my next door neighbor has pushed that a fair bit. He owns all those buildings--2 of them are rentals, 1 is an office for his business, another is where him and his wife live, plus there is the RV storage area. He also has a manufactured home that his daughter lives in and a very large barn/warehouse that he rents out to people wanting to store boats, and other things. Luckily most of it is not right next to my property. But this is a big reason why I planted hedgerows all along that side of my property--I want to block the view of those buildings...

When I first started the projects my neighbor got annoyed because I blocked off an area that they used to use for parking--but it was on my land. But now that everything is growing and they can see the results they actually really like it. I made sure to plant a lot of flowers in the hedgerows that run along the shared dirt driveway. That really made them happy.

My neighbor might even be hiring me to do some design work on his property.

But a couple of his renters were annoyed that they did not have a lot of room to back up their cars out of their parking area. But really this is only an issue because my neighbor wants them to park in an area that is really too tight. My hedgerows are all on areas that used to be lawn so they would have been backing up onto the grass if the hedgerows were not there... But those renters ended up moving and the other renters really like my projects--they come over sometimes so their kids can play with mine. They love the nature based playground I have made.

I have some other neighbors who are further away and overall they all like what I'm doing. But I think most of my neighbors were unsure until things got established and they could see the results.
 
Daron Williams
gardener
Posts: 2167
Location: Olympia, WA - Zone 8a/b
1041
5
hugelkultur kids forest garden fungi trees foraging books bike homestead
  • Mark post as helpful
  • send pies
    Number of slices to send:
    Optional 'thank-you' note:
  • Quote
  • Report post to moderator
This fall and winter I have been busy sheet-mulching large areas of old lawn and getting it ready for planting. Part of that has been building a bunch of new garden beds. I'm really not a fan of the idea of having a single garden area that has to work for all my vegetables. Instead I tend to build a number of different garden areas that are all integrated by trails to the rest of my zone 1/2 area. This has a number of advantages. First it invites my family and I to just take walks through and hangout in the gardens. There is a trail going right through my new corn and squash/melon terrace gardens that connects with a loop trail that runs by the kitchen garden, some berry patches, a play area, and just lots of small planting areas. There is also an eco-lawn in the middle of the loop trail with access points to the loop trail mixed in.

The big goal has been to increase my food growing area but while doing that I also wanted to make my zone 1 area a place where my family and visitors can really enjoy and just hangout. I don't like having a garden off to the side--I want gardens and food growing in general to be right next to the places where people are.

The attached pictures show some of my new growing/garden areas plus some improvements made to my kitchen garden. I still have more sheet-mulching to do but I have eliminated probably around 80% of the old lawn. But I still need to add a lot more plants in these areas. But many of them aren't ready for planting yet and won't be until the fall. I need to let the cardboard and old lawn breakdown.

I'm also exploring more staple food crops that are good sources of calories that I can grow in my zone 1 area. This fall I'm going to try to set up a series of container ponds to grow wapatoin. Thanks Dan for the suggestion for small container ponds! These ponds would also provide good habitat for all sorts of beneficial predators that will help keep garden pests in balance.
kitchen-garden-pea-trellises.jpg
Kitchen garden entering its 2nd year--added new arched trellises for peas and some climbing beans later.
terrace-garden.jpg
Brand new terrace garden for squash, melons, corn, carrots, onions and mixed greens plus flowers and some native plants.
warm-garden.jpg
Brand new garden on the south side of my house. Meant for large tomatoes, peppers, egg plants, plus some other plants. Warm loving plants.
new-planting-bed.jpg
New small planting area--has a lilac but I'm also planting some edible greens in this area.
 
Daron Williams
gardener
Posts: 2167
Location: Olympia, WA - Zone 8a/b
1041
5
hugelkultur kids forest garden fungi trees foraging books bike homestead
  • Mark post as helpful
  • send pies
    Number of slices to send:
    Optional 'thank-you' note:
  • Quote
  • Report post to moderator
In addition to the new growing areas I have also been adding a number of new perennial plants including a bunch of perennial vegetables. Many of the perennial vegetables are native to my area. One is called deltoid balsamroot which I'm really excited about. But I'm also having good luck with 2 types of checker mallows and some other native wild vegetables.

I'm also adding new habitat features ranging from snags, to log piles, to rock piles, and mixes of these. I'm trying to increase the habitat areas for snakes and amphibians--especially garter snakes which eat slugs here in western WA. Creating this sort of habitat also includes planting a lot of flowers. I hope to have pictures of tons of flowers in bloom later this year. Hopefully the flowers will attract a number of beneficial insects that will also help keep pests in balance.
deltoid-balsamroot.jpg
New perennial vegetables
habitat-feature.jpg
New habitat feature
New habitat feature
 
Daron Williams
gardener
Posts: 2167
Location: Olympia, WA - Zone 8a/b
1041
5
hugelkultur kids forest garden fungi trees foraging books bike homestead
  • Mark post as helpful
  • send pies
    Number of slices to send:
    Optional 'thank-you' note:
  • Quote
  • Report post to moderator
I have also been trying to expand my pond system. These ponds are part of my overall water catchment system that will one day include a greywater setup, swales, and other water catchment features. Just getting started but I'm hoping to raise the groundwater level at the low end of my property to help keep a year round pond and of course just keep my land hydrated for longer each year. Plus I want to support as much wildlife as possible and create various micro-climates to expand what I can grow.

My eventual goal is to have enough surface water storage to hold a years worth of water for a family of 4 based on average water consumption in the United States. At this point I have at least 3-4 months of water stored for 1 person based on some very rough calculations. Need to do a lot more but at least I'm moving forward in this area.

The largest of the new ponds is designed to split my seasonal stream into 2 channels. This will eventually create an island in the middle that will also have a boggy area that I want to use to grow blueberries but that is a ways off. Beyond the blueberry bog the island will also feature great areas for growing vegetables that like relatively cool and wet conditions. The blueberries will be grown on small mounds in the boggy area.

The smaller of the new ponds is at the base of a culvert that captures road runoff and runoff from my neighbor's property. They recently clearcut their land which has resulted in a lot of extra runoff filled with sediment. I'm a bit worried about pollutants from this culvert given the source of the runoff. This pond is the start of a system I'm putting in the capture this water and clean it. The pond will eventually be connected to a swale that will run approximately 250 feet. The swale and the pond will be filled with plants that are good at filtering and cleaning runoff. I will also add mulch in the swale to further create conditions for cleaning the water. Trees will line the swale which will also help to clean the runoff.

The swale will empty into a series of small pools with cascading waterfalls that will add oxygen, and capture any remaining sediments before the water then flows into a future large pond. This should help retain a lot more water but also clean the water so I can safely use it. I won't be growing any food plants in the swale--but I will be growing some rushes, Douglas spirea, willows, red oiser dogwood, and potentially cattails (edible but I wouldn't harvest them). I can't remove the culvert so this is a way to make the most of the water.

Over the next few years I will keep expanding this water system until it's "done". I will also steadily be improving the soils on my land, adding more plants and especially trees, adding terraces, and making other improvements that will help retain more water but won't store surface water like the ponds do.

All these ponds have been dug just using a shovel. So far they're working great and the largest (and oldest) pond held up fine to a record breaking rain storm last winter.

large-new-pond.jpg
New large pond that splits the stream into 2 channels (has 2 spillways).
new-pond.jpg
New smaller pond that catches water coming from a culvert that catches a lot of road runoff and runoff from a neighbors property.
ponds.jpg
All my existing ponds seen from the edge of the new terrace garden.
 
Oh darling! You make that outfit POP! -- tiny ad
Heat your home with the twigs that naturally fall of the trees in your yard
http://woodheat.net
reply
    Bookmark Topic Watch Topic
  • New Topic