• Post Reply Bookmark Topic Watch Topic
  • New Topic
permaculture forums growies critters building homesteading energy monies kitchen purity ungarbage community wilderness fiber arts art permaculture artisans regional education skip experiences global resources cider press projects digital market permies.com pie forums private forums all forums
this forum made possible by our volunteer staff, including ...
master stewards:
  • Carla Burke
  • Nancy Reading
  • John F Dean
  • r ranson
  • Jay Angler
  • paul wheaton
stewards:
  • Pearl Sutton
  • Liv Smith
  • Anne Miller
master gardeners:
  • Timothy Norton
  • Christopher Weeks
gardeners:
  • AndrĂ©s Bernal
  • Jeremy VanGelder
  • Matt McSpadden

Broken Concrete Terrace documentation/discussion

 
Posts: 68
  • Mark post as helpful
  • send pies
    Number of slices to send:
    Optional 'thank-you' note:
  • Quote
  • Report post to moderator
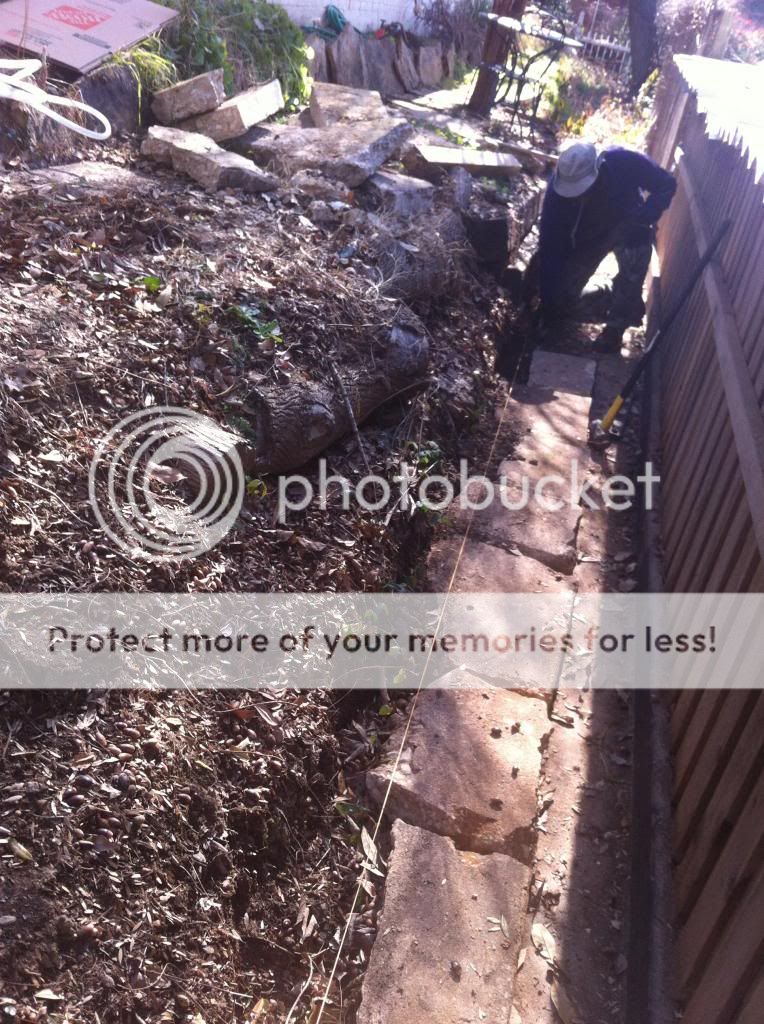
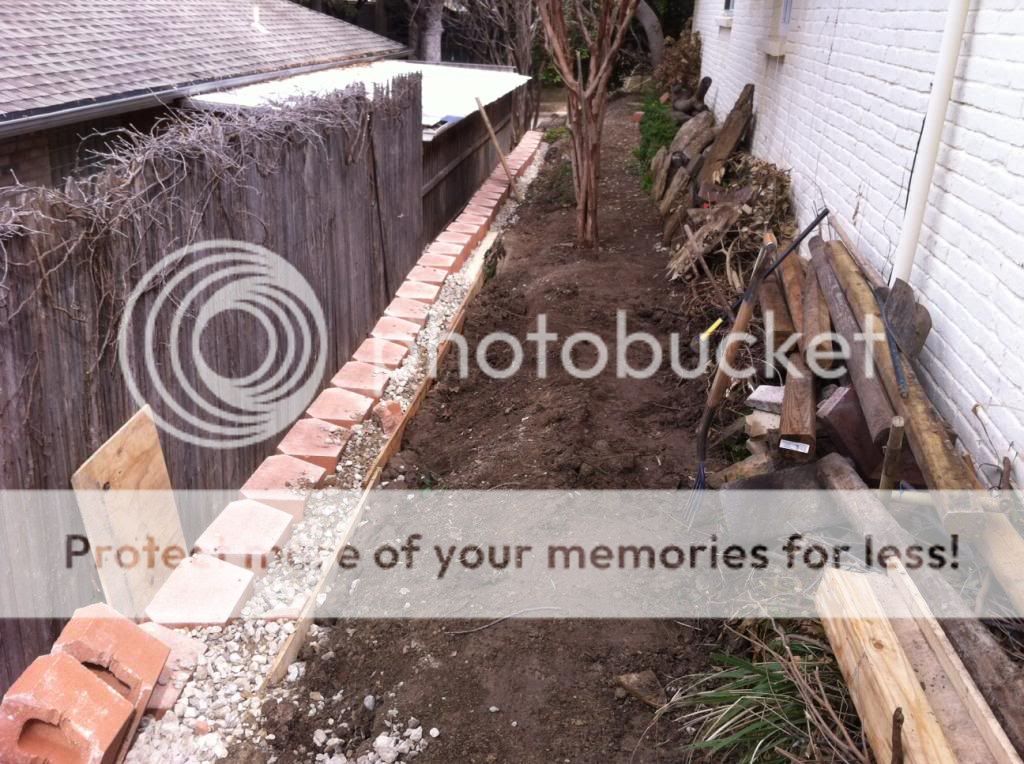
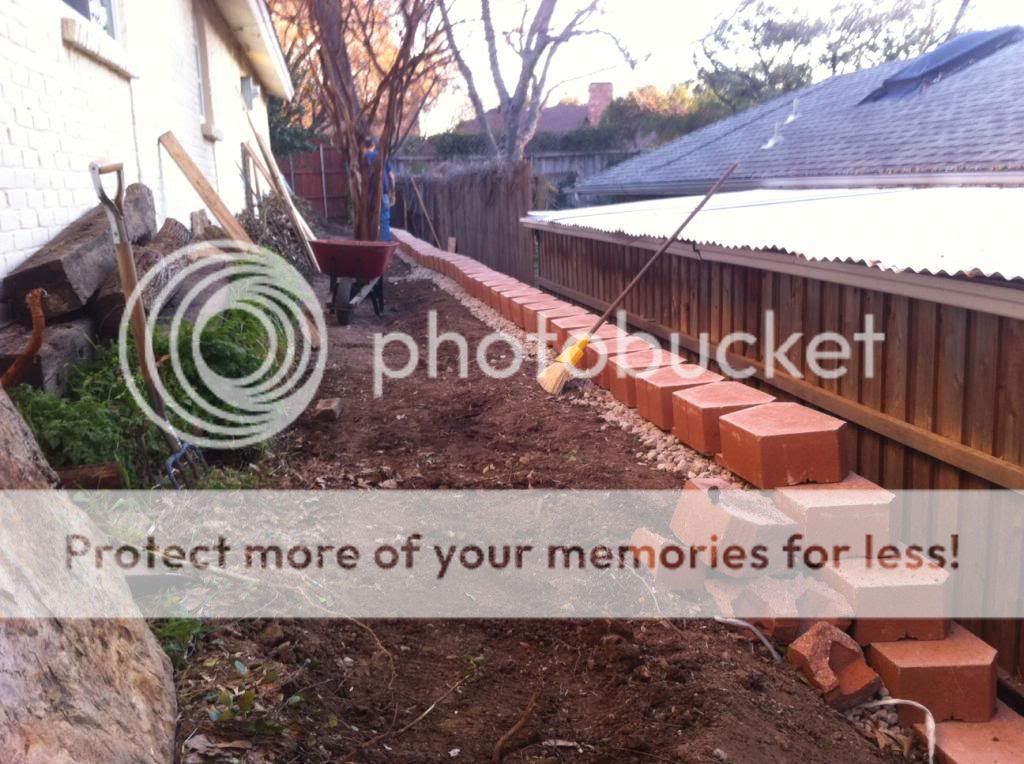
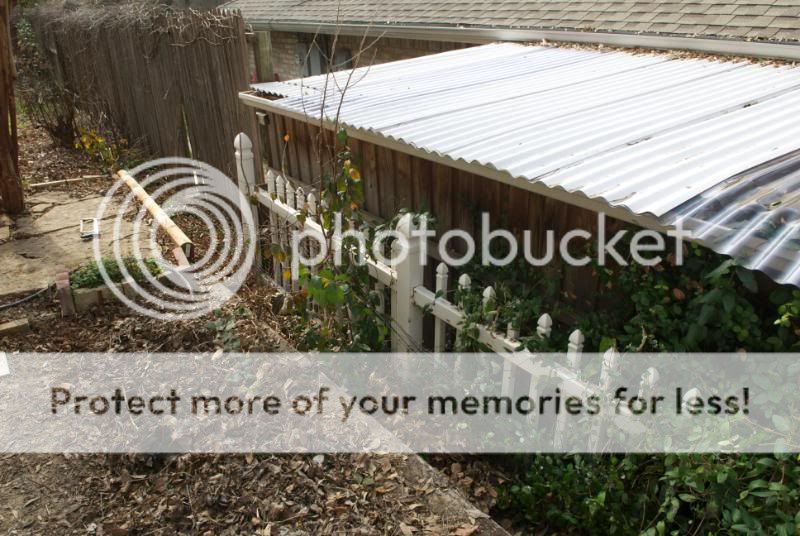
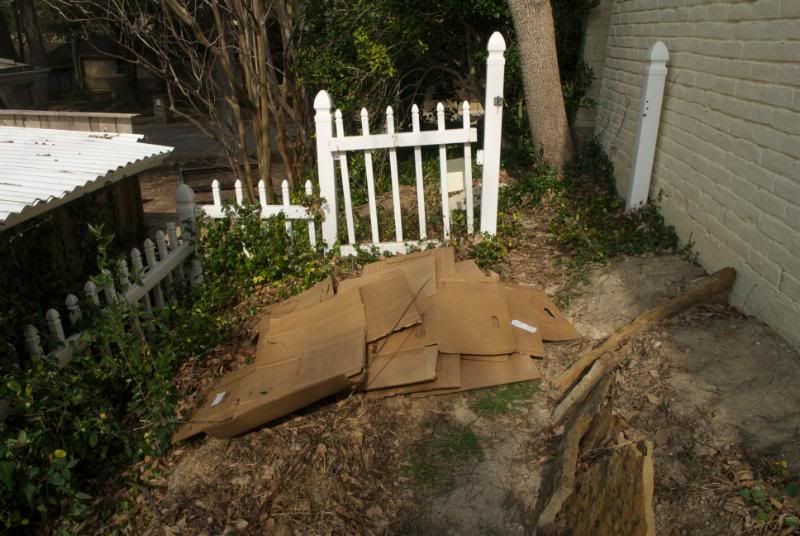
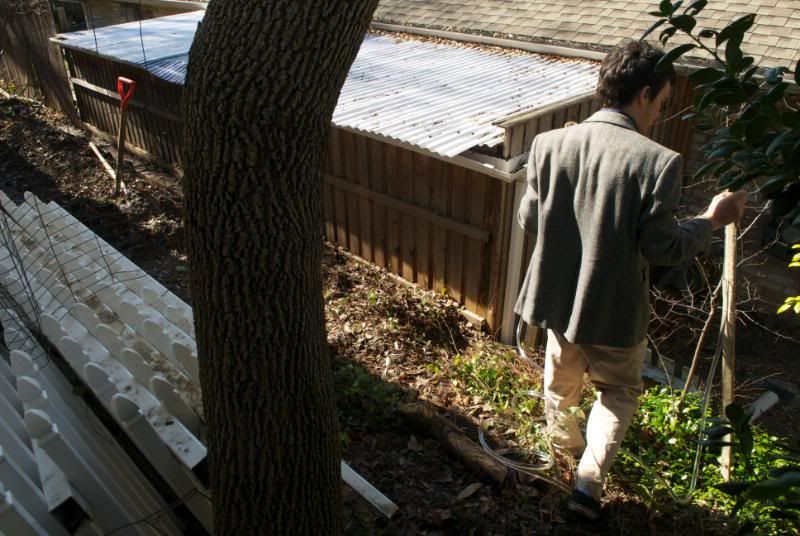
Last winter, I bought two pallets of flat stone from a stone yard and laid out some paths and terraces on the west facing, sloping side of my parents' house. its a twelve foot wide sideyard that slopes at about 20 degrees to a 3 foot high cement retaining wall on the property line. There is also a plastic white picket fence going along the property line, so I constructed the terrace wall about a foot from the retaining wall, about 1 ft high. I used old railroad ties and logs stacked laterally on top of each other. The clay soil caused somewhat of a water logging, as there is no where for the water to drain. It worked well for the past year. It was previously a non-navigable slope, even dangerous and slippery in wet weather. Now at least there is a level path. PLUS it made a nice garden space.. I planted eggplant, kentucky wonders, tomatoes, thornless blackberries, mint. The mint and blackberries are faring well through the winter. I also built another tier above this terrace a foot from the house, using the flat stone upright, buttressed against each other and sunk into the ground below. I have had many design revelations since returning after being gone seven months. My mom took some pictures for me before starting work so you can see the work I did last year.


The white picket fence was constructed about 10 years ago (a place to keep our dog while we were away), and prevented me from building the terrace right next to, or on top of the retaining wall on the property line. I am glad though because the terrace I built last year had no drainage, was not stable, but somehow made it this far. The vines covering the fence is Asian jasmine that has crept around from the front of the house. I am in a constant battle with this stuff. It was most likely planted 30-40 years ago when the house was built. My plan is to sheet mulch over everything as I go before backfilling behind the terrace. Any tips on killing this nasty invasive is much appreciated. My parents are probably moving within 2012, but I am here for the winter and have nothing else to do before spring, so I figure this will keep me occupied and give me something to show for my permaculture design experience if/when I want to start working as a consultant or landscape design. I am hoping this will actually raise the value of the house, since I am creating useful social space from what was once negative space.

facing north

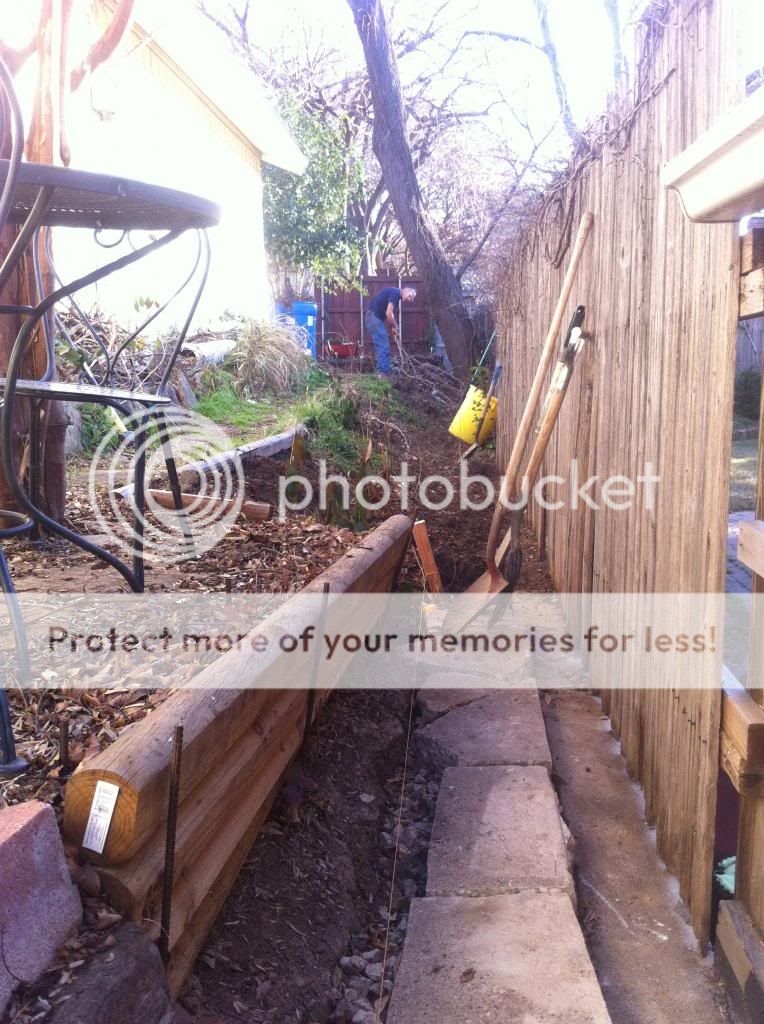
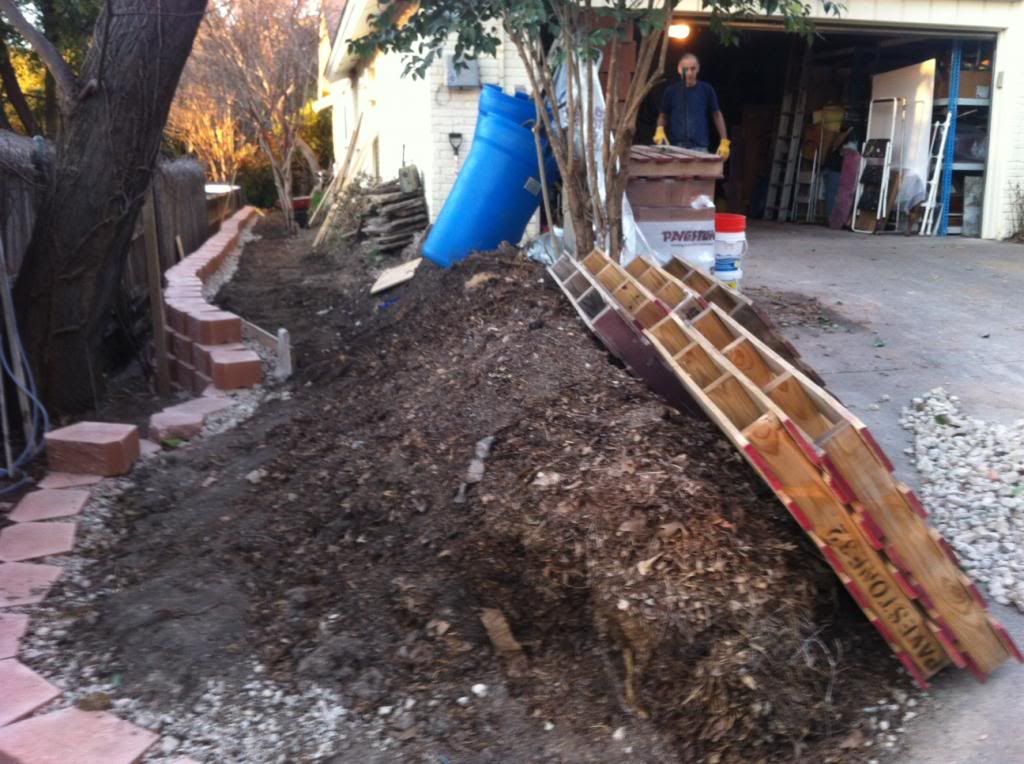
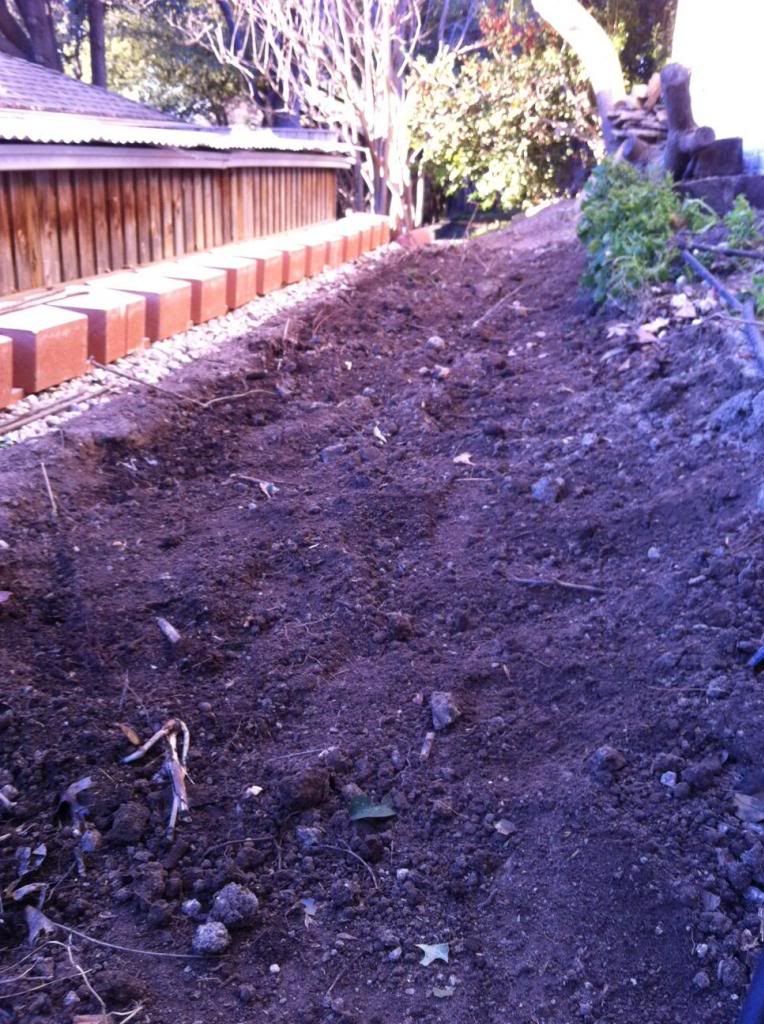
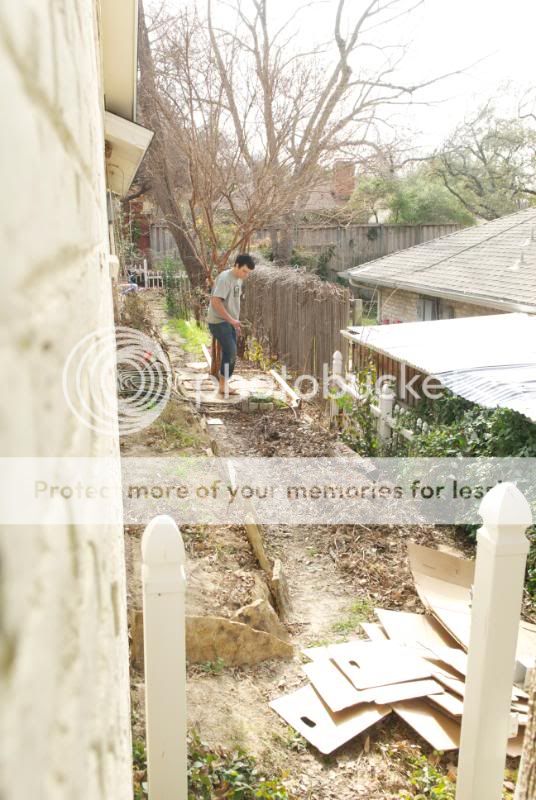
facing south.. where i am standing is an attempt at a sitting space, which I would like to enlarge using the pattern "6 foot balcony" from A Pattern Language. I want to make this side of the house into a "Half Hidden Garden," also from A Pattern Language by Christopher Alexander. Another pattern I have been dreaming about is the "trellised walk" using cedar posts and beams to make an edible fruit covered path. I want to move the existing path up right against the house by bringing the entire width of the sideyard to one level. I want to make the terrace wall about 2 feet high from the top of the existing concrete retaining wall.

me messing with my new bunyip water level.. since the wall will be built behind the existing retaining wall, this gives a good reference for level, so I wont need this tool until I start sweeping the wall of the terrace back into the slope, probably somewhere on the north side of the house. The area will be 10 feet deep by 50 feet long. After the first level is built, I will build steps coming down from the porch on the north side.

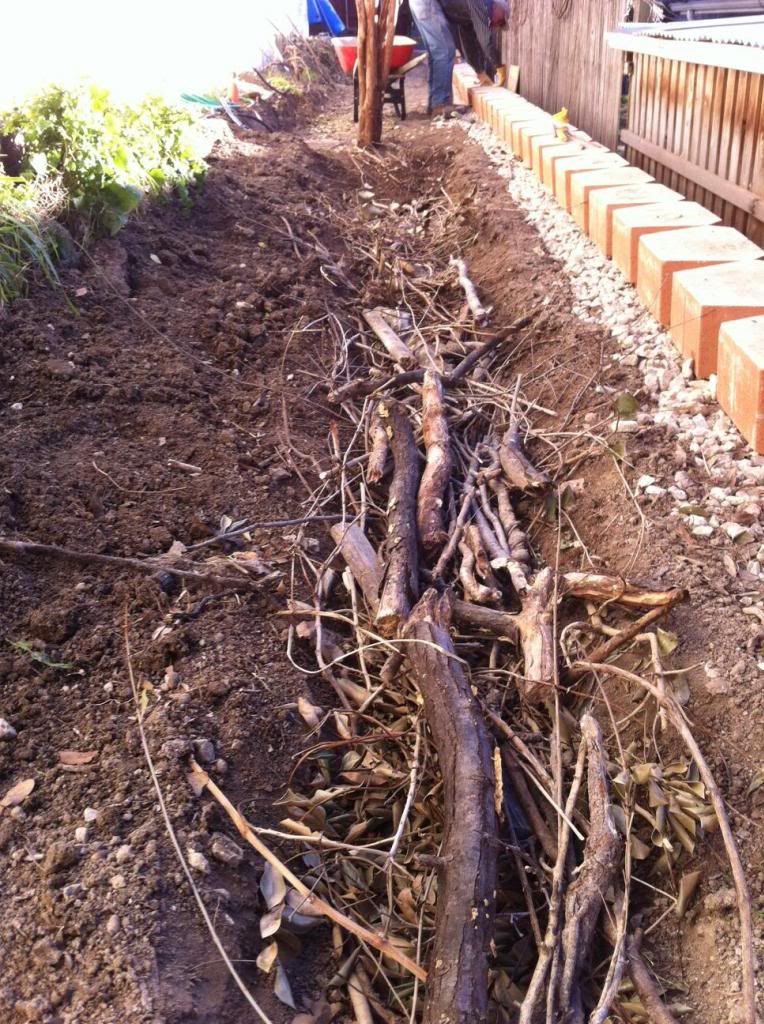
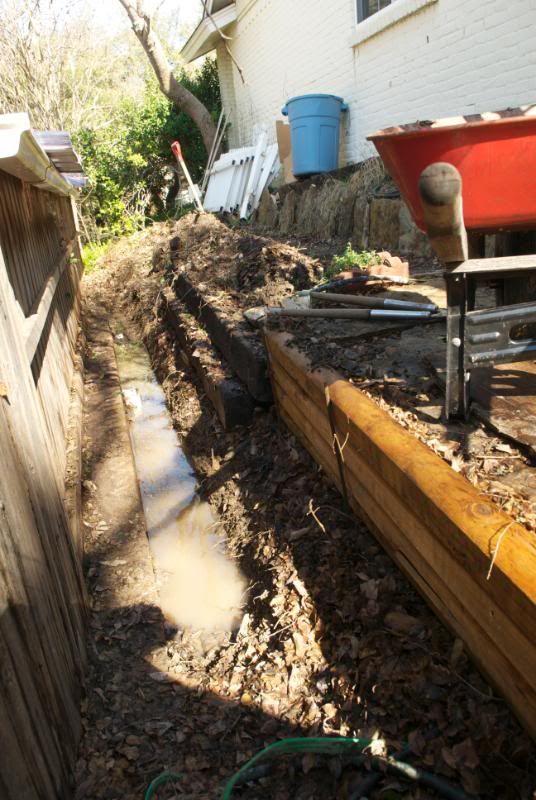
my first step was removing the picket fence so I could pull the vines down and dig a drainage trench along the base of the slope. As you can see we had a good rain last night and the water is beginning to collect in my new drainage trench (see the concrete retaining wall where the water is backing up?). Would it be wise to go even deeper to accommodate large downpours? I am dealing with the runoff from my roof and also from the neighbor's shed roof. Plus the heavy clay soil we have does not help. I will fill this trench with crushed concrete gravel, and the same place that manufactures the gravel will let me take as much broken concrete as I please. Any other cheap/free sources of flat stone in the Dallas area would be a big help.

 
Graham Robertson
Posts: 68
  • Mark post as helpful
  • send pies
    Number of slices to send:
    Optional 'thank-you' note:
  • Quote
  • Report post to moderator
Does anyone have suggestions for improvements to the format of my posts? Im new here and not sure why there wasnt much interest in this topic.. Chance?
 
steward
Posts: 3999
Location: Wellington, New Zealand. Temperate, coastal, sandy, windy,
114
  • Mark post as helpful
  • send pies
    Number of slices to send:
    Optional 'thank-you' note:
  • Quote
  • Report post to moderator
Hi Graham, welcome to permies!
Your thread's had loads of views and I always enjoy reading about people's projects, and your's is a biggie!
I'll hazard a couple of comments about the lack of comments...
These are a few things that *generally* work for me:
I find it much easier to reply to a thread when the poster asks pretty specific questions that need specific answers.
"what would you do in situation X" is something I can get my head around, if the question pertains to my experience, of course!
I keep my posts, sentences and paragraphs very short. Unnaturally short. It helps that I can't type
I also hit the 'enter' key far more than is grammatically correct, as I find reading unbroken text very difficult online.
Don't be disheartened. Maybe rephrase questions in another post so they don't get lost in the original post's text . EG: "how can I beat Asian Jasmine?"

 
Posts: 9002
Location: Victoria British Columbia-Canada
706
  • Mark post as helpful
  • send pies
    Number of slices to send:
    Optional 'thank-you' note:
  • Quote
  • Report post to moderator
Sarah Susanka wrote a book called Outside the Not So Big House. Lots of good small yard advice there. I'm sure I read that one of her big influences was A PATTERN LANGUAGE.
 
Graham Robertson
Posts: 68
  • Mark post as helpful
  • send pies
    Number of slices to send:
    Optional 'thank-you' note:
  • Quote
  • Report post to moderator
thanks for your help, a little guidance is all I needed! I will be adding more photos later from yesterday and today's work, and I'll restructure my post to encourage contribution.
 
Graham Robertson
Posts: 68
  • Mark post as helpful
  • send pies
    Number of slices to send:
    Optional 'thank-you' note:
  • Quote
  • Report post to moderator
Update!


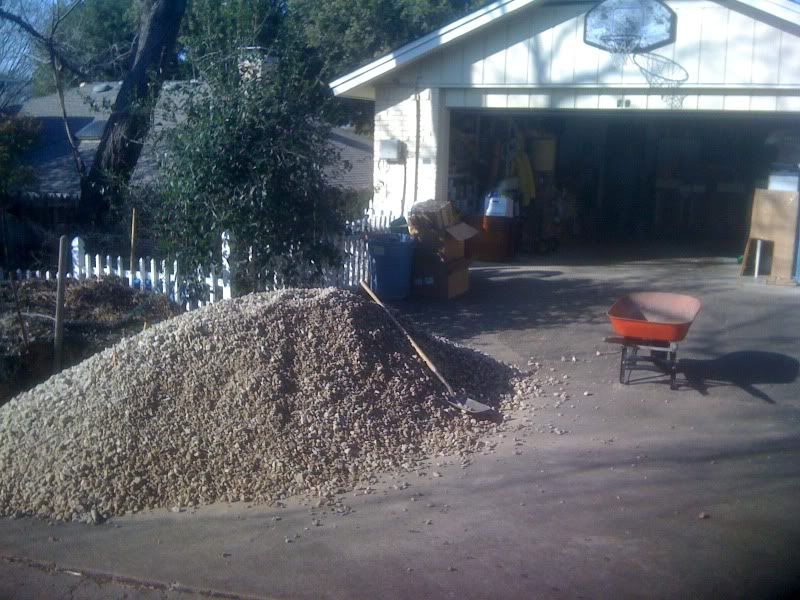
Here's the drainage trench filled with crushed concrete gravel.


about 6 tons of gravel.. I went ahead and used a ton or so to make a french drain where we were having some flooding problems under the drip line of the roof.

I have been using sites like servicemagic.com to find concrete sawers and contractors who would be interested in delivering their "waste" product. One guy came over yesterday offering to build the wall with a crew for $500, but where's the fun in that? He did help me secure a dump truck load of concrete from one of his friend's jobs. He says he can get the blocks custom cut, so I told him the exact dimensions I need. $80 for delivery, so my costs are up to almost $300, and I'm hoping they're the last dollars I'll be throwing at the project. Now all I need is hands! I have posted an event suggestion for a Permablitz on Dallas' Organic Gardening and Sustainability meetup, and an event page on Facebook for this weekend.

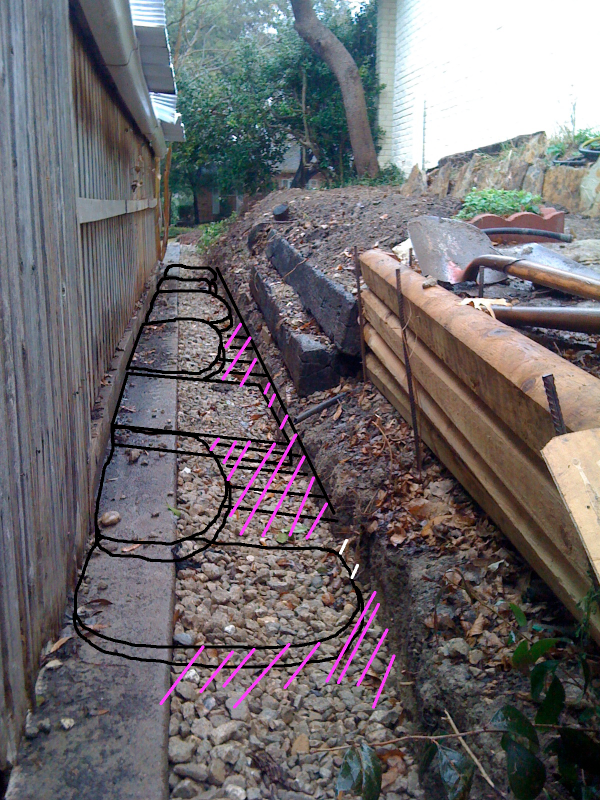
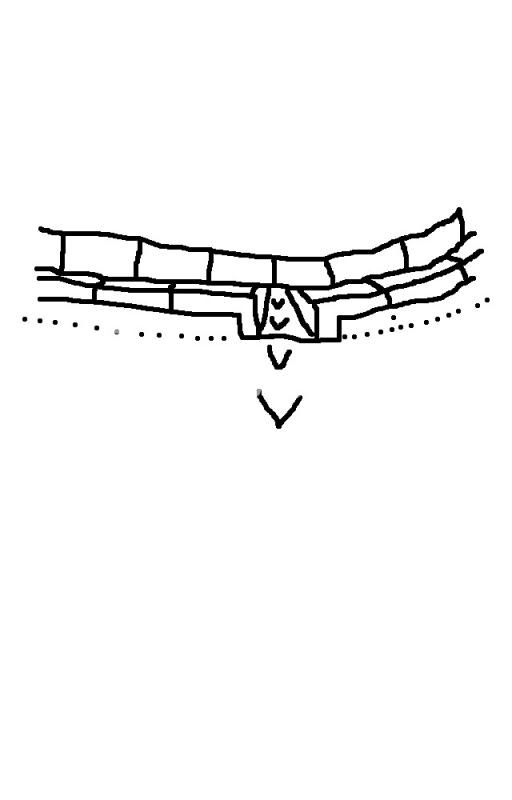
If you look in the first picture of the post, note how the gravel trench buts up against an existing retaining wall. Would the wall remain strong if I placed the first course of stones on the retaining wall, angled back towards the subsoil? My first course will probably be about 20"x24"-36"... Here is a crude drawing of my proposal

The pink lines are gravel/soil backfill behind the first course of rock, so we have a level footer to set the next row.
 
Graham Robertson
Posts: 68
  • Mark post as helpful
  • send pies
    Number of slices to send:
    Optional 'thank-you' note:
  • Quote
  • Report post to moderator
As you can see, the "terrace" I built last year is just about at the end of its life and functionality. It is easily waterlogged since its just timbers, logs, and railroad ties, some braced by rebar, sitting on a level bed of soil. I am drawing my new plans with help of Brad Lancaster's Rainwater Harvesting for Drylands, Vol 2.. It has a great chapter on terrace retaining walls.
 
Graham Robertson
Posts: 68
  • Mark post as helpful
  • send pies
    Number of slices to send:
    Optional 'thank-you' note:
  • Quote
  • Report post to moderator
So, it has been a year since my last update on our retaining wall project. I have been gone for 8 months and have had the recent ability to continue work on my home projects.

News: I have been home for two months. Upon arrival, I discussed with my parents how we want to proceed. Before my leave, we agreed that the "non visible" part of the wall could be done in broken concrete, and we will buy quarried stone for the street facing wall sections. I spent the past month researching the cost/benefits of broken concrete, "prefabbed" dry-cast blocks from Home Depot, stone shipped from a quarry, and retail stone from a local stone yard.

The first month I was here I just wanted to get on with it and use broken concrete, so I did some looking and found a sidewalk repair project being done, and asked if I could get the slabs loaded into a truck. We rented a Uhaul with a trailer and got a load to bring back. My first mistake: I assumed the slabs could be broken with a sledge The contractor told me it had no rebar, that it was "soft concrete." So they loaded us up and off we went. Upon arrival I thought it would be a couple hours of smashing and unloading. Turns out we could barely break one slab with a sledge. The next day we tried using a 7 1/4" circular saw with a diamond tip masonry blade to score, then smash; this worked better, but it was not efficient. We ended up renting a gas powered concrete saw, and that did the job in a couple hours of constant cutting. The chunks turned out great, and make a nice and wide foundation for our three foot wall.

We decided that repeating this with raw slabs might be a mistake, in terms of our window of opportunity (cool Texas weather, finish in time for spring planting, dont wanna be stuck here in Dallas). The time that it takes to source broken concrete from a willing contractor could be indefinite. I was ripped off from the first contractor who told me he could get concrete (my mistake in trusting him with money before seeing any product). Learning a lot though, and since I want to master the art of dry stacking and contracting, I step back at the end of the day and sense I am getting there. Work is a very important part of developing one's identity.

After researching and comparing costs/benefits of broken concrete vs. pre fabbed blocks (for the side of the house), we decided to go with the prefabbed blocks. Cost is very cheap for our quantity, and delivery is cheaper than quarry's rates or renting a truck. Stacking will also be very fast due to their uniformity.

We also decided to extend the retaining wall along the entire length of the property.


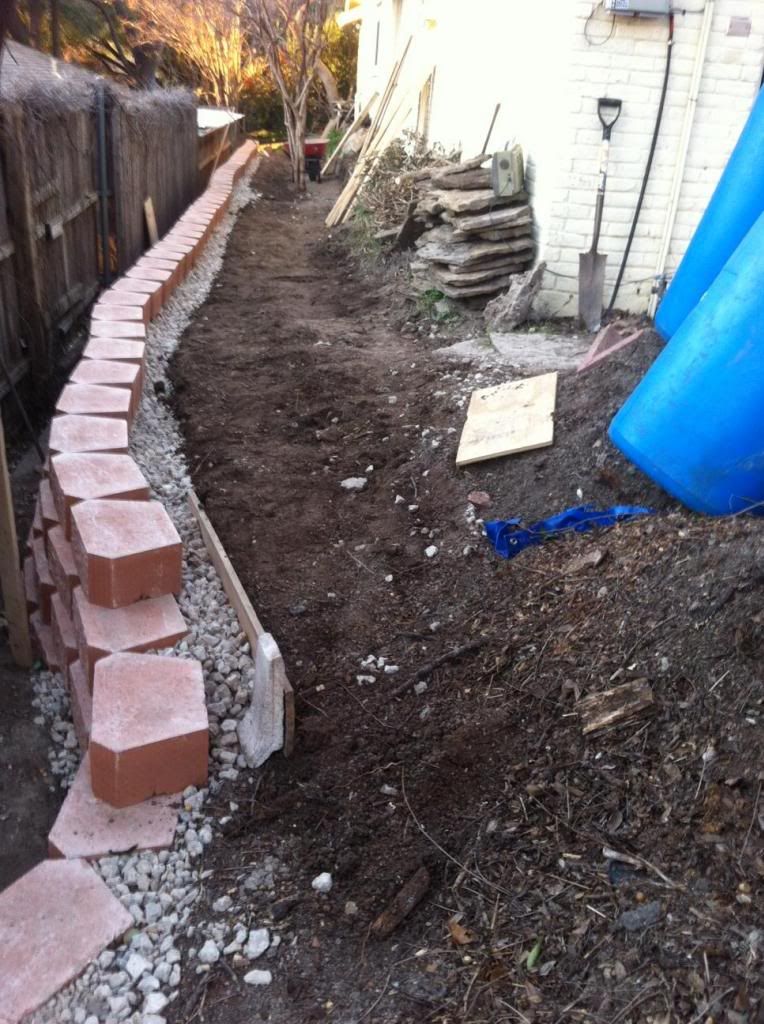
A friend who was visiting this day gave me a hand in setting the broken concrete. We got about 30-40 feet set that day and that was all the broken concrete we had.


Stuart is sitting in the first extension of the foundation trench from last year. We decided to utilize the entirety of the side yard within one three foot high by 80 foot long retaining wall.


Cleaning. I spent a lot of time today just removing little tree stumps and pulling up Virgina Creeper roots. My nemeses at our place are Asian Jasmine, Bermuda grass, and Virgina Creeper, although I do have a bit more affinity for the latter. It is quite beautiful when it covers trees and fences, and I think it is native. It has made a great erosion control groundcover for the past 30-40 years, but I would really like to use the vertical and horizontal space for social gathering and gardens; the retaining wall will serve the purpose of erosion control, and allow more plants to grow and mostly FOOOD. I plan to shoot to kill with these three invasives since they are so out of control. Removing every little stem and root is basically the only way to control these invasive rhizomes.


Beyond the end of the line of concrete you see here, we are preparing to extend the foundation trench.

 
Graham Robertson
Posts: 68
  • Mark post as helpful
  • send pies
    Number of slices to send:
    Optional 'thank-you' note:
  • Quote
  • Report post to moderator
Progress as of Today


I am wondering how to build a trellis along the wall, without having to set the posts as we are building the wall. There is an existing concrete wall that we are building the new one against. I wonder if I could anchor wooden posts into the concrete wall, then have some kind of braced members that extend towards the house, with wires between. I will post a drawing.
 
Graham Robertson
Posts: 68
  • Mark post as helpful
  • send pies
    Number of slices to send:
    Optional 'thank-you' note:
  • Quote
  • Report post to moderator
 
Graham Robertson
Posts: 68
  • Mark post as helpful
  • send pies
    Number of slices to send:
    Optional 'thank-you' note:
  • Quote
  • Report post to moderator
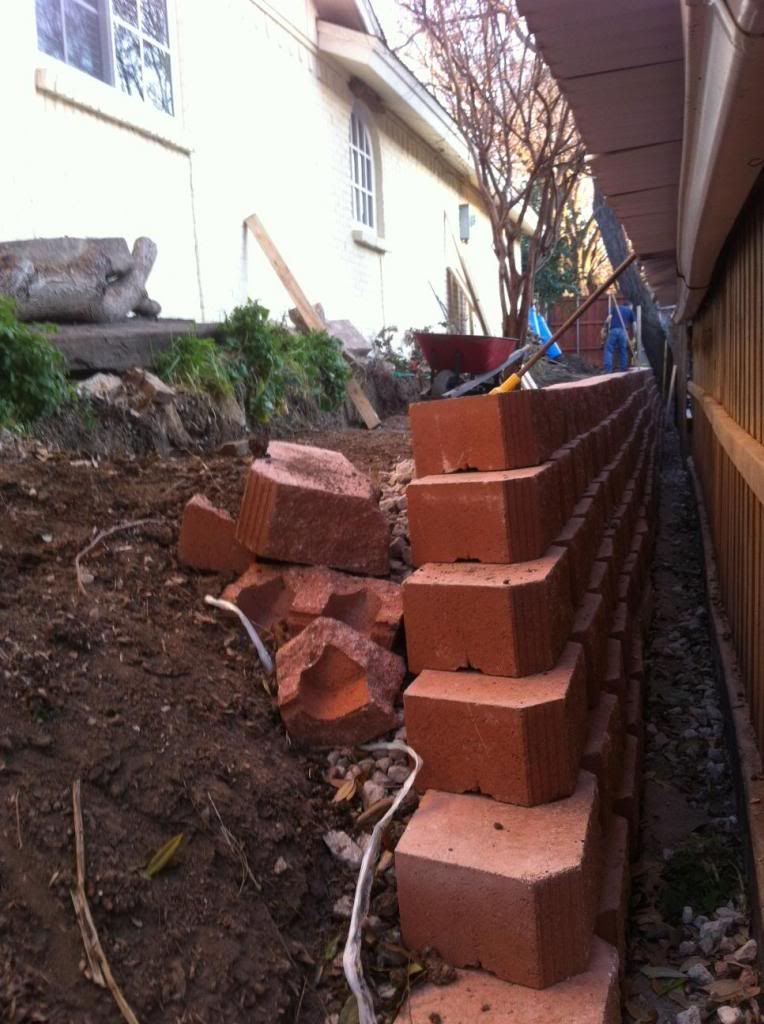
Today's progress: finished backfilling the fifth course and laying the sixth and final course! Still a few more sections of wall to do which will be done in natural stone.


Posts: 182
Location: CO; semi-arid: 10-12"; 6000 ft
8
  • Mark post as helpful
  • send pies
    Number of slices to send:
    Optional 'thank-you' note:
  • Quote
  • Report post to moderator
Wow! what a huge project. That is a nice looking wall.

Your pictures look good, but some are rather large, so I can't see the whole image on the screen at once, which does make it a little hard to see the whole picture. I don't know how to do the picture stuff, but if it might be possible to resize them a bit smaller?
 
Posts: 2413
48
  • Mark post as helpful
  • send pies
    Number of slices to send:
    Optional 'thank-you' note:
  • Quote
  • Report post to moderator
Hi DJ,

I think it's your viewer setting, I have a small lap top and they are normal size?
 
Graham Robertson
Posts: 68
  • Mark post as helpful
  • send pies
    Number of slices to send:
    Optional 'thank-you' note:
  • Quote
  • Report post to moderator
thanks dj,

try pressing ctrl +/- to zoom in and out within your browser

i have been storing up lots of logs, brush and tree trimmings to bury under the topsoil, so it will be a hugel terrace.

today i am digging a shallow trench beside the gravel backfill and filling it with the biomass. after the trench is filled with our native topsoil, i will grade the subsoil slightly downhill towards the base of the final course, then have a load of compost delivered to level it out. on top of the hugel trench, we will plant blackberries, fig, citrus, grapes, and annual vining veggies. i am in the process of figuring out how to build a trellis on the outside of the retaining wall which will somehow extend over the hugel trench. there will also be a simple post/ wire trellis along the wall of the house with more FOOD!
 
pollinator
Posts: 1234
Location: Chicago/San Francisco
196
  • Mark post as helpful
  • send pies
    Number of slices to send:
    Optional 'thank-you' note:
  • Quote
  • Report post to moderator
Hi Grahm

From you drawing it's hard to see the benefit of holding you post right on the property line since there is no useful soil until you're a few inches inside your retaining wall. Why not sink post inside your retaining wall? Much easier engineering that way.

Rufus
 
Graham Robertson
Posts: 68
  • Mark post as helpful
  • send pies
    Number of slices to send:
    Optional 'thank-you' note:
  • Quote
  • Report post to moderator

Rufus Laggren wrote:Hi Grahm

From you drawing it's hard to see the benefit of holding you post right on the property line since there is no useful soil until you're a few inches inside your retaining wall. Why not sink post inside your retaining wall? Much easier engineering that way.

Rufus


I am realizing that now as well. It would be way too difficult to support a wooden post anchored to the retaining wall. It would also be very difficult to anchor one in the gravel. The easiest would be to dig it into the soil behind the gravel, but I am afraid that the gravel may spill into the hole. I really want to do it as close to the outside of the retaining wall as possible.

I looked at 1 3/8" metal fence posts today. They are much cheaper than 4x4s. I assume one could pound them straight into the gravel. Then train the plants to grow a bit diagonally over the gravel?


I've been storing brush for years of which most is buried now.

Dug a trench just behind the gravel backfill, 10-15 feet.

Filled with native topsoil that was scraped and stored when we were preparing the foundation trenches.

We plan to use 1x8 boards supported by rebar stakes to separate the last layer of gravel backfill from the 3-4 inches of compost to be delivered from the local bulk supplier. $35 per cubic yard. with $65 delivery flat rate doesnt sound too bad. We will need about 5 yards to fill our 6x80 area. We will use cardboard to line the seam where the boards meet the soil and gravel. Im expecting the trench to fill with sediment at some point, so the cardboard is just to prevent the initial settling dirt from seeping through.

Before applying the compost here, I think a good practice is to grade out the subsoil slightly downhill towards the trench. So for now just clearing out materials and burying as much brush as possible.

We are going to a quarry on Monday to look at sawn top and bottom stone for building the remainder of the "presentable" walls. This will free up much more space and paths to make the front and side yards more accessible and lively.

Thanks for contributing


dj niels
Posts: 182
Location: CO; semi-arid: 10-12"; 6000 ft
8
  • Mark post as helpful
  • send pies
    Number of slices to send:
    Optional 'thank-you' note:
  • Quote
  • Report post to moderator
Graham, I don't have a clue what you mean--I pressed ctrl and the +/- but nothing happened.

Some of the pictures fit my laptop screen just fine, like the new one of the swale, but others are so tall I have to scroll to see them. (I admit, I am a computer infant--my kids often tease me about having a mental block against technology, and have to show/teach me how to do any new thing. But I can learn--just this past week or two I have been learning how to use QuickBooks for my developing market-garden venture!)
 
Rufus Laggren
pollinator
Posts: 1234
Location: Chicago/San Francisco
196
  • Mark post as helpful
  • send pies
    Number of slices to send:
    Optional 'thank-you' note:
  • Quote
  • Report post to moderator
di niels

I think Graham meant "CTL +" OR "CTL -". Is that what you tried? In many browsers those combinations magnify or reduce the whole screen display, including any pictures. However, if you do not see a horizontal "elevator bar" at the bottom of your screen when viewing a site that usually means that the display is already sized correctly to fit left-to-right and I think once the display shows fully left-to-right most people just scroll as needed.

FWIW

Rufus
 
Graham Robertson
Posts: 68
  • Mark post as helpful
  • send pies
    Number of slices to send:
    Optional 'thank-you' note:
  • Quote
  • Report post to moderator
Update: Continuing on the foundation trenches that reach around to the front. I have about 250 face area left.

If you havent been following the project, I used a tamped gravel filled foundation trench for the first 80 feet of drycast concrete block wall. Now I am continuing into the front yard on the same, level span, but using natural limestone where there is a street view.

We used the existing concrete retaining wall on the property line to absorb the outward pushing force of the new retaining wall. The point along the existing retaining wall that is level with the new section's foundation course is not below the grade of the contour line that continues into the front yard. If I had chosen to continue using gravel footers, that means that the level of the gravel base would be spilling out and down the hill. I contemplated for a few days about what to do, and came upon

>>>>>THIS VIDEO<<<<<<<

which details a traditional Scottish style dry stone retaining wall, and I have decided to use their recommended method of a compacted soil footer, instead of gravel. So I dug down six inches below the level point of the existing wall's first course, and planned to build directly on top of the hard subsoil.

I did come upon a bit of a problem today:

I dug an inch or two too much in some places by accident, and I need advice on adding, leveling, and stabilizing the soil to be strong enough to support the stone wall.

I recently ordered the book Building With Lime, which details techniques of using lime as a binder. They mention a method for stabilizing soil for cobblestone pathways that involves loosening hardcore subsoil "to a depth of 75mm" and mixing with hydrated lime and sand, then compacting.

I am also somewhat certain that our subsoils have a good percentage of lime, anyone know of field tests to determine what kind of lime?

I also found this [url=http://www.lime.org/documents/publications/free_downloads/soils-aggregates-vol-3.pdf]Evaluation of Lime Stabilized Soils
[/url]. Look on Page 6 for a chart showing the compressive strength differences for soil with and without lime.

Might it be helpful to the integrity of the structure or is it needless?

Is compacting the subsoil with a tamper enough?
photo-22.JPG
[Thumbnail for photo-22.JPG]
finishing and shaping the trench
photo-23.JPG
[Thumbnail for photo-23.JPG]
asdfsdaf
 
Jay C. White Cloud
Posts: 2413
48
  • Mark post as helpful
  • send pies
    Number of slices to send:
    Optional 'thank-you' note:
  • Quote
  • Report post to moderator
Hello Grahm,

Do you plan on going any deeper?

Will you lay a bed of 20 mm (3/4") crushed stone?

Small shallow spots in the bottom of your trench should not matter.

Soil solidification with lime is a plus but probably not necessary.
 
Graham Robertson
Posts: 68
  • Mark post as helpful
  • send pies
    Number of slices to send:
    Optional 'thank-you' note:
  • Quote
  • Report post to moderator

Jay C. White Cloud wrote:Hello Grahm,

Do you plan on going any deeper?

Will you lay a bed of 20 mm (3/4") crushed stone?

Small shallow spots in the bottom of your trench should not matter.

Soil solidification with lime is a plus but probably not necessary.


Hey Jay,

I am not planning on laying the gravel at this point because I am already at the required level to meet up with the courses from the existing section of wall.

I have found that the more attention paid to leveling the footer surface makes laying that much faster and accurate. I was planning to do a layer of crushed concrete, but upon seeing the Scottish technique of dry stacking, see here, I like the simplicity of dirt footers.

Most sources seem to agree that the function of gravel footers is drainage, but they fill with sediment over time anyway.
 
Jay C. White Cloud
Posts: 2413
48
  • Mark post as helpful
  • send pies
    Number of slices to send:
    Optional 'thank-you' note:
  • Quote
  • Report post to moderator

Scottish technique

Though refereed to as "Scottish technique," this is a misnomer. It is a common method of laying stone in many parts of Western Europe.

Most sources seem to agree that the function of gravel footers is drainage, but they fill with sediment over time anyway.

Graham, please site you "sources" as you maybe taking them out of context. I have heard some Masons (I have never read this in any erudite text) say that you don't need a wall to drain, and that it can just be built on "mineral soils." As for the "filling in with sediment," even if the gravel drainage is done very poorly, and without the proper preparations, complete sedimentation of the footing would take thousands of years in most cases. In well done methods, I doubt if it would occur at any significant time frame, applicable to the stone works detriment. We have examples that are thousands of years old that are very well preserved (i.e. the Great Wall of China-combination of drainage trench, Cobb-Rammed Earth, and stone)

If settling and movement in the wall is not a concern, over time, then build off the mineral soil, otherwise you will need some form of constructed and planned drainage. This can take on many different forms, to varied to be described here.

I would also note that the soil types in the video are of a well drained nature and not holding any significant amounts of clay. With these soil types, drainage in rather built in. I would also not that if you are using large footer stones in the construction of any masonry wall, they are going to distribute movement and settling much better that other types of footings. I would further suggest, that you try and find other examples of stone work, other than just Western European Ashlar forms. These are the least resistant to movement and not the norm in regions with much seismic or water activity. Pooled water can collect in the inner wall planes, causing "freeze movement." but this is probably not a concern in your region. I also remember you said you are doing this with concrete rubble. Is if hard or soft concrete?
 
Graham Robertson
Posts: 68
  • Mark post as helpful
  • send pies
    Number of slices to send:
    Optional 'thank-you' note:
  • Quote
  • Report post to moderator

Jay C. White Cloud wrote:

Scottish technique

Though refereed to as "Scottish technique," this is a misnomer. It is a common method of laying stone in many parts of Western Europe.

Most sources seem to agree that the function of gravel footers is drainage, but they fill with sediment over time anyway.

Graham, please site you "sources" as you maybe taking them out of context. I have heard some Masons (I have never read this in any erudite text) say that you don't need a wall to drain, and that it can just be built on "mineral soils." As for the "filling in with sediment," even if the gravel drainage is done very poorly, and without the proper preparations, complete sedimentation of the footing would take thousands of years in most cases. In well done methods, I doubt if it would occur at any significant time frame, applicable to the stone works detriment. We have examples that are thousands of years old that are very well preserved (i.e. the Great Wall of China-combination of drainage trench, Cobb-Rammed Earth, and stone)

If settling and movement in the wall is not a concern, over time, then build off the mineral soil, otherwise you will need some form of constructed and planned drainage. This can take on many different forms, to varied to be described here.

I would also note that the soil types in the video are of a well drained nature and not holding any significant amounts of clay. With these soil types, drainage in rather built in. I would also not that if you are using large footer stones in the construction of any masonry wall, they are going to distribute movement and settling much better that other types of footings. I would further suggest, that you try and find other examples of stone work, other than just Western European Ashlar forms. These are the least resistant to movement and not the norm in regions with much seismic or water activity. Pooled water can collect in the inner wall planes, causing "freeze movement." but this is probably not a concern in your region. I also remember you said you are doing this with concrete rubble. Is if hard or soft concrete?


To clarify I am doing the remainder of the wall in limestone locks, 6" high by 8" deep with random lengths between 12-24". So I do not have deep blocks to use for footers or capstones.

Broken concrete connections turned out to be difficult to find. LImestone is cheap from the quarry, though it is a bit far to deliver.

Would it be structural to pack smaller rocks behind the 6x8's and then lay the next course farther back, halfway on the footer and its' packing, and then something like a 1:6 batter the rest of the way?

We have about 60-70% clay soils in Dallas. I believe that expansion of clay soils is the problem, not runoff. Any running water will find its way through the cracks of the wall, it is the expanding soil that pushes a wall outward whether from freezing or just absorption. Our soils are pretty absorbent, and will hold water and swell. I think a large capstone might be as important as anything for providing resistance to moving soils.

Could I use the 6x8's laid long ways into the bank, every other stone for the footer?

I got a book about stonework and it mentions gravel but not explicitly for drainage purposes. Rainwater Harvesting for Drylands by Brad Lancaster mentions using gravel for drainage purposes.
 
Graham Robertson
Posts: 68
  • Mark post as helpful
  • send pies
    Number of slices to send:
    Optional 'thank-you' note:
  • Quote
  • Report post to moderator
Here is an excerpt of a study on European dry stone walls that says about gravel hearting:

"If gravel, aggregate, or pea-stone has been
used for hearting, it is usually visible in places be-
tween the face stones. If this is the case, it is a sign
that the wall was not built well. Gravel, aggregates,
and pea-stone are not suitable for hearting. All
can settle, and leave gaps in the heart of the wall,
or worse act like ball bearings and allow the face
stones to move. Generally speaking do not accept
a wall that has been visibly hearted with any of
these materials."

read more

 
Graham Robertson
Posts: 68
  • Mark post as helpful
  • send pies
    Number of slices to send:
    Optional 'thank-you' note:
  • Quote
  • Report post to moderator
Jay,
I'd like to hear more about other options for drainage systems besides gravel footer/backfill. ideas?

 
Jay C. White Cloud
Posts: 2413
48
  • Mark post as helpful
  • send pies
    Number of slices to send:
    Optional 'thank-you' note:
  • Quote
  • Report post to moderator
Even'n Graham,

Well you are my last thing for this evening, sorry it took me a few days to get back to you. I'm going to jump around a bit, so bare with me.

"If gravel, aggregate, or pea-stone has been used for hearting, it is usually visible in places between the face stones. If this is the case, it is a sign that the wall was not built well. Gravel, aggregates, and eastone are not suitable for hearting. All can settle, and leave gaps in the heart of the wall, or worse act like ball bearings and allow the face stones to move. Generally speaking do not accept a wall that has been visibly hearted with any of these materials."


Well Graham, I am glad you are reading a lot, but the key is to read even more, and understand what you are reading. This is not a criticism but an observation of the old adage, "a little information can be harmful." Kinda like, if somebody has car keys they must know how to drive well...not necessarily.

First, I will try to expand the quoted text from your reading and break it down. To call any kind of gravel "hearting," is a misnomer. Why a study would even refer to gravel of any kind as hearting has me a bit confused. Hearting is always intentionally placed whether it is a small stone or just a chip. You can't place gravel, that is poured, or shovelled into something...hearting is place and set with full intention and purpose. You would never use "pea gravel," and if you did it would only be below grade and never in the wall itself as it would act as "ball bearings," especially in an "Ashlar" laid European wall. Crushed or "cracked" rock gravel is the best form of gravel to used, but again, not in the wall unless placed by hand with full intention of purpose.

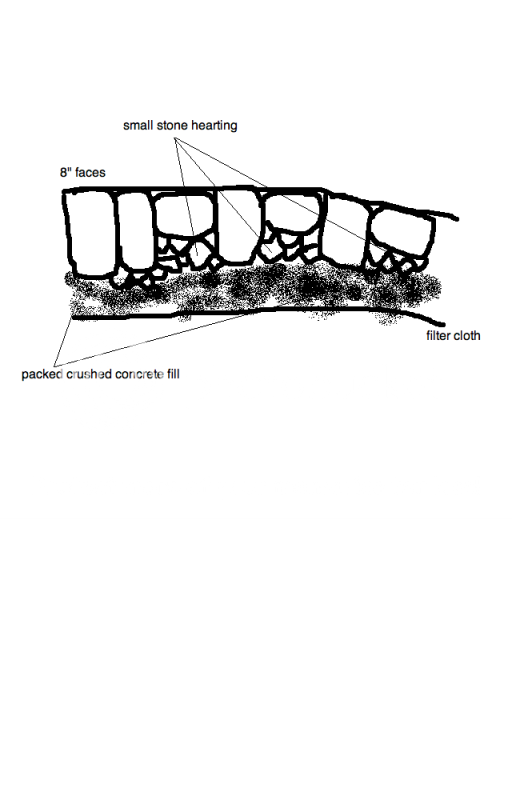
Clay is bad, period, and must be kept away from the stone work. It will destroy the wall in short order, especially if any bentonites varieties are present. This is going to require a drainage bed and a backer of drainage as well. You can use small stone, crushed gravel, any aggregate you can acquire as long as it will drain and pack down well, but still be porous. Note, do not use "hard-pack gravel," as this can form almost a waterproof barrier and not drain. Filter cloth behind and under the wall is strongly advised.

I tend to stay away from Ashlar styles unless a client request it specifically, but that will be your choice. You described the stone as a lime stone and you gave the sizes as>>>" 6" high by 8" deep with random lengths between 12-24"<<< If you don't have footers or capstones, you will have to make do I guess, but will have a weaker wall from their absence, unless you are really good at "drywalling." Also remember that in the case of any wall (free standing or retaining,) the smallest face is what you see, and the length is in the wall. So in you case the majority of the wall is going to be more "cobble" style of 6"x8" face stone with the length tying into the depth of the wall out of sight.

Would it be structural to pack smaller rocks behind the 6x8's and then lay the next course farther back, halfway on the footer and its' packing, and then something like a 1:6 batter the rest of the way?

Hard to say without seeing what you mean, but my general answer would be, probably not.

We have about 60-70% clay soils in Dallas. I believe that expansion of clay soils is the problem, not runoff. Any running water will find its way through the cracks of the wall, it is the expanding soil that pushes a wall outward whether from freezing or just absorption. Our soils are pretty absorbent, and will hold water and swell. I think a large capstone might be as important as anything for providing resistance to moving soils.

Footing nor Cap stones will do anything for expansive clays. They can tear a 60 ton boulder into small pieces. CLAY IS BAD>>>you need DRAINAGE.

Could I use the 6x8's laid long ways into the bank, every other stone for the footer?

Bit confused by this question? this is the only way to lay a stone. THE LENGTH IS ALWAYS IN THE WALL, NEVER IN THE FACE.

Till Later,

jay
 
Graham Robertson
Posts: 68
  • Mark post as helpful
  • send pies
    Number of slices to send:
    Optional 'thank-you' note:
  • Quote
  • Report post to moderator
The only gravel I have access to in large quantities is crushed concrete, about 3/4-1.5". It is very angular and packs very well. I am thinking about using this as drainage behind the wall in light of your insights.

You say "not in the wall," and I take that to mean only just behind the wall. What would an inappropriate use of gravel "in the wall" look like?


If you don't have footers or capstones, you will have to make do I guess, but will have a weaker wall from their absence, unless you are really good at "drywalling." Also remember that in the case of any wall (free standing or retaining,) the smallest face is what you see, and the length is in the wall. So in you case the majority of the wall is going to be more "cobble" style of 6"x8" face stone with the length tying into the depth of the wall out of sight.


I just bought a diesel pickup, so I have free reign over much of the wastelands of Dallas.. which means lots of stones. I may be able to get a hold of some heavy stones for caps.


This is what I have gathered from your post. The wall will have hearting of intentionally placed smaller stones to support the face stones, which are laid longways into the wall. Then packed gravel behind that, and filter cloth behind that.

I have already built a lime stabilized soil foundation to the necessary level, and I am reluctant to dig down again and add a gravel footer. But if you think it is necessary, then so be it.

I wonder if I could accomplish the same drainage effect by digging small "outlets" or drains in the front of the wall that allows water to flow from the gravel backfill.


I dont know how to draw this any more clearly, but the dotted line symbolizes where the stones go underground, and the break in the "grade" line is where I will dig a "drain", which will let water flow from behind the wall and between two stones that are intentionally placed to leave room for that.
 
Jay C. White Cloud
Posts: 2413
48
  • Mark post as helpful
  • send pies
    Number of slices to send:
    Optional 'thank-you' note:
  • Quote
  • Report post to moderator

The only gravel I have access to in large quantities is crushed concrete, about 3/4-1.5". It is very angular and packs very well. I am thinking about using this as drainage behind the wall in light of your insights.

That should work just fine.

You say "not in the wall," and I take that to mean only just behind the wall. What would an inappropriate use of gravel "in the wall" look like?

Any pieces, large or small, you place by hand with purpose and intent.

I just bought a diesel pickup, so I have free reign over much of the wastelands of Dallas.. which means lots of stones. I may be able to get a hold of some heavy stones for caps.

Good, your wall will be better for it.

I have already built a lime stabilized soil foundation to the necessary level, and I am reluctant to dig down again and add a gravel footer. But if you think it is necessary, then so be it.

If your wall is under a meter in height, and you are in a Southern clime, you should be just find with that arrangement, considering the other factors.

I wonder if I could accomplish the same drainage effect by digging small "outlets" or drains in the front of the wall that allows water to flow from the gravel backfill.

If you have achieved a good lime stabilization, you need not do this. Otherwise dig down another 200 mm and pack in gravel or stone chips on end.


I don't know how to draw this any more clearly, but the dotted line symbolizes where the stones go underground, and the break in the "grade" line is where I will dig a "drain", which will let water flow from behind the wall and between two stones that are intentionally placed to leave room for that.

This may serve you well, if done correctly, but it could also create a spot that fast running water from a down poor, could undermine the wall. You want the wall to drain, yes, but over it's length and not at any one point unless it is well stabilized and there is not risk of undermining and erosion.
 
Graham Robertson
Posts: 68
  • Mark post as helpful
  • send pies
    Number of slices to send:
    Optional 'thank-you' note:
  • Quote
  • Report post to moderator
Thanks a ton Jay.

It is easy to feel lost when I know of no one who dry stacks in Dallas. I do see some dry stone walls in the wealthier parts of Dallas, which is encouraging in terms of trying to make a niche for my work.

I am truly grateful to know someone who is dedicated to reviving these arts.

 
Jay C. White Cloud
Posts: 2413
48
  • Mark post as helpful
  • send pies
    Number of slices to send:
    Optional 'thank-you' note:
  • Quote
  • Report post to moderator
No worries Graham, glad you are learning the craft, you are the next generation.

Regards,

jay
 
Graham Robertson
Posts: 68
  • Mark post as helpful
  • send pies
    Number of slices to send:
    Optional 'thank-you' note:
  • Quote
  • Report post to moderator
Eighteen tons of limestone blocks arrived today. They are all very accurate dimensions of 6x8".

As I started laying the first few blocks, I noticed there was a slight dip in the level, when I ran my four foot level across them. Maybe an 1/8" dip between 2 feet. Is there an acceptable tolerance for leveling blocks? I think I may just go back out and lay them again, because it will obviously be much easier and stronger when I lay the next course.
 
Jay C. White Cloud
Posts: 2413
48
  • Mark post as helpful
  • send pies
    Number of slices to send:
    Optional 'thank-you' note:
  • Quote
  • Report post to moderator
1/8" is not bad, just as long as you don't acquire an accumulation of error.
 
Graham Robertson
Posts: 68
  • Mark post as helpful
  • send pies
    Number of slices to send:
    Optional 'thank-you' note:
  • Quote
  • Report post to moderator
I have been working for just a couple hours and I am already exasperated. These blocks are much denser and heavier than the manufactured ones.

Every time I lay a stone the first time, it's pretty much guaranteed that it will need to be taken out and the soil leveled.

I am wondering, might using a 1/4" layer of sand over the soil footer be appropriate to ease the process of leveling?
 
Jay C. White Cloud
Posts: 2413
48
  • Mark post as helpful
  • send pies
    Number of slices to send:
    Optional 'thank-you' note:
  • Quote
  • Report post to moderator
Well Graham, welcome to the world of dry laid stone!!! I love it!!! It is a challenge when you are new to it, but then again I would not touch a "manufacture stone" or concrete ones if you paid me double.

Now, if you are talking about your first course, they are usually set in gravel-NEVER SAND!!! it is to likely (it will) wash away, but you opted for "lime stabilized soil, so yes you must level each stone. This is the nature of the work, and if you had apprentised under Master Dry Laid Stone Mason, you would have picked up many of the little tricks that aren't in the books. Like...do you have these tools?

https://plus.google.com/u/0/photos/110695973610279379923/albums/5870125873092978705

If not, your job will be harder. It's the little things in stone work that makes the job fun and easy (well as easy as stone gets ) Not what you wanted to here but the truth.

Regards,

jay
 
Graham Robertson
Posts: 68
  • Mark post as helpful
  • send pies
    Number of slices to send:
    Optional 'thank-you' note:
  • Quote
  • Report post to moderator

Jay C. White Cloud wrote:Well Graham, welcome to the world of dry laid stone!!! I love it!!! It is a challenge when you are new to it, but then again I would not touch a "manufacture stone" or concrete ones if you paid me double.

Now, if you are talking about your first course, they are usually set in gravel-NEVER SAND!!! it is to likely (it will) wash away, but you opted for "lime stabilized soil, so yes you must level each stone. This is the nature of the work, and if you had apprentised under Master Dry Laid Stone Mason, you would have picked up many of the little tricks that aren't in the books. Like...do you have these tools?

https://plus.google.com/u/0/photos/110695973610279379923/albums/5870125873092978705

If not, your job will be harder. It's the little things in stone work that makes the job fun and easy (well as easy as stone gets ) Not what you wanted to here but the truth.

Regards,

jay


There is a portion of the wall that is continuing from the existing one that will be built on gravel, then that steps down six inches to a stabilized soil bed.
Would it be appropriate to use a thin layer of finer crushed granite, like 1/2"-3/4" on top of the gravel? The gravel is just really coarse, like maximum 1/2-2". So every time I want to bring the stone down or up just a bit, it involves extreme care in removing/adding gravel, then tamping very hard to get it where I want it (I am sure the neighbors are going crazy from my pounding). I think getting a finer top layer of gravel would be stable and helpful. Could I also use crushed granite tamped into the soil footer? It's just really hard to level the clay because it is cured really well in some spots and its pretty moist from rain, so tamping is futile.

I really wish I knew a master dry laid stone mason here in Dallas, but I think specialists are rare in Dallas. I do see some really nice dry stone walls around, I guess the best way to find the builders is to ask the owners. Or I might be willing to travel to apprentice if someone might be willing to show me the ropes. I do need a paid position though, as I am out of money. I adore Thea Alvin's work, have you heard of her? I've been following your Green Halo project; that is some seriously beautiful business.

Those are some nice tools! I have no clue what most of them do, but how might they be used in leveling gravel?

The only tools I have are a mason's hammer, a Smith four foot level, string lines, spirit levels, sledge, tamper, and tomorrow I am going to get a shaping hammer.

 
Jay C. White Cloud
Posts: 2413
48
  • Mark post as helpful
  • send pies
    Number of slices to send:
    Optional 'thank-you' note:
  • Quote
  • Report post to moderator
Brother Graham,

I am with you in spirit, and if I had a way to get there or mentor you more than I am, I most certainly would. Keep your chin up.

Thea Alvin is a friend of mine, and though we see little of each other, I do so love her work and follow her "escapades" as closely as I can when she blogs or writes. You should save up, and come here to Vermont and take a few courses at the Yestermorrow school. You may even want to follow her to Italy where she is restoring several old stone houses. I plan on going in a few more years to do one of the timber framed roofs.

The only tools I have are a mason's hammer, a Smith four foot level, string lines, spirit levels, sledge, tamper, and tomorrow I am going to get a shaping hammer.

Boy...you need more tool, and better ones too!!! Do you know this link? If not go to it and read, read, read. When you are ready, call and ask for Randy Potter. He and the owner are good friends, and mentors. I would not recommend a shaping hammer, get a Point, Set, and Trace. Also, start with a 1.5 lb masons hand sledge until you build up to a 3 lb.

http://www.trowandholden.com/

Gravel should be cracked stone, if decomposed granite is all I can get, I will use it, but don't like to. I think I told you this already, but I will again:

Trench then do a 200 mm lift in 50 mm stone, 100mm of 20 mm stone, and then you can finish with 12 to 10 mm stone in another 100 mm lift. Well pack, (I use a plate compactor) or you have to really go over it well with a hand tamper. If you can't, or didn't do this then you will have to "muddle" through the best you can. Use a 100 mm lift of 12 to 10 mm crushed stone. I needs to be below finished grade.

Warm Regards,

jay
 
Graham Robertson
Posts: 68
  • Mark post as helpful
  • send pies
    Number of slices to send:
    Optional 'thank-you' note:
  • Quote
  • Report post to moderator

Jay C. White Cloud wrote:Brother Graham,

I am with you in spirit, and if I had a way to get there or mentor you more than I am, I most certainly would. Keep your chin up.

Thea Alvin is a friend of mine, and though we see little of each other, I do so love her work and follow her "escapades" as closely as I can when she blogs or writes. You should save up, and come here to Vermont and take a few courses at the Yestermorrow school. You may even want to follow her to Italy where she is restoring several old stone houses. I plan on going in a few more years to do one of the timber framed roofs.

The only tools I have are a mason's hammer, a Smith four foot level, string lines, spirit levels, sledge, tamper, and tomorrow I am going to get a shaping hammer.

Boy...you need more tool, and better ones too!!! Do you know this link? If not go to it and read, read, read. When you are ready, call and ask for Randy Potter. He and the owner are good friends, and mentors. I would not recommend a shaping hammer, get a Point, Set, and Trace. Also, start with a 1.5 lb masons hand sledge until you build up to a 3 lb.

http://www.trowandholden.com/

Gravel should be cracked stone, if decomposed granite is all I can get, I will use it, but don't like to. I think I told you this already, but I will again:

Trench then do a 200 mm lift in 50 mm stone, 100mm of 20 mm stone, and then you can finish with 12 to 10 mm stone in another 100 mm lift. Well pack, (I use a plate compactor) or you have to really go over it well with a hand tamper. If you can't, or didn't do this then you will have to "muddle" through the best you can. Use a 100 mm lift of 12 to 10 mm crushed stone. I needs to be below finished grade.

Warm Regards,

jay


Jay, I am soo grateful for your help, it is more than I could have ever hoped for when I first posted here. After throwing my hands up at the end of today, I feel so relieved to know someone who has been there and can offer some help.

I googled "Point Set and Trace" and did not even find info on the basic function, and couldn't find it on trowandholden.com.

Thanks for the lowdown on the gravel process.

The place we buy our crushed concrete offers a 3/8" "minus" which I assume means anything from 3/8" down to fines (not good right?). My dad and I are going to go down there tomorrow and see if they have any 10-12 mm like you mentioned, that is washed and sifted.

I have never heard of a 300 mm thick layer of gravel. Thats 12 inches deep! Is that really necessary for a wall under 4 ft?

Our gravel's current depth about 5-7 inches deep. Would it be alright to top it off with, say a 30-50 mm layer of 10-12 mm crushed stone on top of our already 4-7 inch trench of 50 mm stone?

 
Jay C. White Cloud
Posts: 2413
48
  • Mark post as helpful
  • send pies
    Number of slices to send:
    Optional 'thank-you' note:
  • Quote
  • Report post to moderator

I googled "Point Set and Trace" and did not even find info on the basic function, and couldn't find it on trowandholden.com.

Please look again, they even have free videos explaining the use and application of the three tools.

http://www.trowandholden.com/glossary.html


Our gravel's current depth about 5-7 inches deep. Would it be alright to top it off with, say a 30-50 mm layer of 10-12 mm crushed stone on top of our already 4-7 inch trench of 50 mm stone?

It will be better that not doing it and easier for you to work I imagine.

Regards,

jay

 
Graham Robertson
Posts: 68
  • Mark post as helpful
  • send pies
    Number of slices to send:
    Optional 'thank-you' note:
  • Quote
  • Report post to moderator
Attached are some pics from the last couple days. Hit a few bumps in the road but come Monday I think we should be off to a good start. We went to the crushed concrete place and they loaded us up with some 3/8" minus, which includes fines, so I set up a sifting station to get them out. I may re-sift the leftovers with a window screen and use the finer stuff for laying pave stones. The mix consists of about 20-25% 3/8" stuff.

First time hauling with my beautiful new Dodge Cummins diesel truck.
photo-25.JPG
[Thumbnail for photo-25.JPG]
Sifting the fines out for the footer
photo-26.JPG
[Thumbnail for photo-26.JPG]
continuing the wall with quarried limestone blocks
photo-27.JPG
[Thumbnail for photo-27.JPG]
 
Graham Robertson
Posts: 68
  • Mark post as helpful
  • send pies
    Number of slices to send:
    Optional 'thank-you' note:
  • Quote
  • Report post to moderator
more pics
photo-28.JPG
[Thumbnail for photo-28.JPG]
photo-29.JPG
[Thumbnail for photo-29.JPG]
18 tons of limestone delivered Thursday
 
crispy bacon. crispy tiny ad:
Heat your home with the twigs that naturally fall of the trees in your yard
http://woodheat.net
reply
    Bookmark Topic Watch Topic
  • New Topic