• Post Reply Bookmark Topic Watch Topic
  • New Topic
permaculture forums growies critters building homesteading energy monies kitchen purity ungarbage community wilderness fiber arts art permaculture artisans regional education skip experiences global resources cider press projects digital market permies.com pie forums private forums all forums
this forum made possible by our volunteer staff, including ...
master stewards:
  • John F Dean
  • Carla Burke
  • Nancy Reading
  • r ranson
  • Pearl Sutton
  • Jay Angler
stewards:
  • Liv Smith
  • paul wheaton
  • Nicole Alderman
master gardeners:
  • Christopher Weeks
  • Timothy Norton
gardeners:
  • thomas rubino
  • Matt McSpadden
  • Eric Hanson

My Plans For Earth Bag Construction In The Town of South Bruce Penninsula, Ontario Canada

 
Posts: 217
Location: Ontario
13
  • Likes 1
  • Mark post as helpful
  • send pies
    Number of slices to send:
    Optional 'thank-you' note:
  • Quote
  • Report post to moderator

Hey folks, Steve here.

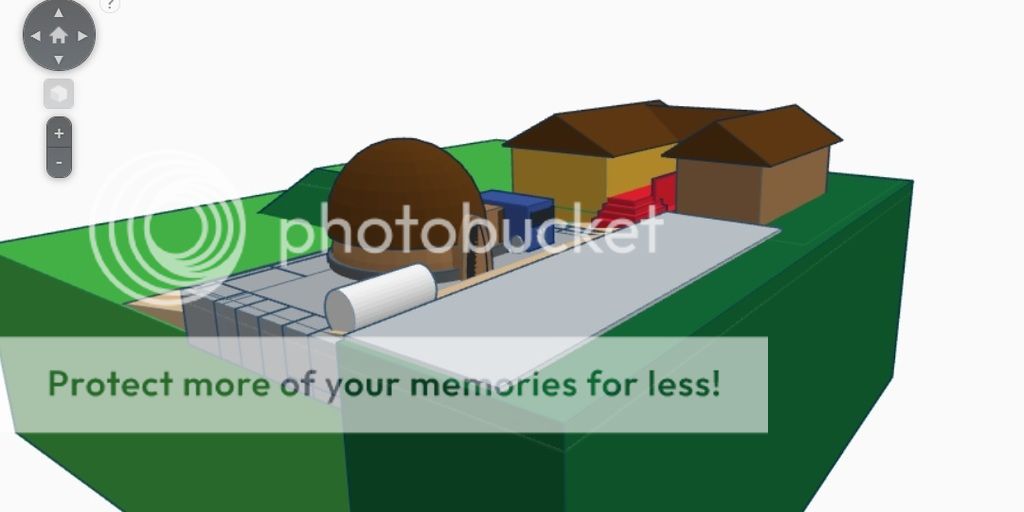
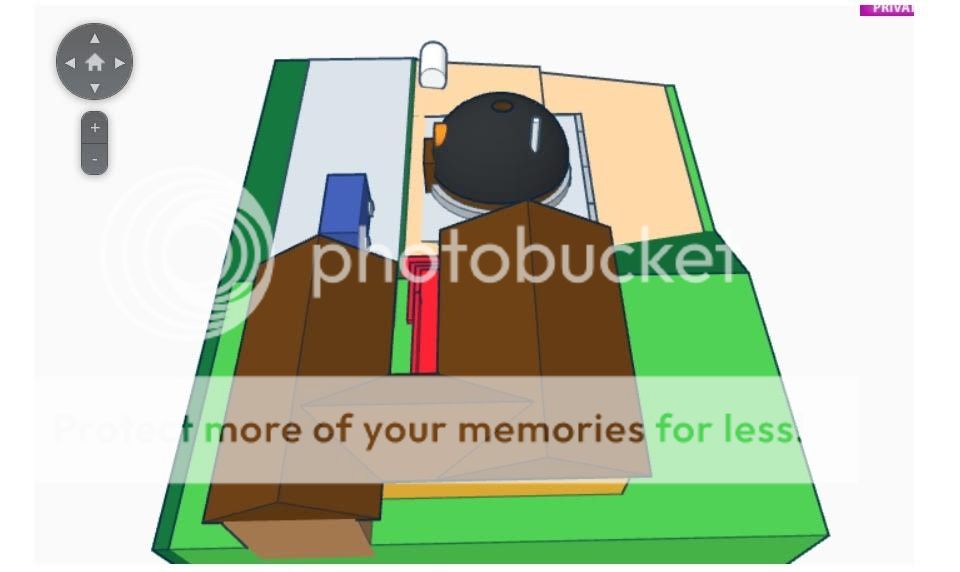
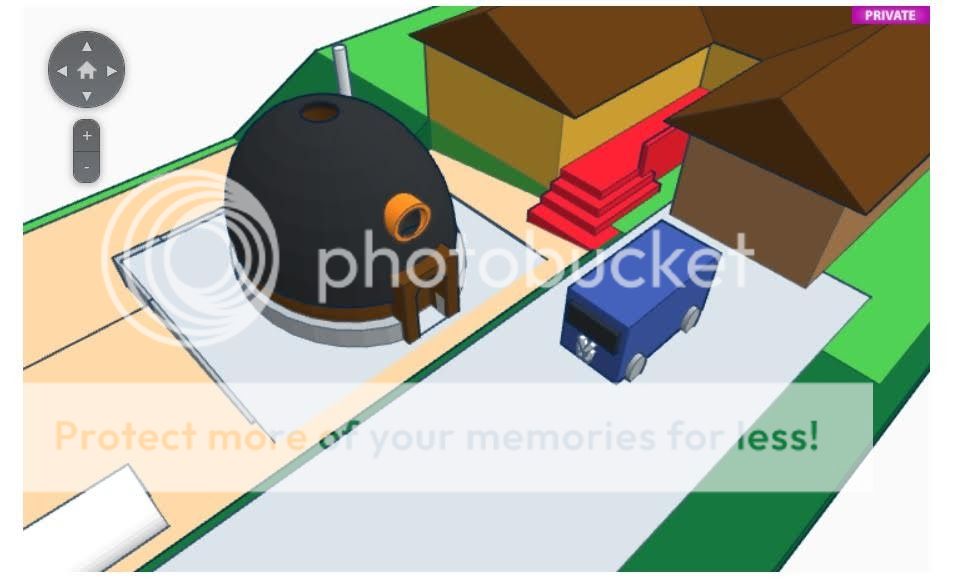
I am planning on building an earth bag house in Ontario. I would build this construction in place of an existing bunkie, on my brothers land. I was hoping to classify the earth bag house as an accessory building. According to the Ontario building code, a permit is not required for an accessory building less than 10m², or 108 ft². My building would have an Interior floor plan of 11.6ft interior diameter. It would not have any plumbing so I would have to rely on the primary building for this service. I would have a small solar panel arrangement to run some small appliances such as a bar fridge, computer, and lights. I could also refill water jugs for cooking and cleaning, and maybe hook up a few rain barrels for a shower. A rocket mass heater will be my primary heat source.

Here are some steps I have been thinking of taking in order to carefully build this earth bag building.

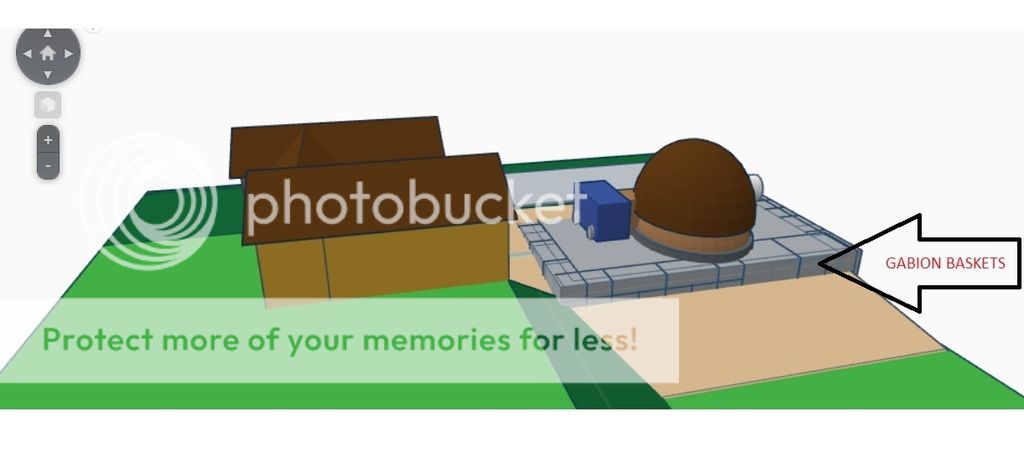
1. I will first have to build a retaining wall to level the building lot. This will also work as an excellent weeping tile system for drainage. I was planing on using gabion baskets filled with rocks for the retaining wall.

2. I would then fill the excavated area inside the retaining wall with gravel and rocks to level the foundation under the earth bag house.

3. I would then dig a 2ft deep trench around as the foundation of the earth bag house, and create a poured concrete foundation wall to start laying the bags behind.

4. I would lay a vapor barrier over the concrete foundation and inside the foundation, and start laying the earth bag walls on the inside of the concrete foundation, to protect the first few rows of bags from moisture.

5. I would fill the earth bags with scoria, and tamp down firmly trying not to crush the scoria, and apply 2 rows of barbed wire between bags.

6. I would also place many wooden cleats every 2 feet or so, in order to create a backing for roof panels, which would be contoured similar to the domed top of the earth house. If I create a cleat grid of 2ft² sections, I could then cut several 2ft² plywood boards to cover the whole upper portion of the dome, I would then shingle over the plywood roof. I hope you get the idea of this, I would also consider arranging the cleats in a geodesic arrangement. I am still working on drawing up a plan for this.

7. I would cob the interior and exterior, and maybe lime plaster over this as well.

8. For the floor inside I would dig down a few feet and pack poly bags filled with perlite and tamp well. I would then add some type of radiant heating above this, and lay a layer of earth crete followed by cob and waterproofing.

9. During this process I would obviously create forms for doors and windows, and I would like to incorporate a door to access my VW Campervan as a mobile bedroom of sorts, mainly used in summer.

10. Install roof and shingles.


Please excuse my basic 3D skills.


That is all I have for now, Please feel free to comment and help me with my ideas, any advice is appreciated.


Thank you kindly.


Posts: 9002
Location: Victoria British Columbia-Canada
706
  • Mark post as helpful
  • send pies
    Number of slices to send:
    Optional 'thank-you' note:
  • Quote
  • Report post to moderator
For insulation, consider filling the bags with sawmill waste, instead of earth. There was a mill in Teeswater when I was there a few years back. I was born in Wingham. The sawdust and bark is lighter. It could be mixed with a small amount of clay slip. I would mix it in July or August, and let it dry before bagging.
 
Steve Harvey
Posts: 217
Location: Ontario
13
  • Mark post as helpful
  • send pies
    Number of slices to send:
    Optional 'thank-you' note:
  • Quote
  • Report post to moderator
Would there be any issue with wood worm or termites in the waste, with that method?

Do you have a link of a build using sawmill waste as fill. It sounds messy and itchy.

Why not use perlite or straw with clay slip instead?
 
Dale Hodgins
Posts: 9002
Location: Victoria British Columbia-Canada
706
  • Mark post as helpful
  • send pies
    Number of slices to send:
    Optional 'thank-you' note:
  • Quote
  • Report post to moderator
There are many homes that employ wood chip and sawdust insulation. The bags could make it structural. Mill waste is free.

Anything that has some insulation value, beats plain dirt.
 
Steve Harvey
Posts: 217
Location: Ontario
13
  • Mark post as helpful
  • send pies
    Number of slices to send:
    Optional 'thank-you' note:
  • Quote
  • Report post to moderator
I was thinking of also filling the bags with a mix of cellulose insulation mixed with a bit of Portland Cement and water. The mix would not be soaked with water but just dampened and mixed well. I want to maximize the insulation value so I don't need to burn too much wood in the winter. I think I would also add a bit of hydrated lime into the mix, and shove some newspaper in the bags at the sides while filling to soak up excess water.

What do you think Dale? I don't think anyone has done anything like this before so I will need to do some small scale testing beforehand.
 
Steve Harvey
Posts: 217
Location: Ontario
13
  • Mark post as helpful
  • send pies
    Number of slices to send:
    Optional 'thank-you' note:
  • Quote
  • Report post to moderator

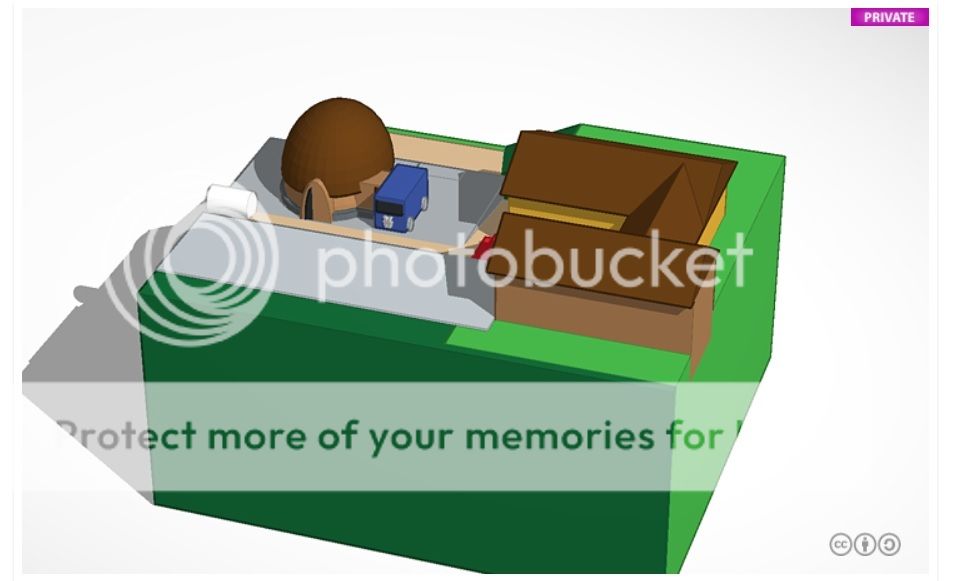
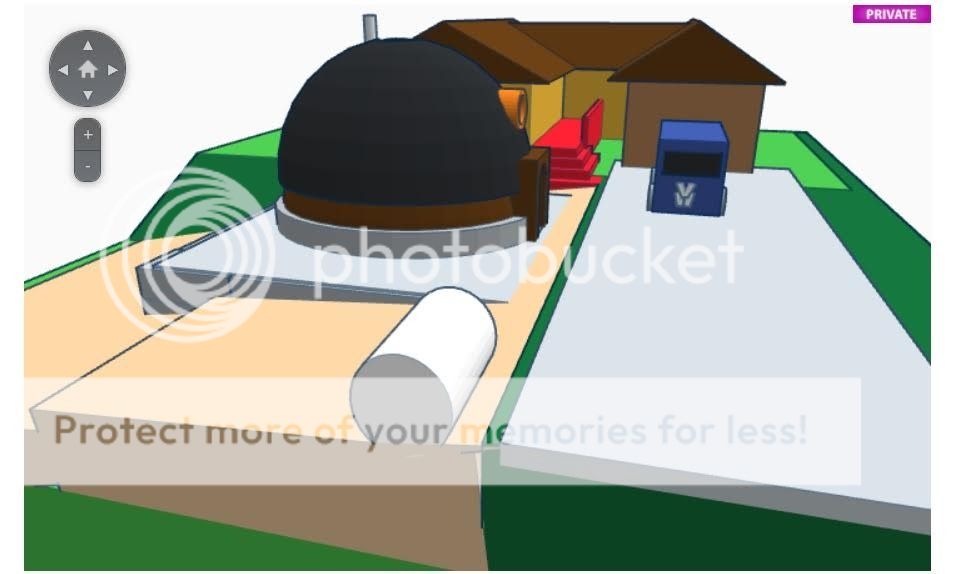
I made some changes to the design after researching zoning bylaws. The earthbag building has to be closer to the primary structure, in order to achieve 50 ft front setback. I will also, when the time comes need to fill out an application proposing to permit a detached accessory building in the front yard. Which should not be an issue because everyone in the area has bunkies/guest cabins in their front yard.

I have also simplified the door design and added a window, skylight, and chimney. I will also have to scrap the van access idea because there would be a lot more work involved with filling Gabion baskets and leveling the building lot for this. I need to make some cuts somewhere to save time and money.


Question: Do you measure front setback from the center line of the road or property line?


Posts: 45
Location: Heart of the Great Lakes in Southern Ontario
11
4
forest garden trees chicken homestead
  • Mark post as helpful
  • send pies
    Number of slices to send:
    Optional 'thank-you' note:
  • Quote
  • Report post to moderator
Hi Steve: I'm a LONGtime Permies Lurker and I can't believe there's anyone else in South Bruce Peninsula besides myself that trolls Permies! I also can't believe Dale's from Wingham. In terms of sawdust, of course you can get cedar sawdust from a lot closer than Wingham--like Liverance's north of Ferndale, ON and in South Bruce Peninsula (Hayes). I have no earth bag experience, but lots of cordwood, some straw bale, and a good bit of plaster experience. Maybe I can be of some use before you're done, 'cause I'm local.
 
Steve Harvey
Posts: 217
Location: Ontario
13
  • Mark post as helpful
  • send pies
    Number of slices to send:
    Optional 'thank-you' note:
  • Quote
  • Report post to moderator

Peter George wrote:Hi Steve: I'm a LONGtime Permies Lurker and I can't believe there's anyone else in South Bruce Peninsula besides myself that trolls Permies! I also can't believe Dale's from Wingham. In terms of sawdust, of course you can get cedar sawdust from a lot closer than Wingham--like Liverance's north of Ferndale, ON and in South Bruce Peninsula (Hayes). I have no earth bag experience, but lots of cordwood, some straw bale, and a good bit of plaster experience. Maybe I can be of some use before you're done, 'cause I'm local.


Hi Peter, The Bruce is a great place, I am moving that way next year from Guelph. I have been taking workshops on natural building in Peterborough, I just went to a plastering workshop this weekend, and I must say I am absolutely fascinated with lime plaster now, it is so much fun to work with. I will definitely need help with plastering near the end of the build, since there will be a lot of area to cover for one person, especially with the short time you have to work with the plaster before it sets up.
 
Dale Hodgins
Posts: 9002
Location: Victoria British Columbia-Canada
706
  • Likes 1
  • Mark post as helpful
  • send pies
    Number of slices to send:
    Optional 'thank-you' note:
  • Quote
  • Report post to moderator
I would favor straw bale, cordwood, and standard stick frame from recycled materials, over any bag system.

Check out papercrete. Seems like you may be reinventing that.
 
Steve Harvey
Posts: 217
Location: Ontario
13
  • Mark post as helpful
  • send pies
    Number of slices to send:
    Optional 'thank-you' note:
  • Quote
  • Report post to moderator

Dale Hodgins wrote:I would favor straw bale, cordwood, and standard stick frame from recycled materials, over any bag system.

Check out papercrete. Seems like you may be reinventing that.


I am familiar with papercrete.

Vermiculite and Cement has been around forever as an insulator, if anything papercrete is absolutely a reinvention of this, and cellulose-vermiculte cement insulation is a reinvention of vermiculite cement, not papercrete.

Here is vermiculite cement fire proof insulation used as a spray on.


The thing I like about the cellulose-vermiculite cement insulation which is similar to papercrete, is that cellulose has a fineness similar to poly-fill, and would act to strengthen and insulate the wall. Vermiculite could be added to create air pockets to better insulate the wall. Papercrete on its own in my mind would be a poor way to insulate the wall, and does not have the same insulating capability as cellulose insulation and vermiculite.


Straw bale and cordwood are nice, but I don't want to live in a square box.


Posts: 617
Location: ontario, canada
15
transportation fungi tiny house
  • Mark post as helpful
  • send pies
    Number of slices to send:
    Optional 'thank-you' note:
  • Quote
  • Report post to moderator
i've used perlite and concrete mixed - but it was in my rocket stove lol.

i stray from vermiculite because it absorbs moisture and has been reported to contain asbestos.

im also from (S.E) Ontario btw.
 
Steve Harvey
Posts: 217
Location: Ontario
13
  • Mark post as helpful
  • send pies
    Number of slices to send:
    Optional 'thank-you' note:
  • Quote
  • Report post to moderator

John McDoodle wrote:i've used perlite and concrete mixed - but it was in my rocket stove lol.

i stray from vermiculite because it absorbs moisture and has been reported to contain asbestos.

im also from (S.E) Ontario btw.


Hey John, Nice to see so many folks around me that are interested in alternative building. I will send you my email John so we can keep in touch and help each other out on our projects. Also vermiculite used to contain asbestos in the 80's and early 90's, but that was just because of one particular mine somewhere in the states, I believe Montana, which also had asbestos where they were mining the vermiculite. They do not use that mine anymore. The particular brand of vermiculite that contained asbestos was called Zonolite. This mine operated since the early 1900's, you can imagine the damage caused to the miners and town residents. Most homeowners don't know what brand of materials were used in their homes, only the builders could know this. So their was a lot of panic which resulted in the removal of a lot vermiculite insulation from peoples attic insulation and other products.
 
Peter George
Posts: 45
Location: Heart of the Great Lakes in Southern Ontario
11
4
forest garden trees chicken homestead
  • Mark post as helpful
  • send pies
    Number of slices to send:
    Optional 'thank-you' note:
  • Quote
  • Report post to moderator
"Straw bale and cordwood are nice, but I don't want to live in a square box."

Ironically, Steve, I live in a cordwood and straw bale house that I built--which is round! Funny.
 
Posts: 120
8
  • Mark post as helpful
  • send pies
    Number of slices to send:
    Optional 'thank-you' note:
  • Quote
  • Report post to moderator
1. I will first have to build a retaining wall to level the building lot. This will also work as an excellent weeping tile system for drainage. I was planing on using gabion baskets filled with rocks for the retaining wall.

You may be able to berm into a slope depending on design, soil composition and drainage mitigation.

2. I would then fill the excavated area inside the retaining wall with gravel and rocks to level the foundation under the earth bag house.

Consider daylighting a French drain while your at it. Or maybe lay in earthtubes or water/septic lines and conduit while its opened up...

3. I would then dig a 2ft deep trench around as the foundation of the earth bag house, and create a poured concrete foundation wall to start laying the bags behind.

Gravelbags and scoriabags make great footers in many soil types and projects.

5. I would fill the earth bags with scoria, and tamp down firmly trying not to crush the scoria, and apply 2 rows of barbed wire between bags.

Much more superior option than mill waste. Exponentially more structural from day one--and as those chips deteriorate. I've filled chipbags, slipchip bags, with and without sawdust when I had a chipper. For curiosity. Nothing to write about except now. Really I just don't see the point to bag wood chips except to feed into my rocket chip hopper, and I still don't like them bagged. Maybe slipped chips in rachel mesh in a nonloadbearing situation makes the most sense, but at that point give me strawbales...a slipchipbag dome is as nutty as a bale dome--imagine having to tell everyone that: "slipchipbag dome"?!. There are better options than those. I won't criticize you for scoriabags as I know how easy they are To work with, how they won't rot, burn, mold, or harbor vermin and insects. How you don't have to wet, mix, slip, and dry the mix, or pick ax your way into a mound. Scoriabags fill themselves. I also know how wonderful they are thermally. If Jay and Dale lived near a pumice or Scoria mine--well they both type as very smart and open minded builders-- who knows they might have a kid stacking bags with them by night too!

6. I would also place many wooden cleats every 2 feet or so, in order to create a backing for roof panels, which would be contoured similar to the domed top of the earth house. If I create a cleat grid of 2ft² sections, I could then cut several 2ft² plywood boards to cover the whole upper portion of the dome, I would then shingle over the plywood roof. I hope you get the idea of this, I would also consider arranging the cleats in a geodesic arrangement. I am still working on drawing up a plan for this.

Obviously easier to just roof a round house, but that just isn't enough fun for ya right? Back to roofed domes: How about a floating roof? Or conical grain bin OR hip roof in the 4-8 sided range. These can get you a porch and shed overhangs where a geo won't. Or pure geo if you want but you better be a good carpenter and shingler because you may not know of a leak for a while. If you do this, I'd consider the synthetic roofing felt instead of the typical tar paper.

8. For the floor inside I would dig down a few feet and pack poly bags filled with perlite and tamp well. I would then add some type of radiant heating above this, and lay a layer of earth crete followed by cob and waterproofing.

Your Scoria is cheaper and won't crush but the perlite will. No need to bag this subfloor. I laid 12" and am happy with my floor warmth.

9. During this process I would obviously create forms for doors and windows, and I would like to incorporate a door to access my VW Campervan as a mobile bedroom of sorts, mainly used in summer.

10. Install roof and shingles.

Ponder this one thoroughly.
 
Steve Harvey
Posts: 217
Location: Ontario
13
  • Mark post as helpful
  • send pies
    Number of slices to send:
    Optional 'thank-you' note:
  • Quote
  • Report post to moderator

1. I will first have to build a retaining wall to level the building lot. This will also work as an excellent weeping tile system for drainage. I was planing on using gabion baskets filled with rocks for the retaining wall.

Christopher Steen:
You may be able to berm into a slope depending on design, soil composition and drainage mitigation.

Answer: This might be possible with this property, but I just don`t want to do it. .5 acre and septic in back yard. The soil is sand on bed rock.


2. I would then fill the excavated area inside the retaining wall with gravel and rocks to level the foundation under the earth bag house.

Christopher Steen:
Consider daylighting a French drain while your at it. Or maybe lay in earthtubes or water/septic lines and conduit while its opened up...

Answer: Yes, I forgot to mention this, if I build the house on gabion baskets it would be a waste of time and money since the soil is sand on bedrock and the gabion baskets would be 6-8 feet high. Plenty of drainage. I am actually considering moving the earthbag behind the house to comply better with zoning regulations, and would require a weeping tile system.


3. I would then dig a 2ft deep trench around as the foundation of the earth bag house, and create a poured concrete foundation wall to start laying the bags behind.

Christopher Steen:
Gravelbags and scoriabags make great footers in many soil types and projects.

Answer: Yes I have thought about this, although I am just worried about critters burrowing between the bags, there are a lot of deer mice in the area, and I would rather have a thick concrete wall keeping them out.


5. I would fill the earth bags with scoria, and tamp down firmly trying not to crush the scoria, and apply 2 rows of barbed wire between bags.

Christopher Steen:
Much more superior option than mill waste. Exponentially more structural from day one--and as those chips deteriorate. I've filled chipbags, slipchip bags, with and without sawdust when I had a chipper. For curiosity. Nothing to write about except now. Really I just don't see the point to bag wood chips except to feed into my rocket chip hopper, and I still don't like them bagged. Maybe slipped chips in rachel mesh in a nonloadbearing situation makes the most sense, but at that point give me strawbales...a woodchipbag dome is crazier than a bale dome--at least a bale dome has structural fibers. Much better options than those. I won't criticize you for scoriabags as I know how easy they are To work with, how they won't rot, burn, mold, or harbor vermin and insects. I also know how wonderful they are thermally. If Jay and Dale lived near a pumice or Scoria mine--well they both type as very smart and open minded builders-- who knows they might have a kid stacking bags with them by night too!

Answer: There is no pumice or scoria mine near me either, so I will be switching my fill to cellulose-vermiculite cement, I got this idea from my old high school art courses, we used to carve relief sculptures out of vermiculite cement, and I think this will make as good an insulation as any. I can always spray on vermiculite cement on the outside of the earthbags, it would probably provide a better scratch coat for lime plaster than cob. maybe mix in some poly fibre in this scratch coat as well.


6. I would also place many wooden cleats every 2 feet or so, in order to create a backing for roof panels, which would be contoured similar to the domed top of the earth house. If I create a cleat grid of 2ft² sections, I could then cut several 2ft² plywood boards to cover the whole upper portion of the dome, I would then shingle over the plywood roof. I hope you get the idea of this, I would also consider arranging the cleats in a geodesic arrangement. I am still working on drawing up a plan for this.

Christopher Steen:
Obviously easier to just roof a round house, but that just isn't enough fun for ya right? How about a floating roof? Or conical grain bin OR hip roof in the 4-8 sided range. Or pure geo if you want but you better be a good carpenter and shingler.

Answer: There are no issues with the cleat idea, in fact they will act as rebar between the bags since they grip into the bags with several large nails. Being located 1 km away from Lake Huron means heavy winds I want the roof to be well secured to the earthbag house. I believe the more cleats securing the roof to the dome the better. The roof is meant to just protect the plaster from excessive rain, but also not fly off with wind, which should not be as big of an issue if placing the earthbag behind the primary structure, as it will block the wind.


8. For the floor inside I would dig down a few feet and pack poly bags filled with perlite and tamp well. I would then add some type of radiant heating above this, and lay a layer of earth crete followed by cob and waterproofing.

Christopher Steen:
Your Scoria is cheaper and won't crush but the perlite will. No need to bag this subfloor. I laid 12" and am happy with my floor warmth.

Answer: Scoria will crush, so I have read. Bagging would be necessary to prevent shifting and act as geotextile under the earthen floor. Plus cob or earthcrete likes to stick to poly bags, I would imagine it would be difficult to lay floor over bare perlite. Scoria may be easier but no scoria near me.


9. During this process I would obviously create forms for doors and windows, and I would like to incorporate a door to access my VW Campervan as a mobile bedroom of sorts, mainly used in summer.

10. Install roof and shingles.

Christopher Steen:
Ponder this one thoroughly.

Answer: ?

 
Joe Vaughn
Posts: 120
8
  • Mark post as helpful
  • send pies
    Number of slices to send:
    Optional 'thank-you' note:
  • Quote
  • Report post to moderator
Answer: There is no pumice or scoria mine near me either, so I will be switching my fill to cellulose-vermiculite cement, I got this idea from my old high school art courses, we used to carve relief sculptures out of vermiculite cement, and I think this will make as good an insulation as any. I can always spray on vermiculite cement on the outside of the earthbags, it would probably provide a better scratch coat for lime plaster than cob. maybe mix in some poly fibre in this scratch coat as well.

Sounds interesting. Would love to hear how tests and costs go. Ratio ideas? Maybe consider testing a denser weaved raschel mesh bags to let it dry if you go heavy on the cellulose (blown-in cellolose?). Or testing a 10% replacement of cement with borax to keep your fill more mold resistant. is a vermiculite-crete without cellulose fill to expensive? I like lightweight cretes, scoriacrete And pumicecrete and epscrete and papercrete have all found appropriate uses in my work but I have never used them in hard tamped applications. A lot of carving on the pumicecrete and epscrete though. If it doesn't test out for the impact and compressive tamping tests, and you want to see your experimental vermiculite-cellulose Crete though then you could always consider forming up for a pour in such a way that your roofing integrates with your formwork.
Since your venturing into alternative insulative bag fill territory, here is another idea you might wanna try testing: including some reground wastestream EPS. I see from a quick google search that Ontario recycles styrofoam and have plants that regrind this material. At $.45/lb it is about a third of the cost of blown in cellulose per pound, and once consolidated by tamping or crete, I'm sure EPS gives you much more R value and bulk per pound, unless you aerate your vermiculite-cellulose-crete mix (doubtful you could tamp at that point if aerated). I am pretty envious as this is a difficult resource to find in most of the states (if anyone knows of any sources I am all ears).


Answer: Scoria will crush, so I have read. Bagging would be necessary to prevent shifting and act as geotextile under the earthen floor. Plus cob or earthcrete likes to stick to poly bags, I would imagine it would be difficult to lay floor over bare perlite. Scoria may be easier but no scoria near me.

I prefer a tamped roadbase subfloor between any pad and insulation to bulk up the mass, especially with radiant tubing, and solidify the mass floor. A threadbare tarp (or plastic if you want vapor/radon barrier) between insulation and flooring keeps fines from filling your insulative voids. Bagging floor insulation seems like unnecessary work. If laying an earthen floor over bagged floor insulation, then I would recommend tamped roadbase subfloor to prevent cracking, as I've seen to many cracked floors from this. If not, then add plenty of straw fiber in your first lift, plenty in your second lift, allowing each to dry completely, and trowel out and press hard the driest thin heavy on cattail earthen finish coat thats workable--burnish well as it dries to minimize cracks. And scoria doesn't crush when tamped, but it crushes when you stomp one piece with bootheel on concrete. This is why it is so wonderful as structural bag fill.


Answer: There are no issues with the cleat idea, in fact they will act as rebar between the bags since they grip into the bags with several large nails. Being located 1 km away from Lake Huron means heavy winds I want the roof to be well secured to the earthbag house. I believe the more cleats securing the roof to the dome the better. The roof is meant to just protect the plaster from excessive rain, but also not fly off with wind, which should not be as big of an issue if placing the earthbag behind the primary structure, as it will block the wind.

My first thought was difficulty and possibly ending up with a funky askewed roof aesthetic. Without any plumbing inside, you could also consider an elastomeric roof paint or synthetic stucco. i know, blasphemy on this forum, but in your climate and with a vermiculite-crete exterior plaster, could be a decent solution as well. As far as protecting the plaster and addressing winds, that is why I suggested a 4-8 sided hip with enough overhangs to give a small porch or shed-like storage (attach to posts at the eave). I am not against your roof idea at all, it was funky enough that I'm responding instead of clocking into work. Just giving my thoughts since you solicited adice.

10.Install roof and shingle.

Christopher Steen:
Ponder this one thoroughly.

Answer: ?

I meant have a good game plan for all the complex miters and curves (going both ways). Like have all your geodesic miters prefabbed before placement, or maybe geodesic connectors (stardome 1 frequency I think it's called), or leave plenty extra sticking out with extra length and figure it out afterwards, or more conical or typical Lancet corbel or geodesic hemispherical dome profile. 1V vs 3V vs freeform roofing. Or two layers of 1/4" ply to bend curves on the roofing--if so unprofiled metal roofing could hit those curves on top. Ways to flash a geodesic vs hips. I could also see poly strapping laid through two courses being handy in securing exterior framing as well. Or a conical interior pole framework, then bags, then exterior framework strapped or bolted thru really simplifying the roofing. You know, it's winter, so ponder this upcoming alternative roof design since there isn't much tradition to draw upon. I like these things, so keep us updated on your progress.
 
Steve Harvey
Posts: 217
Location: Ontario
13
  • Mark post as helpful
  • send pies
    Number of slices to send:
    Optional 'thank-you' note:
  • Quote
  • Report post to moderator
Answer: There is no pumice or scoria mine near me either, so I will be switching my fill to cellulose-vermiculite cement, I got this idea from my old high school art courses, we used to carve relief sculptures out of vermiculite cement, and I think this will make as good an insulation as any. I can always spray on vermiculite cement on the outside of the earthbags, it would probably provide a better scratch coat for lime plaster than cob. maybe mix in some poly fibre in this scratch coat as well.

Christopher Steen:
Sounds interesting. Would love to hear how tests and costs go. Ratio ideas? Maybe consider testing a denser weaved raschel mesh bags to let it dry if you go heavy on the cellulose (blown-in cellolose?). Or testing a 10% replacement of cement with borax to keep your fill more mold resistant. is a vermiculite-crete without cellulose fill to expensive? I like lightweight cretes, scoriacrete And pumicecrete and epscrete and papercrete have all found appropriate uses in my work but I have never used them in hard tamped applications. A lot of carving on the pumicecrete and epscrete though. If it doesn't test out for the impact and compressive tamping tests, and you want to see your experimental vermiculite-cellulose Crete though then you could always consider forming up for a pour in such a way that your roofing integrates with your formwork.

Answer: I don't think those bags will work for me because the material will fall out the larger holes. Poly bags are fine and work well with lime plasters. Ratio mix will be a 50:50 cement to vermiculite, cellulose insulation will vary depending on desired performance. I don't think I will use borax, but may use some lime for preventing mold. Cost wise vermiculite is fairly cheap, cement is like 10 bucs for 50lb bag maybe cheaper in bulk, cellulose is cheap, and yes it will be blown in type. The mix should be on the dryer side, like a semi dry mortar, tamping should hydrate all material well enough to compact them and also leave enough air gaps inside as further insulation.


Answer: There are no issues with the cleat idea, in fact they will act as rebar between the bags since they grip into the bags with several large nails. Being located 1 km away from Lake Huron means heavy winds I want the roof to be well secured to the earthbag house. I believe the more cleats securing the roof to the dome the better. The roof is meant to just protect the plaster from excessive rain, but also not fly off with wind, which should not be as big of an issue if placing the earthbag behind the primary structure, as it will block the wind.

Christopher Steen:
My first thought was difficulty and possibly ending up with a funky askewed roof aesthetic. Without any plumbing inside, you could also consider an elastomeric roof paint or synthetic stucco. i know, blasphemy on this forum, but in your climate and with a vermiculite-crete exterior plaster, could be a decent solution as well. I am not against your roof idea at all, it was funky enough that I'm responding instead of clocking into work. Just giving my thoughts since you asked for some.

Answer:
My plaster is water proof, however, in order to avoid having to reapply waterproofing agents like wax over the plaster every year, A roof will protect it from rain and snow. Absolutely no bandaid roof paint or synthetic anythings on this one.


Answer: Scoria will crush, so I have read. Bagging would be necessary to prevent shifting and act as geotextile under the earthen floor. Plus cob or earthcrete likes to stick to poly bags, I would imagine it would be difficult to lay floor over bare perlite. Scoria may be easier but no scoria near me.

I prefer a tamped roadbase subfloor between any pad and insulation to bulk up the mass, especially with radiant tubing.

10.Install roof and shingle.

Christopher Steen:
Ponder this one thoroughly.

Answer: ?

Christopher Steen:
I meant have a good game plan for all the complex miters and curves (going both ways). Like have all your geodesic miters prefabbed before placement, or maybe geodesic connectors (stardome 1 frequency I think it's called), or leave plenty extra sticking out with extra length and figure it out afterwards, or more conical or typical Lancet corbel or geodesic hemispherical dome profile. 1V vs 3V vs freeform roofing. Or two layers of 1/4" ply to bend curves on the roofing--if so unprofiled metal roofing could hit those curves on top. Ways to flash a geodesic vs hips. I could also see poly strapping laid through two courses being handy in securing exterior framing as well. Or a conical interior pole framework, then bags, then exterior framework strapped or bolted thru really simplifying the roofing. You know, it's winter, so ponder this upcoming alternative roof design since there isn't much tradition to draw upon. I like these things, so keep us updated on your progress.


Answer: I think I will just use metal to wood roofing screws, and attach plastic or metal corrugated roof right to the wood cleats.


Joe Vaughn
Posts: 120
8
  • Mark post as helpful
  • send pies
    Number of slices to send:
    Optional 'thank-you' note:
  • Quote
  • Report post to moderator
Steve Harvey: "There is no pumice or scoria mine near me either, so I will be switching my fill to cellulose-vermiculite cement, I got this idea from my old high school art courses, we used to carve relief sculptures out of vermiculite cement, and I think this will make as good an insulation as any. I can always spray on vermiculite cement on the outside of the earthbags, it would probably provide a better scratch coat for lime plaster than cob. maybe mix in some poly fibre in this scratch coat as well."

Christopher Steen: "Sounds interesting. Would love to hear how tests and costs go. Ratio ideas? Maybe consider testing a denser weaved raschel mesh bags to let it dry if you go heavy on the cellulose (blown-in cellolose?). Or testing a 10% replacement of cement with borax to keep your fill more mold resistant. is a vermiculite-crete without cellulose fill to expensive? I like lightweight cretes, scoriacrete And pumicecrete and epscrete and papercrete have all found appropriate uses in my work but I have never used them in hard tamped applications. A lot of carving on the pumicecrete and epscrete though. If it doesn't test out for the impact and compressive tamping tests, and you want to see your experimental vermiculite-cellulose Crete though then you could always consider forming up for a pour in such a way that your roofing integrates with your formwork."

Steve: "I don't think those bags will work for me because the material will fall out the larger holes. Poly bags are fine and work well with lime plasters. Ratio mix will be a 50:50 cement to vermiculite, cellulose insulation will vary depending on desired performance. I don't think I will use borax, but may use some lime for preventing mold. Cost wise vermiculite is fairly cheap, cement is like 10 bucs for 50lb bag maybe cheaper in bulk, cellulose is cheap, and yes it will be blown in type. The mix should be on the dryer side, like a semi dry mortar, tamping should hydrate all material well enough to compact them and also leave enough air gaps inside for a insulation."

Christopher: "I'd like to suggest that you might try a dozen or more tests this winter before you go out by bulk quantities. I suggested *Denser weaved* raschel bags if you can find them, because I would not put papercrete in an earthbag--too long to dry. Lime in a papercrete plaster makes sense because there is carbon dioxide exchange at those thicknesses. Borax replacing a 10% by volume of portland cement has been tested and shown in engineering papers to not reduce overall performance (compressive strengths mainly noted) of concretes by much. It seems to me that more borax (already included in blown in cellulose as a fire and mold retardant) would be more appropriate mold retardant when mixed with hydrophillic cement since lime won't carbonate at those thicknesses, and lime would be best used in more effective and effecient thicknesses and applications. However, concrete aggregates will produce a completely different animal than a 50:50 cement:vermiculite (dare I say near foamed cement mix at typical mixing rates and application), wherein your mix while insulative, easily molded (and pumpable at typical usage), I foresee this mix better suited to pouring and bulking up application to a ferrocement than a tamped bag fill. There is one caveat in my thoughts: if you were to have all your form work ready, and have enough hands on deck so that you could mix, fill, lay, and tamp all your bagwork in one day, wherein tamping upper rows does not excessively destroy the tender budding newly growing cement microcrystalline dendrite growths (the stuff that makes cement hard), then this could work with a wonderful result if mixed with a cement set retarder additive (don't skimp on the ratio due to cost) and mixed with a LARGE high torque tow mixer (this should probably be stationary for your logistics) to blend the cellulose and portland and borax and additive first then utilizing the vermiculite to dry up the mix enough to a point that when the bags are laid there isn't an excessive squish factor anywhere on the dome (mainly the bottom rows, around door and window openings, and the beginning of the real corbel rows to watch out for). Thankfully the small size of this dome is not structurally demanding or time consuming to bag up, but it is nice to be able to take time to check that everything is proper in relation to your compass and that all your window and door openings are true with a nice reveal and that all your roof cleats are where you want them. Please meditate on how tamping on uncured portland permantly damages possible dendrite growth, and that even tamping on fully cured rows of vermiculite-cellulose-crete will smash bags and dendrite growth and insulative values. If you are getting bulk yards of vermiculite (or cubic meters, trailer loads, dump truck, etc. from a mine or landscaping yard or whatever) that is cheaper than bagged vermiculite and is cost effective, then why not just carefully stack them and wrap a few layers of stucco netting before your stucco? Logistics, cost, environmental impact, not having decomposable organic matter in hydrophillic cement paste, insulation value all seem to favor that, even if it requires formwork inside of the dome. That form work could be temporary and reused outside as your roof framing, or if designed aesthetically, left in place to attach your roof framing to from the outside. Strength wise, a solid reinforced plaster skin on both sides of even shape-shifting vermiculite-bags, especially with a strong dome shape at your small size, is nothing to sneeze at structurally.
As far as your remark about "The mix should be on the dryer side, like a semi dry mortar, tamping should hydrate all material well enough to compact them and also leave enough air gaps inside for a insulation"--you understand the dry mix importance, but don't think about relying on tamping to hydrate or blend your binder. If you want your bag fill compacted as well as mechanically bound by binder it should all be mixed. As far as insulative air gaps once you mix in that rich (depending on your cellulose ratio) binder content and tamp it, don't think that your insulation value will be close to pure vermiculite or fluffed up cellulouse. Thankfully you have the thickness of earthbags working for you. Loose vermiculite will be your best r-value by far. Is it worth the cost and effort of mixing in portland just to put vermiculite and cellulose it in bags? To me it seems the bags are enough and best for a simple dome with a structural skin, and that mixing a funky cool insulative crete is best if you want to do an interesting shape like a groin vault...
All this isn't to say your 10' diameter dome won't be strong if you just do a row or few a day like I assume is your original plan thus far, but please know that tamping on yesterdays or last weeks work at those stated mix ratios will crush dendrite growth and insulation value? Or put another way, if you are going to take more than a day to tamp on bags with those types of insulative fill, why add portland inside if it robs your insulation value for questionable structural value? That same portland cement can be used much better as a structural plaster skin, wether its traditional stucco, ferrocement, or vermiculite-crete plaster.


Steve: "There are no issues with the cleat idea, in fact they will act as rebar between the bags since they grip into the bags with several large nails. Being located 1 km away from Lake Huron means heavy winds I want the roof to be well secured to the earthbag house. I believe the more cleats securing the roof to the dome the better. The roof is meant to just protect the plaster from excessive rain, but also not fly off with wind, which should not be as big of an issue if placing the earthbag behind the primary structure, as it will block the wind."

Christopher (EDITED for future readers wanting more info): "My first thought was difficulty in clean carpentry lines and possibly ending up with a funky askewed roof aesthetic. Without any plumbing inside or shower generating excessive indoor humidity, you could also consider an elastomeric roof paint, synthetic stucco, or real ferrocement coating maybe topped with waterglass (.4 water : 1 portland : 2 sand) which when paired with an indoor clay content of earthen plaster/floor, would keep your bag fill very dry. i know, blasphemy on this forum to speak of synethic or non-breathable wall assemblies, but in your rainy and freeze thaw climate and with a hydrophillic vermiculite-crete exterior plaster, this could be a decent solution for someone if they chose an exposed plaster roof aesthetic. I am not against your roof idea at all, it was funky enough that I'm responding instead of clocking into work. Just giving my thoughts since you welcomed solicited advice."

Steve: "My plaster is water proof, however, in order to avoid having to reapply waterproofing agents like wax over the plaster every year, A roof will protect it from rain and snow. Absolutely no bandaid roof paint or synthetic anythings on this one."

Christopher: " If your exterior plaster is 50:50 vermiculite:cement, well it is pretty rich but not gonna be waterproof as is with the vermiculite aggregates. 2 sand: 1 portland (ferrocement) is considered pretty waterproof when water content is .4 to portland, but cement will always be hydrophillic. What happens with freeze thaw cycles. Wax is like an exterior bandaid, it melts and wears off, while something like waterglass is like getting stitches; a great waterproofer that's breathable and permanent (by far my preference). Quality elastomerics and other coatings like graco are just bomber in the durability department, and although not breathable can be a component in a well designed wall system like the above stated example with interior earthen plaster with all those clay platelets moderating indoor humidity and wall assembly moisture. For someone in a wetter climate wanting a dome (or someone wanting to cover an exterior dome, vault, wall, slab) an appropriate and quality coating is no more a band aid than a second roof system in order to push a dome comfortably into a wetter freeze-thaw climate than where domes originally excelled. For example, a quality ferrocement vault work topped with waterglass or elastomeric like graco should last way longer than the highest quality galvanized metal quonset (let alone shingles) in the face of many different destructive forces. Portland cement is synthetic, just like that paint on the metal roof, asphalt shingles, and misprint rice bags. It's about how well something is used."
 
Steve Harvey
Posts: 217
Location: Ontario
13
  • Mark post as helpful
  • send pies
    Number of slices to send:
    Optional 'thank-you' note:
  • Quote
  • Report post to moderator

Christopher Steen wrote:

Steve: "My plaster is water proof, however, in order to avoid having to reapply waterproofing agents like wax over the plaster every year, A roof will protect it from rain and snow. Absolutely no bandaid roof paint or synthetic anythings on this one."

Christopher: " If your exterior plaster is 50:50 vermiculite:cement, well it is pretty rich but not gonna be waterproof as is with the vermiculite aggregates. 2 sand: 1 portland (ferrocement) is considered pretty waterproof when water content is .4 to portland, but cement will always be hydrophillic. What happens with freeze thaw cycles. Wax is like an exterior bandaid, it melts and wears off, while something like waterglass is like getting stitches; a great waterproofer that's breathable and permanent (by far my preference). Quality elastomerics and other coatings like graco are just bomber in the durability department, and although not breathable can be a component in a well designed wall system like the above stated example with interior earthen plaster with all those clay platelets moderating indoor humidity and wall assembly moisture. For someone in a wetter climate wanting a dome (or someone wanting to cover an exterior dome, vault, wall, slab) an appropriate and quality coating is no more a band aid than a second roof system in order to push a dome comfortably into a wetter freeze-thaw climate than where domes originally excelled. For example, a quality ferrocement vault work topped with waterglass or elastomeric like graco should last way longer than the highest quality galvanized metal quonset (let alone shingles) in the face of many different destructive forces. Portland cement is synthetic, just like that paint on the metal roof, asphalt shingles, and misprint rice bags. It's about how well something is used."


I never said the exterior plaster was going to be 50:50 vermiculite:cement, I said that would be my bag fill. My exterior plaster would be sprayed on vermiculite cement finished with Tadelakt.
 
Joe Vaughn
Posts: 120
8
  • Mark post as helpful
  • send pies
    Number of slices to send:
    Optional 'thank-you' note:
  • Quote
  • Report post to moderator
Keep us updated, would love to see how different insulative mixes test out. I'm guessing that weighing each bag different fill should closely relate to their r values.
I'd bet that vermiculite or cellulose or wood chip fill would be just fine since structurally it's a low force 10'er (might want to tie the rows together as you lay them) and you're planning on oiling and roofing your lime plaster. I just get nervous from seeing and hearing about failed bale domes and papercrete domes and leaking geodesics and saturated bale walls. Organic bag fill in domes is unsettling to me but I live next to Scoria and pumice mines. Just flash those seams and plan on a way to nail on some hardware cloth at the bottom of the roof to keep mice, birds, wasps out.
P.s. I always assumed that the max square footage below mandatory building code/permit was the exterior footprint for most jurisdictions. Hope yours isn't cause it's such a nice area and this is an interesting project.
 
Steve Harvey
Posts: 217
Location: Ontario
13
  • Mark post as helpful
  • send pies
    Number of slices to send:
    Optional 'thank-you' note:
  • Quote
  • Report post to moderator
ummmm it doesn't really say anything in the zoning bylaw about this, I just figured it was interior ft² because exterior would be stupid.
 
Peter George
Posts: 45
Location: Heart of the Great Lakes in Southern Ontario
11
4
forest garden trees chicken homestead
  • Mark post as helpful
  • send pies
    Number of slices to send:
    Optional 'thank-you' note:
  • Quote
  • Report post to moderator
I believe the code assumes exterior with the wall being a "wafer thin shell." I could be wrong--check with an official somewhere (else?). For an outbuilding under the 100 sq. ft./10 m. sq. parameters, they won't really care. If it's round, they're likely not going to bother doing the math and just take your word for it if you're close.
 
Steve Harvey
Posts: 217
Location: Ontario
13
  • Mark post as helpful
  • send pies
    Number of slices to send:
    Optional 'thank-you' note:
  • Quote
  • Report post to moderator
You are probably right, the zoning bylaw says area of 108 ft². I just figured that was floor area. I could get a permit to build larger.
 
Steve Harvey
Posts: 217
Location: Ontario
13
  • Mark post as helpful
  • send pies
    Number of slices to send:
    Optional 'thank-you' note:
  • Quote
  • Report post to moderator
Looks like someone near me with the same zoning, R2 resort residential, applied for a permit for a guest cabin 489 ft² and 9 ft from the front property line. looks like I should be able to get mine permitted as long as they are ok with the engineering of the structure.
 
pollinator
Posts: 1481
Location: Vancouver Island
60
  • Mark post as helpful
  • send pies
    Number of slices to send:
    Optional 'thank-you' note:
  • Quote
  • Report post to moderator

Steve Harvey wrote:
Hey folks, Steve here.

I am planning on building an earth bag house in Ontario. I would build this construction in place of an existing bunkie, on my brothers land. I was hoping to classify the earth bag house as an accessory building. According to the Ontario building code, a permit is not required for an accessory building less than 10m², or 108 ft².


Cool, I am planning to aquire land so that I can plan on building an earthbag house on Vancouver Island. The building code here (for "farms") is that any building (of any size) can be an accessory building provided (I can't remember the exact phrase) it is not occupied a great percent of the time. (that is it can not be the house you live in.) I think it could be a sleeping house, or a cook house and be ok... but not a sleeping house with a kitchen In my case I am thinking - bathroom in one building (outhouse may be separate again) - cookhouse in another and a sleep house for sleep only... we'll see.


Here are some steps I have been thinking of taking in order to carefully build this earth bag building.

3. I would then dig a 2ft deep trench around as the foundation of the earth bag house, and create a poured concrete foundation wall to start laying the bags behind.


I am hoping to not use any concrete on the basis it is a water magnet and it is not friendly to earth. These houses have been built with no concrete and withstood earth quake and hurricane and still managed to feel dry inside. (drier than similar earthbag houses in the same area with concrete foundations)

Please note: the above is more opinion on my part and a concrete foundation will work too. I would suggest lots of air flow in this (or any) lived in space. Though you are working in a cooler part of the country than I am.


6. I would also place many wooden cleats every 2 feet or so, in order to create a backing for roof panels, which would be contoured similar to the domed top of the earth house. If I create a cleat grid of 2ft² sections, I could then cut several 2ft² plywood boards to cover the whole upper portion of the dome, I would then shingle over the plywood roof. I hope you get the idea of this, I would also consider arranging the cleats in a geodesic arrangement. I am still working on drawing up a plan for this.


This part of your plans are of the most interest to me. Absolutely I would use some kind of roof. The bare dome is only good in the desert. I had in fact given up on any kind of domed roof and have been planning either a live or steel roof in low slope shed form. But this has given me pause to rethink. It may be more difficult to shingle with the centre being the most difficult.
 
Posts: 1
  • Mark post as helpful
  • send pies
    Number of slices to send:
    Optional 'thank-you' note:
  • Quote
  • Report post to moderator
Hey. I've been reading up on earth bag construction for the better part of the year, and really want some real world experience. I'm willing to volunteer my time to learn the process! Hell I'll even volunteer my boyfriend's time -he'll be thrilled I have no doubt lol! It would have to be on weekends as we both work full time during the week, but we've been looking for a project to do together, and learning something like this firsthand would be an amazing experience that we could use later in life. We're both in Walkerton, and hard workers. I make car parts in a factory and he works at a sawmill in Elmwood.
Let me know if you could use the extra hands!
 
  • Likes 1
  • Mark post as helpful
  • send pies
    Number of slices to send:
    Optional 'thank-you' note:
  • Quote
  • Report post to moderator
I'm building with cob up on Manitoulin! Nice to see someone else in Ontario planning a build :)
 
Posts: 17
Location: Ontario, Canada
  • Likes 1
  • Mark post as helpful
  • send pies
    Number of slices to send:
    Optional 'thank-you' note:
  • Quote
  • Report post to moderator
Hi Steve.  Since it’s a few years on, I was wondering how the project has gone.  Could you give an update?

I’m considering a similar project in NE Ontario.
 
I have begun to write a book. I already have all the page numbers done! And one tiny ad:
A rocket mass heater heats your home with one tenth the wood of a conventional wood stove
http://woodheat.net
reply
    Bookmark Topic Watch Topic
  • New Topic