• Post Reply Bookmark Topic Watch Topic
  • New Topic
permaculture forums growies critters building homesteading energy monies kitchen purity ungarbage community wilderness fiber arts art permaculture artisans regional education skip experiences global resources cider press projects digital market permies.com pie forums private forums all forums
this forum made possible by our volunteer staff, including ...
master stewards:
  • Nancy Reading
  • Carla Burke
  • r ranson
  • John F Dean
  • paul wheaton
  • Pearl Sutton
stewards:
  • Jay Angler
  • Liv Smith
  • Leigh Tate
master gardeners:
  • Christopher Weeks
  • Timothy Norton
gardeners:
  • thomas rubino
  • Jeremy VanGelder
  • Maieshe Ljin

Please help me keep these cuttings (and my sanity) alive!

 
pollinator
Posts: 278
Location: Italian Alps, Zone 8
134
hugelkultur duck forest garden fungi foraging chicken food preservation homestead
  • Likes 8
  • Mark post as helpful
  • send pies
    Number of slices to send:
    Optional 'thank-you' note:
  • Quote
  • Report post to moderator
Hi everyone,

As some of you may already be aware, due to the Covid-19 lockdown we have been confined to our gardenless third floor appartement for these past 2 weeks, and will very likely be so for at least another month.
Although we have our recently purchased property with a large garden and some forest, we are not allowed to travel to it. The government has also banned people from going out to walk in the forest or parcs, and we are only to go out to go to the supermarket (which is literally across the street from us), or to go to the doctor/ pharmacy. As you can imagine, the cabin fever is getting pretty real, and I dread the long month of confinement that is still ahead of us. I really miss our garden, but have been coping by doing various little gardening experiments on our window sills and little balcony with whatever seed and potting material I had lying around the house (can’t go out to buy them).

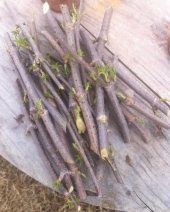
I was speaking over the phone with some friends of ours that are local biofarmers, about how I missed going out into the garden, and how I was going to miss out on taking cuttings from the berries this years to try my hand at propagating them via cuttings for the first time. Yesterday, when delivering the fresh veggies we bought from them, our friends, bless their hearts, also delivered a pile of cuttings from their ribes and elderberries for me to have some fun with. I had not expected this, and thus am not really prepared! Watching things grow on the balcony has been one of the things calming me down and giving me something to look forward to. So I’d love to give it my all to keep these babies alive and prosperous. I tried cutting and planting them to the best of my limited knowledge, and would love your input to help me improve my setup, or correct my mistakes.

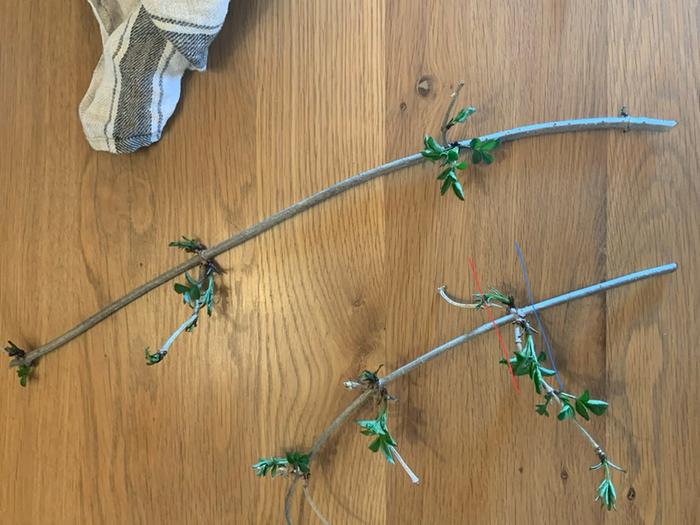
A few of the Ribes were bare root suckers, so I just planted those in a pot. One of the plants had some very long shoots, which I decided to cut as I established that the sap-flow hadn’t started yet. I decided these shoots into two cuttings to try and propagate as well. On one of the cuttings I wasn’t exactly sure how deep I should burry it. (Check the picture) Do I burry it so that the first buds with the side branch are also covered (red line), or do I leave them above ground (blue line).The other cuttings had more buds that were easier to burry.

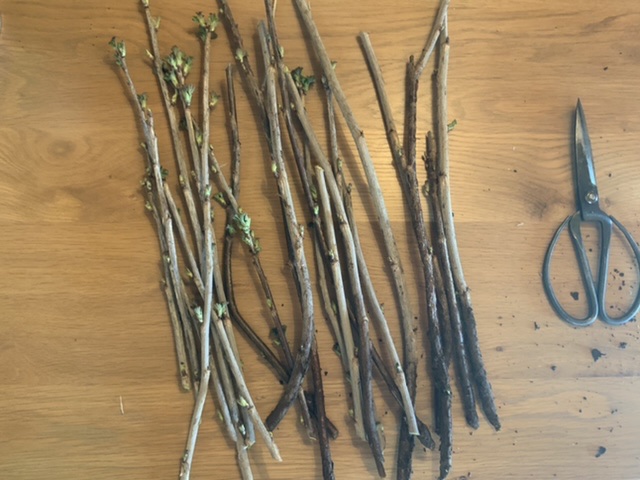
I cut the elderberry long shoots into smaller cuttings, so that each cutting had about 4-6 buds on them. I buried 2 to 3 buds and left the rest above ground. I buried them in regular potting soil, because it was all I have.
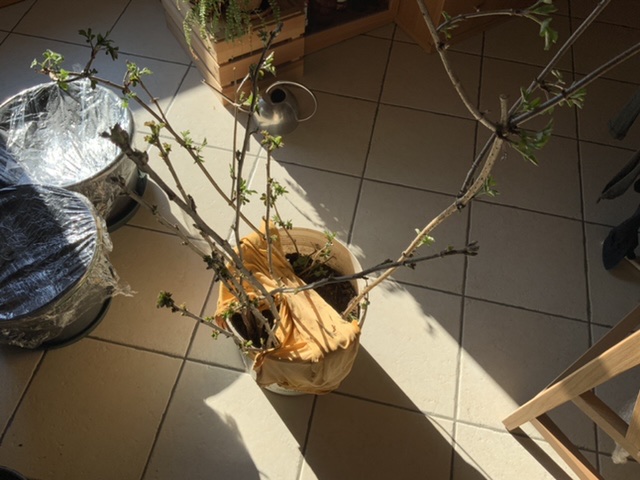
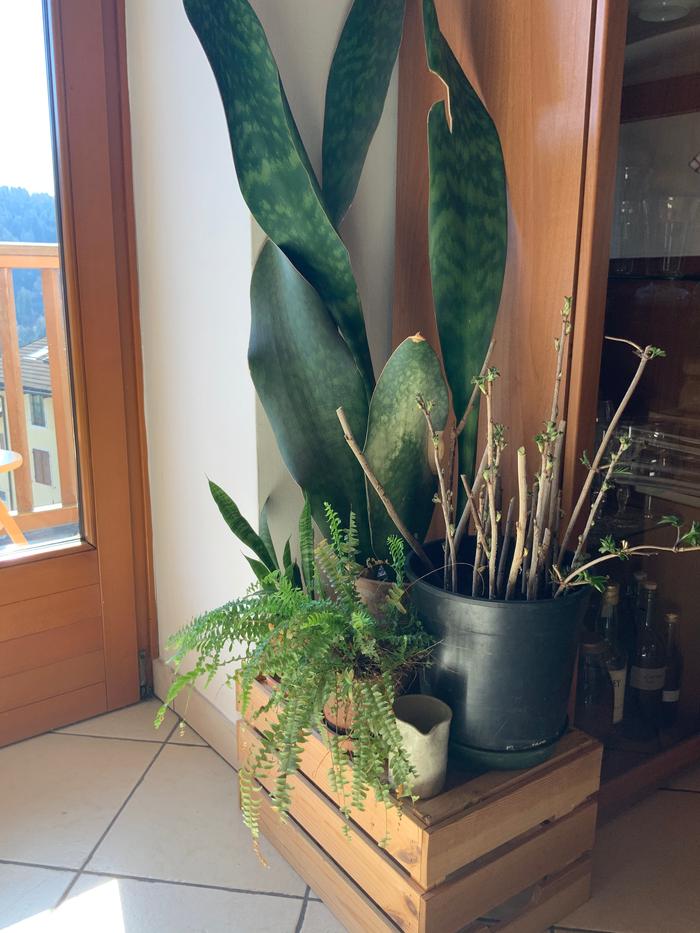
I put the pot inside on a warm spot that doesn’t have direct sunlight, but still is a light spot in the house. Should I leave them here or move them to a darker/ cooler spot in the house?

I don’t have any products that could help with the root development. Are there any house-hold products I could use to stimulate root-growth and to give extra fertiliser to my bare rooted ribes plants? Could I make a tea of basic ingredients I might have at home?

Thanks for your help!
3AE0F572-E3C1-4FDD-A901-61E65CD81BD3.jpeg
How I got the cuttings. A few of the ribes were naked-rooted suckers. The elderberry were long cuttings.
665585C9-B1FF-4EFC-B707-6B9E6BADFF1C.jpeg
How deep should I bury this cutting. Up to the blue line or up to the red?
9D3CCE69-AE72-401A-9304-2D858CDD7DAA.jpeg
The elderberry cuttings ready to be planted
618E0CEF-5DD1-4D5A-95C3-A80E7B848A35.jpeg
The pot in the current spot I picked out for them. No direct sunlight, but reflected light from the balcony window
8E0D4FDD-52F5-46BC-954A-83BCAEB3F7A3.jpeg
The naked-roots Ribes planted in the back, with some other experiments around it.
 
pollinator
Posts: 888
Location: 6a
283
hugelkultur dog forest garden trees cooking woodworking
  • Likes 6
  • Mark post as helpful
  • send pies
    Number of slices to send:
    Optional 'thank-you' note:
  • Quote
  • Report post to moderator
S.Bard,

I feel for you.  At least I can go outside.  Alternate rooting hormones you can look into Aspirin, Raw Honey, Cinnamon, and Apple Cider vinegar.  I'm guessing you don't have access to willow.

Hang tough and Stay safe.

Regards, Scott
 
S. Bard
pollinator
Posts: 278
Location: Italian Alps, Zone 8
134
hugelkultur duck forest garden fungi foraging chicken food preservation homestead
  • Likes 1
  • Mark post as helpful
  • send pies
    Number of slices to send:
    Optional 'thank-you' note:
  • Quote
  • Report post to moderator
Thanks Scott!
Unfortunately no access to willow. I do have honey, apple cider vinegar and cinnamon!

Any thoughts on if I could make a compost tea out of spinach (the stems and roots) and beet leaves that could give some nutrients to the bare-root plants?
Maybe some other vegetables/ kitchen scraps?
 
Scott Foster
pollinator
Posts: 888
Location: 6a
283
hugelkultur dog forest garden trees cooking woodworking
  • Likes 1
  • Mark post as helpful
  • send pies
    Number of slices to send:
    Optional 'thank-you' note:
  • Quote
  • Report post to moderator
I don't do much with composting teas.  Maybe a pro will chime in.

This method for kitchen composting in a ball jar looks pretty easy. I say try it with what you have.

Kitchen Compost in a Ball Jar
 
S. Bard
pollinator
Posts: 278
Location: Italian Alps, Zone 8
134
hugelkultur duck forest garden fungi foraging chicken food preservation homestead
  • Mark post as helpful
  • send pies
    Number of slices to send:
    Optional 'thank-you' note:
  • Quote
  • Report post to moderator
Hi Scott,

I just looked into the alternative rooting hormones like the honey and cinnamon. In all cases they say to stick the cuttings into the honey / cinnamon powder before planting. I unfortunately already planted mine. Would it be a good idea to pull the cuttings back out, rinse the bottom part, apply the honey/ cinnamon and replant? Or is it better not to disturb the cuttings once planted? Would it do any good to apply the rooting hormone by diluting in water and just watering the cuttings with it?
 
Scott Foster
pollinator
Posts: 888
Location: 6a
283
hugelkultur dog forest garden trees cooking woodworking
  • Likes 2
  • Mark post as helpful
  • send pies
    Number of slices to send:
    Optional 'thank-you' note:
  • Quote
  • Report post to moderator

S. Bard wrote:Hi Scott,

I just looked into the alternative rooting hormones like the honey and cinnamon. In all cases they say to stick the cuttings into the honey / cinnamon powder before planting. I unfortunately already planted mine. Would it be a good idea to pull the cuttings back out, rinse the bottom part, apply the honey/ cinnamon and replant? Or is it better not to disturb the cuttings once planted? Would it do any good to apply the rooting hormone by diluting in water and just watering the cuttings with it?


If it were me I'd leave as is.  If you just planted the cuttings I don't think it would hurt them to pull them out, scarify, slather with honey and cinnamon and replant. , If the cuttings have already pushed roots I'd leave them alone and proceed with just your compost tea.  Or, get crazy and experiment.  
 
S. Bard
pollinator
Posts: 278
Location: Italian Alps, Zone 8
134
hugelkultur duck forest garden fungi foraging chicken food preservation homestead
  • Likes 2
  • Mark post as helpful
  • send pies
    Number of slices to send:
    Optional 'thank-you' note:
  • Quote
  • Report post to moderator
I’ve just planted them this morning.
What do you mean with ‘scarify’? This is my first time working with cuttings, so I really don’t have much of a clue.
I also burried buds that already started producing leaves. Should I have removed the leaves?
 
Scott Foster
pollinator
Posts: 888
Location: 6a
283
hugelkultur dog forest garden trees cooking woodworking
  • Likes 4
  • Mark post as helpful
  • send pies
    Number of slices to send:
    Optional 'thank-you' note:
  • Quote
  • Report post to moderator
Check out this article:

Scarification is just scraping the area at the bottom of the cutting before applying the rooting hormone.   I would remove the leaves or only leave a couple at the top.  Check out this article from Purdue University.

Purdue Propagation
 
S. Bard
pollinator
Posts: 278
Location: Italian Alps, Zone 8
134
hugelkultur duck forest garden fungi foraging chicken food preservation homestead
  • Likes 2
  • Mark post as helpful
  • send pies
    Number of slices to send:
    Optional 'thank-you' note:
  • Quote
  • Report post to moderator
Thanks for the article! Looks like I have a lot to learn still!
I didn’t remove the leaves and didn’t scarify the bottom. I also didn’t use a specific depth for planting the cuttings, I just pushed them into the soil deep enough to cover 2 buds, which resulted in the cuttings being planted at varying depths.
I apparently also need to find enough transparent plastic to cover them with so the humidity remains high enough. I will have to get a bit crafty with the small amount of shopping bags I have lying around.
 
pollinator
Posts: 1596
Location: Root, New York
318
forest garden foraging trees fiber arts building medical herbs
  • Likes 5
  • Mark post as helpful
  • send pies
    Number of slices to send:
    Optional 'thank-you' note:
  • Quote
  • Report post to moderator
yeah honey is a good substitute for rooting hormone, but you really dont need to use anything.

water is what you really need for roots, humidity and the the right, moist- not soggy -medium.

you also do not need to worry about any nutrients for the plant while it's rooting. at this point you dont need forward growth of leaves and the plant, just roots. actually any forward growth of the plant detracts from the formation of the new roots. this why you strip off the leaves, so the plant focusses on roots not leaves, and also the leaves need moisture. light spraying once a day with a fine mist, or spray bottle for a few seconds can also help, if you dont cover them with plastic. covering them with plastic though is better, to keep the humidity level much higher than your indoor conditions.

imo there's too many cuttings in that pot, they should have a bit more room, though...well it may be ok. i would personally spread them out further., if you have more pots.
you are not wanting to encourage any funk and places where the stems touch, or tight spaces may encourage bad funks.

i also see that all those cuttings could be cut down further, you could get more cuttings by cutting some of those in half.

the exact specifics of how deep and etc...well this isnt that important, except to say the more of the plant thats under the surface the better, mostly because under the surface of the soil it's moist.
this is why some people do cuttings horizontally, where the entire cutting is underneath some moist (not soggy!) medium.

so one way to do cuttings, depending on that you have some stuff to do so...is in plastic storage containers, like big tupperware or small plastic storage box with lid....or even a large plastic ziplock....then place the cutting HORIZONTALLY under some sphagum moss or in peat or other sterile seed starting soil (non soil...you know, seed starting mix). in this way sometimes you can even get multiple sites where roots come out, so that after being in the plastic container for ...ooo probably a month ish...the cuttings form multiple roots and could be cut into 2 or 3 pieces after the roots formed.

with certain things this can even be done in the fridge...though certain things wouldnt like the cool temps...but some do.

but yeah thats an alternate way to do cuttings...in tupperware or other covered plastic containers...again MOIST not soggy...and the ideal medium for that being moss, but other mediums will work...sand, perlite...i think some people use, etc....

otherwise...you could look into wrapping your pots with saran wrap or plastic baggies...to keep the cuttings in the right high humidity
 
leila hamaya
pollinator
Posts: 1596
Location: Root, New York
318
forest garden foraging trees fiber arts building medical herbs
  • Mark post as helpful
  • send pies
    Number of slices to send:
    Optional 'thank-you' note:
  • Quote
  • Report post to moderator
and yeah scarify is just slash it up a bit, cut into the bottom with a knife or tool.... some people have very precise methods that they swear by, but really it doesnt need to be precise. i cant say this way is best, but for me i often do it with my fingernail ...quite randomly and not precise, mostly because i will be too lazy to go find scissors! but yeah that works for me...quickly rough it up with my fingernails...though theres a lot of various ways to do.

times when i do go get a blade or scissors...i tend to like...grate of a few spots...like you would while grated the skin off a carrot...just a bit in a few spots in the bottom.
 
S. Bard
pollinator
Posts: 278
Location: Italian Alps, Zone 8
134
hugelkultur duck forest garden fungi foraging chicken food preservation homestead
  • Mark post as helpful
  • send pies
    Number of slices to send:
    Optional 'thank-you' note:
  • Quote
  • Report post to moderator
Thanks for your advice, Leila. I hope you don’t mind me barraging you with some follow up questions.

I planted my cuttings in soil that was dug up from the forest plus some leftover potting soil I still had. I can’t go outside, so don’t have acces to peat or sphagnum or anything of the sort. Will the soil I used be a problem?
I can try spacing them out a bit more, I still have leftover containers. I don’t have an endless supply of soil though. Perhaps the horizontal approach might be a solution. Do I just place the cuttings horizontally as they are, or do I need to alter them first? Scarify them or remove buds/ leaves?
You say I could get some more cuttings out of this length of cuttings. How many buds should there be in each cutting? And how many buds should be sticking above ground once planted?

I’m also still a bit confused about what to do with the buds that will be below ground. Do I remove them and the leaves that might have started to grow. Or do I just burry them as they are? Also, am I correct to assume you need a few buds to be bellow the ground? Or is this irrelevant, and you just need as much wood surface underground and the roots will just sprout everything along the length of the buried cutting, regardless if there are buds/ nodes?
 
pollinator
Posts: 105
Location: Central Arkansas zone 7b
57
2
forest garden books food preservation
  • Likes 2
  • Mark post as helpful
  • send pies
    Number of slices to send:
    Optional 'thank-you' note:
  • Quote
  • Report post to moderator
Here is a diagram of the way I did it. I had tried rooting elderberry cuttings before (the wrong way) and none survived. These I cut correctly and all of them rooted. I just stuck them in jars of water and put them out on the enclosed back porch. As you can see, they are really healthy! Some I'm going to pot up before planting and some I'm going to plant bare root to see the difference.

On another note, my husband has a former student who is a doctor in Italy so we have been keeping up. Hang in there! I know this is rough.
0-1.jpg
[Thumbnail for 0-1.jpg]
0-2.jpg
[Thumbnail for 0-2.jpg]
 
leila hamaya
pollinator
Posts: 1596
Location: Root, New York
318
forest garden foraging trees fiber arts building medical herbs
  • Likes 3
  • Mark post as helpful
  • send pies
    Number of slices to send:
    Optional 'thank-you' note:
  • Quote
  • Report post to moderator
this is where the "scarifying" comes in, the places where you rough it up or slice into it a bit is where you are encouraging roots to come out. as i said i am not very precise about this, but in general i am not very precise about many things, and that works for me. there are several different methods for people that are into being precise and many people have their favorite way that they develop after trying a few. the point is to slice in towards the middle of the plant and to encourage roots to come out in those spots.

forest soil is not ideal, but you can make it work, and the plants you are rooting are easier and more forgiving than most.

forest soil is great outside in it's context, but you dont necessarily want the various microorganisms and living soil for this type of method. additionally it can sometimes have bugs...this is an ask me how i know type thing =) cause i have definitely brought in lots of garden soil or forest soil to make my potting soil go further inside...and then consequently had some bug issues.

if you have access to sand? or seed starting mix, or just straight peat or sphagnum moss thats more ideal. some people use perlite, coco coir, and all sorts of other things. at this early point you dont need "soil" or nutrients or much...really...just proper moisture levels.

BUT work with you have and it's not like...youve ruined it or whatever...i think it can work still.

for future reference i would stick with something more "sterile". your enemy when you are rooting is funks, because you have to keep it much wetter than normal and funks are the major drawback and most common problem that can happen. this can also be an issue if you root straight into water...that and transplant shock when you finally move it into dirt. but this can be done too, with some things...just stick your cuttings in a jar of water, be sure to change the water every few days...and you will see roots develop pretty fast in straight water. this is ok for really easy to root things like willow or figs...and some others i would put in the super easy category. elderberry and ribes...well i would say mostly easy, fairly easy, they may root ok in straight water.

i think i have even seen people using that plastic storage method with coffee filters...or paper towels...at the beginning of trying to get roots..you dont need any soil at all...just some thing to hold that moisture against the cutting and your slash spots.

one way to sterilize soil is to bake it. its a PITA really...but worth it for a small batch...i have actually baked soil in the oven for use inside...to sterilize it and also kill any potential bugs. just stuck a bunch of dug garden/forest soil on a baking sheet 300 for a couple of hours...leaving in there afterwards for a while to just really make sure it's baked through.

and i personally dont worry to much about...how many buds...or exact length. i do tend to take smaller cuttings, or maximize what i cut by cutting long cuttings in half. i think...maybe 2 buds or so is the general rule of green thumb, but like i said i dont pay that much attention to those details as they dont seem to really matter.

but yeah if theres a bud spot thats on the bottom of your cutting and that part will be under the soil, just chop off all of it, and i would go further and even gouge out the bit around that bud spot...use that as one of the spots where you cut into it a bit to encourage new roots...
 
S. Bard
pollinator
Posts: 278
Location: Italian Alps, Zone 8
134
hugelkultur duck forest garden fungi foraging chicken food preservation homestead
  • Likes 2
  • Mark post as helpful
  • send pies
    Number of slices to send:
    Optional 'thank-you' note:
  • Quote
  • Report post to moderator
Hi everyone,

Thanks again for your wonderful replies and insights. I’ve decided to go for two different approaches, as a way of not putting all of my eggs in one basket and reducing the amount of cuttings in the pot. I’ve left part of the cuttings in the potted forest solid, and part of them in a vase with water I change ever 2 days.

It’s been two weeks now. For the potted ones I have no idea if any roots are developing. For the ones in the vase, I know I don’t see any roots yet. Some of the bark is coming of. And maybe I see some little points on the stems that have swollen a bit. But that’s it. I used to have both of the systems covered with plastic to keep the moisture high. But then in both systems the leaves and buds on the cuttings began to get mouldy, so I removed the covers. The cuttings look healthier now that the covers are of. But I don’t know if this will make the cuttings dry out.

I have a few other concerns.
-The cuttings are leafing out like crazy. Each day I remove a portion of the biggest leaves that sprout, but I still have a lot of leaves on them. I don’t know how much of them I should remove, and how much should stay on.

-The stems of the cuttings  in the water are becoming hairy, like something is growing on them. I don’t know if this is a good thing or a bad thing. I rinse the stems under running water each time I change the water, but I don’t rub them to clean them as I fear ruining whatever root is trying to grow. Is this hairy substance a point of concern or is it a good thing? How should I proceed.

Attached you can find pictures of how things are looking right now.

I would really welcome any insights, as I want these cuttings to survive. Watering them and checking their progress daily is one of the few highlights of my days during this lockdown so I really don’t want them to die on me.

B3649DFC-D485-4C9B-B4B6-B57A5809F2CD.jpeg
The cuttings in the pot. Lots of leaves. A bit of mould had grown on the leaves due to the plastic cover. I removed all the mouldy bits
AD3445B4-3066-4EE4-AC63-3A89BD588568.jpeg
The cuttings in the vase.
9C6236CD-BD93-40B1-BE7A-F393BA97C476.jpeg
Hairy fibrous things around the stems under water. Cause for concern or celebration?
 
S. Bard
pollinator
Posts: 278
Location: Italian Alps, Zone 8
134
hugelkultur duck forest garden fungi foraging chicken food preservation homestead
  • Likes 3
  • Mark post as helpful
  • send pies
    Number of slices to send:
    Optional 'thank-you' note:
  • Quote
  • Report post to moderator
Now that I have removed the plastic over the cuttings, the mould has pretty much disappeared.
BUT some of the leaves on the cuttings are starting to droop. I checked the soil and it is still wet enough, so now I'm worried that the cuttings are losing to much moisture through the leaves.
What do I do? Do I remove even more leaves ( I removed about 1/3 to half of the leaves on each cutting already)? Do I put the plastic bag on again, but possibly risking new mould?

I would really appreciate any input. This is my first try doing cuttings, so I'm feeling a bit helpless right now that I don't know what to do. I know I can just try this again next year if these cuttings fail, but I've kinda grown attached to them because they are my 'pet-project' during this lockdown and I really don't want to lose them. Which probably sounds a bit silly, I know. But it's the little things like tending the cuttings and my seedlings that are keeping me from going slightly insane being cooped up into the apartment for 4 weeks now.
 
leila hamaya
pollinator
Posts: 1596
Location: Root, New York
318
forest garden foraging trees fiber arts building medical herbs
  • Likes 4
  • Mark post as helpful
  • send pies
    Number of slices to send:
    Optional 'thank-you' note:
  • Quote
  • Report post to moderator

S. Bard wrote:Now that I have removed the plastic over the cuttings, the mould has pretty much disappeared.
BUT some of the leaves on the cuttings are starting to droop. I checked the soil and it is still wet enough, so now I'm worried that the cuttings are losing to much moisture through the leaves.
What do I do? Do I remove even more leaves ( I removed about 1/3 to half of the leaves on each cutting already)? Do I put the plastic bag on again, but possibly risking new mould?

I would really appreciate any input. This is my first try doing cuttings, so I'm feeling a bit helpless right now that I don't know what to do. I know I can just try this again next year if these cuttings fail, but I've kinda grown attached to them because they are my 'pet-project' during this lockdown and I really don't want to lose them. Which probably sounds a bit silly, I know. But it's the little things like tending the cuttings and my seedlings that are keeping me from going slightly insane being cooped up into the apartment for 4 weeks now.


i think they look good and most of them seem to be making it.

but yeah that happens when they are too wet.
and thats the tricky balance when rooting cuttings, you want it too wet and humid, but those are the conditions to get bad funks, little molds and often you can see mycellium bloom on the soil.

so yeah thats what gardeners mean when they say moist not soggy.
a gentle spray for a spray bottle filled with good water will help the leaves stay hydrated. now that the plastic is off you might try no watering for a while and light quick sprays of water once or twice a day.

you may be watering the pot too often. once or twice a week is enough. the top of the soil will look dry, but push a finger down deep in the potted soil and you will feel moisture in the middle.

if you do put them under plastic you water good before that, and then you dont need to add more for weeks.

just keep removing leaves as you see fit, you want to encourage roots more than top growth. i would leave any of the new growth thats healthy, and at this point you dont need to keep them covered.
 
S. Bard
pollinator
Posts: 278
Location: Italian Alps, Zone 8
134
hugelkultur duck forest garden fungi foraging chicken food preservation homestead
  • Mark post as helpful
  • send pies
    Number of slices to send:
    Optional 'thank-you' note:
  • Quote
  • Report post to moderator
Thank you so much for that reply Leila!

You might be right about me watering too much. I was a bit fearful that they would dry out, so I watered them every 2 days or so.
The topsoil is definitely still moist, so you're probably spot on that it is too wet (soggy rather than moist). I will refrain from watering for a bit and spray the leaves instead.

How often should I spray the leaves?
 
leila hamaya
pollinator
Posts: 1596
Location: Root, New York
318
forest garden foraging trees fiber arts building medical herbs
  • Likes 2
  • Mark post as helpful
  • send pies
    Number of slices to send:
    Optional 'thank-you' note:
  • Quote
  • Report post to moderator
at least once a day.  twice a day if you remember. just quickly spray a bit around on all the leaves.

yeah the fact that the plant is already pushing it's own forward growth by growing fresh leaves is a good sign. it definitely means it is still making it, enough to keep growing out.
 
S. Bard
pollinator
Posts: 278
Location: Italian Alps, Zone 8
134
hugelkultur duck forest garden fungi foraging chicken food preservation homestead
  • Mark post as helpful
  • send pies
    Number of slices to send:
    Optional 'thank-you' note:
  • Quote
  • Report post to moderator

leila hamaya wrote:at least once a day.  twice a day if you remember. just quickly spray a bit around on all the leaves.

yeah the fact that the plant is already pushing it's own forward growth by growing fresh leaves is a good sign. it definitely means it is still making it, enough to keep growing out.


That’s a reassurance! Thank you. I put my spraybottle next to the cuttings and will try to spray them twice a day. I’ll just try to incorporate it into my breakfast and diner rituals! :-)

Do you know what the hairy growth in the cuttings in the vase is? Should I rinse it off, or leave it?
 
leila hamaya
pollinator
Posts: 1596
Location: Root, New York
318
forest garden foraging trees fiber arts building medical herbs
  • Likes 2
  • Mark post as helpful
  • send pies
    Number of slices to send:
    Optional 'thank-you' note:
  • Quote
  • Report post to moderator

S. Bard wrote:

leila hamaya wrote:at least once a day.  twice a day if you remember. just quickly spray a bit around on all the leaves.

yeah the fact that the plant is already pushing it's own forward growth by growing fresh leaves is a good sign. it definitely means it is still making it, enough to keep growing out.


That’s a reassurance! Thank you. I put my spraybottle next to the cuttings and will try to spray them twice a day. I’ll just try to incorporate it into my breakfast and diner rituals! :-)

Do you know what the hairy growth in the cuttings in the vase is? Should I rinse it off, or leave it?


i would rinse it off, but youre right above, you dont want to scub it or mess with it much.

one thing i do is heat up a bunch of water in my kettle, and then let it just cool off a bit (or add a splash of cold). then after rinsing them or letting them sit in a sink filled up some with water, i use the still warm on the side of hot to refill it.

and also its good to clean up the container, or switch to freshly clean container...i usually give the glass/jar/vase a really good cleaning, or just rinse it really well with the just boiled water to sterilize the glass.

a gentle rinsing is ok, especially before they have roots. i can see where's there's some bumps there, where it is starting to push roots.

straight in water does work well for somethings, but the only issue is transferring them to dirt once they already got going in water. its best to move them to dirt as soon as roots appear, IMO.
but you can instead try to let them get well developed and then transplant them to dirt.
 
S. Bard
pollinator
Posts: 278
Location: Italian Alps, Zone 8
134
hugelkultur duck forest garden fungi foraging chicken food preservation homestead
  • Likes 2
  • Mark post as helpful
  • send pies
    Number of slices to send:
    Optional 'thank-you' note:
  • Quote
  • Report post to moderator
Another update on the cuttings: I have been spraying the leaves diligently twice a day (morning and evening).
But despite this, some of the leaves have started to die. On some places the leaves turn yellow. On other cuttings they have just died off completely. Especially the currants aren’t looking good. Are the cuttings of which the leaves all died a lost case? Or is there still hope that they are forming roots?

The cuttings in the vase are finally starting to push trough the first tiny bumps of what I suspect are roots. Should I transplant them into soil soon, or should I wait until I’m positive roots are growing?

If I transplant, how big should the container for the cuttings be? One cutting per container or can I do several in the same pot?

1AC9C0EC-9CA3-4344-903C-742B0FC6503D.jpeg
Some cuttings appear to be dying :(
29010055-97C3-4D71-91D9-05FF211D3E2D.jpeg
Looks like a root is finally starting!
 
S. Bard
pollinator
Posts: 278
Location: Italian Alps, Zone 8
134
hugelkultur duck forest garden fungi foraging chicken food preservation homestead
  • Likes 2
  • Mark post as helpful
  • send pies
    Number of slices to send:
    Optional 'thank-you' note:
  • Quote
  • Report post to moderator
I’m noticing a big difference between the cuttings in the potted soil and the ones in the water now. Almost all of the cuttings in the water still have their leaves, while of the cuttings in the soil about half of them had their leaves dry out and wither. I’ve been misting the leaves of both twice a day now, and the soil in the pot has never been dry.
Is there still a chance I can save the cuttings from the pot?

The cuttings in the water have now finally pushed through the beginnings of their roots. Should I start transplanting them to soil now, or should I wait a bit linger still?
Also how big a pot would the cuttings need? For now I would have to keep them on our south facing balcony, which I can imagine being a bit too hot for delicate cuttings. But I don’t have any other places for the cuttings to go as long as this lockdown keeps going. I hope to be able to put them in full ground in our garden once the lockdown is over.

3A963DD4-AEC9-40C5-85D2-7A2C27BEE243.jpeg
Cuttings in the water doing fine
DAB20681-9F91-4AF8-9A9E-E4BEA4212C78.jpeg
Cuttings in the soil, not so great
FC85F62F-5BF1-4AE6-B23E-96C3C283B956.jpeg
Roots pushing through!
 
S. Bard
pollinator
Posts: 278
Location: Italian Alps, Zone 8
134
hugelkultur duck forest garden fungi foraging chicken food preservation homestead
  • Mark post as helpful
  • send pies
    Number of slices to send:
    Optional 'thank-you' note:
  • Quote
  • Report post to moderator
Help!! Something is attacking my cuttings now! White sticky pin-prick sized critters have started populating the underside of the leaves!
The cuttings have finally started rooting, I don’t want to lose them now!! What do I do? 😢

I’m kicking myself from not noticing sooner, now they’re everywhere!!
They only seem to have populated the cuttings in the water. I’ve carefully tried to rinse all the leaves to wash them off. But I don’t know if I got all of them, and if that’s going to deter them enough from coming back.
I’ve also put the cuttings in the water away from those in the soil, so they hopefully don’t spread.

What else can I do to prevent these bugs from killing my already fragile cuttings. Please help!!
EEB5DA4F-0C4E-4969-8312-D417DE33E66B.jpeg
White crawlies on the underside of the leaves
4D5DF671-48C9-47BE-9A66-00C5A908A200.jpeg
Fluffy sticky white stuff on the top of the leaves
 
Posts: 37
5
  • Mark post as helpful
  • send pies
    Number of slices to send:
    Optional 'thank-you' note:
  • Quote
  • Report post to moderator
What happened in the end??
 
S. Bard
pollinator
Posts: 278
Location: Italian Alps, Zone 8
134
hugelkultur duck forest garden fungi foraging chicken food preservation homestead
  • Likes 1
  • Mark post as helpful
  • send pies
    Number of slices to send:
    Optional 'thank-you' note:
  • Quote
  • Report post to moderator
Hi Leah!

In the end 3 of the cuttings made decent roots; all of them from the version where I put them in water. I potted them up. Gave away one to a friend. Broke one by being clumsy with my watering can, snapping the stem. One ended up surviving and has since been planted in our orchard next to an Apple tree in may. It is now however completely buried beneath a thick pack of snow, so I can’t snap a picture. Let’s hope the cutting will survive its first winter!

So in the end, not many ended up surviving, but it was a great learning experience, and I’m eager to try again next year!
 
Four score and seven years ago, our forefathers brought forth this tiny ad:
the permaculture bootcamp in winter (plus half-assed holidays)
https://permies.com/t/149839/permaculture-projects/permaculture-bootcamp-winter-assed-holidays
reply
    Bookmark Topic Watch Topic
  • New Topic