• Post Reply Bookmark Topic Watch Topic
  • New Topic
permaculture forums growies critters building homesteading energy monies kitchen purity ungarbage community wilderness fiber arts art permaculture artisans regional education skip experiences global resources cider press projects digital market permies.com pie forums private forums all forums
this forum made possible by our volunteer staff, including ...
master stewards:
  • Carla Burke
  • Nancy Reading
  • John F Dean
  • r ranson
  • Jay Angler
  • paul wheaton
stewards:
  • Pearl Sutton
  • Liv Smith
  • Anne Miller
master gardeners:
  • Timothy Norton
  • Christopher Weeks
gardeners:
  • Andrés Bernal
  • Jeremy VanGelder
  • Matt McSpadden

Row/Hugelkultur Hybrid

 
Posts: 33
Location: Fraser Valley, BC Canada
3
homeschooling hugelkultur fungi
  • Mark post as helpful
  • send pies
    Number of slices to send:
    Optional 'thank-you' note:
  • Quote
  • Report post to moderator
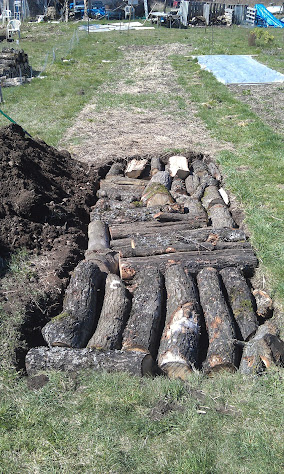
Hello. I got a whole bunch of oak logs delivered by a local arborist and set aside all the ones I'm not using to grow shiitake. I have some straight rows as part of my garden and have been experimenting with different size and shape hugelkultur projects. I have an area that could use some depth to the soil to grow better root crops, so I figured I could raise the soil up a bit by digging down to the subsoil, making it deep enough to bury a layer of oak logs.

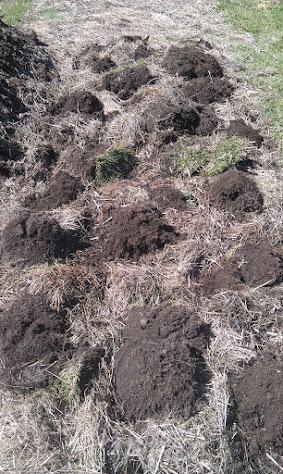
I jammed the logs in as tight as I could and stuffed the spaces with hay that was being retired from it's duty of protecting the ground from the west coast winter rain and capped it with some the clumps of grass that had grown where I dug. It's looking great, and was easy to plant into. It was planted with a mix of leafy vegetables like Kale, Corn Salad and Lettuce, along with some Potatoes and a some fava beans, all of which I hope will work to stabilize the nice pillow like mound. Finally it was capped off with some remay cloth to keep speed germination.

I figure this method could be a good way to get some of the benefits of hugelkultur without changing the look or function of an existing straight row.


pollinator
Posts: 11853
Location: Central Texas USA Latitude 30 Zone 8
1258
cat forest garden fish trees chicken fiber arts wood heat greening the desert
  • Mark post as helpful
  • send pies
    Number of slices to send:
    Optional 'thank-you' note:
  • Quote
  • Report post to moderator
Looks very tidy. Keep us updated on how it performs.

 
pollinator
Posts: 4437
Location: North Central Michigan
41
  • Mark post as helpful
  • send pies
    Number of slices to send:
    Optional 'thank-you' note:
  • Quote
  • Report post to moderator
looks good, hope the grass clumps don't become a weed problem, keep us posted on how it works out for you.
 
pollinator
Posts: 720
Location: Clemson, SC ("new" Zone 8a)
158
10
  • Mark post as helpful
  • send pies
    Number of slices to send:
    Optional 'thank-you' note:
  • Quote
  • Report post to moderator
@Jason - Good stuff! I am also experimenting a bit with the "sunken hugelkulture" concept: burying the wood, rather than building up a mound on top of it. I have some narrow strips of land I will use as a kitchen garden on either sides of walkways down some long, low terraces. There would just be no room in some places there to build a raised mound, and I will probably grow a lot of row crops there just like you, at least in the springtimes. Given my own situation, locations, plans for use, etc., the sunken model just seems to make more sense, as apparently it does for you.

Only three observations/questions:

1) It's hard to tell from the photos, but how wide is your bed? By going "sunken" as opposed to "raised" there is additional need to safeguard against soil compaction, so it is extra important to observe the double-reach dimension guidelines. I.e., beds 3' wide (maybe 4' absolute maximum) so that one can reach to the center from either side and need NEVER step inside the bed again once constructed. That is another key concept of the hugelkulture mound, in addition to the sponge-effect of the rotting wood core. I do believe that is why Sepp Holzer builds his hugelkulture so tall and steep-sided.

2) I chose to diversify my wood a little, compared to what is visible in your photos. By that I mean using different sizes, from twiggy brush up to medium sized branches, in addition to your big logs. That way over the years you will always have wood at the core of your bed in differing states of decomposition, with the smallest stuff decomposing the fastest, then the medium, then the largest. I would think that this should add more "texture," resulting in more edge effect inside your soil.

3) Did you add enough high-nitrogen content while building the bed? Again, hard to tell for sure from the photo, but the old hay looks pretty brown. The best compost - and compost is ultimately what you are producing inside hugelkulture, just very very slowly - is always made with an optimum balance of carbon and nitrogen content. I am throwing a bunch of manure down with my wood as I add soil layers back on top of it. Even so, both of us should be on guard the first few years that our hugelkulture beds aren't sucking too much nitrogen away from our growies, and be ready with lots of good compost for top-dressing/mulch.

Thanks for the photos!
 
Jason Tomblin
Posts: 33
Location: Fraser Valley, BC Canada
3
homeschooling hugelkultur fungi
  • Mark post as helpful
  • send pies
    Number of slices to send:
    Optional 'thank-you' note:
  • Quote
  • Report post to moderator
Thanks everyone. Great advice Matthew. It's definitely wider than would be practical for reaching into the middle. Perhaps I will plant something shrubby in the middle or something that doesn't need to be accessed regularly. The rows are about 6 feet wide, and is the widest of my rows. Another thing I could do would be to make it into a keyhole garden (or two) since the wood is buried I could still cut into it. I think I'll do that so there's no issues harvesting and tending.

The wood was almost all oak, with a few maple logs. but there certainly wasn't the type of diversity in size than would have been ideal to create a mix of sizes to decompose in phases. I plan to amend the soil with manure and compost as it becomes available to me on site. For now I'm just using bonemeal and worm castings as the main feeding to the topsoil, though a ground cover is in the works for the rows. I intend for future nitrogen additions to wash down into the logs once they age a bit and start to really suck up the water. Hopefully. I'll keep you posted on the developments.
 
Matthew Nistico
pollinator
Posts: 720
Location: Clemson, SC ("new" Zone 8a)
158
10
  • Likes 1
  • Mark post as helpful
  • send pies
    Number of slices to send:
    Optional 'thank-you' note:
  • Quote
  • Report post to moderator

Jason Tomblin wrote:Perhaps I will plant something shrubby in the middle or something that doesn't need to be accessed regularly. The rows are about 6 feet wide, and is the widest of my rows. Another thing I could do would be to make it into a keyhole garden (or two) since the wood is buried I could still cut into it. I think I'll do that so there's no issues harvesting and tending.


Hmmm, really interesting idea about planting the middle with a hedge of shrubs. I hadn't thought about that, but its a perfectly good solution. You might consider N-fixers, which would benefit the hugelkulture and the annual veggies at the same time; being shrubs, their roots should get into upper and lower levels of the soil, and they could stay year after year while your row crops come and go. The only thing that comes to mind as a potential problem is shade on your row crops, though shouldn't bee too much of a problem if you prune the hedge to keep it from getting too tall. How is the bed oriented relative to the sun? Besides, at least where I am (hot summers!), a bit of shade is sometimes a good thing for extending the season for herbs and leafy greens. And, by pruning regularly, you will encourage more root die-back, speeding the addition of N to the soil. And, of course, having a deciduous perennial in the bed will contribute leaf litter to your mulch layer each fall.

In my own systems, I am primarily using White Dutch Clover, Black Locust, Goumi, and Sea Buchthorn as N-fixers, of which the last two are shrubs. Of these two, I would definitely recommend Goumi, which have so far proven themselves robust and fast-growing for me. I don't know where you are located, but I believe Goumis are good for a wide range of climates. And they make fruit for you, too, though mine haven't fruited yet so I can't vouch for the taste or productivity.

Making keyhole paths into the bed would work too, of course. Or, even simpler: lay a line of treated 2x8s up the middle (in place of a hedge) on top of the soil and now you can walk up the middle and squat to work on your veggies. That way you would have two 3' beds, instead of a big 6' bed, without any more significant work. And each 3' bed would still be accessible by wheelbarrow from one side (the outside edge).

BTW, I have a similar plan as do you regarding top-dressing and fertilizer. I think you can definitely count on nitrogen additions to wash through the depths of your whole bed. I have other hugel beds - actual raised ones, though of very small dimensions - elsewhere on my property, that I added no nitrogen to while building. I was just rushing and neglected to add anything before covering with soil. Oops! So far I've been amending with my own "liquid gold" by the bucketful!
 
Posts: 182
Location: CO; semi-arid: 10-12"; 6000 ft
8
  • Mark post as helpful
  • send pies
    Number of slices to send:
    Optional 'thank-you' note:
  • Quote
  • Report post to moderator
I made my sunken wood and mulch beds 6 feet wide, and 40 or 50 feet long, then divided the finished beds into planting sections 4 feet wide, with a board for a path in between each planting section. That way, the roots have room to spread,and moisture is held in the big bed, but not confined to the smaller beds, and I have room to get in and tend/harvest the smaller beds. I have been thinking that with one of the long beds I will erect trellis on each edge, with boards down the center for a walkway, to grow vining crops and provide shade for lettuce etc.

I don't think it is advised to use Pressure Treated wood anywhere near a garden of edible plants, though, so I just whatever old, scrounged lumber I can find, for my paths. Then, when they rot, I throw them in the bottom of a bed I'm working on.

It is an interesting idea to use shrubs down the center.
djn
 
Matthew Nistico
pollinator
Posts: 720
Location: Clemson, SC ("new" Zone 8a)
158
10
  • Mark post as helpful
  • send pies
    Number of slices to send:
    Optional 'thank-you' note:
  • Quote
  • Report post to moderator
@dj - Sounds good! If you ever find yourself short of scrap lumber to lay down as pathways atop your sunken hugelkultur beds, I have in the past used a double layer of old carpet scraps. Not an ideal solution, to be sure, but they work. It is important to double them up - the extra stiffness created distributes your weight a bit more evenly and results in less sinking when the underlying soil is wet. As I said: I would rather use wooden boards or something similar, but this is an option as well.
 
Posts: 1
  • Mark post as helpful
  • send pies
    Number of slices to send:
    Optional 'thank-you' note:
  • Quote
  • Report post to moderator
Bought 2 acres 80 year old lava field with lots of brush, grasses, etc to start the beds. We're growing tropical fruit trees. Planting design will be 6 x 6 high density. We will create vessels to hold coconut stumps, by moving lava rocks from area between rows to row. Boy, that's hard to say. Also growing field peas and yardlong beans for fixing nitrogen and wood for hugelculture rows.
 
I've been selected to go to the moon! All thanks to this tiny ad:
two giant solar food dehydrators - one with rocket assist
https://solar-food-dehydrator.com
reply
    Bookmark Topic Watch Topic
  • New Topic