• Post Reply Bookmark Topic Watch Topic
  • New Topic
permaculture forums growies critters building homesteading energy monies kitchen purity ungarbage community wilderness fiber arts art permaculture artisans regional education skip experiences global resources cider press projects digital market permies.com pie forums private forums all forums
this forum made possible by our volunteer staff, including ...
master stewards:
  • Carla Burke
  • Nancy Reading
  • John F Dean
  • r ranson
  • Jay Angler
  • paul wheaton
stewards:
  • Pearl Sutton
  • Leigh Tate
  • Devaka Cooray
master gardeners:
  • Christopher Weeks
  • Timothy Norton
gardeners:
  • thomas rubino
  • Matt McSpadden
  • Jeremy VanGelder

Downspout ideas to reduce amount of rain water to the barrel

 
Posts: 3
  • Likes 1
  • Mark post as helpful
  • send pies
    Number of slices to send:
    Optional 'thank-you' note:
  • Quote
  • Report post to moderator
Hi There, New here and trying to wrap my head around how to divert enough water from the gutter to the rain catchment setup which is basically a couple of 275 gallon IBC totes.

Attached a pic of the current gutter layout which comes down from the second floor on to the first floor and drains into a gutter which leads the water into the tank.
This has been a hit or miss due to the following reasons,
                1. During a heavy down pour the tanks fill up in less a 10 mins and there is a flood of water and even the overflow is over worked there is still a flood. I try to divert the water and the worst part was I had to do it in the pouring rain the last time and add more pipes to divert the water as much as possible.
                2. During this heavy downpour, the water water splashes over and on to the deck right above the door that lead to the backyard which then has the risk of it running into the basement walls. BLUE highlight
                3. In the winter I would have to manually switch the gutters due to all the snow in our region. RED highlight

Is there a way or setup that I could build/buy that would split the water in half, where one half goes to the containment and the other to the gutter that is detached now which runs the water on to the street.
Seen a bunch of devices online but do not know which would be the best in this scenario.

Appreciate any insight if anyone have been in a similar situation.


Thanks.
Gutters.JPG
[Thumbnail for Gutters.JPG]
 
pollinator
Posts: 5367
Location: Bendigo , Australia
485
plumbing earthworks bee building homestead greening the desert
  • Likes 4
  • Mark post as helpful
  • send pies
    Number of slices to send:
    Optional 'thank-you' note:
  • Quote
  • Report post to moderator
I have experience with this, look at my signature for a link.
Have you thought of having a bigger tank? 20,000L?
Some ideas;
- I would insert that bit you have sitting in the photo permanently.
- that lower roof looks very short, is it? Because you may not get much water from it anyway.
- What are you using the water for? It helps to plan around the end use.
- If you fit a gutter baffle to stop the water spilling over it may go backwards and inside the eave.
- If you dont want to fit the downpipe on the side  permanently fit a downpipe spreader, it will prevent flooding etc.within the gutter.
download-18.jpg
Downpipe spreader
Downpipe spreader
 
Bvard Vis
Posts: 3
  • Likes 1
  • Mark post as helpful
  • send pies
    Number of slices to send:
    Optional 'thank-you' note:
  • Quote
  • Report post to moderator
Hi John,
Thanks for your reply. Adding some info to the points you have raised.

Some ideas;
- I would insert that bit you have sitting in the photo permanently. - I did this but with a downpour it would still splash water every where. Am referring to the blue highlighted piece.
- that lower roof looks very short, is it? Because you may not get much water from it anyway.- yes its about 2ft and does not help a bit with catching any water.
- What are you using the water for? - Vegetable beds only.
- If you fit a gutter baffle to stop the water spilling over it may go backwards and inside the eave.- Yes.
- Fit a downpipe spreader- have not tried this. Might be a good idea but then again when it pours the outcome may be the same with water running over the gutter below considering the 2ft roof span for it to flow.
 
master steward
Posts: 12490
Location: Pacific Wet Coast
7044
duck books chicken cooking food preservation ungarbage
  • Likes 2
  • Mark post as helpful
  • send pies
    Number of slices to send:
    Optional 'thank-you' note:
  • Quote
  • Report post to moderator
My parents had a problem with downspouts on their house years ago, and they were told that having a downspout either empty onto a section of roof, or into another trough was a recipe for overflows and backups under the flashing. They were told that once a downspout exits a trough, it should go all the way to the ground. When they followed that advice, several problems were much reduced, particularly issues with ice dams in winter.

So if this was my roof, I'd permanently run the downspout through the spout to the right in the red circle. If that means that you need to put some sort of diverter off that section of downspout lower down, that's what I'd do. If that pipe simply can't handle the volume of water entering it from the upper roof, then I'd see where else downspouts could be added, or if the slopes were wrong and the water wasn't exiting the roof evenly.

It would help if you did a diagram of the whole system. I'm concerned that you haven't sized the system for the size of storms you're getting, and certainly in my province, we've been blowing through "averages" regularly. As you say, in the middle of a storm isn't when you want to be fixing things. I suspect if you posted the size of your roof, the number of downspouts, and the sorts of "millimeters of rain per hour" that you experience in the big storms, John C Daley could give you some idea of how many liters that would represent. It does sound as if you need many more IBC's, or many other options for part of the water coming off your roof.
 
John C Daley
pollinator
Posts: 5367
Location: Bendigo , Australia
485
plumbing earthworks bee building homestead greening the desert
  • Likes 2
  • Mark post as helpful
  • send pies
    Number of slices to send:
    Optional 'thank-you' note:
  • Quote
  • Report post to moderator
BVARD, in response to your answers


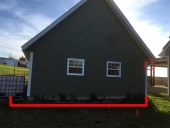
1- I would insert that bit you have sitting in the photo permanently. - I did this but with a downpour it would still splash water every where. Am referring to the blue highlighted piece.
2- that lower roof looks very short, is it? Because you may not get much water from it anyway.- yes its about 2ft and does not help a bit with catching any water.
3- What are you using the water for? - Vegetable beds only.
4- If you fit a gutter baffle to stop the water spilling over it may go backwards and inside the eave.- Yes.
5- Fit a downpipe spreader- have not tried this. Might be a good idea but then again when it pours the outcome may be the same with water running over the gutter below considering the 2ft roof span for it to flow.


1- the blue highlighted bit is not the same as I suggested, thats why I showed something different that does work
2 -ok
3 - full household use with out any treatment, drinking, cooking, shower, laundry and veges.
4 - ok
5 - try it before thinking it will be the same as you have. The water flow is spread out, thats why it works.
 
gardener
Posts: 5174
Location: Cincinnati, Ohio,Price Hill 45205
1011
forest garden trees urban
  • Mark post as helpful
  • send pies
    Number of slices to send:
    Optional 'thank-you' note:
  • Quote
  • Report post to moderator
How big is your overflow?
 
Bvard Vis
Posts: 3
  • Mark post as helpful
  • send pies
    Number of slices to send:
    Optional 'thank-you' note:
  • Quote
  • Report post to moderator
Hi William,
The overflow is a 2" pvc pipe leading into a 3" pipe that diverts the water away from the house.
The reason for this 2" overflow is because the valve on the IBC totes is 2".

Thanks.
 
pollinator
Posts: 308
Location: Jacksonville, FL
138
tiny house solar woodworking
  • Likes 4
  • Mark post as helpful
  • send pies
    Number of slices to send:
    Optional 'thank-you' note:
  • Quote
  • Report post to moderator

Bvard Vis wrote:The overflow is a 2" pvc pipe leading into a 3" pipe that diverts the water away from the house.
The reason for this 2" overflow is because the valve on the IBC totes is 2".


That bottleneck is a problem. An overflow with an area greater than the downspout would allow for the overflow to deal with the water coming in once the water catchment is full. For example, if the downspout is the larger 3" x 4" size, then the area is 12 square inches. A 3 inch pipe would be ~7 sq in, or not nearly enough. The 2" overflow is woefully inadequate. If your downspout is of the smaller 2" x 3" variety, it would still need a 3" minimum overflow pipe to avoid backing up, and a 4" pipe for a 3" x 4" downspout.

Adding the overflow to the tank itself is likely going to be more work and money. An alternative is to divert the overflow right at the point where water comes in. Unfortunately there aren't a ton of options for Tee or Y downspout fittings, for the obvious reason that it would get overburdened and back up causing an overflow condition. However they do exist, and using one in an alternative fashion would allow for water to drop into the tank until full, then back up only to the point of the Tee, where it can then divert away from the area and avoiding the issue of backing up and overflowing in a less convenient place. Here is a link to give an idea of what I am talking about:

Downspout Y Fitting on Amazon

The basic idea is that one side has water come in, drops to the tank, and once full it backs up to the Y. From there you can put a 90 degree fitting on the other 'inlet' of the Y to use it as an outlet and go downhill after that with the overflow to divert it away from the tank. Of course that part I linked to is also a bit spendy, so I personally would break out the tin snips and hand riveter and buy a cheap elbow, essentially jamming it into the downspout with a slight uphill angle so it only overflows once full. I did something similar to this when I had rain barrels set up, and the system worked quite well.

You also mention you have multiple IBC totes. You could potentially link the outlets together in to one pipe with enough area to carry away the overflow. Unless everything is oversized and the downspout is evenly distributed to the tanks there will be a bit of 'lag' in the system. The water coming in can easily overburden the first tank before it has a chance to evenly distribute. The rain barrel system I was given initially had this problem. Even though in theory it was set up OK, the sudden rush of a downpour and the friction of the multiple fittings on the overflow caused it to back up and spill out at the first barrel. It likely wouldn't have been as much of a problem if I had set it up to send the rain water into the middle barrel instead of at one end, but I didn't realize the issue until the barrels were full, so I put the overflow directly on the downspout to fix the problem. Hopefully all of this makes sense and gives you some ideas.
 
John C Daley
pollinator
Posts: 5367
Location: Bendigo , Australia
485
plumbing earthworks bee building homestead greening the desert
  • Likes 2
  • Mark post as helpful
  • send pies
    Number of slices to send:
    Optional 'thank-you' note:
  • Quote
  • Report post to moderator
Using a t piece you may be able to create a manifold with 1 inlet and 2 outlets.
Using 1 T and a 90 deg bend at each end.
The image below does not use 90 deg. bends and it has 3 outlets. I could not find an image with the bends I speak off, but the concept is visible.
A bit like this;
download-21.jpg
maifold shape I am talking about
 
Any sufficiently advanced technology will be used as a cat toy. And this tiny ad contains a very small cat:
2024 Permaculture Adventure Bundle
https://permies.com/w/bundle
reply
    Bookmark Topic Watch Topic
  • New Topic