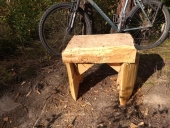
Ok the title is a bit of a cheeky lie, but the concept of this bench is to use only the stump and off cuts from something like a 3 log bench.
Why not just sit on the stump itself? I'm glad you asked. It's usually rough, sappy, and only seats one. The zero-log bench aims to solve all of these issues.
What you need:
- A log of ~6 to 8 feet being used for something else
- chainsaw
- hammer
- chisel
- about a dozen large nails (~16p)
- a stump in a nice location that's >8" diameter and >12" tall
The first rough cut off your mill (or chainsaw, if you are doing this the crazy way) will have sort of the profile of a skinny capital letter D. Cut this piece about 60% of the way from the base (fat side). Now rip the shorter piece lengthwise about a third of the way in from the edge. You now have the bench top (large piece) and the support (small piece) as well as a small waste piece, the pictures below will make this clearer.
Now find a stump that would make a good bench location. It could certainly be the stump that your log was cut from. Cut horizontally through the stump to make a flat top, if it doesn't already have one. Using a hatchet or chainsaw, make it so a reasonably long section in the middle of the support piece has the same thickness, or close to it. Place your support piece, ripped face downward, across the centerline of the stump in the orientation that you want your bench to face. Mark the face of the stump along both sides of this board.
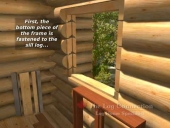
Cut a channel into the stump, a bit inside of your lines, so that the support piece will wedge in snuggly. In order to clear out the material in the channel, use a chisel or a chainsaw (WARNING: plunge cutting with a chainsaw can be very dangerous, use a chisel instead unless you know what you're doing).
Once your channel is at least as deep as the support piece is wide, knock the support into the stump until the ripped face sits flush with the stump top. Using four large nails, secure the support to the stump as shown in the pictures. The nails should go into the side of the stump that sits flat on the broad face of the support.
Now set the bench top, flat face down, onto the stump/support. I secured the bench with four large nails into the support and three into the stump itself, but do what feels right given your pieces.
This was a quick project using up some semi-rotted wood at Wheaton Labs. Since the wood was old dead-standing pine, I don't expect it to last super long. There are a few of improvements you can, and should, make if you are putting this in your yard (use better wood, oil the bench top, flip the bench top over and add a matching cut below it, etc.)
IMG_20220829_155834922.jpg
Ripping the support piece to have two faces at 90deg
IMG_20220829_163701147.jpg
Support piece pressed in, note toe nail locations. Two more nails used beneath these two.
Clever idea! An option I might suggest, since there will not be a large flat supporting surface under the bench top, would be to carve the stump top to a cradle fitting the curve of the bench slab live face, and mount it with the flat face up. Having a curved saddle supporting the bench top would make it even a bit more steady. It would take more skill with chain saw or chisel to fit the curve.
Edit: I note that you mention "flip the bench top over and add a matching cut below it"...
I started doing a thing I'm calling the MoPID series. It's a bunch of permaculture-y innovations that I am working on during my time at Wheaton Labs, and I made this bench the 0th entry. If anyone is interested, check out this thread to follow along.
Gravity is a harsh mistress. But this tiny ad is pretty easy to deal with:
Experience months or even years of natural building and growing your own food


 18
18


Skill verified by Mike Haasl")