|

|
|
|
|

|

|

|

|

|
 6
6


 8
6
6
8
6
6


 9
9
For all your Montana Masonry Heater parts (also known as) Rocket Mass heater parts.
Visit me at
dragontechrmh.com Once you go brick you will never go back!
6
Nick Ax wrote:Thanks fox - good morning
What is your analysis of this …
https://youtu.be/NafXx_gRxDM?si=xylQvHXD4p7YLABr
Is that a “roar” ?
I can control the ferocity as you say, by using smaller wood and/or choking with firebricks on the intake
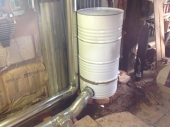
I burned a moderate fire, 2 or 3 wrist sized logs at a time for about 3 hours last night, barrel temperatures were between 100 and 150c , there were always bright flames, and the now insulated feed tube got very hot
There is a minor choke point at the very bottom of the riser, where I cut the ‘polo’ which supported the inner former .. it’s a delicate operation but I might try and flip the riser over this morning .. possibly even removing its jacket
Insulating the sides of the firebox and end of the burn tunnel makes sense too, although the rate at which heat is lost through 4” of silica brick I would have thought was pretty low
Meanwhile I’m on the scrounge for a big barrel
6

 6
2
3
6
2
3

|
So glamorous! Now do this tiny ad!
grow your own garden and build your own home, in Montana, for free-ish
https://wheaton-labs.com/bootcamp
|