• Post Reply Bookmark Topic Watch Topic
  • New Topic
permaculture forums growies critters building homesteading energy monies kitchen purity ungarbage community wilderness fiber arts art permaculture artisans regional education skip experiences global resources cider press projects digital market permies.com pie forums private forums all forums
this forum made possible by our volunteer staff, including ...
master stewards:
  • r ranson
  • Nancy Reading
  • Carla Burke
  • John F Dean
  • Jay Angler
  • paul wheaton
stewards:
  • Nicole Alderman
  • Pearl Sutton
  • Anne Miller
master gardeners:
  • Christopher Weeks
  • Timothy Norton
gardeners:
  • Nina Surya
  • Matt McSpadden
  • thomas rubino

Secondary air inlet function stacking?

 
gardener
Posts: 565
281
  • Likes 2
  • Mark post as helpful
  • send pies
    Number of slices to send:
    Optional 'thank-you' note:
  • Quote
  • Report post to moderator
Hi, rocket newbie here with an idea. Our future cabin will, if we follow our current plan, have a wooden floor. It will be heated with a RMH, probably batch-box. Sub-floor ventilation will be of the essence, since the load-bearing posts extend below the floor. So, we really don't want any moisture build-up there. My thought is, what if we include a L-bent metal pipe pulling air from under the floor and use it as a secondary air intake for the rocket? Will it work, or will it lead to disaster? Very grateful for any input.
 
pioneer
Posts: 337
34
chicken wood heat rocket stoves
  • Likes 8
  • Mark post as helpful
  • send pies
    Number of slices to send:
    Optional 'thank-you' note:
  • Quote
  • Report post to moderator
Hello Eino,

I believe what you are referring to is called "Make-Up Air" and it has been a subject of contentious debate.  My 1950's brick home has two fireplaces and a third flue that leads from the basement to the top of the chimney that was originally intended for make-up air.  I was curious about why it was there and researched it myself.   Apparently, they have fallen out of favor as they just don't seem to work very well.  Now, some states in the U.S. have mandated outside make-up air for masonry heaters, but the general consensus here at Permies, if I may speak for the group at large, is that bringing in cold, outside air will:
1, Cool the fire and prevent it from getting to it's maximum temp.
2, Bring in moisture that will condense inside the stove as it travels through a bench or up the flue leading to a bigger water problem than you would have had without it.

Any issues you have with water should only last for as long as your RMH is still wet.  It shouldn't take so long for your Dragon to dry out that you suffer any damage from whatever moisture is let out of it.

The only other way you might have a problem with water is if you're burning wet wood.  Make sure your Dragon has dry wood.  That's what it likes to eat.

Good luck on your build.  Looking forward to you posting your progress here.

 
Eino Kenttä
gardener
Posts: 565
281
  • Likes 3
  • Mark post as helpful
  • send pies
    Number of slices to send:
    Optional 'thank-you' note:
  • Quote
  • Report post to moderator
Hi Thomas, thank you for the reply!

Well, a bunch more water and cooling the fire doesn't sound so good... But it makes a lot of sense that that would happen. Guess it's a crappy idea then.

The moisture I'm concerned about doesn't come from the RMH as such, but from the ground. We'll be building the stove before laying the floor, so it'll have time to dry "in the open". It will rest on the sub-floor, which is basically a raised rock-and-gravel platform. I'm worried about moisture rising through the platform from the ground proper leading to moisture build-up under the floor, once it's built. We'll need some form of sub-floor ventilation to prevent this (I think... Neither of us has built a cabin before.) The systems I've seen for this have been passive, basically holes in the foundations covered with net to keep rodents out. I was mainly wondering if there was a way to build an active one powered by a RMH. To use it as a secondary air inlet was just an attempt at finding another function for it.

Sorry if this was unclear/downright stupid, my brain isn't working at its best right now. Anyway, thanks again for the help!
 
Thomas Tipton
pioneer
Posts: 337
34
chicken wood heat rocket stoves
  • Likes 2
  • Mark post as helpful
  • send pies
    Number of slices to send:
    Optional 'thank-you' note:
  • Quote
  • Report post to moderator
Hi Eino.

Not a stupid idea at all since many have thought the same thing and tried it.  I'm not a construction technology expert, but it would seem to me if you were to lay a heavy, 6 mil or so vapor barrier on the subfloor of your cabin, in what we would call the "crawl space", then you could technically build on top of a RMH foundation underneath the vapor barrier.  The barrier shouldn't mind the load on it, yet should still prevent the migration of water, via capillary action (which is what I believe you are concerned about).
 
Eino Kenttä
gardener
Posts: 565
281
  • Mark post as helpful
  • send pies
    Number of slices to send:
    Optional 'thank-you' note:
  • Quote
  • Report post to moderator
Hi Thomas,

I'm not so concerned about moisture in the thermal mass, really (although of course it would suck if the secondary air inlet added extra water) but rather evaporation from the foundation "platform" making the entire crawl space moist and leading to rot in the load-bearing posts (the lower end of which will be extending down below the floor and resting on a bunch of big rocks). No idea if this is a valid concern, or if I'm overthinking this... Our area is quite rainy, so I'm a bit paranoid about moisture.

The moisture barrier sounds like a good idea, but in our situation it might not be so easy. Our build site is rather remote, so we want to use mostly materials sourced on-site. Also, we'd like to use a minimum of industrial "gicky" materials. Our plan for the roof moisture barrier is birch bark (covered with sod, as per the traditional Scandinavian method) but I wonder if birch bark would work for putting underneath the thermal mass. How warm would it get in there, do you think? (Suppose that, as always, it depends, but ideally?)

Thank you!
 
Thomas Tipton
pioneer
Posts: 337
34
chicken wood heat rocket stoves
  • Likes 2
  • Mark post as helpful
  • send pies
    Number of slices to send:
    Optional 'thank-you' note:
  • Quote
  • Report post to moderator
Eino,  If you are going to have a ventilated crawl space it won't matter if you are pulling air in from directly beneath your stove.  Although it might contribute to making your floor just a tad colder since outside air will be moving into the crawlspace from the perimeter vents or from anywhere else it can leak in.  Just so we are clear, I understand this as you want to build the RMH with the weight borne by support posts in the floor.  Will these be wood?  or Steel?    I understand the desire to go "all natural", but there is merit in considering compromise.  Whereas your birch bark will eventually capture and entrain moisture, and eventually decay, a polyethylene vapor barrier will not.  Have you considered a poly sheet for your roof cover, upon which you can layer your birch bark for durability and aesthetic reasons.  You must understand that to be a "Vapor Barrier" the material must be relatively impenetrable to moisture and not have any voids in it.  I'm afraid your roof, while historically accurate, will leak without one.  Maybe you could give us a sketch of what you have planned so we may better understand your intent?
 
gardener
Posts: 5265
Location: Cincinnati, Ohio,Price Hill 45205
1053
forest garden trees urban
  • Likes 2
  • Mark post as helpful
  • send pies
    Number of slices to send:
    Optional 'thank-you' note:
  • Quote
  • Report post to moderator


If you really don't want to use a plastic membrane under the cabin I think you will want very extensive grading around it, and a sound roof with wide eaves.

I don't entirely understand what the foundation will consist of, but with the materials you have mentioned,  I would want  to set the large stones on top of  rubble filled trenches, and the support posts on top of those.
In that configuration I don't think you will get damp wicking up from the earth.
Any condensation will be minimal, because the stones will be close in tempatures to the earth below, plus drying should be easy and immediate.

If the platform the rocket is built on is large stones in a similar manner,  I think it also will be fine.

I think you can still use gravel in the subfloor, but it should be isolated from the soil beneath by larger stones, to prevent wicking.

With a good roof and a rocket mass heater running rightk above, I think the soil under the cabin will become relatively dry.
The dirt floor of my greenhouse is very dry, and  I dont recall using any  barrier.
I am in the middle layering wood boards with dry, tamped soil, to make a stabile floor.
I tore put the platforms I had in there because they were hiding spots for rodents.


Eino Kenttä
gardener
Posts: 565
281
  • Likes 3
  • Mark post as helpful
  • send pies
    Number of slices to send:
    Optional 'thank-you' note:
  • Quote
  • Report post to moderator
Okay, so, I fear my explanations were quite unclear, sorry about that. I'll try to clarify. First, the RMH foundations will rest directly on the foundation platform, which is made from rubble, gravel and rocks, and quite a bit above-grade. See pictures. Then we'll lay the wooden floor around the RMH, once finished. The posts I mentioned have nothing to do with the RMH per se, they will be for supporting the roof structure. I'm just afraid of moisture leading to rot in the supporting structure, and wondered if there is a specific way to use the RMH to avoid that.

Thomas Tipton wrote:Whereas your birch bark will eventually capture and entrain moisture, and eventually decay, a polyethylene vapor barrier will not. [...]You must understand that to be a "Vapor Barrier" the material must be relatively impenetrable to moisture and not have any voids in it.  I'm afraid your roof, while historically accurate, will leak without one.

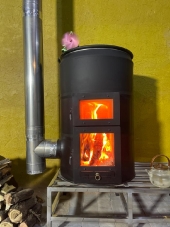
Actually, no. Birch bark and sod was the main roofing material in a lot of areas in Scandinavia all the way to the beginning of the 1900s. A good sheet of birch bark is completely waterproof, and basically doesn't degrade unless exposed to UV light (besides being insulation, the main function of the sod in a sod roof is to prevent light from reaching the bark). This kind of roof will stay leak-proof for decades or more (according to Wikipedia, 30 years was once considered the "normal lifespan" of a sod roof before it had to be re-done. However, I also read a manual on building a Sami "gamme" where it was claimed that a well-laid sod roof with birch bark will stay sound for a century or more...) The main reason it fell out of favour was that it's quite labour-intensive to build, compared to modern roofing materials.

William Bronson wrote:If the platform the rocket is built on is large stones in a similar manner,  I think it also will be fine.  


That was the plan, yeah, even though the rocks aren't there yet. Relieved to hear you think it'll work.
Okay, this has moved a bit beyond the original topic, but I hope that's ok. Thanks again for sharing your insight!

Edit to say that I'll post a sketch of the plan once I've drawn one. I suck at drawing, it'll be ugly...
IMG_20220730_130234.jpg
Not the finished foundations, but it might give you a rough idea.
IMG_20220816_121731.jpg
One side of the finished foundations, don't have any good pics of the whole thing, sadly.
 
Thomas Tipton
pioneer
Posts: 337
34
chicken wood heat rocket stoves
  • Likes 3
  • Mark post as helpful
  • send pies
    Number of slices to send:
    Optional 'thank-you' note:
  • Quote
  • Report post to moderator
Thank you for the pictures Eino.  That makes things a lot more clearer.  I had not so much understanding of the birch bark roof until you educated me about it.  It looks like you have a solid foundation going there, and like William said, grade your surrounding area for proper drainage and you shouldn't have much to worry about.  As far as water wicking, and post rot, have you looked into the practice of charring the wood and setting it on a stone?  The charring prevents rot and insect damage, while the stone provides a barrier from direct contact with wet earth.
 
Rocket Scientist
Posts: 4587
Location: Upstate NY, zone 5
600
5
  • Likes 4
  • Mark post as helpful
  • send pies
    Number of slices to send:
    Optional 'thank-you' note:
  • Quote
  • Report post to moderator
With the amount of raised rock/gravel fill, and setting everything on large flattish stones, I think you will have no moisture issues as long as you end up with good roof overhangs and exterior drainage management. I see no need to add active ventilation to the subfloor; a couple of perimeter vents as you described will do fine. If you are in Finland, your air will be quite cold and thus hold very little moisture in absolute terms. Once warmed to room temperature, it will be relatively very dry. You will get enough makeup air from the normal indoor air quality ventilation, and using room air means that only stale air will be removed from the room for combustion. If your room is so tight that you cannot get enough air for combustion, you need more ventilation for clean indoor air.

One last thought... bedding stones fully in sand/clay/mortar will increase the possibility of moisture wicking. If you have layers of flat rocks without full bedding (but laid so as to be solid and stable), you will have air spaces that will prevent wicking.
 
Eino Kenttä
gardener
Posts: 565
281
  • Likes 2
  • Mark post as helpful
  • send pies
    Number of slices to send:
    Optional 'thank-you' note:
  • Quote
  • Report post to moderator
Okay, nice to hear, thanks!

Thomas Tipton wrote:As far as water wicking, and post rot, have you looked into the practice of charring the wood and setting it on a stone?


That's a thought! I've done it for fence posts, but hadn't considered it for actual buildings. You don't think it might weaken the post, though? Also, will it prevent wicking, or just immediate rot in the charred area? Char is quite porous... Interesting idea though. Maybe if you char lightly, and then apply something like linseed oil to clog the pores and prevent wicking... We were going to (again) use birch bark for a moisture barrier between rock and post, as has been done traditionally, but our rocks are quite rough and might puncture the bark once pressure is placed on it.

Glenn Herbert wrote:With the amount of raised rock/gravel fill, and setting everything on large flattish stones, I think you will have no moisture issues as long as you end up with good roof overhangs and exterior drainage management. I see no need to add active ventilation to the subfloor; a couple of perimeter vents as you described will do fine. If you are in Finland, your air will be quite cold and thus hold very little moisture in absolute terms.

Good to hear! Well, I do have a tendency to overthink things, and perimeter vents are a lot easier to build than active ventilation. We are in coastal Norway, so our air will never be very cold or dry, but I doubt traditional houses in our area had active ventilation... Suppose simpler might be better.
 
Thomas Tipton
pioneer
Posts: 337
34
chicken wood heat rocket stoves
  • Likes 1
  • Mark post as helpful
  • send pies
    Number of slices to send:
    Optional 'thank-you' note:
  • Quote
  • Report post to moderator
Charred post on stone technique

Charred post technique

Charred post on stone windproof
 
Eino Kenttä
gardener
Posts: 565
281
  • Mark post as helpful
  • send pies
    Number of slices to send:
    Optional 'thank-you' note:
  • Quote
  • Report post to moderator
Ooh, that looks cool! Thanks!
 
the struggle IS the education. Wise old tiny ad:
A PDC for cold climate homesteaders
http://permaculture-design-course.com
reply
    Bookmark Topic Watch Topic
  • New Topic