As I begin the second growing season in my high tunnel project, I think it's a good time to share the details and design decisions that led to this point and seek a bit of assistance if possible. Full disclosure, I'm not an engineer. I encountered a few issues with the earth tube install that I will elaborate on, but I'm really happy with the results so far.
A little background:
Why the high tunnel? For six years after moving to North Idaho I day dreamed about almost every type of greenhouse I could imagine. In the end I was laying out a fancy 4 season structure with insulated walls and south facing polycarbonate face and earth tubes when I ran into a road block. I could not produce a budget. Having never built one, I had no idea what the total cost would be.
At this point a couple commercial growers recommended the high tunnel route, combined with an NRCS grant that covers a significant percentage of the purchase price. My thinking was: cut and dry price, larger foot print, and we could produce significantly more produce when the sun is shining and do some basic food preservation to make it through the periods when the sun is not shining.
Why the earth tubes? I was wavering on again off again with the earth tubes, and it was basically a split decision heading home with a trailer on a Friday and running by the supplier to grab the 12" main ducts and 100 foot rolls of 4". I was already going to have an excavator for running electric and water, so might as well throw in some earth tubes.
Why the roof vent? They make it really appealing and a cheap add on in the catalog and I had no idea it would add a bit of complexity and a good bit more time pulling the plastic and setting up the roof vent. It was not until the day before I was pulling the plastic that I watched a youtube video showing someone running 2x6 boards the length of the rafters for walking on and working on the structure. This little tidbit would have saved me hours, as I ended up strapping a pallet to the top of the side by side and using that for scaffolding. I was also hoping this would allow me to avoid using shade cloth and keep things naturally venting in the summer which can hit 100 from time to time.
Issues with the earth tubes : These were due entirely to my lack of experience and foresight. I will describe how I went about it, and then what I plan to change for the next greenhouse.
I think most people who do earth tubes excavate the entire foot print of the structure, install all of the tubes, and then return all of the soil. That would have been lovely, however I did not have the capacity to excavate the entire 30 x 72 structure or the time and place to put all of that material efficiently. So what I ended up doing is placing the main 12 inch lines at both ends and the center. Then I proceeded to work my way across one half of the greenhouse, excavating down three feet and placing that material further along the path, then installing two or three or four 4" connecting runs. Then burying those runs while excavating the next channel for the next 3 or 4 runs of 4" drain pipe. I believe there are total of 13 or 14 runs between each 12" pipe. Definitely not a lot of runs, I think maybe 900 feet total 4" pipe buried at 3 feet deep.
Basically I just wanted to get it finished and I had limited time. In hindsight, I inverted a lot of subsoil and there has been some huge compaction issues that did not arise until the day I was planting tomatoes and needed a crow bar and a good sledge to get them deep enough. But I'm an optimist when it comes to soil building and I feel with the right resources and diligence, that can be overcome and structure returned.
When I build the next structure(because the best greenhouse is the next one) I have been thinking that it would be feasible to lay in the main pipes with an excavator, but then do the cross pipes one at a time with a walk behind trencher, that digs three or four feet. Then install the tube, bury the trench, and move to the next one. I have a feeling this will eliminate a lot of the subsoil issues I encountered.
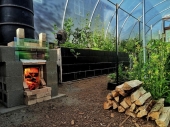
Second issue I had with the tubes was that I assumed that getting them in place and somewhat sealed would be sufficient as they would get buried and maintain their position and function. On this point I was wrong. I used a chainsaw to cut the 12" pipe at a 45 degree angle and then spin one piece 180 degrees to the get the right angle. I drilled a few holes and wound some bailing wire through the joints like a doctor might stitch up a cut. Well, before I got around to covering the thing in plastic, we had a wet spring and that particular area of subsoil turned into some red, blob-like ooze that ended up filling up a good portion of my center tube. I was somewhat willfully ignorant as I looked down the center tube from above and saw soil building up. I waited until I had a access to a small backhoe to tackle that repair, as I'm not getting younger, and had no plans to do any hand digging. A shop vac, a water hose, a 20 foot pvc pipe and a couple days later, and I had the center tube 95% cleared and decided to seal it with expandable foam this time. Lesson learned.
At the moment I do not have the greenhouse tied into the grid. I bought two 12 volt radiator fans and two solar panels to drive the earth tubes. My intention was not to have enough heat exchange capacity to run fans overnight and keep up the night time temperatures. I was only attempting to heat up my three foot growing space and use radiant heat to extend the season. The solar panels are nice because they are basically self determining, when the sun is shining, the interior is warm and the fans should move air underground. Quite simple.
This is where I could really use some recommendations so I don't have to reinvent the wheel. If you know someone versed in process control, I was hoping to install some temp sensors and humidity sensors and soil temp sensors, and tie them into some automated vents. My goal was to have a simple system that could record this in a database that I could share for people considering installing earth tubes. If you know someone in this field, who could consult on this project, please let me know.
Thus far I am really satisfied with the build, despite the challenges. We also now have an abundance of produce, that before a covered environment, with this short growing season, never yielded a satisfactory amount of tomatoes. I would highly recommend the high tunnel approach with an NRCS grant. I got mine from midwest produce supplies in Iowa, and they were great to work with.
My roof vents operate purely passively, without electricity. When they get warm, a fluid inside them expands pushing the windows open. When it cools down, they close.
I hope to have automatic venting at some point in the future. One nice option with the manual venting is that in the very early season when I just have cover crops in there I can keep it closed up and let it heat up as the earth tubes transfer a good bit of heat three feet down. I’m hoping this will also work well at the end of the season to build up a heat savings bank to make it through our freak cold snaps. Time will tell
This is awesome, thanks for sharing. I too can't afford the greenhouse I really want. I just found a used hoop house with side walls on craigslist and decided to dive in with the savings and learn.
I'm a bit obsessed with information about temperature but also don't know what kind of fancy units others use to record and share. It's probably expensive anyhow. Years ago I bought two RC-5 temperature logger devices that work great, except you don't have data until you pull them from the location they are at and import the data onto a computer. Still, I imagine it's the most affordable option.
Now that I have a greenhouse I just bought three more on ebay for $30. I now have 5 total. I will put one 6" down in the soil outside the greenhouse and one 6" down in the greenhouse -- I just made up 6", no idea what I should measure, and I wish I had a bunch more to do every foot down to 3'. I also want one at the top inside my greenhouse to simply know how hot it gets (and get me excited about earth tubes that I would probably have to install one by one with a trencher), one on the ground, and one outside the greenhouse on the ground.
The last photo has a ton of grass. Can you tell me what you're doing there?
West of Denver, Colorado @ 8,000'
Zone 4(ish)... Summers are still brutal!
I fantisize about being able to grow tropical trees here in zone 8b via a greenhouse or high tunnel, in my mind a high tunnel makes more sense because more space, but I could be totally wrong as I've never experienced one before, only seen them online.
Celtic/fantasy/folk/shanty singing at Renaissance faires, fantasy festivals, and other events in OR and WA, USA.
RionaTheSinger on youtube.
Pop-up garden/vintage+ yard stand owner.
How was the application for the NRCS grant in Idaho? Was the process simple, or complicated?
I saw a video from KY that said the grant allowed $5.92/sq ft of greenhouse in 2023 - wondering what the grant allowed in Idaho.
I'm in SE Idaho, 5A, and I'm thinking I'll bury mine about 6 ft down and run some earth tubes as well.
The process of applying for the grant was very easy, and the local NRCS office did almost all of the work. Basically, you apply for the grant, the deadline each year is around October or November as I recall. Then they will come out and inspect your proposed site to make sure it is not directly on the breeding grounds of some wetland endangered frogs. Also when they come to inspect, they would like to see that you have grown something in the space, even if it is a cover crop. So you have a space capable of growing, and it would not violate EPA laws somehow.
Then they will put together the contract and you will sign it the following summer. As soon as you sign it, you have one year to purchase a high tunnel and install it, but I believe you can file for an extension if you need longer.
After you complete construction, they will come out and inspect it, and inspect the installation manual, so hold onto that.
After it passes inspection, you can expect the grant direct deposited in your account.
Every year the total amount possible for the grant varies. The year I did it, I received 5k dollars back. Basically taking 30% off the price of the basic structure.
Keep in mind : Even though they pay per square foot, it is up to a maximum of 1000 square feet.
So you could build a high tunnel half the size of this one, and get the same payout from the grant.
It's a great program, I recommend it.
If somebody says you look familiar, tell them you are in porn. Or in these tiny ads:


 6
6