• Post Reply Bookmark Topic Watch Topic
  • New Topic
permaculture forums growies critters building homesteading energy monies kitchen purity ungarbage community wilderness fiber arts art permaculture artisans regional education skip experiences global resources cider press projects digital market permies.com pie forums private forums all forums
this forum made possible by our volunteer staff, including ...
master stewards:
  • Carla Burke
  • Nancy Reading
  • John F Dean
  • r ranson
  • Jay Angler
  • paul wheaton
stewards:
  • Pearl Sutton
  • Leigh Tate
  • Devaka Cooray
master gardeners:
  • Christopher Weeks
  • Timothy Norton
gardeners:
  • thomas rubino
  • Matt McSpadden
  • Jeremy VanGelder

Rocket Mass Heater with a Glass Chimney

 
Posts: 42
1
  • Likes 1
  • Mark post as helpful
  • send pies
    Number of slices to send:
    Optional 'thank-you' note:
  • Quote
  • Report post to moderator
Rocket Mass Heater with a Glass Chimney

I’ve spent a significant amount of time and money working on a Rocket Mass Heater design that has a glass chimney. The way I imagined it seeing a 2 to 4 foot flame blazing up my chimney while producing a clean burn and efficiently heating my house with sticks would be a really cool thing.

I’ve had a few people tell me that it can’t be done, that ultimately the design would not work. But from the testing I have done so far, I’d have to say they are wrong. I have some good video evidence to show that I am off to a good start.

Unfortunately, I need to put this project on hold for quite a few years. I have some other more pressing long term projects so I cannot perfect this design. I was planning on bringing it to market. But now I am hoping someone else will pick up the ball where I left off and continue with my design and produce a product from it because I want one!


Rocket Mass Heater Done Differently

In order for a RMH to have a glass updraft chimney we cannot have a barrel, or at the very least the barrel would require some significant modifications that I am not skilled or tooled up to make at this time. So my current design has no barrel. And I the glass emanates a significant amount of heat such that the fast heat the barrel gives off is instead given off by the glass.

Only about half, or perhaps a third of the updraft chimney can be glass. The glass should be double pane to insulate it better since a hot updraft chimney sucks so much more than a cool one. (More rockety.) And it is that sucking action that draws the air across the fuel so as to cause it to burn clean.

The other major change in this design is that the fuel should burn directly under the updraft chimney. I found that when the fire had to maneuver corners and change directions I lost the cool effect of those really tall flames. When the fuel is burning directly under the updraft chimney those flames dance so beautifully up the chimney and well past the 2 feet of glass that I was using.


Produce the Hottest Rocket Mass Heater on the Market

Please, someone take this design and perfect it. Make it mass produced product and then give me one for giving you a jump start on this project. Or at the very least sell me one at a bargain price. I’ll answer your questions to let you know what I tried, what worked, what failed. I’ll even help you brainstorm on some of the ways to move forward. But I just don’t have the time or money to continue the trial and error process of perfecting this myself.


Picture Showing the Basic Concept

This picture shows the basic concept. It was taken when I did not have it burning clean, thus you see smoke coming out. However, I did get it burning clean and efficient and the videos will show that. This picture also shows a design that started out burning sideways instead of burning directly under the glass updraft chimney.

It is intended that the end of that pipe be placed inside of a mass just like the usual RMH designs.


Coolest Video of My Rocket Mass Heater with a Glass Chimney

This video starts showing the burn chamber which is directly under the glass updraft chimney. The burn chamber also has a double pane of glass so that we can see the sticks burning. You also get a peek of the ash chamber where the small coals and ash can fall into and then be scooped out as necessary.

As the video goes on we can see the 2 feet of flames going up the glass updraft chimney, then at about 14 seconds into the video the camera backs up and you can once again see the burn and ash chambers.

At about 30 seconds the camera has backed up to show the steam coming out of the stove pipe. That is steam, not smoke…remember you can see the burn through the glass chimney and it is clean. If it were not clean the glass would be black and you could not see the flames.

When the camera moves back in closer notice the inner walls of that glass chimney, it has rock wool insulation on the inside of the chimney as well as on the outside of it too.

At about 1:06 into the video it shows the fuel input. Unfortunately this design was too small of a fuel chamber and it was a constant chore of feeding in the fuel. Notice that the fuel is sticks about the diameter of my finger or twice that in some cases. Pretty cool to get such a hot fire out of such small pieces of fuel! That is about a 2.5” by 5” opening for feeding in the fuel.

I have since designed and built a better fuel chamber, had it working somewhat, but ultimately had to end in this unsatisfying place of admitting I could not complete this project.


More Videos Showing the Dancing Flames

These are more of the same, but focusing more on the beauty of the dancing flames.


Video of a Failed Design

What is interesting about this video is that you can get a better idea of how I did the chimney and how the flames in a J-Tube design just does not dance upright as good as flames directly under the chimney.


pollinator
Posts: 4154
Location: Northern New York Zone4-5 the OUTER 'RONDACs percip 36''
67
hugelkultur fungi books wofati solar woodworking
  • Mark post as helpful
  • send pies
    Number of slices to send:
    Optional 'thank-you' note:
  • Quote
  • Report post to moderator
Michael Skowronski : Welcome to the Permies.com Rocket Mass Heater and Wood Stoves Forum Threads. While I have a few problems with your Units build, you have reached a
forum where your work should and can be regarded for what it is, a Major attempt to think outside the box, here at Permies we truly respect people who not only think outside the
box, but work so hard at it ! Your work should be evaluated by that standard ! Much of the Success you have created is due to your generous use of further insulating materials!

This is my 4th attempt to write you the respectful response that your posting of this wood burning unit deserves. It clearly resembles a Rocket Mass Heater in quite a few ways !
I am more concerned by what your video did not show than what It did !

In the videos that you provided I was only able to see a specific rocket-y effect in that the video showed that you successfully created a horizontally drafting condition of some
5' (based on the size and location of the supporting cinder locks in the video ) after a short down draft and elbow !

It must be said that the Rocket-y noise that we have come to expect and love is only an Auditory signature of the Turbulent flow of Gases/Plasma within the R.M.H., it appears to
be missing in your build. A single length of stove pipe placed over a conventional 'camp fire' will produce the 2' of flame you show in your videos !

I have a few questions on how easily this unit will initially draft, and am not satisfied from what I have seen that it will burn as clean as a more conventional unit, "Clean Glass "
only means that your temperatures are high enough to keep them clean at that point, not that you have achieved a clean burn !

While you used insulating mat-like materials quite effectively, showing the J-Tube and combustion Unit directly above Regular cinder blocks, with the history of these blocks and
concrete in general showing repeated failures at temperatures in the 400 degree F range This flaw, common in U-Tube builds should not be repeated here !

As always, your comments and questions are both solicited, and always Welcome ! For the Good of he Craft ! Think like Fire ! Flow like a Gas, Don't be the Marshmallow! A. L.
 
pollinator
Posts: 2392
104
  • Mark post as helpful
  • send pies
    Number of slices to send:
    Optional 'thank-you' note:
  • Quote
  • Report post to moderator
A scientific glass shop can set you up with a piece of quartz tubing that will (1) be much less prone than glass to cracking from temperature shocks and (2) is made to fit to the runs of metal flue.

Quartz is more expensive than regular glass, but would be worth it in this application. (IMHO)
 
Michael Skowronski
Posts: 42
1
  • Mark post as helpful
  • send pies
    Number of slices to send:
    Optional 'thank-you' note:
  • Quote
  • Report post to moderator
Thanks for your reply Allen, it is taken as respectful.

allen lumley wrote:It must be said that the Rocket-y noise that we have come to expect and love is only an Auditory signature of the Turbulent flow of Gases/Plasma within the R.M.H., it appears to
be missing in your build.


Having never witnessed and official RMH I must say that I am unfamiliar with the Rockety noise that you refer to. I have read references to it but I have also not heard too much of it in the many videos I have seen involving rocket mass heaters. Certainly mine does make a slight sound, but nothing like a rocket. My goal is a clean and beautiful burn as well as efficient heating.


allen lumley wrote:A single length of stove pipe placed over a conventional 'camp fire' will produce the 2' of flame you show in your videos !


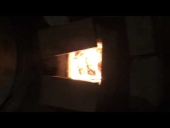
Although that may be, this fire is a handful of small sticks producing a 2' flame. That impresses me, and I think it would also impress a lot of other people as well. Personally I love to see my fire and this is a very cool way to view it and to visually witness the rocketyness of the heater.


allen lumley wrote:I have a few questions on how easily this unit will initially draft,


I have made a few designs that initially drafted very well, but then I did not have the u-turn, downdraft and extra stove pipe involved at that time, which certainly creates more drag that must be overcome. This particular one you see in the video did take about 8 minutes to get to a clean burning stage. I found it was shortened by initially covering the glass with insulation and removing it once the smoke stopped coming out of the stove pipe.

allen lumley wrote:and am not satisfied from what I have seen that it will burn as clean as a more conventional unit, "Clean Glass "
only means that your temperatures are high enough to keep them clean at that point, not that you have achieved a clean burn !


I am sure there must be some instruments out there that could measure the cleanliness of the burn. I don't have them nor am I familiar with them in anyway. All I can say is it looks clean and it smells clean. What comes out the end of the stove pipe is clean.

I will not assert that this particular version of this design is optimal, far from it. I need better materials and better ways to test it to optimize it. However, I do believe from what I had done so far that a fully clean burn can be achieved with a design that incorporates about 3 feet of glass at the bottom (between the burn chamber and the beginning of the chimney) followed by a very efficient 3-4 feet of chimney which will also provide an added measure of rocketyness.

From my understanding the things required to get a full burn are enough oxygen and heat to burn all of the fuel. Providing those two conditions the shape of the heater will dictate how rockety it is, thus pushing the hot gasses through the system and out into the open air in a clean way. If that can be achieved in a beautiful way then we have a winner...IMHO.


allen lumley wrote:While you used insulating mat-like materials quite effectively, showing the J-Tube and combustion Unit directly above Regular cinder blocks, with the history of these blocks and
concrete in general showing repeated failures at temperatures in the 400 degree F range This flaw, common in U-Tube builds should not be repeated here !


This concern about the cinder blocks is a distraction from the primary design. They are just a temporary base from which I am experimenting from. For this design to be nice, it must be raised from the floor somewhat. Whatever the body design ultimately turns out to be, the heat of the body can be insulated well enough to prevent damaging what is underneath.

In the photo that is fire brick I am using and it is cemented together with a very strong Rutland furnace cement rated at 2700°F. That is a bit of particle board under it and it never even got hot enough to discolor the wood (except where some coals fell through the rock wool I used to cover it up). So the cinder block is not at all a concern.

In most of those videos, the body is made of two layers of steel mesh, with 2" of rock wool in between them and a 1/8" thick layer of Rutland furnace cement covering the steel mesh. It is so strong that I can stand on it. And it holds up to the heat very well. HOWEVER, I do not pretend this is the ideal material to use, just a possibility. For a unit that would be mass produced many other possibilities exist. This is for someone else to decide, or perhaps for me at some distant future when I once again have the time to play around with it.


John Elliott wrote:A scientific glass shop can set you up with a piece of quartz tubing that will (1) be much less prone than glass to cracking from temperature shocks and (2) is made to fit to the runs of metal flue.

Quartz is more expensive than regular glass, but would be worth it in this application. (IMHO)


The glass I am using is 3/16" Neoceram which is rated to 2300°F. Originally I tried a Quartz glass tube from a propane patio heater, it was thinner and it was cracked by the intense heat. But a custom made piece might do the trick, maybe, thanks for the suggestion.


Lets Focus on the Goal
I appreciate the suggestions and the questions. However, right now the choice of materials and manufacturing techniques are my secondary concern. My primary concern is to get other people thinking outside of the box with the hopes that someone will actually build a commercial version of this that is both beautiful and efficient, which will result in me owning and enjoying it for many years to come. This is possible, I know it is. Lets make it happen!

Sincerely,
Michael Skowronski
 
Posts: 51
4
  • Mark post as helpful
  • send pies
    Number of slices to send:
    Optional 'thank-you' note:
  • Quote
  • Report post to moderator
I will just comment that it seems to me, all those flames are a sign that your burn tunnel is probably in-efficient. Since there is no data, burn tunnel temps, co levels etc. it is hard to evaluate this. But one of the whole points of rocket heaters is efficiency. I am primarily familiar with our dragon burners, so I can not speak to all rocket heater tunnels, but there is no flame in a dragon burner by the time it hits the heat riser. The testo gas analyzer shows them to be over 90% efficient and wood flames in the feed channel are purple hot. You need hot to be efficient.

Everyone loves to see the fire, but i think it will take a different approach.
 
Michael Skowronski
Posts: 42
1
  • Mark post as helpful
  • send pies
    Number of slices to send:
    Optional 'thank-you' note:
  • Quote
  • Report post to moderator

Sandy Mathieu wrote:I will just comment that it seems to me, all those flames are a sign that your burn tunnel is probably in-efficient. Since there is no data, burn tunnel temps, co levels etc. it is hard to evaluate this. But one of the whole points of rocket heaters is efficiency. I am primarily familiar with our dragon burners, so I can not speak to all rocket heater tunnels, but there is no flame in a dragon burner by the time it hits the heat riser. The testo gas analyzer shows them to be over 90% efficient and wood flames in the feed channel are purple hot. You need hot to be efficient.

Everyone loves to see the fire, but i think it will take a different approach.


In my design the burn tunnel is directly under the heat riser, making them nearly one and the same. If you look at the video of what I called my "Failed Design" it matches what you are saying, the flames did not extend up into the heat riser, except 1 or 2 inches on a few rare occasions. But once I placed the burn directly under the heat riser then we get to see the nice tall flames.

From a private email

Sandy Mathieu wrote:
the main problem is you have a goal to maximize the flames, not the efficiency, not wrong, just not really a rocket heater candidate, to me.


Actually efficiency is more important to me. I was unaware that the presence of flames indicated an inefficient burn, is that true? Surely there must be some flame, even if it is only 1 foot high. I do know the color of the flame does indicate the heat level of it, but do you really think achieving a purple or near purple flame with a glass chimney/heat riser is impossible? Do you really believe such a design cannot be efficient as well as visually stunning?

I think a purple flame would look cool as well. If that is what it takes to be efficient then I'd definitely want the interior of that part of the heat riser to be a white color material like the rock wool one I used in most of those videos or some of the other materials I have seen so that the purple flame is visible. Wouldn't want a dark background color there.

Thanks Sandy for taking the time to look. Since your company is in the business of making commercial products I was hopeful you'd take this idea and run with it. If not, perhaps someone else will. If not, perhaps one day I'll get back to it.
 
no wonder he is so sad, he hasn't seen this tiny ad:
Rocket Mass Heater Jamboree And Updates
https://permies.com/t/170234/Rocket-Mass-Heater-Jamboree-Updates
reply
    Bookmark Topic Watch Topic
  • New Topic