• Post Reply Bookmark Topic Watch Topic
  • New Topic
permaculture forums growies critters building homesteading energy monies kitchen purity ungarbage community wilderness fiber arts art permaculture artisans regional education skip experiences global resources cider press projects digital market permies.com pie forums private forums all forums
this forum made possible by our volunteer staff, including ...
master stewards:
  • Carla Burke
  • John F Dean
  • Timothy Norton
  • Nancy Reading
  • r ranson
  • Jay Angler
  • Pearl Sutton
stewards:
  • paul wheaton
  • Tereza Okava
  • Andrés Bernal
master gardeners:
  • Christopher Weeks
gardeners:
  • Jeremy VanGelder
  • M Ljin
  • Matt McSpadden

Raised Bed Garden

 
Posts: 8
  • Likes 4
  • Mark post as helpful
  • send pies
    Number of slices to send:
    Optional 'thank-you' note:
  • Quote
  • Report post to moderator
Hi, I am looking for a solution for my raised bed gardens. I double stacked them and I also will have them on stone. I am looking for something that is nontoxic to seal the seams between the beds and something to put on the bottom to keep the soil from draining out. I am looking for something that will last. Is there a nontoxic caulking for the seams? I was looking at NSF rated pond liner but it is expensive. The beds are 3'x6'. Thanks!
20250314_134832.jpg
[Thumbnail for 20250314_134832.jpg]
20250319_163043.jpg
[Thumbnail for 20250319_163043.jpg]
20250314_134919.jpg
[Thumbnail for 20250314_134919.jpg]
20250314_134910.jpg
[Thumbnail for 20250314_134910.jpg]
 
steward & manure connoisseur
Posts: 4530
Location: South of Capricorn
2516
dog rabbit urban cooking writing homestead ungarbage
  • Likes 10
  • Mark post as helpful
  • send pies
    Number of slices to send:
    Optional 'thank-you' note:
  • Quote
  • Report post to moderator
Welcome to permies! those are some nice beds you have there.
I would say don't worry too much about the seams and leakage, frankly. You're going to have all sorts of organic matter in there holding your gorgeous dirt together.

About the stone-- is there something underneath you don't want the roots getting to? Or is it just a matter of not wanting to get the stone out of there?
You could conceivably use cardboard or even fabric (depending on your drought/drainage situation, the fabric might differ). both will eventually break down. Roots will eventually penetrate the stones. Once you fill up with dirt it will hold the fabric in place.
 
Wild Boy
Posts: 8
  • Likes 3
  • Mark post as helpful
  • send pies
    Number of slices to send:
    Optional 'thank-you' note:
  • Quote
  • Report post to moderator

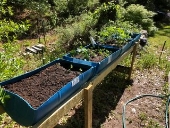
Tereza Okava wrote:Welcome to permies! those are some nice beds you have there.
I would say don't worry too much about the seams and leakage, frankly. You're going to have all sorts of organic matter in there holding your gorgeous dirt together.

About the stone-- is there something underneath you don't want the roots getting to? Or is it just a matter of not wanting to get the stone out of there?
You could conceivably use cardboard or even fabric (depending on your drought/drainage situation, the fabric might differ). both will eventually break down. Roots will eventually penetrate the stones. Once you fill up with dirt it will hold the fabric in place.


Thanks for replying and the compliment! There is about 6" to 8" of stone under the gardens and was looking for something to stop the dirt and roots from going into the stone.
 
Tereza Okava
steward & manure connoisseur
Posts: 4530
Location: South of Capricorn
2516
dog rabbit urban cooking writing homestead ungarbage
  • Likes 5
  • Mark post as helpful
  • send pies
    Number of slices to send:
    Optional 'thank-you' note:
  • Quote
  • Report post to moderator
hm. that is a lot of stone to consider moving out of the way. I think you'll find that eventually some roots may end up going through, hard as it may to believe. I don't think you're going to be losing soil into the stones (it's like garden pots, it looks like it's all going to go out those little holes at the bottom, but once the roots get going and mycelium and soil biota, that dirt isn't going anywhere).
You may find old canvas or even carpet to throw under them if it concerns you. Those would both be really good and safe options (obvs depending on what kind of carpet it is). But I wouldn't worry too much-- personally i'd just plant right in there on top of the rocks with nothing in between, but that's just me.
 
pollinator
Posts: 506
Location: Boudamasa, Chad
143
2
  • Likes 2
  • Mark post as helpful
  • send pies
    Number of slices to send:
    Optional 'thank-you' note:
  • Quote
  • Report post to moderator
Wow,  fancy! I like the green color. Ditto to the above replies. They look real deep,  so I'm curious,  what are you going to fill them with?
 
Steward of piddlers
Posts: 6173
Location: Upstate NY, Zone 5, 43 inch Avg. Rainfall
2994
monies home care dog fungi trees chicken food preservation cooking building composting homestead
  • Likes 7
  • Mark post as helpful
  • send pies
    Number of slices to send:
    Optional 'thank-you' note:
  • Quote
  • Report post to moderator
Welcome to Permies!

I actually would recommend not going the caulking route, I think after you fill them and it initially settles you won't have much soil leakage. To be safe near the bottom, I would recommend the route of getting some branches/scrap wood and filling the bottom layer with that as a sort of hügelkultur/space filling approach. The small seam from stacking should not be an issue from my experience.

Something that might prove to be an issue is once you fill up those beds, the pressure on the walls can cause some bulging/twisting. If you have the ability, you might want to beef up the cross ties to just be safe.

 
Tereza Okava
steward & manure connoisseur
Posts: 4530
Location: South of Capricorn
2516
dog rabbit urban cooking writing homestead ungarbage
  • Likes 4
  • Mark post as helpful
  • send pies
    Number of slices to send:
    Optional 'thank-you' note:
  • Quote
  • Report post to moderator

Timothy Norton wrote:nice video about raised beds


This youtube channel is a great resource for growing in raised beds, this guy grows only in raised beds like yours (excluding his citrus/banana orchard) and he's a real wealth of information (and an endless source of dad-like jokes, if you can stand it).
 
gardener
Posts: 788
Location: 5,000' 35.24N zone 7b Albuquerque, NM
551
hugelkultur forest garden fungi foraging trees cooking food preservation building solar greening the desert homestead
  • Likes 6
  • Mark post as helpful
  • send pies
    Number of slices to send:
    Optional 'thank-you' note:
  • Quote
  • Report post to moderator
Nice beds!
Speaking from a "learned-it-the-hard-way" experience, now I secure 1/4" hardware cloth along the bottom of all open raised bed frames. Unlike an impervious liner, hardware cloth provides good drainage for plants and soil to prevent water logging and rotting. The mesh prevents tree roots from running over and slurping up the water and nutrients in the generously nurtured beds. The mesh also prevents unwanted critters from burrowing up from under the beds to dine on the luscious roots.
Luckily, your beds are still empty which makes the job a lot easier. Digging out the soil to line the bed bottoms after the beds were filled was not a happy experience for me.
 
gardener
Posts: 620
Location: New England
275
cat monies home care books cooking writing seed wood heat ungarbage
  • Likes 8
  • Mark post as helpful
  • send pies
    Number of slices to send:
    Optional 'thank-you' note:
  • Quote
  • Report post to moderator
The first 2 beds we did, we put plastic parking/gravel forms and hardware cloth under the dirt, because we'd had gophers, mice etc. in that part of the garden before. When we did the next 3, we didn't, as we'd had deep raised beds there before and minimal damage, also there was asparagus in those beds, so I didn't want to disrupt it any more than necessary.

We did reinforce the sides of the beds too.

After 3 years for the first bed and 2 now for the next 3, I can say that there's minimal loss from critters, leakage, etc. so I agree with the comments above.
 
Posts: 145
Location: eastern cape breton, 6b
53
cat fish ungarbage
  • Likes 4
  • Mark post as helpful
  • send pies
    Number of slices to send:
    Optional 'thank-you' note:
  • Quote
  • Report post to moderator
all the above comments are valid - tbh - just fill them as is!

you could run some 1-2 inch branches along the seams at the bottom on the inside to help with dirt seeping out - a little soil around the outside perimeter should work too.

those are dandy beds - they are also tall!! you could probably do fine taking the top half off each on and double your beds (if you have more room) - 18" is deep enough for almost anything.. it will help with buckling  as well (less height kicking out)..

the rocks on the bottom are fine - yes some soil will get in there but eventually fuse in... side seams should be fine.!

best of luck!
 
Wild Boy
Posts: 8
  • Mark post as helpful
  • send pies
    Number of slices to send:
    Optional 'thank-you' note:
  • Quote
  • Report post to moderator

Tereza Okava wrote:hm. that is a lot of stone to consider moving out of the way. I think you'll find that eventually some roots may end up going through, hard as it may to believe. I don't think you're going to be losing soil into the stones (it's like garden pots, it looks like it's all going to go out those little holes at the bottom, but once the roots get going and mycelium and soil biota, that dirt isn't going anywhere).
You may find old canvas or even carpet to throw under them if it concerns you. Those would both be really good and safe options (obvs depending on what kind of carpet it is). But I wouldn't worry too much-- personally i'd just plant right in there on top of the rocks with nothing in between, but that's just me.


Thanks, I am going to level the gardens as well.
 
Wild Boy
Posts: 8
  • Likes 3
  • Mark post as helpful
  • send pies
    Number of slices to send:
    Optional 'thank-you' note:
  • Quote
  • Report post to moderator

Nathanael Szobody wrote:Wow,  fancy! I like the green color. Ditto to the above replies. They look real deep,  so I'm curious,  what are you going to fill them with?


I was going to do some logs, mulch, and dirt.
 
Posts: 1039
Location: In the woods, West Coast USA
214
  • Likes 3
  • Mark post as helpful
  • send pies
    Number of slices to send:
    Optional 'thank-you' note:
  • Quote
  • Report post to moderator
You can line the bottom with large concrete pavers, or pour concrete about 3" thick on the bottom.   I think bricks might wiggle out of place, but if you've got a cheap supply, since those in the gravel as much as possible.

I've started doing dry-pour concrete for most of my pads.  This would take a few days in your situation, (it can take a month if it's a car or tailer pad, since concrete needs to cure, regardless of how it got there.)  But you just need it to solidify.  I think the beds are deep enough that the alkalinity won't matter, it will be outweighed by the organic mix of the soil/compost/mulch.  

Pour out the powder from the bag, keep it about 3 inches thick, level it with the back of a rake, then with a fuzzy paint roller and that gets it pretty even.  Then, this is important, just mist (not sprinkle) the top layer with water from a hose or a  mist sprayer until it's shiny.  This creates a crust.  slowly you will add water until it permeates the 3" thickness of powder.   Then wait 20 minutes, mist it again.  Every 20 minutes mist it until it's shiny for 5 or 6 times.  Cover it, keep the sun off it, let it sit overnight, then sprinkle it with water from the hose at least 3 more times 20 minutes apart.  If you can touch it with your finger and it doesn't give, let the water run gently all across the top until it's shiny.    Repeat throughout the day several times, keep it covered.  When it feels really solid in a few days after repeated soakings, then it's probably safe to add the soil.

I've done dry-pour for a car parking spot.  I spent a month after spreading 4" of powder, putting wire mesh in the center of the powder, wetting it down a couple times a day, keeping it covered, made sure it was solid, starting to cure, and could support the weight of a vehicle.  That was two years ago, and there's not a crack in it, it looks great.

the nice thing about dry pour is if you get interrupted it's no problem.  It's not as heavy as wet concrete.  You can walk on it gently if you need to, but it should be resmoothed if you do.  I did a wide pad under an arbor in my garden and couldn't reach the backside of it, since it was next to a fence, but walking on it was fine.

Check it out on YouTube.  
 
Nathanael Szobody
pollinator
Posts: 506
Location: Boudamasa, Chad
143
2
  • Likes 2
  • Mark post as helpful
  • send pies
    Number of slices to send:
    Optional 'thank-you' note:
  • Quote
  • Report post to moderator

Wild Boy wrote:

I was going to do some logs, mulch, and dirt.


Perfect. Just make sure there's dirt between and around it all. You want biological "pathways" allthroughout. Lots of manure would also be helpful to provide nitrogen. It will compact significantly over time just just keep adding good stuff on the top. Like compost.

But like everyone else said: absolutely no worries about the cracks. Once you're soil is most it will just hold together.
 
Cristo Balete
Posts: 1039
Location: In the woods, West Coast USA
214
  • Likes 1
  • Mark post as helpful
  • send pies
    Number of slices to send:
    Optional 'thank-you' note:
  • Quote
  • Report post to moderator
I just thought of something else that is easier.  Green shade cloth.  I have some that is 30 years old and is as sturdy as the day I bought it.  

The beige version started falling apart in a few years, and I put that in the driveway, under gravel, and it has helped as road fabric.  Not worth the money.

You haven't mentioned gophers.  They eat through just about everything except concrete.
 
Wild Boy
Posts: 8
  • Likes 3
  • Mark post as helpful
  • send pies
    Number of slices to send:
    Optional 'thank-you' note:
  • Quote
  • Report post to moderator

Timothy Norton wrote:Welcome to Permies!

I actually would recommend not going the caulking route, I think after you fill them and it initially settles you won't have much soil leakage. To be safe near the bottom, I would recommend the route of getting some branches/scrap wood and filling the bottom layer with that as a sort of hügelkultur/space filling approach. The small seam from stacking should not be an issue from my experience.

Something that might prove to be an issue is once you fill up those beds, the pressure on the walls can cause some bulging/twisting. If you have the ability, you might want to beef up the cross ties to just be safe.

[youtube]https://www.youtube.com/watch?
v=zqnqSBBXvM0[/youtube]


Thanks for the video and the information!
 
Wild Boy
Posts: 8
  • Likes 1
  • Mark post as helpful
  • send pies
    Number of slices to send:
    Optional 'thank-you' note:
  • Quote
  • Report post to moderator

Amy Gardener wrote:Nice beds!
Speaking from a "learned-it-the-hard-way" experience, now I secure 1/4" hardware cloth along the bottom of all open raised bed frames. Unlike an impervious liner, hardware cloth provides good drainage for plants and soil to prevent water logging and rotting. The mesh prevents tree roots from running over and slurping up the water and nutrients in the generously nurtured beds. The mesh also prevents unwanted critters from burrowing up from under the beds to dine on the luscious roots.
Luckily, your beds are still empty which makes the job a lot easier. Digging out the soil to line the bed bottoms after the beds were filled was not a happy experience for me.


Thank you, I will check out the hardware cloth!
 
Wild Boy
Posts: 8
  • Mark post as helpful
  • send pies
    Number of slices to send:
    Optional 'thank-you' note:
  • Quote
  • Report post to moderator

James MacKenzie wrote:all the above comments are valid - tbh - just fill them as is!

you could run some 1-2 inch branches along the seams at the bottom on the inside to help with dirt seeping out - a little soil around the outside perimeter should work too.

those are dandy beds - they are also tall!! you could probably do fine taking the top half off each on and double your beds (if you have more room) - 18" is deep enough for almost anything.. it will help with buckling  as well (less height kicking out)..

the rocks on the bottom are fine - yes some soil will get in there but eventually fuse in... side seams should be fine.!

Thanks, I will put the wood around the edges.
best of luck!

 
Wild Boy
Posts: 8
  • Mark post as helpful
  • send pies
    Number of slices to send:
    Optional 'thank-you' note:
  • Quote
  • Report post to moderator

Cristo Balete wrote:You can line the bottom with large concrete pavers, or pour concrete about 3" thick on the bottom.   I think bricks might wiggle out of place, but if you've got a cheap supply, since those in the gravel as much as possible.

I've started doing dry-pour concrete for most of my pads.  This would take a few days in your situation, (it can take a month if it's a car or tailer pad, since concrete needs to cure, regardless of how it got there.)  But you just need it to solidify.  I think the beds are deep enough that the alkalinity won't matter, it will be outweighed by the organic mix of the soil/compost/mulch.  

Pour out the powder from the bag, keep it about 3 inches thick, level it with the back of a rake, then with a fuzzy paint roller and that gets it pretty even.  Then, this is important, just mist (not sprinkle) the top layer with water from a hose or a  mist sprayer until it's shiny.  This creates a crust.  slowly you will add water until it permeates the 3" thickness of powder.   Then wait 20 minutes, mist it again.  Every 20 minutes mist it until it's shiny for 5 or 6 times.  Cover it, keep the sun off it, let it sit overnight, then sprinkle it with water from the hose at least 3 more times 20 minutes apart.  If you can touch it with your finger and it doesn't give, let the water run gently all across the top until it's shiny.    Repeat throughout the day several times, keep it covered.  When it feels really solid in a few days after repeated soakings, then it's probably safe to add the soil.

I've done dry-pour for a car parking spot.  I spent a month after spreading 4" of powder, putting wire mesh in the center of the powder, wetting it down a couple times a day, keeping it covered, made sure it was solid, starting to cure, and could support the weight of a vehicle.  That was two years ago, and there's not a crack in it, it looks great.

the nice thing about dry pour is if you get interrupted it's no problem.  It's not as heavy as wet concrete.  You can walk on it gently if you need to, but it should be resmoothed if you do.  I did a wide pad under an arbor in my garden and couldn't reach the backside of it, since it was next to a fence, but walking on it was fine.

Check it out on YouTube.  


Interesting, I will look at the videos the tube!
 
Without deviation from the norm, progress is not possible - Zappa. Tiny ad:
montana community seeking 20 people who are gardeners or want to be gardeners
https://permies.com/t/359868/montana-community-seeking-people-gardeners
reply
    Bookmark Topic Watch Topic
  • New Topic