• Post Reply Bookmark Topic Watch Topic
  • New Topic
permaculture forums growies critters building homesteading energy monies kitchen purity ungarbage community wilderness fiber arts art permaculture artisans regional education skip experiences global resources cider press projects digital market permies.com pie forums private forums all forums
this forum made possible by our volunteer staff, including ...
master stewards:
  • r ranson
  • Carla Burke
  • Nancy Reading
  • John F Dean
  • Jay Angler
  • paul wheaton
stewards:
  • Pearl Sutton
  • Burra Maluca
  • Joseph Lofthouse
master gardeners:
  • Timothy Norton
  • Christopher Weeks
gardeners:
  • Jeremy VanGelder
  • Maieshe Ljin
  • Nina Surya

RMH joining stove pipe.

 
Posts: 4
  • Likes 4
  • Mark post as helpful
  • send pies
    Number of slices to send:
    Optional 'thank-you' note:
  • Quote
  • Report post to moderator
Hi
I am trying to build a RMH from used stainless steel stove pipe for the heat exchange.
The only issue is not all of the used pipe has a crimped male  end so they won't slot into each other.
Do I have to buy a joiner piece or is there another way to join the pipe?

 
master pollinator
Posts: 1875
Location: Ashhurst New Zealand (Cfb - oceanic temperate)
580
duck trees chicken cooking wood heat woodworking homestead
  • Likes 3
  • Mark post as helpful
  • send pies
    Number of slices to send:
    Optional 'thank-you' note:
  • Quote
  • Report post to moderator
Hi Trayc, and welcome. If you're patient and have a set of needle nose pliers, you might be able to put enough of a crimp in the end of a piece to get it to fit into another. I do this with tin cans to make quick and dirty mini retorts for making biochar in a wood fire.
 
rocket scientist
Posts: 6573
Location: latitude 47 N.W. montana zone 6A
3456
cat pig rocket stoves
  • Likes 7
  • Mark post as helpful
  • send pies
    Number of slices to send:
    Optional 'thank-you' note:
  • Quote
  • Report post to moderator
Hi Trayc;
They make a crimping tool to self-crimp pipe.
I own one, but they do not work very well.

The "real" adapter piece is easiest.
 
pioneer
Posts: 898
Location: Inter Michigan-Superior Woodland Forest
145
5
transportation gear foraging trees food preservation bike building solar writing woodworking wood heat
  • Likes 9
  • Mark post as helpful
  • send pies
    Number of slices to send:
    Optional 'thank-you' note:
  • Quote
  • Report post to moderator

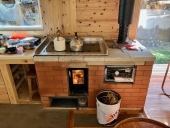
Trayc Smith wrote:I am trying to build a RMH from used stainless steel stove pipe for the heat exchange.
The only issue is not all of the used pipe has a crimped male  end so they won't slot into each other.
Do I have to buy a joiner piece or is there another way to join the pipe?


If it will be only one piece, cheaper to buy a male-male section, but for ongoing work and flexibility to make cuts where needed, a tool will pay for iteself quickly. I'm not sure about brand names and sourcing, but this one has worked on my galvanized ducts: https://www.menards.com/main/heating-cooling/ductwork/ductwork-tools-installation/masterforce-reg-5-blade-round-duct-pipe-crimper/thht-1444/p-1488180036833-c-6833.htm
I don't see any reason something like it would not work on stainless...
 
Rocket Scientist
Posts: 4602
Location: Upstate NY, zone 5
613
5
  • Likes 4
  • Mark post as helpful
  • send pies
    Number of slices to send:
    Optional 'thank-you' note:
  • Quote
  • Report post to moderator
I suspect the gauge of the stainless vs. the gauge of the galvanized pipe will be important. Also, stainless typically seems to be stiffer than carbon steel, as in less willing to keep a bend.

The single crimping tool has worked well for me on steel stovepipe. The multiple crimper may work well, but obviously would require much more force to use.
 
Coydon Wallham
pioneer
Posts: 898
Location: Inter Michigan-Superior Woodland Forest
145
5
transportation gear foraging trees food preservation bike building solar writing woodworking wood heat
  • Likes 4
  • Mark post as helpful
  • send pies
    Number of slices to send:
    Optional 'thank-you' note:
  • Quote
  • Report post to moderator
Obviously buying from a brick and mortar store would be advantageous to facilitate an easy return if there was a problem. The package mentions no restriction on the duct material, so there should be no objection to a return even if your local store might otherwise be stringent.

Just testing mine, crimping normal ducts feels like cutting paper with a scissors. The double jointed hinge provides good leverage. I tried it on some scrap steel from an oil drum lid and made an impression to match a professional duct with about as much pressure as I would apply if I wanted to impress someone with a firm handshake...
 
Trayc Smith
Posts: 4
  • Likes 2
  • Mark post as helpful
  • send pies
    Number of slices to send:
    Optional 'thank-you' note:
  • Quote
  • Report post to moderator

Phil Stevens wrote:Hi Trayc, and welcome. If you're patient and have a set of needle nose pliers, you might be able to put enough of a crimp in the end of a piece to get it to fit into another. I do this with tin cans to make quick and dirty mini retorts for making biochar in a wood fire.


Thanks the pliers worked well.
 
Trayc Smith
Posts: 4
  • Likes 4
  • Mark post as helpful
  • send pies
    Number of slices to send:
    Optional 'thank-you' note:
  • Quote
  • Report post to moderator


[Im looking for advice on a heat shield.
We are building the RMH in a cabin with timber framing in the walls . I've removed the drywall and cobbed between the framing for insulation. From what I've read just cob over the wood is not enough protection.
I have rocks,  ceramic tiles and red brick to possibly use somehow?
Can these be used with a thick layer of cob?
Can there be gaps of cob in between the stone or tiles?


20250512_135423.jpg
[Thumbnail for 20250512_135423.jpg]
 
pollinator
Posts: 147
17
  • Likes 2
  • Mark post as helpful
  • send pies
    Number of slices to send:
    Optional 'thank-you' note:
  • Quote
  • Report post to moderator
Not an expert, but I have experience with heat shields for traditional wood stoves.  An air space of 2 inches between your cobbed wall and the shield will make an enormous difference

In the past I have used brushed steel, cob or tile for forming heat shields, make it moveable at first so by testing temps, you can arrive at the perfect  air gap to use.  My 2 cents.
 
Curse your sudden but inevitable betrayal! And this tiny ad too!
Learn Permaculture through a little hard work
https://wheaton-labs.com/bootcamp
reply
    Bookmark Topic Watch Topic
  • New Topic