• Post Reply Bookmark Topic Watch Topic
  • New Topic
permaculture forums growies critters building homesteading energy monies kitchen purity ungarbage community wilderness fiber arts art permaculture artisans regional education skip experiences global resources cider press projects digital market permies.com pie forums private forums all forums
this forum made possible by our volunteer staff, including ...
master stewards:
  • r ranson
  • Carla Burke
  • Nancy Reading
  • John F Dean
  • Jay Angler
  • paul wheaton
stewards:
  • Pearl Sutton
  • Burra Maluca
  • Joseph Lofthouse
master gardeners:
  • Timothy Norton
  • Christopher Weeks
gardeners:
  • Jeremy VanGelder
  • Maieshe Ljin
  • Nina Surya

Steel J-Tube RMH - Feed Back appriciated


Posts: 4
Location: United States - Western Washington
  • Mark post as helpful
  • send pies
    Number of slices to send:
    Optional 'thank-you' note:
  • Quote
  • Report post to moderator
I am working on building a rocket mass heater to replace my oil burning furnace.

So far, I have been very lucky to scavenge everything I need to date except for some welding rod. But, since I am using what I have, I am also not doing everything "by the book" either.

Here is a link to some photos of my outdoor test setup:

http://s945.photobucket.com/user/concreterocks/library/?sort=3&page=1

I have also attached a video.

The stove was getting a bunch of smoke back at first but once I read further in forums and turned my chimney vertically, that went away. However, I still think I am not getting a very clean burn. I realize that most of what I see coming out of the chimney could be steam from the wet ground, but it still smells very smokey. Like a fire place that has been dampered down too much. Also, the top of the barrel seems a little on the cold side to me.

Here is what I used:

Steel tube steel 6x6x5/16 for the J-Tube, 55 gallon steel drum, 16 ga 8" spiral duct for the exhaust from the barrel. 8" chimney sleeve filled with waist fire-proofing spray for insulation inside a 16" spiral duct (sealed top and bottom but left hollow for the test) for inside the drum.

I have two basic suspicions:

1. The distance from my fire box to my heat riser is too long. I had a pretty tough time getting the draw to start every time I have started the stove. Although once I converted to a vertical chimney it got much better. Still, it seems that whether or not the barrel is on, it just does not develop a good secondary burn. I have seen videos where there is fire 10" out of top of the J-tube. Mine does nothing close to that. Also, the top of my barrel never gets very hot. Hot enough to boil splashes of water but not REALLY hot.

2. I have too much space between my barrel and the insulation section of my fire riser. I used a 16" diameter duct as the outer surface of my insulation section. For my test it is hollow but it will be filled when I do the permanent install. I did insulate the inner section of 8" sleeve. 22 1/2" drum - 16" duct = 6 1/4" / 2 since the drum is centered and you have 3 1/8" around the drum. Obviously that is a much larger cross section than the rest of the system. My intention was to keep as much heat as I could out of the "radiant heat" portion of the system because I won't use much radiant heat in the location of the stove. I want as much as possible going into the mass.

One other possible problem could be my horizontal section (although I really hope not). I used 6x6 tube for the whole system so it is the same size as the rest of the J-Tube. It would be a lot of work to cut it down but better to do it now than later.

I also wouldn't mind some feedback on the "mass" portion of the system and on the base of the stove. For the base, I would prefer not use cob since I don't know of a good source of clay where I live. Is regular concrete ok? I do a lot of concrete work so it is what I am good at working with. For the mas, I have a lot of sand and rock, my plan is to eventually build a Hearth near an existing raised fireplace. I want to face it with stone and top it with a concrete top (like a concrete counter/table top). Any feed back on those type of systems would help me out.

Thank You,
 
Posts: 46
Location: interior Alaska
1
  • Mark post as helpful
  • send pies
    Number of slices to send:
    Optional 'thank-you' note:
  • Quote
  • Report post to moderator
I can't help you with the mass part since I am pretty new at this and haven't started fooling with masses yet.

On the previous, your dimensions sound OK to me, having a big gap between the insulation and the barrel should help your immediate radiance at the expense of less heat in the mass. If you want less radiance and more calories in the mass, yup, you might close down the gap between your riser and barrel some more.

1. How does the J tube run with no barrel on it? I _think_ the combustor length versus riser height is gonna be kinda flexible as long as the riser height v- feed tube height is good. Are you losing heat from the sides of the combustor that therefore isn't getting through the barrel into your mass?

2. How does the J tube with no barrel on it run with kiln dried dimension lumber stored indoors? I mean not a 2x4 you pulled out of a snow bank 2 minutes ago, but rather a 2x6 that's been in your garage a couple weeks? No offense, many folks local to me think their wood is much drier than it really is. Kiln dried lumber stored in your house should be at 7-10% moisture content. If your J runs good on kiln dried you may wanna take a moisture meter to your wood pile. No offense. I should save this paragraph to my desktop so I can copy/paste it over and over. None of my J's run worth a plugged nickel with wood over about 15-18% (give or take) MC.

2a. How small are your splits? It seems to me the question isn't how much mass can you fit in the feed tube, but rather how much surface area of wood can you expose to flame. I am kicking around the idea of buying a bunch of fireplace matches, cutting a kitchen match length off the business end and then seeing how those little sticks with no heads on them burn in the J tube.

3. If your J runs great with the barrel on it for 30-60 minutes and then starts smoking, you might oughta upgrade the insulation between your riser and your barrel. Sounds like this isn't a fertile field of inquiry.

4. Can you rig a chimney straight to the barrel outlet and run just that part, bypassing the mass?

Sorry, that's all I got.

EDIT: I had the photobucket album open the whole time I was typing and finally looked it over. I think your sticks are way too big. Starting with a 2x2, split that sucker into quarters. I agree that you aren't getting secondary combustion. Starting from dry 2x you oughta be. Besides splitting those things smaller, try keeping them away from the corner where the feed tube meets the combustion chamber, and try to add more wood so the feed tube is 1/2 to 2/3 occupied by wood. Your welds look good- if it wasn't for that green stuff in your yard I would think you lived close enough to come over and help me out.

Looking at 'J tube smoking" especially I think your combustion chamber length is fine, but you don't have enough wood in there and the pieces you have in there, I think, are too big. And they are at an angle. Try stoking that thing vertical, put the end of every fresh piece of wood into the beautiful ash pit you built that I lust for. Go for nothing bigger in cross section than your pinky finger, fill that vertical tube with vertical pieces to 60-70% of the CSA of the feed tube and see if it doesn't take off. That's gonna be a rip-snorter when you get it fully stoked.

If you are coming from box type stoves you gotta make a leap. A properly stoked rocket is the same as a dangerously overstoked box stove. I would estimate properly stoked your neighbors will be coming out on their porches to look for low flying jet airplanes. Looking forward to more pictures.

EDIT II: Please do peruse this thread to see what I do know. If I had your J tube in my yard the little old lady who over reacts too late that lives three doors down from me? She would be dialing 911...on Alaskan poplar. If you can come up with some really really dry white oak you are going to be out on your front porch in shorts and a Hawaiian shirt with a frozen blender drink in your hand to take a break from the heat in your house. https://permies.com/t/30134/rocket-stoves/prototyping-stove-running-variables#234497
 
gardener
Posts: 3471
Location: Southern alps, on the French side of the french /italian border 5000ft elevation
194
  • Mark post as helpful
  • send pies
    Number of slices to send:
    Optional 'thank-you' note:
  • Quote
  • Report post to moderator
First of all, metal is doomed, it dosn't last in a properly working rocket.

Secondly, where is the insulation? You need at least 2 inches of rockwool, perlite or vermiculite around the fed tube, burn tunel and heat riser.

Thirdly, The barrel gap can be bigger than 2 inches, so make sure you have at least that.

Fourth, how is your transition from barrel to chimney?

 
Posts: 91
Location: Spokane, Washington
6
  • Mark post as helpful
  • send pies
    Number of slices to send:
    Optional 'thank-you' note:
  • Quote
  • Report post to moderator
Satamax is correct: metal is doomed.

First of all, it only reflects a certain amount of heat back into the system where you need it the most, while it conducts and transfers the rest of it elsewhere. Enough of the right kind of insulation will let you achieve the higher temps, but when you do, the other problem rears its ugly head: reduction and spalling.

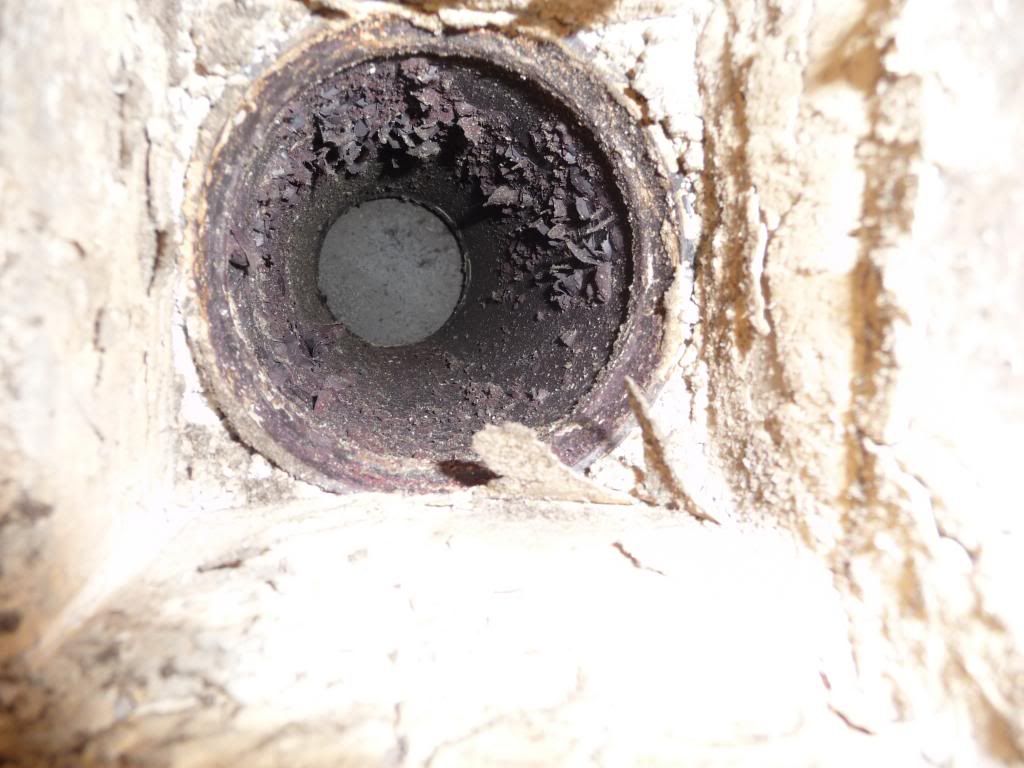
Here's a picture I took of the inside of a 4.5 inch system after it been in constant use for 6 weeks...

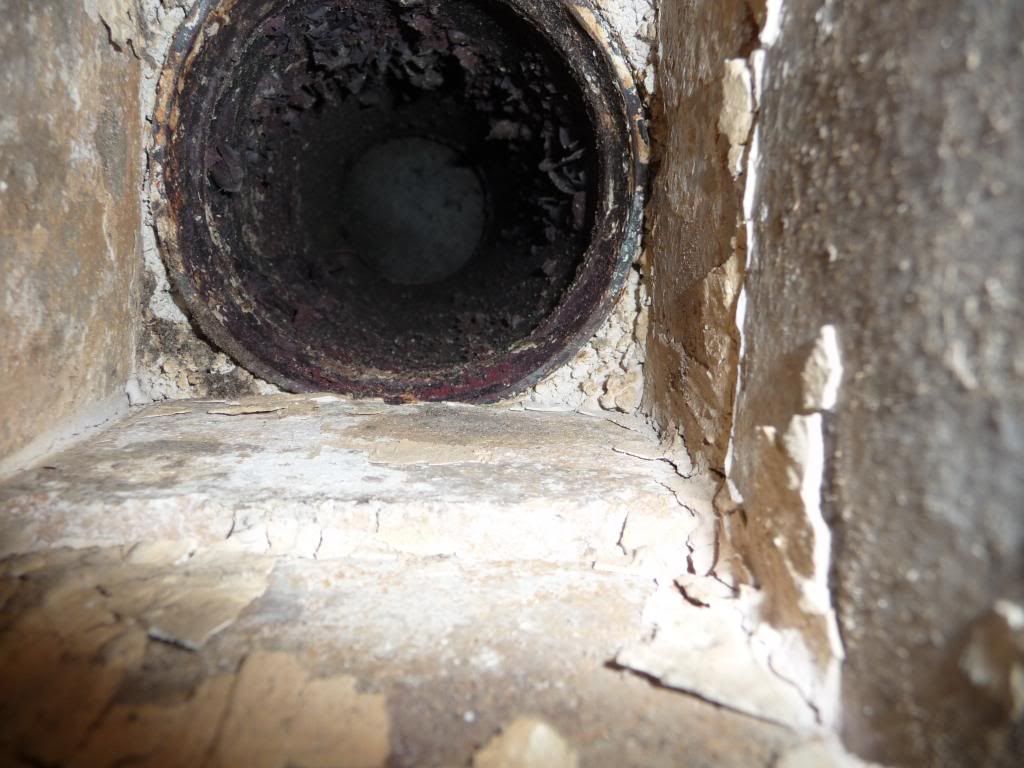
The feed tube, burn tunnel, and the beginning of the riser are refractory brick, but the rest of the riser is a piece of schedule 40 steel pipe. The riser is insulated with 2 inches of a tightly packed refractory compound made up of fireclay, perlite, silicon dioxide sand, and alumina fibers. You can see the spalling of the steel sticking out like a bunch of steel cornflakes, creating a ton of drag on the system. The stuff that looks the same thing going on on the firebrick, is just excess fireclay slip from the assembly of the core. As you can see in this photo, it knocks off easily and reveals smooth firebrick...

The metal spalling, however, does not come off so easily, and merely continues throughout use. Here's a picture taken from the top of the riser after about 4 months of constant use...

As you can see, the insulation worked quite well, because i was able to get hot enough temps at the top of the riser to blister and spall the steel.

Metal seems like a quicker, sensible option at first, but in the long run, it will fail.
 
pollinator
Posts: 4154
Location: Northern New York Zone4-5 the OUTER 'RONDACs percip 36''
67
hugelkultur fungi books wofati solar woodworking
  • Mark post as helpful
  • send pies
    Number of slices to send:
    Optional 'thank-you' note:
  • Quote
  • Report post to moderator
One Note, One Vote ; Heres mine, forget the metal ! Big AL !
 
Satamax Antone
gardener
Posts: 3471
Location: Southern alps, on the French side of the french /italian border 5000ft elevation
194
  • Mark post as helpful
  • send pies
    Number of slices to send:
    Optional 'thank-you' note:
  • Quote
  • Report post to moderator

allen lumley wrote:One Note, One Vote ; Heres mine, forget the metal ! Big AL !

Metal is dooommed!


Posts: 4
Location: United States - Western Washington
  • Mark post as helpful
  • send pies
    Number of slices to send:
    Optional 'thank-you' note:
  • Quote
  • Report post to moderator

Thanks for the feed back. I posted some new photos from tonight when I took the temp set up apart.

http://s945.photobucket.com/user/concreterocks/library/?sort=6&page=1

So I am sure there is some good reason to say "Steel is doomed" but I would be interested to know if you have any experience with which steel types fail and which don't. "Steel" can be used more generally than it should. The example in Chris' photos, (I am almost positive) are shooting down the bell end of a ductile iron water/sewer pipe. That is an almost entirely different material than my 5/16" thick ordinary strength steel salvaged column. It also reacts much, much different to heat, if you don't believe me, get a cutting torch and cut 1/4" thick steel and 1/4" thick ductile iron.

Obviously, from my original post, I am not sure that I was not getting as high of temps as I should have. However, I did not get any scaling after 6 hours of burning.

In my experience, (I was a shipyard welder in a land far far away and a time long long ago), OS steal handles heat very well if it is clean (and I am talking about Heat as in a torch or plasma cutter or arch welding). If the bi-product of these stoves really is only CO2, then that should actually protect the stove after the oxygen has burned off. Welders still use CO2 for a shielding gas. It is the oxygen that will eventually wear away the steel, although I would think that it would take a really long time to wear way 5/16" of it even running at 1000 degrees - we routinely pre-heated steel to 800 degrees before welding.

In any event, my whole point about clean steel (before I started off on a tangent) was to ask if anyone has tried polishing their "doomed steel" with a sand paper pad on an angle grinder? As I said, heat on steel with a dirty surface is much different than on clean / shinny surface.

Michael Scott:

Lots of good advice. I think you hit the nail on the head when it came to moisture in the wood. Most of the wood I have is well cured but not all. Also , it has been under an outdoor cover in the pacific northwest so it is damp. I brought some inside to dry a bit more and I think I will obviously need a "final drying area" as part of the final project.

Now that you can see the heat pattern on the J tube in the newer photos, do you still think that making it a bit shorter wouldn't help? I would rather not shorten it if I don't have to cut the thing apart.
 
Satamax Antone
gardener
Posts: 3471
Location: Southern alps, on the French side of the french /italian border 5000ft elevation
194
  • Mark post as helpful
  • send pies
    Number of slices to send:
    Optional 'thank-you' note:
  • Quote
  • Report post to moderator
Mate, thoses stoves an easily reach 1200c° In hammersmithing that called clear yellow to shiny white. Metal nearly turns liquid there. Fusion point of steels being about 1435/1470C° iirc. So, no steel can cope. Some very high content tungsten steel might work better. But even then, they can't be full tungsten. Plus they are hard to work with.

Surprisingly, in france we have thoses cheap aluminised steel pipes. They are protected by a layer of aluminium, which turns to alumina with heat and air. Alumina melts at 2072C° Tho, if you reach 1500C°, which might happen, your tube colapses. Filling the room with smoke.

Thoses stoves are not protected from oxidation, as they run mostly with exess air, and freakingly hot gases still containing oxygen, plus moisture isn't too good for steel.

I have melted gas bottles used for the innards of a rocket.
 
allen lumley
pollinator
Posts: 4154
Location: Northern New York Zone4-5 the OUTER 'RONDACs percip 36''
67
hugelkultur fungi books wofati solar woodworking
  • Mark post as helpful
  • send pies
    Number of slices to send:
    Optional 'thank-you' note:
  • Quote
  • Report post to moderator
Con Rocks ; I went to wikipedia and read the article on High Temperature Hydrogen Attack, And found it very informative.
I was looking for something else at the time ! This is Single Atoms of hydrogen swimming around in the plasma that is our RMHs Fire,
Elemental or single atom hydrogen is so slippery it will actually leak out of/through the pores in glass ! Give it a shot. Big AL !
 
Chris Burge
Posts: 91
Location: Spokane, Washington
6
  • Mark post as helpful
  • send pies
    Number of slices to send:
    Optional 'thank-you' note:
  • Quote
  • Report post to moderator
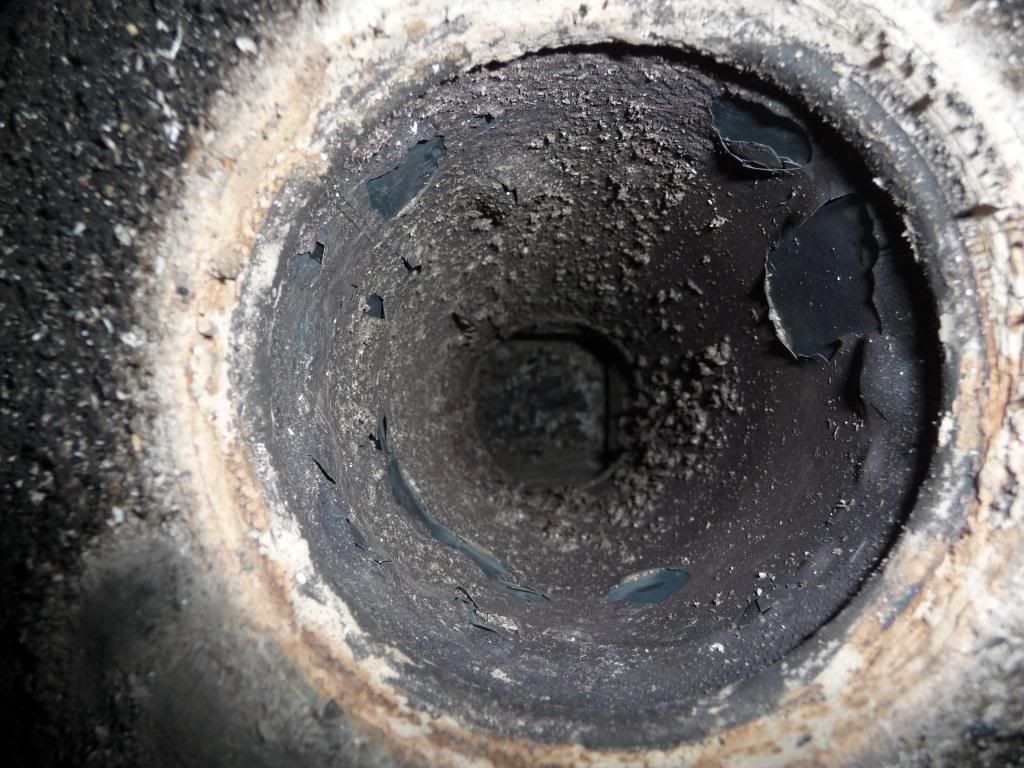
c rocks:

this is what happens to HSS at the correct burn temps...

I went through three of these in three months.

metal......doomed
 
In the renaissance, how big were the dinosaurs? Did you have tiny ads?
Learn Permaculture through a little hard work
https://wheaton-labs.com/bootcamp
reply
    Bookmark Topic Watch Topic
  • New Topic