Ok.. Some images of the build:
There has been a little bit of a redesign as the space that the stove was built in was rather tight. The tank sets directly on top of the heat riser, rather than beside it. The stove is much taller than I had planned, but much narrower and al in all a tighter build. I like that heat coming from the riser strikes the bottom of the tank directly. The intense hit should provide a rather violent mixing action, turning over the water and making it stratify less.
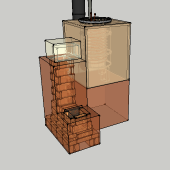
First, some of the parts. This is the stand that will hold up the water tank and allow heat-flow around the bottom of the tank and up to the bell above.
The tank. This is a 24 gallon tank, taken from the old hot water heater (in the same location). We cut the top off and added a sleeve for extra height to allow some free-board in the water level. I wanted to keep the solar pre-heater in the system and the top pipe connector seemed a bit too close to the top, now there's room for expansion and to keep the water level up a bit.
The base going in. It's insulated under with perlite/clay.
The bottom of the stove, the firebox and burn tunnel are built with firebrick. My neighbour gifted me with some extra large bricks, measuring 12" by 6" by 3", not a lot of them are needed to do the job. The body of the stove was built from adobe brick and cob. In this image, you can see the bottom layout. The heat riser was cast in place using adobes as the outside of the form and sonotube, cardboard concrete forming tube as the inside. We kept the burn tunnel as short as possible, you can see that the center of the heat riser (base) is not in the center of the build. The heat riser is angled to the center at top.
Unfortunately, I don't have any images of the forming/packing of the heat riser. The base was built up with adobes, making an inside adobe form left quite a bit of space around to be filled. We used the dirt/rocks/broken adobes and other debris left over from taking apart the previous stove to fill in extra space in this new build.
Here you can see the rocket stove base, J-tube inside, with the spacer and stove setting on top.
You can see in this image the piping for the solar pre-heater attached to the tank. The exhaust manifold is partially visible at the bottom left of the tank.
We then built a "bell" around the hot water heater. We built a surround of adobes, leaving a gap of around 8 inches between the adobes and the tank, all the way around. The adobes were plastered with an insulating layer of perlite/clay, added as we went, layer by layer. Here you can see down between the tank and the bell walls to the exhaust below.
Leslie Jackson, having fun with the process.
The top layer was made with adobes leaned up the long way, angled into the barrel and cobbed around to seal. Here, James Henderson places the last bricks and closes 'em up.
The stack, raw.
The top acquired a little definition and some sealing with a wet, cob like plaster. Here, Jay Emery applies and smooths.
The coil was suspended (by myself and Robin Bonine (pictured)) by hanging it from wires. The coil is not allowed to touch the bottom or sides, in case of a failure that may drain the tank it will never be allowed to come in direct contact with a super-heated barrel side.
Then, the coil was hooked up to water inlet/outlets, the tank was filled with water and the system tested.
It works!


 1
1


 ? It looks pretty easy to wrap in fiberglass (or something more natural), if needed.