• Post Reply Bookmark Topic Watch Topic
  • New Topic
permaculture forums growies critters building homesteading energy monies kitchen purity ungarbage community wilderness fiber arts art permaculture artisans regional education skip experiences global resources cider press projects digital market permies.com pie forums private forums all forums
this forum made possible by our volunteer staff, including ...
master stewards:
  • r ranson
  • Nancy Reading
  • Carla Burke
  • John F Dean
  • Jay Angler
  • paul wheaton
stewards:
  • Nicole Alderman
  • Pearl Sutton
  • Anne Miller
master gardeners:
  • Christopher Weeks
  • Timothy Norton
gardeners:
  • Nina Surya
  • Matt McSpadden
  • thomas rubino

Composter heating

 
pollinator
Posts: 741
Location: Clemson, SC ("new" Zone 8a)
165
10
  • Mark post as helpful
  • send pies
    Number of slices to send:
    Optional 'thank-you' note:
  • Quote
  • Report post to moderator

jack vegas wrote:Matthew - Oh boy does your last response to Hank Fletcher have my head reeling.  Lots of new stuff to think about!  The Johnson Su Bioreactor paper is a real find.  I haven't read it in depth yet but its bound to keep me awake tonight.  Its particularly interesting to me because after getting into this conversation I'm thinking more and more about how to build a larger scale system needed to accommodate larger chunk material like yard waste and wood chips.


Glad to hear that your grey cells are in an agitated state.  Do a search for Johnson-Su bioreactor and you will find many design variations and examples on YouTube.
 
Matthew Nistico
pollinator
Posts: 741
Location: Clemson, SC ("new" Zone 8a)
165
10
  • Mark post as helpful
  • send pies
    Number of slices to send:
    Optional 'thank-you' note:
  • Quote
  • Report post to moderator

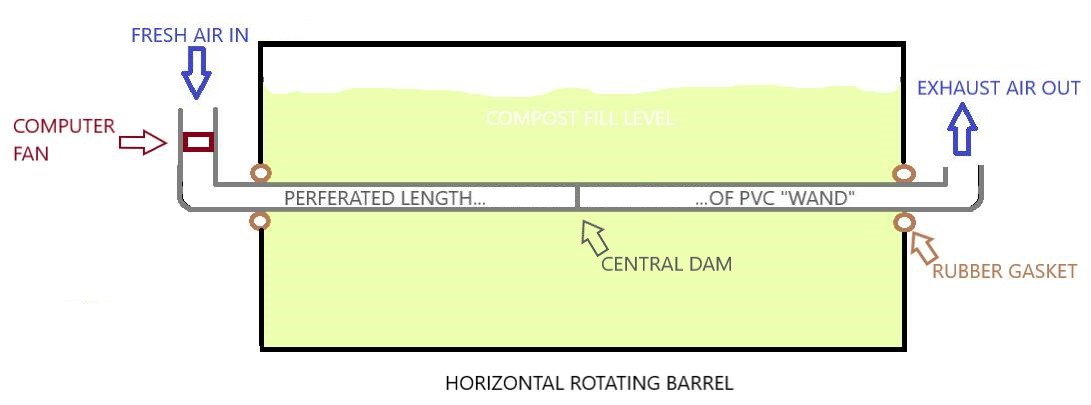
jack vegas wrote:Matthew - I like your central wand.  One reason is that it would allow the fan to blow air rather than suck.  My sucking fan had to work in a humid vapor saturated environment which is not great for an electrical device.  There should probably be a dam in the the middle of the wand however to divert all flow through the drum.  Without it, air could preferentially just travel in one end and out the other, without much flow through the perforations.  Need to think about how to handle the rubbing seal.


I am pleased, even if a little surprised, that you approve of this design.  I do take your point about reversing the direction of air flow.  But I don't immediately see why you couldn't reverse air flow in your original design...?  And yes, that was one of my concerns, that air would follow the path of least resistance through my central wand and not out of it.  Yet I did not immediately see such a poetically simple solution!  I have updated my diagram to show reversed airflow and a central dam in the wand:


jack vegas wrote:A bigger hair dryer may not help much since its important not to overheat the bed beyond about 140 deg-F, otherwise it kills rather than nurtures the bacteria.  I picked the one I did since it was powerful enough and also it was DC.  Another option might be to use an infrared "reptile heater" bulb installed inside the box.  These can be had for about $25 including a a remote thermostat.


I do not believe that an IR heating bulb, as used in reptile cages, would be a suitable alternative to a hair drier to pre-heat or re-heat the air inside the box.  Those bulbs are 150W.  The cheap AC hair driers I am advocating are up to 2kW.  There is just no comparison in terms of power.  Yes, I see that a heater so powerful it kills our bacteria is only counterproductive.  But consider that I have already proposed breaking the "hair drier" part of the system into two components, an electric resistance coil and a blower fan, so that they could be placed on separate circuits and thus be controlled separately.  These could be purchase separately or literally ripped from various hair driers, it doesn't matter.  As a functional pair, I collectively call them "the hair drier."  The "muzzle temp" of a hair drier is determined by three factors: the ambient temperature of the intake air, the wattage of the resistor coil, and the volume of air flowing over that coil.  If we assume the ambient air temperature is constant, then it seems to me that we can achieve any outcome we want by tweaking the other two factors.  Thus in practice I would take a powerful heater from a powerful AC hair drier and then combine it with a fan providing sufficient air flow until I'd lowered the muzzle temp to 140 degrees F.  This should allow for rapid heating of the box with maximum BTUs, yet with minimal concern about inadvertently overheating our bacteria.

jack vegas wrote:Since I was mostly experimenting, I never ran the thing more than 4-5 days without shutting it down.  I cleaned it out every time, though I'm guessing it could easily have run a month before clean-out would be needed.  I estimated heat by taking the total dry material added over a run and dividing by the hours that were run, estimating 8,000-9,000 Btu/lb of dry material.


How interesting that you chose to clean it out and start afresh so frequently.  That means there has not actually yet been a test of the interior compost heater in operation over a prolonged duration with many consecutive daily refuelings.  I wonder what might happen?  I wonder how noticeably the output would decrease over time, as the volume of usable, compostable fuel inside the digester decreased?  Which is to say, as the proportion of that volume comprised of spent "ash" increased?

I see now the logic you used to calculate the thermal output.  If the potential thermal energy embodied in 1 lb of fuel = X BTUs, and the heater is observed to consume 1 lb/hour, then we say that it outputs X BTUs/hr.  I follow the math, but I am doubtful of the results.  Or I should say, I think they should be considered a very rough estimate that I worry is optimistically high.

First of all, I look online and I see the same estimates of 8-9K BTU/lb for the potential thermal energy from firewood (see here).  But then I read that there is good reason to reduce that estimate to just 8K at most (see here).  Then I realize that they are talking about kiln-dried wood, whereas we should assume at least 20% moisture content for air-dried wood.  So reduce again to no more than 6.7K.  Then I consider that they are assuming we will burn the wood, which we will not.  Neither combustion nor composting is a 100% efficient way to convert the chemical energy in the wood to BTUs.  But which conversion process is more efficient, combustion or bacterial digestion?  Can we even guess?  I know that, when composting, a portion of the wood's chemical energy is converted into heat, but then another portion goes to support the bacteria's metabolisms, and then another portion remains embodied in the residual compost, and finally another portion remains embodied in the CO2, methane, ammonia, and whatever other exhaust gases result from the decomposition.  I don't know how big each portion is, nor how that compares to the "portioning" of energy during combustion, nor even how the starting estimate of the wood's thermal energy does or does not take some of these concepts into account.  In other words, when they say "firewood has X thermal energy potential per pound," are they already factoring in estimates for the inefficiencies of the combustion process?

Plus there are likely other factors in the process, and other assumptions baked into the reference data we are using, that I wouldn't even begin to guess at.  My point is simply that, while we don't know a precise figure for the average thermal output from our compost heater, I think we can safely say that it is actually considerably less than 8-9K BTUs/lb of wood fuel.

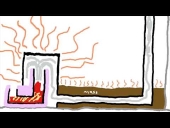
jack vegas wrote:I finally broke down and calculated heat soak through the barrel.  Can't believe I never did before.  Perhaps I did and promptly forgot about it.  Anyway, a 55 gallon drum has about 21.6 sqft of surface area.  The maximum surface temperature I can imagine is about 140 deg-F and at that point the steel can only radiate about 145 Btu/hr-sqft.  So without convection, pure radiation can only dump about 3,130 Btu/hr.  Convection with air (or water) is needed to draw more heat out of the system.  This is both good and bad.  The good news is an un-insulated drum could reach full operating temperature so insulation isn't needed.  On the other hand, a fan is needed to be to push enough air over the drum to draw heat away through convection.  Both to prevent over-heating and to draw more heat out of the system.  It seems my insulated box served as a duct to channel that air.  I may have been operating very close to the limits of my system and not have known it!  So a good design would probably use the hair dryer to start the system and to protect against sudden cooling and the "box" should be configured to provide a good air cooling jacket to maximize convective heat transfer.  Just about any material could be used for this air cooling jacket since it doesn't need to provide insulation.  Cardboard and duct tape might be used to build a well formed cooling jacket and a relatively quiet and inexpensive box fan might be used as the convective air source!


Very interesting.  This could be another argument for a potential vertical drum design, since the one you were considering wasn't insulated, and since now you calculate that insulation may not be necessary even for your horizontal drum design.  In this regard, I remind about Hank's suggestion to replace the closed lid of the vertical barrel with a screen lid.  Needless to say, this is a possibility only because the barrel is vertical.  If, as your new numbers suggest, we might find ourselves bumping against the limited capacity of a rip-roaring compost heater - say, a vertical barrel design 80% full of compost, instead of only 40% - to shed adequate heat via conduction through the steel barrel walls, then using a screen top would be perfect.  Hot exhaust gases would just naturally, continually rise up and out of the unit.

I note that I will choose for now to take on faith your assertions that we need not be concerned with odors emanating from our heater.  I have enough experience with healthy, well-balanced compost to place at least 80% confidence in your assertion ; )

Other advantages of a vertical drum design include 1) increased usable capacity, as I alluded above; 2) ease of fueling through a removable top lid; 3) no need to penetrate the steel barrel circumference at any point, since all sensor wires, power wires, and air flow channels could enter/exit through the top opening; and 4) perhaps less mechanical complexity.  #4 assumes we could perfect an aeration system that precludes the need to ever mix or turn the compost.  Most likely, it would be a forced-air system.  The work already put into Johnson-Su bioreactors strongly suggests that we could indeed perfect such a system.  Are there other "pros" that I missed?  What might any "cons" be?

I have taken what I think are the best elements so far from Jack's, Hank's, and my own input and reworked the diagram for a vertical barrel compost digester.  I believe this is the most promising concept we yet have going.  I left in here the optional notion of insulating the barrel:

 
Matthew Nistico
pollinator
Posts: 741
Location: Clemson, SC ("new" Zone 8a)
165
10
  • Mark post as helpful
  • send pies
    Number of slices to send:
    Optional 'thank-you' note:
  • Quote
  • Report post to moderator
BTW, when it comes to using perforated PVC pipes as aeration devices, whether horizontal or vertical, it occurs to me that they should probably be encased within a close-fitting "sock" made of weed cloth.  This would prevent chunks of compost from entering the pipe, where they could build up and restrict airflow
 
Posts: 40
2
  • Mark post as helpful
  • send pies
    Number of slices to send:
    Optional 'thank-you' note:
  • Quote
  • Report post to moderator
Rainy days make for a good time to play. So I did. Have had quite a few cans I've collected over the past couple weeks, like well over 100. Decided to educate myself and experiment some at the same time. I started with trying to size a round can down to about 3/4" diameter. Then I got to looking and realizing...

I wanted to try a the 5 gallon bucket, especially since I'm in such a small house anyways, but more importantly the 55 gallon drums were outside and I didn't want to go out in the rain to get a soaked bucket and bring it inside:)

I saw I had numerous, 15+ of the Red Bull small diameter sized cans, smaller diameter than a normal 12 oz pop can. I looked and thought, why not stack a couple of them on top of each other and since the 5 gallon bucket is so darn small, why not just cut holes in the side of the can and forget the side arms altogether.

So I cut off the top of two cans, and the bottom out of one of them. I put them together, friction fit, and found something to temporarily work with in the bottom of the bucket and set them down in the bottom of the bucket. I toyed around with the idea of using a third short 7.5 oz can, same diameter, but after grabbing the heat gun(definitely overpowered/overheated more below) I saw I probably didn't want the extra can.

I proceeded to cut four holes down the two can layout. One hole on each 'side'. So air/heat would be escaping all around the pile, versus one side only. Each hole was space roughly 180 degrees apart and probably around 4 inches apart vertically. Think one can N-S, and the other can E-W holes.

After getting the bottom screen cut out, just used 1/2" welded wire mesh set up on two short pieces of angle iron, I found I could/needed to use some of the other mesh for the top to try to help keep the heat gun from wanting to tip over on me. I got the top piece set up and proceeded to see how well it might work, empty, again it was raining outside and I didn't want to go out and get all wet to gather and overly wet leaves/yard clippings.

I didn't know for sure how much trouble I might get into by using the heat gun versus a hair dryer. I found out pretty quickly I wouldn't need to run the heat gun very long to get the cans to smoke for me, not sure if that was from not having the cans cleaned out or what but they did start smoking on me within 20-30 seconds. I also found with the cans sitting in the middle of the bucket, that within 20-30 seconds the sides of the bucket were already starting to get warm. I quickly realized my original thought of trying to find a non-electronic way of cycling the heat gun(1 minute per hour, or something like that) might be more like 20-30 seconds once every hour. Granted I think after the initial start a fan would probably be the more preferable way, at least for something as small as a 5 gallon bucket.

I did end up putting in an additional brace, the metal ruler from a combination square in between the bucket and the top screen to stiffen up the top screen so it didn't want to sag down into the bucket. I wanted to make sure the plastic of the heat gun would be able to touch the side of the cans.

I think I have a setup I will give a try at later today after things have had a bit of a chance to warm up and dry out. I will also try to grab some photos before and after I load up the bucket with debris and post them tomorrow.

No I didn't drill any holes in the bucket, and now thanks to Matt, I think I will hold off on that idea.
 
Hank Fletcher
Posts: 40
2
  • Likes 1
  • Mark post as helpful
  • send pies
    Number of slices to send:
    Optional 'thank-you' note:
  • Quote
  • Report post to moderator
I didn't get around to adding fuel to the buckets but I'm hoping to here later this afternoon. I did get the photos taken last night, but not sure if there is a way other than through an alternative site for putting them up. I don't have any photo account site from which to link to. I figured I would be able to attach the photos versus having to do them through linking, OOPS. For further information, not totally well demonstrated in the photos, the lid is removed from both cans, and only the top can has the bottom removed. The bottom can still has the bottom intact. I figured it would be better off to do it that way to help force the air out the sides of the can rather than letting the air just go all the way down into the bucket. Granted after seeing how well things heated up rather quickly I'm glad I did leave the bottom in the bottom can.

 
pollinator
Posts: 317
Location: New Mexico USA zone 6
66
2
  • Likes 1
  • Mark post as helpful
  • send pies
    Number of slices to send:
    Optional 'thank-you' note:
  • Quote
  • Report post to moderator
I'm definitely attracted to low-tech solutions like Hank is experimenting with.  For one thing, they are projects I can do myself and that often use materials I might already have.  Important because going into town for supplies takes a chunk out of a working day just for the travel time.

I'm off the grid so for me there are no electric bills but also I am limited as to what I can do with electricity to heat my house in the winter (at 7000' altitude the winters are below-zero cold!).  My first solution is seal the sources of drafts and insulate, insulate, insulate!  That alone will reduce power consumption for heat.  

Heating an air-leaky, under-insulated house is a lot like heating the great outdoors.  Investing in reducing the need for heat is way less expensive than the cost of heat in the long run.
 
Posts: 35
Location: Pembrokeshire
8
cat fiber arts building
  • Likes 1
  • Mark post as helpful
  • send pies
    Number of slices to send:
    Optional 'thank-you' note:
  • Quote
  • Report post to moderator

corrado de cesare wrote:Hi, maybe you already know this guy's work, but I put a link anyway.

I am willing to build one for my 100% off-grid hut in the Alps, 1100 mt altitude, probably this autumn.

https://mb-soft.com/public3/globalzl.html


That system came to my mind too. There is an updated version here https://mb-soft.com/public3/globalzo.html
 
Hank Fletcher
Posts: 40
2
  • Likes 1
  • Mark post as helpful
  • send pies
    Number of slices to send:
    Optional 'thank-you' note:
  • Quote
  • Report post to moderator

Lif Strand wrote:I'm definitely attracted to low-tech solutions like Hank is experimenting with.  For one thing, they are projects I can do myself and that often use materials I might already have.  Important because going into town for supplies takes a chunk out of a working day just for the travel time.

I'm off the grid so for me there are no electric bills but also I am limited as to what I can do with electricity to heat my house in the winter (at 7000' altitude the winters are below-zero cold!).  My first solution is seal the sources of drafts and insulate, insulate, insulate!  That alone will reduce power consumption for heat.  

Heating an air-leaky, under-insulated house is a lot like heating the great outdoors.  Investing in reducing the need for heat is way less expensive than the cost of heat in the long run.


One more thing to think about, why in the old days did you wrap a potato in aluminum foil before you put it in the oven? In my previous 'room' I wrapped the whole room in aluminum foil. This time, I'm looking at repurposing soda/beer cans. I have probably over 200 I've collected thus far from the roads around where I live. I keep picking up more all the time. I figure cut the tops and bottoms off. Cut them open and lay them out flat and then glue them together into sheets to put up on the walls. They will reflect both, heat and light. Cuts back on the lighting needs as well. No electricity needed to do it. The aluminum cans will be much harder to tear or anything else. Heck I could even use the sheets for roofing material, seriously planning on it if I can get enough cans, 3-4,000 by the time next spring rolls around. I need the new roof and they would work quite nicely.
 
Posts: 251
Location: Manotick (Ottawa), Ontario
18
  • Likes 3
  • Mark post as helpful
  • send pies
    Number of slices to send:
    Optional 'thank-you' note:
  • Quote
  • Report post to moderator

Douglas Alpenstock wrote:It's a neat idea, but I don't think it would realistically produce enough heat to help the OP in a country with genuine winter.
.


I'm sure you're right. Egged on by the Ontario government's promotion and rebate, last year I installed a heat pump. As the installer told me to expect, the only time the air from a register feels more than barely warm is when the propane furnace is running.

I can get a big pile of shredded fall leaves to 120F, but for only a few days. But if I could set up a boxed pile in the greenhouse, even a little warmth to supplement the RMH would be welcome, and I'm sure the plants would like the CO2.
 
master pollinator
Posts: 5218
Location: Canadian Prairies - Zone 3b
1427
  • Likes 4
  • Mark post as helpful
  • send pies
    Number of slices to send:
    Optional 'thank-you' note:
  • Quote
  • Report post to moderator

David Wieland wrote:

Douglas Alpenstock wrote:It's a neat idea, but I don't think it would realistically produce enough heat to help the OP in a country with genuine winter.
.


I'm sure you're right. Egged on by the Ontario government's promotion and rebate, last year I installed a heat pump. As the installer told me to expect, the only time the air from a register feels more than barely warm is when the propane furnace is running.

I can get a big pile of shredded fall leaves to 120F, but for only a few days. But if I could set up a boxed pile in the greenhouse, even a little warmth to supplement the RMH would be welcome, and I'm sure the plants would like the CO2.


Unfortunately, heat pumps are being sold aggressively in deep cold climates where they are not effective, leaving homeowners holding the bag. In the milder coastal areas of Canada, they work brilliantly and are absolutely the right choice.

If a person had access to a more industrial scale compost heap, this could work. Cattle/dairy farmers in cold regions create straw packs for their cattle to lay on outside. The straw (carbon) is refreshed daily, to keep the animals clean and dry. Their indiscriminate peeing and pooping turns the straw pack into a hot anaerobic compost heap, which in part is why the cattle want to bed down on it. Some farmers bury poly piping in the straw pack as a radiator and pump fluid through it, providing a heat source for buildings. On this scale, it works -- there's enough energy available to harvest in a practical way.
 
Matthew Nistico
pollinator
Posts: 741
Location: Clemson, SC ("new" Zone 8a)
165
10
  • Mark post as helpful
  • send pies
    Number of slices to send:
    Optional 'thank-you' note:
  • Quote
  • Report post to moderator

Hank Fletcher wrote:I did get the photos taken last night, but not sure if there is a way other than through an alternative site for putting them up. I don't have any photo account site from which to link to.


FYI, there are multiple free photo-hosting sites you can use.  Just do a quick Google search and create a free account with one of them.  But I have found a very convenient alternative for whenever I want to post a pic to permies.com - which as you pointed out, can only link to online pics; you cannot upload directly to permies.com.  My solution is to post a pic to my own Facebook page, which is quick, easy, and secure.  With every new post you create, Facebook asks you to whom you'd like to share the post.  For these photo-hosting posts, I set to share with "me only."
 
Matthew Nistico
pollinator
Posts: 741
Location: Clemson, SC ("new" Zone 8a)
165
10
  • Mark post as helpful
  • send pies
    Number of slices to send:
    Optional 'thank-you' note:
  • Quote
  • Report post to moderator

Hank Fletcher wrote:In my previous 'room' I wrapped the whole room in aluminum foil.  This time, I'm looking at repurposing soda/beer cans.  I have probably over 200 I've collected thus far from the roads around where I live.  I keep picking up more all the time.  I figure cut the tops and bottoms off. Cut them open and lay them out flat and then glue them together into sheets to put up on the walls.  They will reflect both, heat and light.  Cuts back on the lighting needs as well.  No electricity needed to do it.  The aluminum cans will be much harder to tear or anything else.  Heck I could even use the sheets for roofing material, seriously planning on it if I can get enough cans, 3-4,000 by the time next spring rolls around.  I need the new roof and they would work quite nicely.


That will make for a very unique aesthetic in your room.

BTW, the name for the concept you are exploring is "radiant barrier."  This is what makes foil emergency blankets work, for one example.

For new construction, you can buy building materials with a radiant barrier built in, such as 4'x8' OSB with aluminum foil on one face, which are marginally more expensive than plain OSB sheets.  This way you can incorporate a radiant barrier into your structure without adding even 1 minute to your build time.  You can also buy rolls of radiant barrier for retrofit.  Typically these are plastic bubble wrap with foil on one side, which you can install just about anywhere.

Important note: you must always install any radiant barrier with the foil side facing an air gap, or else physics dictates that it won't function.  I have been amazed at how many professional builders who use these materials routinely don't understand that.

Your idea of flattening aluminum cans for use as roofing tiles has been done!  Do a search on YouTube.  It's a pretty neat concept, though I must wonder how durable a roof would result.  Don't think I would trust my home to such a technique, but would be all about experimenting with a small shack or some temporary structure.
 
Matthew Nistico
pollinator
Posts: 741
Location: Clemson, SC ("new" Zone 8a)
165
10
  • Mark post as helpful
  • send pies
    Number of slices to send:
    Optional 'thank-you' note:
  • Quote
  • Report post to moderator

Douglas Alpenstock wrote:Unfortunately, heat pumps are being sold aggressively in deep cold climates where they are not effective, leaving homeowners holding the bag. In the milder coastal areas of Canada, they work brilliantly and are absolutely the right choice.


Very true!

Douglas Alpenstock wrote:Cattle/dairy farmers in cold regions create straw packs for their cattle to lay on outside. The straw (carbon) is refreshed daily, to keep the animals clean and dry. Their indiscriminate peeing and pooping turns the straw pack into a hot anaerobic compost heap, which in part is why the cattle want to bed down on it. Some farmers bury poly piping in the straw pack as a radiator and pump fluid through it, providing a heat source for buildings. On this scale, it works -- there's enough energy available to harvest in a practical way.


Do a search here on permies.com for "Jean Pain heater."  : )
 
Villains always have antidotes. They're funny that way. Here's an antidote disguised as a tiny ad:
Learn Permaculture through a little hard work
https://wheaton-labs.com/bootcamp
reply
    Bookmark Topic Watch Topic
  • New Topic