• Post Reply Bookmark Topic Watch Topic
  • New Topic
permaculture forums growies critters building homesteading energy monies kitchen purity ungarbage community wilderness fiber arts art permaculture artisans regional education skip experiences global resources cider press projects digital market permies.com pie forums private forums all forums
this forum made possible by our volunteer staff, including ...
master stewards:
  • Carla Burke
  • John F Dean
  • Timothy Norton
  • Nancy Reading
  • r ranson
  • Jay Angler
  • Pearl Sutton
stewards:
  • paul wheaton
  • Tereza Okava
  • Andrés Bernal
master gardeners:
  • Christopher Weeks
gardeners:
  • Jeremy VanGelder
  • M Ljin
  • Matt McSpadden

DSR3 Beehive Dome Completed!

 
Posts: 160
91
  • Likes 2
  • Mark post as helpful
  • send pies
    Number of slices to send:
    Optional 'thank-you' note:
  • Quote
  • Report post to moderator
Thank you, Fox. Got links?
 
Rocket Scientist
Posts: 821
Location: Guernsey a small island near France.
319
  • Likes 5
  • Mark post as helpful
  • send pies
    Number of slices to send:
    Optional 'thank-you' note:
  • Quote
  • Report post to moderator
Well all my development videos are on my channel but this one shows how far we have come…
 
pollinator
Posts: 145
Location: Utah
45
3
composting toilet bike building writing wood heat rocket stoves greening the desert
  • Mark post as helpful
  • send pies
    Number of slices to send:
    Optional 'thank-you' note:
  • Quote
  • Report post to moderator

Fox James wrote:Oh no that is not the best result considering all the effort you put into your stove!
You may find my latest videos of some interest to you, it has taken me several years but I have managed to get my 4” vortex working on song.
However there are some details you may not be able to adapt and your 6” may behave differently anyway.


Could you post a link to your videos?
 
April Wickes
Posts: 160
91
  • Likes 8
  • Mark post as helpful
  • send pies
    Number of slices to send:
    Optional 'thank-you' note:
  • Quote
  • Report post to moderator
Better. I temporarily blocked off the raised cooktop to make an even ceiling across the top box. I narrowed the shelf slot above the afterburner to somewhere between 100% and 110% CSA (not such precise materials as Fox’s fine glass!). And I found some metal scraps and magnets to block the primary air down to 20%. The airframe as designed let in a LOT more primary air than that, more like 50%. This may have been a good bit of the problem. So I am now a lot closer to the recommended Vortex proportions.

I am definitely not getting such perfection as Fox shows in his video above. Start up was again a sooty mess, but it was closer to 15 minutes than yesterday’s full hour of guck. After that it ran acceptably. Today the vortex lost its oomph faster than it should have and overfueled some on the reload, although not terribly.

Sure wish there was some step by step plan for troubleshooting these: If this, try this; If that, try the other. Fox’s results shown above are indeed fantastic, really breathtaking … but those four+ years of fiddling are exactly why I didn’t just build a Vortex core in the first place! Still, we’re on the right track.
 
Fox James
Rocket Scientist
Posts: 821
Location: Guernsey a small island near France.
319
  • Likes 7
  • Mark post as helpful
  • send pies
    Number of slices to send:
    Optional 'thank-you' note:
  • Quote
  • Report post to moderator
Yes quite right, lots of tiny adjustments for three years but, my stove is smaller and completely made from insulating materials so quite different from yours.
However you may get some joy by following some of my adaptations…

It has been noted many time on this forum and all the other sources of rocket stove info, that you need to follow the designers dimensions exactly or you are unlikely to share the designers success!
It just seems to me that, there are dozens of builds, hundreds even, that just never work out for the builders because they did not or could not follow the exact design.
From my experience, the chimney can make or break a stoves working ability and all to often, it is the last thing folk think to check or they simply dont realise just how much a strong drawing chimney effects riser less cores ability to work well!
In your case, especially as you seem pretty resourceful, I am sure we can get your stove working.
Any video you can take will  help a lot when trying to diagnose an issue…….
 
April Wickes
Posts: 160
91
  • Likes 7
  • Mark post as helpful
  • send pies
    Number of slices to send:
    Optional 'thank-you' note:
  • Quote
  • Report post to moderator
Well in this case, it was a case of *could* not follow the DSR3; I couldn’t source the right part.
As for the Vortex, I’ve felt a good bit of frustration figuring out exactly what the design IS, and I suspect I am not alone in that. That design has changed over and over and over again along the course of the (extremely long) development thread! Put a stumbling block in, nope, take it out entirely and make a shallower top box, nope, put it back in ….

This particular balance of chimney draft (strong, by the way), expansive bell, and high-located air intake seems to like having a stumbling block. It likes it a lot. Two burns in a row with the present configuration have behaved quite well now, even though today is muggy and windless. If it keeps up like this through some windy storms too, I will be content.

So, presently working Vortex configuration on this 5.5” system (23.9 in2 CSA):
* 20% primary air, no secondary. Because I have an airframe, this is delivered high in the firebox rather than low; I might look into whether lower-located air improves the slow coaling at some future date. Needed the door cracked open to catch the kindling alight, but then let it develop slowly. Fire remained well controlled throughout the burn.
* Firebox and port as is. Shelf between is extra thick because I wanted to raise the short vortex into the center of the round viewing window. It doesn’t seem to make any difference.
* Afterburner 4.2” high, 8” wide, more like 12.5” deep (my glass window is plenty sheltered behind the thick front wall; if yours isn’t, you should leave the full 4” gap.) Insulating material of course! CFB scraps at the moment. I will probably try to rebuild with something less toxic where possible, or at least coat it with sealant.
* ½” stumbling block restriction as it passes into the upper shelf chamber, plus a couple of scraps to narrow the full shelf width. So that’s about 1.7” x 9” or 65% CSA – a little bigger than recommended (in the mid-thread range of Vortex designs at least) but I don’t think I’d want to slow this fire down any more. Trev was calling this an “exit port,” meaning the exit from the afterburner, not from the whole core. This was placed back about ¾” from the shelf edge, as recommended.
* Upper shelf chamber 2.2”x 11”, or pretty near 100% CSA
* Final exit into bell 2.4”x 8” or 80% CSA.

A surprising note: Over the last few days of harried testing, I needed some ½” spacers in odd places, like between layers of the shelf and to temporarily replace the cooktop and form the stumbling block. I had some scraps of ordinary cement board leftover from a tile project, I think HardiBacker brand [?]. Dense cement and fiberglass integral to the mix, tough to cut. I threw it in because it was the right size, fully expecting it to burn out immediately. It didn’t. It appears completely unaffected. Wouldn’t trust it structurally in a refractory setting but I’m impressed. The stuff is certainly cheap enough to experiment with!

Video is a limitation in rural Vermont, so that likely won’t be coming. Fox, I will try to make a day to go sit in the public library with headphones and watch more of your videos … but that’s what it takes with our shonky internet here! Thank you for your fantastic public service in creating them. I look forward to it.
35.jpg
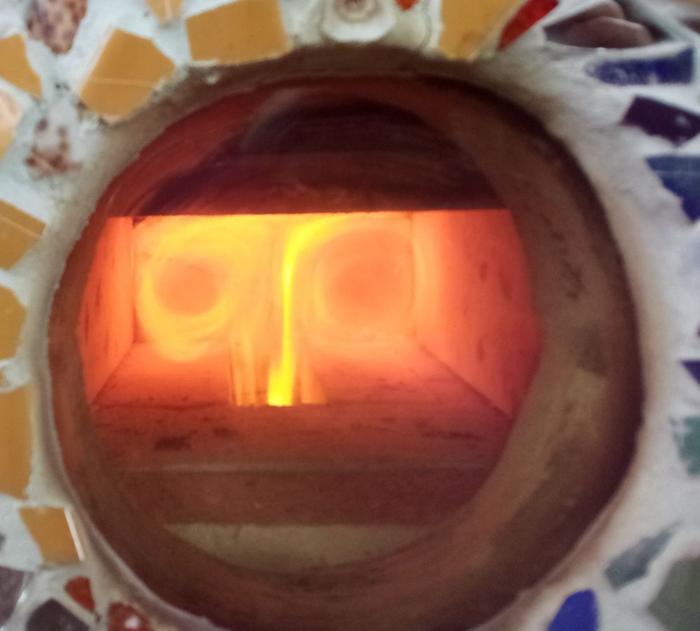
DIY clean burn vortex mass heater
 
Fox James
Rocket Scientist
Posts: 821
Location: Guernsey a small island near France.
319
  • Likes 7
  • Mark post as helpful
  • send pies
    Number of slices to send:
    Optional 'thank-you' note:
  • Quote
  • Report post to moderator
Ok cool, you seem to be getting there already!
If you can find a old ceramic glass cook top, they can be extremely useful.
You can lay small pieces on the afterburner floor and adjust the vortex slot size and use other pieces to adjust the exit size ect.

Basically I discovered the best results for my stove was having a much larger than system size area  immediately after the afterburner but offering resistance through the exit. ie when I tried a 4” square exit it would overflow like made but a long thin system size ‘slot’ helped that and then the slopping ceiling added more residence sealing the deal.

However I think the same concept could be achieved with other details ie Trevs stumbling block.

So in my case i have found a balance of restriction and flow through several areas to keep the vortex in the back of the afterburner and the stove running on song for long periods.
I think the pre heated air in the fire box plays a part as it helps burn off excess gasses before they reach the afterburner but having adjustable air is a big help.
Hopefully I (we) will eventually find a more universal design that can cope with more varying conditions but as far as I can tell, all the riserless cores have temperamental tendencys. What I mean is, my stove works beautifully in my back yard at sea level but, how do I know if it will work at 10000’ in freezing concisions?
Anyway, good luck with any tweaking……
 
Posts: 17
9
  • Likes 5
  • Mark post as helpful
  • send pies
    Number of slices to send:
    Optional 'thank-you' note:
  • Quote
  • Report post to moderator
Hello April,

I just came across your topic and it was interesting for me to read it , since I recently finished a DSR3 core.
First of all I am sorry, that the core didn´t work as expected, and I hope you found a workable solution.

One thing that catched my eye is the picture of the door frame, that you posted (31pic). There seems to be a mistake in following the original DSR3 design, that might be crucial, the slots for the air intake on the left and right side should be in the upper half of the core. Looking at your picture, they look like going down almost to the bottom of the core. Peter mentioned several times, that this is crucial, and with the slots that low, it would be more prone to run into thermal overload, at least I understood it like that.

Another thing, you have a large bell! Do you have a bypass? Like a shortcut for the flue gases, that they won´t cool down that much before they enter the chimney. At least when the bell is cold, such a bypass might be crucial for the fire to come to live. The chimney will provide more draft, when the flue gases are at temperature, and the temperature before entering the chimney should  be at least around 200 F.

I hope you have a good working stove now, but for the case you are still on the journey, these things might help you. I want to believe, that a DSR3 design can work fine with a rectangle afterburner instead of a tube, but I didn´t try this. I could fine tune my core very easy with diminishing the space inside the top box by putting inside some refractory leftovers to calm down the burn a bit.  
 
April Wickes
Posts: 160
91
  • Likes 6
  • Mark post as helpful
  • send pies
    Number of slices to send:
    Optional 'thank-you' note:
  • Quote
  • Report post to moderator
Hi Mattias, thanks for checking in.
I’m pretty sure this didn’t work as a DSR3 because of the experimental parts I had to fudge. That’s not a problem with the design of the DSR3 – but it does seem to mean that if one cannot actually follow that design, one had better be prepared to do some troubleshooting. Square afterburners may behave differently.
As a Vortex core, it is now working reasonably well, although not nearly so fine and steady as Fox Martyn has achieved. It smokes some. Some days I can only get a fire fountain, not a vortex. Seems to depend a lot on the weather and wind.

We are still in heating season here so I will post an update when I do the spring cleanout. I will assess how much creosote buildup there is then.

What you are seeing in the door is a bit of an optical illusion. What it is, is that the door sits high on a brick platform with no room to extend below the firebox as many of the airframes do. So the bottom member of the airframe is covering the front of the lower part of the firebox. The air exit slots to feed the fire are as high as they could go while maintaining Peter’s proportions, and are indeed in the upper half of the firebox. However, since switching to the Vortex core, I wonder if it might not be happier with a little lower air.

The ISA of the bell is about 33 ft2 (roughly 3.3 m2). This was calculated as reasonable for a system of this size, but maybe would be better with a radiating bell such as steel. As brick and cob (about 6” thick on the dome, 8-9” on the lower box), I feel like I have to pour a lot of heat into it to get much back out, so the core may be undersized to power it. Also, when it is below 0*F with a 50+ mph wind, I have to keep the stove running continuously all day and my house is still chilly. (It’s fine under any more moderate conditions.) So perhaps I should have built a slightly larger core.

No, no bypass, although I do have a priming hole in the chimney. I have not needed it. It lights and draws just fine.

Thermal cracking in the brickwork has held steady in the same places and to the same degree as when it first appeared. I’m mostly not worried about it. Carbon monoxide alarm has remained silent all winter, so it can’t be leaking much.

Glad to hear yours is working well for you!
 
Forget Steve. Look at this tiny ad:
Learn Permaculture through a little hard work
https://wheaton-labs.com/bootcamp
reply
    Bookmark Topic Watch Topic
  • New Topic