We have some suggestions for where to find various materials at the bottom of our "shop" page -
http://www.ErnieAndErica.info/shop
To answer the specific manifold question: Two options:
1/2 Barrel manifold:
This is what's shown in our Cabin 8" and Greenhouse 8" plans,
http://www.ErnieAndErica.info/shop, if you click on "view item" you can see other pictures.
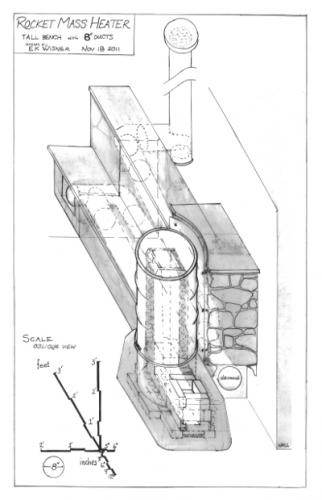
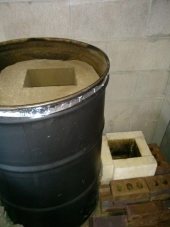
Ernie likes to cut the manifold from a matching 55-g drum, cut out where it will fit over the bricks and insulation of the J-tube, and cut a hole for the outlet to the bench ducting. We fit it all in place, put some foil tape or screws in as needed to hold it together, and mortar it. Sinking the cut lower edge of the manifold barrel into a bed of earthen mortar makes a nice knife-edge join with a decent seal; firing the system while the cob/clay-sand mortar is still pliable sets it at a reasonable approximation of its expanded-when-hot size, and avoids most cracking problems.
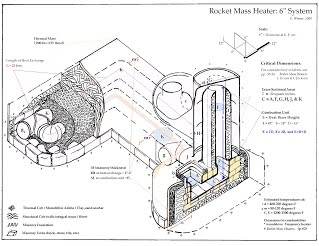
Peter van den Berg and I agree that to avoid restrictions in this area, the gap between the interior junk (heat riser/firebox insulation in the center) and the opening of the pipe should be at least half the diameter of the pipe. 4" for an 8" system, 3" for a 6" system, etc. So depending on how your heat riser and firebox are insulated, you may need to monkey around a bit.
If you can't get the full 4" there, you might want to go online and get a tapered fitting like a 12" to 8"x8" T (which would let you branch off a cleanout, while using the 12" part on the manifold size for better gas flow from the larger barrel, or a 24" to 8" tapered saddle-T junction. Or build a brick plinth, which lets you make it as big as needed.
If you don't have at least 2" or so between the inside wall of the barrel and the outside of the heat riser insulation/structure, you are going to have some problems with maintenance anyway. You want to be able to get a vacuum hose in there to deal with fly ash. If you have other ways to clean it or can remove the barrel (as above, you clamp the lips of the 2 barrels together and can remove the upper one if needed), then Ernie feels the absolute, practical minimum is about 1.5 inches on all sides of the heat riser.
Brick Plinth Manifold:
This is roughly what's shown on both of our 6" heater plans, the Annex 6" and Daybed 6", and also on the Bonny 8" plans at the
same link as above, and we have Annex 6" heater pics
here. For the Annex 6" heater build, we cobbed in a square-to-round fitting below the barrel instead of a round piece of duct, but it all works out to be about the same process.
To build a brick plinth/manifold, you look at the available space, figure out if you want it square, octagonal, or like a 'brick beehive' covered in cob, and figure out how to allow enough space for the pipes to connect (usually mortared in place as you build up, and bridged over with about 2 courses of brick, or 1 course brick and some refractory board or stone slab or something. In the Annex build, we mortared a square-corner-to-round fitting in so it collects the gas from under the barrel, and then cobbed up over them).
While building, you must seal the brick box quite well if it's to hold and channel the exhaust gases. You wet each brick with water or clay-slip before mortaring; mortar each brick with a nice ridge of mortar to absolutely seal any potential leaks; level the courses by tapping the high bricks slightly down into fresh mortar as you go; and don't wiggle them around after setting them. You will build up to about 1/2" below the final height you want the barrel to sit at, make a generous layer of mortar (with shims if you like to set the barrel height), and set the barrel so there's at least 1/4 of the diameter gap above the heat riser, to the lowest surface of the barrel top.
In this configuration you will be mortaring all around the barrel with about 4" of cob or a fiber-rich mortar or plaster, and if you will be waiting to test-fire the system you may want to include a little strip of flexible, non-combustible material like mineral fiber insulation around that barrel rim as an expansion joint.
After the brickwork is done and the system is test fired, you cover the whole thing in a backup layer of plaster (inside or out, your choice; or both). We often use cob and/or an earthen plaster with some fiber content like chopped straw or fresh/dried horse dung (that's pre-chopped straw) or animal hair. Yes, you can use these fibers inside the smoke channels; the outer surface fibers may char slightly but the clay of the plaster will prevent much degradation and makes them almost non-combustible. You could also use fiberglass fiber if that's your thing; I have to admit I hate working with it, and I would not want to have to dig into a project made with it to do repairs later.
As for buying a prefab: Haven't tried it. Sounds like it could simplify things a lot - you'd presumably only have to seal things with the appropriate mortars or gaskets or what-have-you. The cast-refractory manifolds I've tried making in one piece have cracked badly, but I think part of that was due to poor curing temps (one of them almost certainly froze before it was properly cured, let alone dried). A kit with multiple pieces, and some room for thermal expansion around the firebox/barrel connection, sounds like it could work.
Got a link to something you've seen?
We've almost always made our own fittings from the available local selection of barrels, stovepipe, or other nearly-relevant stock. But you can find almost anything online these days, if you are creative with search terms and winnowing out the details.
-Erica W


 )
)