• Post Reply Bookmark Topic Watch Topic
  • New Topic
permaculture forums growies critters building homesteading energy monies kitchen purity ungarbage community wilderness fiber arts art permaculture artisans regional education skip experiences global resources cider press projects digital market permies.com pie forums private forums all forums
this forum made possible by our volunteer staff, including ...
master stewards:
  • r ranson
  • Nancy Reading
  • Carla Burke
  • John F Dean
  • Jay Angler
  • paul wheaton
stewards:
  • Nicole Alderman
  • Pearl Sutton
  • Anne Miller
master gardeners:
  • Christopher Weeks
  • Timothy Norton
gardeners:
  • Nina Surya
  • Matt McSpadden
  • thomas rubino

problems with RMH

 
Posts: 2
  • Likes 1
  • Mark post as helpful
  • send pies
    Number of slices to send:
    Optional 'thank-you' note:
  • Quote
  • Report post to moderator
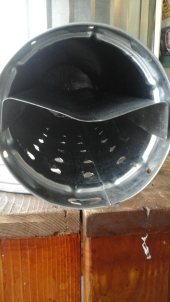
To be brief. 1st RMH for me. It is for a small Aarea. I have 6" schedule 40 steel pipe for burn chamber, total of 23" long. 6" heat riser, 34" tall. I have 4" schedule 40 steel intake, 4" high. I have lit a fire, and it draws OK. But not great. Sticks will not stay ignited. This was all the pipe I had so I was limited as to what I could do. Is there a way to improve the function, or just trash it? Any help greatly appreciated. I need this heater.
 
Posts: 567
Location: Mid-Michigan
43
duck forest garden trees hunting books food preservation bee solar
  • Likes 1
  • Mark post as helpful
  • send pies
    Number of slices to send:
    Optional 'thank-you' note:
  • Quote
  • Report post to moderator
Short answer: Scrap it and rebuild with firebrick.


Long answer:
Show us some pictures.
Tell us about your chimney and the rest of the exhaust path.
Tell us about your barrell/bench/bell(s), and the rest of your extraction area.

We're still going to tell you to rebuild it with refractory materials, because once you get it running properly, it will eat the steel right up. Yes, even Sc 40.

But then at least we can help you get your brick one running right.
 
pollinator
Posts: 4154
Location: Northern New York Zone4-5 the OUTER 'RONDACs percip 36''
67
hugelkultur fungi books wofati solar woodworking
  • Mark post as helpful
  • send pies
    Number of slices to send:
    Optional 'thank-you' note:
  • Quote
  • Report post to moderator
Jim Baxter : Welcome to Permies.com, our sister site Richsoil.com and The Rocket/Wood Stoves and Cob Forums ! With ~28,000~ Fellow Members
Worldwide you can come here 24/7 to talk to someone who wants to talk about what you want to talk about

In the old days of American Stock Car Racing, the rule was ''Run what you Brung'' if you placed well there was the post race tech inspection, Failing that, you
would go home with out any 'Trophy money'. Irregardless, you were still invited back next week, that was often the way the field got filled out

In your case I see a report from a man who had both the materials and the skill set to make up his 1st attempt at making a Rocket (mass heater ?) out of
Sched 40 iron pipe

Just a few days ago I received an E-card with a picture of the jolly old Elf himself, and underneath was the caption " I've seen your welds, your getting a
grinder for X Mass ( It must have been on back-order, I haven't got it yet !

First the real bad news, Both Iron/Steel and even concrete made from Portland Type Cement will not long survive in the heart of a Rocket Mass Heater RMH.

You can Google the Terms ''High Temperature Hydrogen Attack" Hydrogen/Steam Embrittlement, Hydrogen Blistering and Porosities, This is the reason that
welding rods are stored sealed up in boxes, heated cabinets - i know you were told that it was to stop the rods from soaking up water vapor - which is made
up of Hydrogen and Oxygen, ! There is your Physics lesson for the day ! Also be aware there is a great deal of crap on U-Tube !

So heres what you can do, a good ratio for a working 6'' RMH would run something like A 6'' feed Tube 10'' high, (you don't have enough room for both fuel
and air to a 6'' RMH with a 4''opening)

Then the length of the Burn tunnel should be no longer than 2Xs The Depth of your Feed Tube, so it needs to be shortened a little!

The heat riser is fine and can be taller, This needs to be wrapped in Some form of insulation Roxul brand Rock Wool is one Brand.

The temperatures that the inside of the Heat Riser will face will eventually destroy it but before that happens you may get as much as a month or a little more
from your reconfigured Heat Riser you want a gap between the Top of the Heat Riser and the inside of the Barrel to be no less than 1.5 inches and no more
than 3'', The Rock wool wrapped around the outside of the Heat Riser can be held inlace with chicken wire, you need to have an air gap of 2 to 2.5 inches all
side of the Heat Riser to get your gases to freely flow to your horizontal pipe running through Thermal mass

So, You can immediately shorten your Burn tunnel by cutting the 4'' end of, and try feeding it small, very dry, fine split lengths of wood horizontally to see if
you do not get an immediate improvement in your Rocket, This fueling arraignment is for trial only, as the wood will not self feed, and pushing sticks into the fire
will- ( even with great care ) cause the Burn Tunnel to fill up with glowing embers and charcoal. and then start to smoke back !

Again, You have come to the right place, there are many fellow members here to help you redesign your system to something that will serve you well for years !

Here is where I suggest you go to Rocketstoves.com to Download a PDF Copy of ''Rocket Mass Heaters''!

This will allow you to come back here and use the same words when you talk with Your Fellow Members describing Sizes, shapes, and the correct orientation of
parts to themselves and the Whole !

It will also save you time, frustration and money as you create your own well functioning Rocket And provide the Forever home for some lucky House Dragon !

For The Good of the Craft ! Big AL !
 
Jim baxter
Posts: 2
  • Likes 1
  • Mark post as helpful
  • send pies
    Number of slices to send:
    Optional 'thank-you' note:
  • Quote
  • Report post to moderator
Many thanks Mike,and Allen. Using the steel was just for convenience. I had it on hand, and this heater is mostly to help me get familiar with the RMH. It only needs to perform this winter, then hopefully I will have learned enough to go full in building a good system. I have not even set the barrell assembly yet. I just built the burn chamber assembly, and tested it before I completed the heater. I will get picture tomorrow. I do have a 10" pipe to encircle the heat riser, and plan to insulate with perlite. I also planned to run only 15 to 20 feet of pipe for heat collection. Also, concerning "cob." Is is acceptable to mix in some straw with the sand, brick, and clay? Thanks again for the help, and by all means feel free to give me the "skinny" on do’s and dont's. I am certainly trying to learn. I was just hoping to put together a unit to assist me in doing that.
 
allen lumley
pollinator
Posts: 4154
Location: Northern New York Zone4-5 the OUTER 'RONDACs percip 36''
67
hugelkultur fungi books wofati solar woodworking
  • Mark post as helpful
  • send pies
    Number of slices to send:
    Optional 'thank-you' note:
  • Quote
  • Report post to moderator

Jim baxter wrote:Many thanks Mike,and Allen. Using the steel was just for convenience. I had it on hand, and this heater is mostly to help me get familiar with the RMH. It only needs to perform this winter, then hopefully I will have learned enough to go full in building a good system. I have not even set the barrell assembly yet. I just built the burn chamber assembly, and tested it before I completed the heater. I will get picture tomorrow. I do have a 10" pipe to encircle the heat riser, and plan to insulate with perlite. I also planned to run only 15 to 20 feet of pipe for heat collection. Also, concerning "cob." Is is acceptable to mix in some straw with the sand, brick, and clay? Thanks again for the help, and by all means feel free to give me the "skinny" on do’s and dont's. I am certainly trying to learn. I was just hoping to put together a unit to assist me in doing that.


Jim :Look at the area surrounding your Names Space, and L@@K at mine, By Going to the Permies Toolbox top of the page between the Permies Banner
of the week and the Video of the Week you can locate and Click on the [My Profile] Tab, on the next page you will be guided to enter the location
information you wish to share.

This will get you out there where a Fellow Member Who is a Near Neighbor With RMH or Cob Experience can perhaps invite you to see a working Rocket !
Also if we know your location we can give you better, more useful information !

Also a little more information about the area you are trying to heat, While the RMH is a fantastic Space Heater warming butts directly and Radiating out heat
into the immediate space it occupies getting heat from it to remote locations is a Challenge! The more you need to run the Rocket the sooner it will fail !

Again almost any form of insulation will work to surround the outside wall of the inner shell of your heat riser , perlite will work , mostly we stabilize the
perlite by adding in some clay slip to ridgidize the perlite, this reduces the overall insulating value and we generally like to see 2.5 - 3'' of this mix

Generally we say that you can run 30' of horizontal ductwork through your Thermal Mass, and extract most of the heat, however this 30' is reduced 5' by every
90º Stove pipe Elbow or "T'' that you use to channel the flow of your hot gases ! Also the final vertical chimney will perform best for you if it exits vertically
out through your roof rather than out through a side wall and then up to a height 4-5' over the peak of your Roof ! ( and installed on the Lee or downwind side-
of your house, this assumes that you will have constant winds unchanging in general direction for your entire heating season )

A simple rule to follow is as soon as the Barrel is placed over the heat riser you immediately need to be hooked up to a vertical chimney, DO Not Expect the
Rocket to work with out one ! This also is a very useful diagnostic tool, if your Rocket worked fine with a straight run of horizontal ductwork and then a vertical
chimney but did not work as well when totally hooked up your problem is in the final duct work !

Cob will vary a great deal, especially if you use local Clays, this is nearly always possible, Except for the combustion zone which should be constructed out of
'Fire Brick'. Surrounding the 'fire brick' including the heat riser we want insulation to help our rocket come up to temperature quickly and again perlite with Clay
slip is a good insulator if thick enough!Other than that any use of straw in body of the Rocket Burner/base or the Thermal mass will be insulating and will slow
the absorption of the heat energy from your horizontal duct work and the transfer of that heat energy through the Thermal mass !

For long term durability a Structural coat containing straw is added as a protective coat over the whole monolithic unit , and then a finish coat to reduce water
absorption is generally applied to the Top after the Cob has been fired long enough to be dried out !

This is a lot of information to take in all in one day, My Recommendation of a copy of "Rocket Mass Heaters " still stands as probably the single best thing you
can do for yourself !

For the good of the Craft ! Big AL
 
gardener
Posts: 319
Location: Buffalo, NY
32
  • Mark post as helpful
  • send pies
    Number of slices to send:
    Optional 'thank-you' note:
  • Quote
  • Report post to moderator
It sounds like you can get something running, not well, but running. You will probably have to tear down your current build to replace it with something more robust next season.

Since it sounds like your experimenting. Experiment with the cob too. I use one part clay to two parts sand, your recipe might vary. Make some test bricks, see if they crack (too much clay) or fall apart with pressure or break easy (too much sand). Add small amounts of straw until it is covered with cob, I like to error on the too little side.

Don't place cob with straw around your J-tube!
 
It is difficult to free fools from the chains they revere - Voltaire. tiny ad:
Free Seed Starting ebook!
https://permies.com/t/274152/Orta-Guide-Seed-Starting-Free
reply
    Bookmark Topic Watch Topic
  • New Topic