• Post Reply Bookmark Topic Watch Topic
  • New Topic
permaculture forums growies critters building homesteading energy monies kitchen purity ungarbage community wilderness fiber arts art permaculture artisans regional education skip experiences global resources cider press projects digital market permies.com pie forums private forums all forums
this forum made possible by our volunteer staff, including ...
master stewards:
  • Nancy Reading
  • Carla Burke
  • r ranson
  • John F Dean
  • paul wheaton
  • Pearl Sutton
stewards:
  • Jay Angler
  • Liv Smith
  • Leigh Tate
master gardeners:
  • Christopher Weeks
  • Timothy Norton
gardeners:
  • thomas rubino
  • Jeremy VanGelder
  • Maieshe Ljin

my take on a Walipini greenhouse

 
Posts: 19
1
  • Likes 1
  • Mark post as helpful
  • send pies
    Number of slices to send:
    Optional 'thank-you' note:
  • Quote
  • Report post to moderator
Hi everyone.
I am new here and just started reading all the topics. But here is my idea of a walipini greenhouse, with relative use of passive solar principles.


So here it goes.
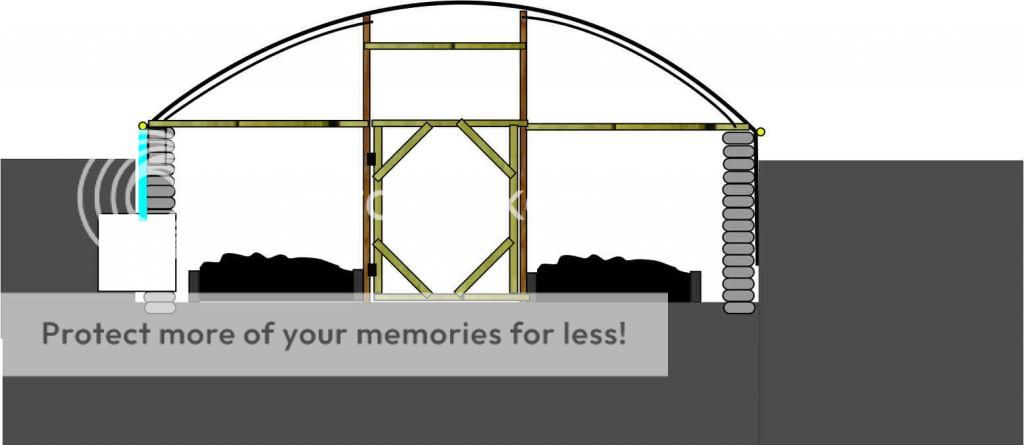
Total width 8m, minus the earth bags 7m. The length will be 50m. So total surface area about 400square meters or 4305 square feet.
We will go 1.5m underground, just enough to tap into the warmer ground.
Earth bags are here to prevent ground from caving in, and the north wall will be cob plastered to act as a thermal mass. They are about 0.5m higher than ground level to allow placing windows for circulation. The first layer is in a drench, filled with pebbles, to act as a drain for any water that might come in.

The arches are PVC pipe (used for water) which are quite cheap. The polls are wooden, 8x5cm, just to hold everything in place.

The middle of the greenhouse will be highest, with mild slopes going down to each side.

The yellow circles on the sides are drain pipes to collect rain water from the greenhouse. All the rain water is collected into 2 1000liter tanks (the white rectangle on the left).

The 2 raised beds in the middle are worm bins, 2m wide and 40m long each. We want to provide them with ideal conditions all year long.
On the north wall, we will install a vertical hanging garden for veggies made from recycled bottles, that will be watered from the rain water tank. The garden will eventually be hooked up to an aquaponic system.

Here is some info about my location. We are in the norther hemisphere..
Subotica is located in a plain, at an average of 115meters, no hills or mountains for 60 miles around. The climate here is mild, and generally warm and temperate. The rainfall in Subotica is significant, with precipitation even during the driest month. The Köppen-Geiger climate classification is Cfb. The temperature here averages 10.9 °C. The rainfall here averages 561 mm. At an average temperature of 21.1 °C, July is the hottest month of the year. At -0.5 °C on average, January is the coldest month of the year.

The general idea is to apply permaculture principles to a commercial sized greenhouse, and to start organic veggie production all year long.
We begin the digging as soon as the temps go up a bit. We have a lot of snow currently. First I want to get the polls, arches and PVC foil up, so we can continue the work regardless of outside conditions. Then slowly fill the bags and rise the walls.

All thoughts and suggestions welcome
 
pollinator
Posts: 4024
Location: Kansas Zone 6a
284
  • Likes 2
  • Mark post as helpful
  • send pies
    Number of slices to send:
    Optional 'thank-you' note:
  • Quote
  • Report post to moderator
I like the idea, but I think you need a lot more water storage and drainage. If you do it as you show, it will be a covered pool after a modest rain event. You have a significant roof, it could fill a 1000 l tote in minutes. Think about not digging as deep and instead build up the ground around the greenhouse so you get some drainage away.

 
Stevan Covic
Posts: 19
1
  • Mark post as helpful
  • send pies
    Number of slices to send:
    Optional 'thank-you' note:
  • Quote
  • Report post to moderator

R Scott wrote:I like the idea, but I think you need a lot more water storage and drainage. If you do it as you show, it will be a covered pool after a modest rain event. You have a significant roof, it could fill a 1000 l tote in minutes. Think about not digging as deep and instead build up the ground around the greenhouse so you get some drainage away.


Hi. Thanks for the input. I wasn't shure how quickly the totes would fill, but I was worried about it. The first plan was to go only 0.5m deep with the greenhouse (about 2 feet). But I found out that in order to use the geothermal energy we need to go at least 4 feet (1.2m). That's why we decided to go so deep.
As for the totes.. my other plan was to embed a bunch of barrels in the earthbag wall, and have them connected with the totes so that one water pump in the lowest tote could drain the entire system. I'm just not sure how much funds I'll have at the time. But still, it's just a couple of thousands of liters more. I will still have to make an overflow and direct it outside..

Drainage will be fascilitated by sloping the floor. The terrain already has a natural slope to one side. So all the water that might get into the greenhouse will be diverted to the drenches beneath the earthbag walls, and then to a large hole (a "septic tank") located in the lowest part of the property.
I will also make precautions to try to avoid any water sipping in. There will be drenches at each entrance that divert water to some kinds of septic tanks..
 
Posts: 2413
48
  • Likes 1
  • Mark post as helpful
  • send pies
    Number of slices to send:
    Optional 'thank-you' note:
  • Quote
  • Report post to moderator
Hello Stevan, et al,

I will try to quickly just hit "highlights" that I have questions/concerns with...

1. The size is determined by what? Production for how many?

2. The span is structurally too wide I believe for just PVC pipe and will need a ridge beam of some fashion, if you have any snow loads at all...Even then this is asking too much of just PVC.

3. The earth bags can not be built in the fashion shown in your cross sectional elevation view. They must be...if intended to support structural bracing and support to the earth around them...corbeled into the earth in a proper fashion for strengthening earth slopes. There also needs to be a thorough understanding of the "angle of repose" for the local soils, as this will determine the "cut in" of the walls of the pit, and the angle the earth bags need to be at forming the strengthening required for protection from cave in/collapse. This will require about 5 times as many bags minimum from what is shown, if this structure is to be enduring through weather cycles and any type of tectonic events.

4. Drainage for this structure will be another .5 to 1 m greater in depth, and should "run to light" or "some other holding tank and/or distribution fields...

5. Berming the earth around the structure, as R. Scott has suggested is standard practice and will facilitate the trapping of the geothermal heat sink of the surround earth sufficiently. I would model the earth volumes be moved accordingly before any final design schematic is finalized.

That what I could see in a cursory viewing of this project...very exciting build. I look forward to following along...

Regards,

j

 
Stevan Covic
Posts: 19
1
  • Mark post as helpful
  • send pies
    Number of slices to send:
    Optional 'thank-you' note:
  • Quote
  • Report post to moderator
Hello Jay

Jay C. White Cloud wrote:
1. The size is determined by what? Production for how many?


In 2014 I applied for a Green ideas forum with my Wormfarm project and got the prize. This project entails raising a 200 bin worm farm, and having half of it indoors and the other half outside. This will be the first indoor worm farm in Serbia as far as I know, and the most cost effective way to do it is with a greenhouse.
so there will be 4 bins, 2mx50m each. That is why I went with such a big greenhouse. But I also want to go into organic veggies and aquaponics, so this greenhouse will be perfect for "getting my feet wet".
And a 8x50m greenhouse is a typical greenhouse used for commercial veggie production here. My brother has one and another one 6m wide. Acctually we are on the same land so it will be interesting to see the difference between my walipini and his greenhouses

Jay C. White Cloud wrote:2. The span is structurally too wide I believe for just PVC pipe and will need a ridge beam of some fashion, if you have any snow loads at all...Even then this is asking too much of just PVC.


It is not regular PVC for hoop houses. It is the black pipes used for water. They're called OKITEN pipes here, not sure what you guys call them. I have a friend that made a few hoop houses 4m wide using those pipes and no structural support- no problems at all. My greenhouse will be wider, hence the support of the wooden beams. Each hoop has a beam structure to hold it up.

Jay C. White Cloud wrote:3. The earth bags can not be built in the fashion shown in your cross sectional elevation view. They must be...if intended to support structural bracing and support to the earth around them...corbeled into the earth in a proper fashion for strengthening earth slopes. There also needs to be a thorough understanding of the "angle of repose" for the local soils, as this will determine the "cut in" of the walls of the pit, and the angle the earth bags need to be at forming the strengthening required for protection from cave in/collapse. This will require about 5 times as many bags minimum from what is shown, if this structure is to be enduring through weather cycles and any type of tectonic events.


I am not sure I get this correctly. Are you referring to making buttresses or something else?
The earth bags will be layered as though building an earth bag house. There will be 2 rows of barbed wire between each layer of earth bags, and every 3-4 rows will be tied vertically with wire. We will probably buttress the end of the wall. The cave in protection is just a precaution. The top soil is sand, but beneath it is clay. So the earth bags will be filled with a clay mix that will make them harden. And once done, we will fill the gaps.
I just thought if there is nothing to "hold" the earth wall, when excesive rain falls the top soil could "run down" into the greenhouse. And the other reason is to create a thermal mass.
Earthquakes are not an issue in these parts.

Jay C. White Cloud wrote:4. Drainage for this structure will be another .5 to 1 m greater in depth, and should "run to light" or "some other holding tank and/or distribution fields...


You are probably right. I already told my wife we should make a deeper drench on the sides.

Jay C. White Cloud wrote:5. Berming the earth around the structure, as R. Scott has suggested is standard practice and will facilitate the trapping of the geothermal heat sink of the surround earth sufficiently. I would model the earth volumes be moved accordingly before any final design schematic is finalized.


Well that is what I don't get. If the "thermal constant" starts at a depth of 4', a berm cannot duplicate this effect. It can give me insulation but nothing more, right? As the primary objective is to keep a relatively constant climate for the worms (and at the same time the plants) I think it is better to go deeper and use the thermal constant. We're positioned on a hill, so the water level is far lower than us.

At first, we wanted to concentrate on passive solar and go with a flat roof, not rounded. However, I checked the solar atlas for this area and the ideal angle of the roof should be at 45-60 degrees (60 better during winter). To achieve this the north wall would have to be extremely high. We contemplated doing 2 smaller greenhouses, but we don't have sufficient funds. And considering we cannot align the greenhouse perfectly to the south because of the shape of the farm, we decided to concentrate on geothermal energy and the solar energy will be secondary.

Jay C. White Cloud wrote:That what I could see in a cursory viewing of this project...very exciting build. I look forward to following along...


Regards,

j


Thanks. Help will be needed along the way, I am sure
 
Stevan Covic
Posts: 19
1
  • Mark post as helpful
  • send pies
    Number of slices to send:
    Optional 'thank-you' note:
  • Quote
  • Report post to moderator
The drawing in the first post is the front. This is a look form the inside. Every PVC arc has a post structure to hold it>


The reason we placed the thinner inside arc, is to hold the double foil. We don't have inflatable double foils like you over there, so we just put a thin foil as a curtain. That inside foil will be rolled up during the summer, and spread out over the lower arc during winter.

I have another question. This is a view of the north wall. The white on the sides are the IBC tanks, and the black are supposed to be barrels that should act as a thermal mass. The question is would I benefit at all from just 10 barrels? How many barrels you think would make a difference? I am afraid I won't have enough funds to line the whole wall with barrels, so the question is should I do it at all?

 
R Scott
pollinator
Posts: 4024
Location: Kansas Zone 6a
284
  • Likes 1
  • Mark post as helpful
  • send pies
    Number of slices to send:
    Optional 'thank-you' note:
  • Quote
  • Report post to moderator
I did the math to convert to metric, each MILLIMETER of rainfall is 380 liters collected on your roof!!!

My barn roof is a little over 7200 sq ft and a good rain (not a downpour) will fill a 12 inch pipe. Your roof will fill an 8" / 200mm drain pipe once the tanks are full...
 
pollinator
Posts: 4154
Location: Northern New York Zone4-5 the OUTER 'RONDACs percip 36''
67
hugelkultur fungi books wofati solar woodworking
  • Likes 1
  • Mark post as helpful
  • send pies
    Number of slices to send:
    Optional 'thank-you' note:
  • Quote
  • Report post to moderator
Stevan Covic : I am sending you a P M

$ the Crafts ! Big AL
 
Stevan Covic
Posts: 19
1
  • Mark post as helpful
  • send pies
    Number of slices to send:
    Optional 'thank-you' note:
  • Quote
  • Report post to moderator

R Scott wrote:I did the math to convert to metric, each MILLIMETER of rainfall is 380 liters collected on your roof!!!

My barn roof is a little over 7200 sq ft and a good rain (not a downpour) will fill a 12 inch pipe. Your roof will fill an 8" / 200mm drain pipe once the tanks are full...


Wow, thanks for the heads up. It will take one hell of a tank to take all that water. We'll definitely have to make a huge septic tank on the lowest part. We call them septic tanks, because they're usually made where people don't have a sewer system. It's just a huge hole lined with bricks and covered. I guess you make them in a similar fashion?

My brother has a small walipini nearby, that actually started as a swimming pond. Then he realised he had some spare metal arches from the big greenhouse and he made a cover over the pool. later he drained it and now he rarely uses it. It is small but has no water drenches or any kind of protection, not even earth bags. He has no issues with rainfall or earth caving in or anything. Now the greenhouse I am making is a whole other story just because of the size so I want to take all the precautions..

Looking forward to the PM, Big Al
 
Jay C. White Cloud
Posts: 2413
48
  • Likes 1
  • Mark post as helpful
  • send pies
    Number of slices to send:
    Optional 'thank-you' note:
  • Quote
  • Report post to moderator
Hello Stevan,

Each hoop has a beam structure to hold it up.


Excellent...that should work well...

It is small but has no water drenches or any kind of protection, not even earth bags. He has no issues with rainfall or earth caving in or anything.


Hmmm...actually there are trenches (I believe what is being called a "drench" which means to wet thoroughly) and drains in all inground pools they are designed that way. As for comparing a pool to "earth bags"...well, that doesn't work structurally, and pools that are left empty for to long in zone with freeze thaw cycles can cave in if not made from reinforced materials or plastics...

I am not sure I get this correctly. Are you referring to making buttresses or something else?


Well, not actually a buttresses per se, yet rather a "step back" or "terracing" with the bags are required to avoid wall collapse over time. Same as a stone wall built to support a terrace in hill gardens. We just can't stake earth bags up along a wall as they would be in an above ground structure...each has very different structural dynamic, shear, and bending loads.

The earth bags will be layered as though building an earth bag house. There will be 2 rows of barbed wire between each layer of earth bags, and every 3-4 rows will be tied vertically with wire.


If I went into the soil and structural engineering of this it might get a bit dry of a conversation...suffice it to say...these wall can't be just stacked bags of earth as in an earth bag house above ground. Even those have frame work if square, and if not they are round with many buttressing feature...A completely different kind of architecture, and this will have to be designed as a fossorial structure, with proper bracing,strengthening modalities if an enduring structure is desired. Even without earthquakes...it is not prudent to dig a pit with straight walls and some bags place vertically with these soil walls and expect them not to cave in over time...this is the entire concept of "angle of repose" in soil science.

There is as much very bad information on the internet on how to build retaining walls as there is good...probably more from the drawings and many designs I have seen. The methods of good practice in retaining wall design are pretty straight forward, and it focuses on "tiebacks" stepping and proper drainage.

here are some examples to study...

Below are Earth (sand) Bag methods


Below are dry laid stone or wood methods... and for a structure like the one planned for...I would step the soils back even further...


Well that is what I don't get. If the "thermal constant" starts at a depth of 4', a berm cannot duplicate this effect.


Well actually, if designed properly that is exactly what a properly bermed fossorial structure does. Wofati architecture works on the same principle. If a thermal constant is at a depth of 1.2. meters for a given area...as soon as you pile compact soils on top of this that constant elevates to a similar equilibrium.

It can give me insulation but nothing more, right? As the primary objective is to keep a relatively constant climate for the worms (and at the same time the plants) I think it is better to go deeper and use the thermal constant. We're positioned on a hill, so the water level is far lower than us.
 
Stevan Covic
Posts: 19
1
  • Mark post as helpful
  • send pies
    Number of slices to send:
    Optional 'thank-you' note:
  • Quote
  • Report post to moderator
Ok, I understand. Figure 4 seems doable, but it will demand additional space, so let me explore some alternatives here..

During the last months we went trough a lot of variations. One option was to reinforce the earth bag wall with wooden posts, connected by horizontal beams. If done so, what would have to be the max spacing between the posts? The arches are 1.5m appart.

One addition was to spread a wire mesh (like for making fences) between the posts and the wall. It would be nailed to the posts to provide tension.
Are the posts even necessary then, or is it enough to put chicken wire mesh, tie it to sections of the wall with wire and plaster it to the wall. Would that serve our purpose?

Another option is vertical rebar pins.
I forgot to mention that we will dig out a lot of clay, so the bags will be filled with a clay/sand mix.

And sorry about the trench/drench thing... don't know what that was about.. :/
 
Jay C. White Cloud
Posts: 2413
48
  • Mark post as helpful
  • send pies
    Number of slices to send:
    Optional 'thank-you' note:
  • Quote
  • Report post to moderator
Hi Stevan,

I am not seeing the post doing anything structurally at all in this case...

The bottom line is you have a "cut" into the earth...these want to cave in...to the point of reaching equilibrium (homeostasis.) This balance is the "angle of repose." To resist this desire to "cave in," the bags need to be braced with abutments into the working space (not a functional option) or "tied back" into the earth at least a meter. Backfilling with gravel facilitates proper drainage...

Hope that makes more sense...as no 4 would be a minimum tie in for such a structure.

The best wall design for such a fossorial build would be a stepped back system with terraced earth bags then forming a wall system that is battered back about 5 degrees.
 
Posts: 39
2
  • Mark post as helpful
  • send pies
    Number of slices to send:
    Optional 'thank-you' note:
  • Quote
  • Report post to moderator
Thanks for the pics of the dirt bag walls, that is  helpful, but  I don't understand how these would be "tied-in" so that they don't shift over time.  Also, is there a specific angle that this needs be done at for the best wall stability?  The next question is if it's possible to just build walls? Using Cedar posts & wood, with some sort of waterproofing membrane on the side that has dirt against it?  Thanks in advance for any suggestions offered.
 
gardener
Posts: 5171
Location: Cincinnati, Ohio,Price Hill 45205
1011
forest garden trees urban
  • Likes 1
  • Mark post as helpful
  • send pies
    Number of slices to send:
    Optional 'thank-you' note:
  • Quote
  • Report post to moderator
The "tie-ins are shown as "deadman" on most of the diagrams.
These would be a  block,rock,bag,etc,that extends from the face of the wall into the backfill.

 
Posts: 2
  • Mark post as helpful
  • send pies
    Number of slices to send:
    Optional 'thank-you' note:
  • Quote
  • Report post to moderator
Im interesten ain how the walipini construction edificated 5 years ago went, can you tell me?
Thank you
Cristina
Instagram quinta.pionera
or email cristinagdeayerza gmail.com
 
Have you no shame? Have you no decency? Have you no tiny ad?
Switching from electric heat to a rocket mass heater reduces your carbon footprint as much as parking 7 cars
http://woodheat.net
reply
    Bookmark Topic Watch Topic
  • New Topic