• Post Reply Bookmark Topic Watch Topic
  • New Topic
permaculture forums growies critters building homesteading energy monies kitchen purity ungarbage community wilderness fiber arts art permaculture artisans regional education skip experiences global resources cider press projects digital market permies.com pie forums private forums all forums
this forum made possible by our volunteer staff, including ...
master stewards:
  • Nancy Reading
  • Carla Burke
  • r ranson
  • John F Dean
  • paul wheaton
  • Pearl Sutton
stewards:
  • Jay Angler
  • Liv Smith
  • Leigh Tate
master gardeners:
  • Christopher Weeks
  • Timothy Norton
gardeners:
  • thomas rubino
  • Jeremy VanGelder
  • Maieshe Ljin

RMH in a spawn house

 
Posts: 40
3
  • Mark post as helpful
  • send pies
    Number of slices to send:
    Optional 'thank-you' note:
  • Quote
  • Report post to moderator
Ahoy!

For the combined purposes of: (1) spawn production beyond what a bedroom closet can handle; and (2) season-extending indoor production of select species of fungi (in reusable containers-don't you worry!), I intend to repurpose our defunct silo foundation room and adjoining "feed room" as a growroom and mycological lycaeum. Pooling from E&E's annex plan and the BIG BOOK, I'd like to install a rocket mass heater which spans both rooms, thus heating the growing area and running spawn-heating vessels using the readily available wood fuel of our Great Lakes biome. As shown in this picture, my intend is to have the feed tube and barrel just inside the work room, passing the ducting through into the spawn house, around one of the 2 monolithic walls, back into the work room, up and away! The bench will look like a flattened quarter-round tucked against the wall. I accept that I'll have to step over the thing repeatedly. I intend to use the warmer (inner) area for spawn run, the 2nd warmest area (RH outside) for fruiting (this means it should be closed off to contain a humidity spike, yes?) and the barely-heated area for either finished-spawn holding or to become my clean-room/lab.

I would put my lab and flow hood out in the workroom, but its ability to be kept clean and still is a distant second to the spawnhouse. Thoughts on this matter are welcome.

The old silo above will be sealed off by means of silicone applied over the edges of the steel door which opens through the ceiling.

Thoughts? Glaring flaws? Where will the concrete room fall in the thermal mass/heat sink/heat robber spectrum? 8 inches thick on all sides, I believe. Any cleaning concerns with cob at ~100% RH for several months? Will the residual old corn, of which I'll probably never scour away all traces, present an insurmountable contamination spore load?

Thanks in advance!
Derick
RMH-Spawnhouse-crude-layout.jpg
[Thumbnail for RMH-Spawnhouse-crude-layout.jpg]
The floorplan
IMG_20150217_160846.jpg
[Thumbnail for IMG_20150217_160846.jpg]
Spawn house
IMG_20150217_162338.jpg
[Thumbnail for IMG_20150217_162338.jpg]
Work room
 
gardener
Posts: 4269
636
7
forest garden fungi trees food preservation bike medical herbs
  • Mark post as helpful
  • send pies
    Number of slices to send:
    Optional 'thank-you' note:
  • Quote
  • Report post to moderator
This is a really interesting possible innovation, Derick. I will be interested to see how it turns out.
John S
PDX OR
 
gardener
Posts: 6814
Location: Arkansas - Zone 7B/8A stoney, sandy loam soil pH 6.5
1647
hugelkultur dog forest garden duck fish fungi hunting books chicken writing homestead
  • Likes 1
  • Mark post as helpful
  • send pies
    Number of slices to send:
    Optional 'thank-you' note:
  • Quote
  • Report post to moderator
Very Interesting plan, are you going with a J tube or a Batch Box type rig? Have you looked into bells? This web site has lots of information and experimental results you may find helpful. Donkey's Rocket stove site They have lots of great information there, it has been very helpful to me.
 
Posts: 46
Location: mid. TN
1
  • Mark post as helpful
  • send pies
    Number of slices to send:
    Optional 'thank-you' note:
  • Quote
  • Report post to moderator

Derick Greenly wrote:Ahoy!

For the combined purposes of: (1) spawn production beyond what a bedroom closet can handle; and (2) season-extending indoor production of select species of fungi (in reusable containers-don't you worry!), I intend to repurpose our defunct silo foundation room and adjoining "feed room" as a growroom and mycological lycaeum. Pooling from E&E's annex plan and the BIG BOOK, I'd like to install a rocket mass heater which spans both rooms, thus heating the growing area and running spawn-heating vessels using the readily available wood fuel of our Great Lakes biome. As shown in this picture, my intend is to have the feed tube and barrel just inside the work room, passing the ducting through into the spawn house, around one of the 2 monolithic walls, back into the work room, up and away! The bench will look like a flattened quarter-round tucked against the wall. I accept that I'll have to step over the thing repeatedly. I intend to use the warmer (inner) area for spawn run, the 2nd warmest area (RH outside) for fruiting (this means it should be closed off to contain a humidity spike, yes?) and the barely-heated area for either finished-spawn holding or to become my clean-room/lab.

I would put my lab and flow hood out in the workroom, but its ability to be kept clean and still is a distant second to the spawnhouse. Thoughts on this matter are welcome.

The old silo above will be sealed off by means of silicone applied over the edges of the steel door which opens through the ceiling.

Thoughts? Glaring flaws? Where will the concrete room fall in the thermal mass/heat sink/heat robber spectrum? 8 inches thick on all sides, I believe. Any cleaning concerns with cob at ~100% RH for several months? Will the residual old corn, of which I'll probably never scour away all traces, present an insurmountable contamination spore load?

Thanks in advance!
Derick


if you plan on using filter patch bags for spawn then you should probably just save a lot of heartache and quit now. you will more than likely become very frustrated, quickly, with throwing out all of your hard work. I would know as I used a straw insulated room as an incubation chamber. Jars might work fine. Substrate bags might work fine. But grain spawn in filter patch bags will probably not. A high spore load and temperature swings is going to push spores into your bags. Even if you can't see them at the time of spawning, they will germinate and ruin your substrate. Since jar filters are thicker, you can probably get away with them. Or, if you can keep the temperatures +/- 5-10 degrees, you would probably be OK.

or you could spend the big bucks and use mycelia/saco2 bags. if anything nasty shows up in them, you put it there
 
Derick Greenly
Posts: 40
3
  • Mark post as helpful
  • send pies
    Number of slices to send:
    Optional 'thank-you' note:
  • Quote
  • Report post to moderator
It'll be a J-tube, certainly. I'll be working closely on the cooktop most times it's in use and be happy to feed to suit my needs.

As for Drake's caution, I do thank you. But my thought for a little while now has been: grain bags in anyplace but a filtered, clean incubation room? A touchy nuisance! Who needs it? My work will consist of:

-Grain spawn in jars (I can hold enough grain spawn in both arms to spawn enough substrate to half-fill this space and then spawn a mess of logs. Half gallon and quart jars will do fine, and reliably.
-Sawdust substrate bags, straw substrate bags and sawdust spawn bags for logs and rafts outdoors (this is where my use of "spawn" maybe threw you off).

I have previously and successfully grown many jars of Liquid culture and grain spawn in a drafty area with a nice fat spore load. Please let me know if you'd still worry about sawdust in bags in an environment like this. I suppose my observation of (other people's) Stropharia, Shiitake, Oyster and Elm on pasteurized substrate in (essentially) humidified semi-outdoor conditions has instilled quite a confidence in me in this regard.
 
drake schutt
Posts: 46
Location: mid. TN
1
  • Mark post as helpful
  • send pies
    Number of slices to send:
    Optional 'thank-you' note:
  • Quote
  • Report post to moderator

Derick Greenly wrote:It'll be a J-tube, certainly. I'll be working closely on the cooktop most times it's in use and be happy to feed to suit my needs.

As for Drake's caution, I do thank you. But my thought for a little while now has been: grain bags in anyplace but a filtered, clean incubation room? A touchy nuisance! Who needs it? My work will consist of:

-Grain spawn in jars (I can hold enough grain spawn in both arms to spawn enough substrate to half-fill this space and then spawn a mess of logs. Half gallon and quart jars will do fine, and reliably.
-Sawdust substrate bags, straw substrate bags and sawdust spawn bags for logs and rafts outdoors (this is where my use of "spawn" maybe threw you off).

I have previously and successfully grown many jars of Liquid culture and grain spawn in a drafty area with a nice fat spore load. Please let me know if you'd still worry about sawdust in bags in an environment like this. I suppose my observation of (other people's) Stropharia, Shiitake, Oyster and Elm on pasteurized substrate in (essentially) humidified semi-outdoor conditions has instilled quite a confidence in me in this regard.


no it's really just spawn that's the problem since it's so nutritious, and you're expanding it, and the membrane seperating it from the outside world is a micron or two thick. Your sawdust bags should be fine as long as you don't plan on expanding them in sterile cultivation. what happens is a few spores can get sucked in the bag, and start growing, even though you can't see it the mold can be there.
 
pollinator
Posts: 202
Location: Ontario
60
  • Mark post as helpful
  • send pies
    Number of slices to send:
    Optional 'thank-you' note:
  • Quote
  • Report post to moderator
You and I have chatted about the RMH plans, and it seems to me (and maybe agreed, don't remember) that the heat sink factor can go either way, just depends on how and how often you fire the RMH. If your mushroom practise calls for you to cook often enough and therefore provide steady firing, then your concrete mass, plus the earth that is banked on one side of the building will be turned warm enough that you can consider them to be 'mass', and useful for heat retension. If your cook-top needs don't align with a pratice that also gets the concrete and earth warm enough, then 'heat sink' it is. It'd be ideal that your operating of the RMH for use of the cooktop just coincides with providing enough heat through the exhaust to get your masses warm. It's worth building the thing and seeing where it goes.

Does anyone else have a similar set-up? Concrete walls and floor, partly banked into the earth? Any tips?
 
Derick Greenly
Posts: 40
3
  • Mark post as helpful
  • send pies
    Number of slices to send:
    Optional 'thank-you' note:
  • Quote
  • Report post to moderator
Yeah, the heat sink:mass spectrum is the core of my uncertainty about the thing. I'll proceed with a dry stone mass until in proves itself, then cob it in for good. I suppose I need to see how warm each area gets with my own two peepers before I decide which rooms will be for incubation, fruiting and lab work. It's going to be a n 8-inch, all firebrick-cored, rockwool wrapped, 45 foot drag ducted RMH. Options to either use a plain ol 55-gallon oil drum or a 30-gallon shiny stainless catnip oil drum are being dissed out today, but I've my doubts about the latter.
 
Olenka Kleban
pollinator
Posts: 202
Location: Ontario
60
  • Mark post as helpful
  • send pies
    Number of slices to send:
    Optional 'thank-you' note:
  • Quote
  • Report post to moderator
Time to buy an infrared thermometer!
Should I buy one while I am in Montana?
 
Olenka Kleban
pollinator
Posts: 202
Location: Ontario
60
  • Mark post as helpful
  • send pies
    Number of slices to send:
    Optional 'thank-you' note:
  • Quote
  • Report post to moderator
An update: the spawnhouse project has been chugging along, and so far, so great. :)

We experienced some delays due to cold weather (primarily ice forming on the floor in the area of the rocket heater), but the extra time has given the project time to unfold in a well thought-out manner; more time to thoroughly consider the space, and more time to hypothesize and shoot for best results.

Derick has dug a small trench in the adjoining room to the spawnhouse to divert any water along the floor, so things there are looking good.

The site of the RMH has been re-considered since what had been drawn in the above diagram. Instead of being located outside the spawnhouse, it is now inside the spawnhouse. (Spawnhouse = the round room, the base of the silo.) This decision was made in consideration of heat sink. While we know the space is quite insulated (with concrete and earth), heating the room just by the exhaust of the RMH (embedded in a cob mass right up against a concrete wall) might work well enough, and it might not. Putting the RMH inside the spawnhouse will give the space all the different heat forms that come from the RMH (radiant, conductive). If it's not warm enough, we can build an insulative wall separating the spawnhouse room from the adjacent room. If it turns out to be too warm, the spawnhouse can be vented to get some cool air exchange. This set-up seems like it has good options for managing heat through all 4 seasons.

One concern for the RMH being inside the spawnhouse is the comfort of space. The spawnhouse room's ceiling is lower than the adjacent room. The RMH in the spawnhouse means less room for handling the pressure cooker over the barrel for cooking. But perhaps it'll be as fine and comfortable set-up as any. This is something experience will tell.

I'll post some pictures after my next visit to the farm (I have not stopped pin-balling myself from location to location since leaving the tipi!)

 
Derick Greenly
Posts: 40
3
  • Mark post as helpful
  • send pies
    Number of slices to send:
    Optional 'thank-you' note:
  • Quote
  • Report post to moderator
Aye, aye, aye. The spawn house, which I was hoping to have online by this time, has had its share of unforeseen hurdles which offered opportunity for optimization of the design as a whole. Most notably, the lab will remain in a walk-in closet in the farmhouse indefinitely, the aisle of the silo base will be the main heat source and incubation area, and both bracket rooms will serve as fruiting areas. If the season necessitates it, the west (left) bracket room may be used as an earth-sheltered cold room with a coolbot, while fruiting can move to a simple hoop house.

Particulars of tHe system to follow....
IMG_20150316_164819.jpg
[Thumbnail for IMG_20150316_164819.jpg]
IMG_20150415_124747.jpg
[Thumbnail for IMG_20150415_124747.jpg]
 
Derick Greenly
Posts: 40
3
  • Likes 1
  • Mark post as helpful
  • send pies
    Number of slices to send:
    Optional 'thank-you' note:
  • Quote
  • Report post to moderator
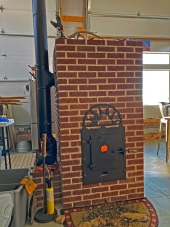
To avoid spalling of the concrete below, we raised the floor of the heater by one course of red brick and stuffed shredded roxul in there as a bonus. There is also a tinfoil floor, but i won't sing its merits too heartily.
IMG_20150415_124611.jpg
[Thumbnail for IMG_20150415_124611.jpg]
core in final location
IMG_20150316_183150.jpg
[Thumbnail for IMG_20150316_183150.jpg]
insulative-ish floor
IMG_20150316_165117.jpg
[Thumbnail for IMG_20150316_165117.jpg]
floor course 1
 
Derick Greenly
Posts: 40
3
  • Likes 1
  • Mark post as helpful
  • send pies
    Number of slices to send:
    Optional 'thank-you' note:
  • Quote
  • Report post to moderator
Courses
....
IMG_20150316_165020.jpg
[Thumbnail for IMG_20150316_165020.jpg]
IMG_20150316_164937.jpg
[Thumbnail for IMG_20150316_164937.jpg]
IMG_20150316_164913.jpg
[Thumbnail for IMG_20150316_164913.jpg]
 
Derick Greenly
Posts: 40
3
  • Likes 1
  • Mark post as helpful
  • send pies
    Number of slices to send:
    Optional 'thank-you' note:
  • Quote
  • Report post to moderator
A dozen heartfelt appreciations for your patience for having read this far.

One very critical change incurred when we went into the spawnhouse with this system is that the ceiling is a few hairs short of six feet. this means our 29-inch 35-gallon barrel must be able to clear the top brick of the heat riser, which a 40-inch riser would not allow. the compromise is that we'll have a shorter riser than in perfectly ideal-somewhere around 35.5 inches. still not project-shattering. the burn tunnel will be in the neighborhood of 16 inches, and the feed tube, though it is around 16 inches in the pictures above, will be shortened to 12 inches or so tonight. One footnote: there is also the option to create a 12x4.5 inch notch in the barrel, just for the purpose of passing the barrel over the riser, which I could then build to 40 inches even. This would necessitate a dreadful amount of sealing and reworking around the barrel once placed, as opposed to the nice knife edge seal I will have by keeping only a 9x3 notch cut out of the barrel. This notch will tuck onto the bricks forming the ceiling of the burn tunnel. This notch is to obtain that 2" gap between the heat riser's summit and the barrel's inner surface that's known to be so spiffy for cooking. If the notch were omitted, the gap would be 5" and the cooking potential would be nil, no?

Manifold: I obtained a nice truckload of freebie broken clay bricks from a demo in a neighboring town. My intent is to build a brick plinth ringing the area below the barrel, exhausting into a 1-foot section of stove pipe, then a cleanout tee, then the mass.

This is the week that I'm full steam ahead on the heater. Daily routine will be (in order): feed the pigs, feed the ducks, collect eggs, poke some seeds in the garden and FLOAT THAT TROWEL!
gift
 
The Humble Soapnut - A Guide to the Laundry Detergent that Grows on Trees ebook by Kathryn Ossing
will be released to subscribers in: soon!
reply
    Bookmark Topic Watch Topic
  • New Topic