• Post Reply Bookmark Topic Watch Topic
  • New Topic
permaculture forums growies critters building homesteading energy monies kitchen purity ungarbage community wilderness fiber arts art permaculture artisans regional education skip experiences global resources cider press projects digital market permies.com pie forums private forums all forums
this forum made possible by our volunteer staff, including ...
master stewards:
  • r ranson
  • Nancy Reading
  • Carla Burke
  • John F Dean
  • Jay Angler
  • paul wheaton
stewards:
  • Nicole Alderman
  • Pearl Sutton
  • Anne Miller
master gardeners:
  • Christopher Weeks
  • Timothy Norton
gardeners:
  • Nina Surya
  • Matt McSpadden
  • thomas rubino

Rocket stove secondary air

 
Posts: 11
  • Mark post as helpful
  • send pies
    Number of slices to send:
    Optional 'thank-you' note:
  • Quote
  • Report post to moderator
Love the rocket stove. Keep reading on secondary air. Can we put an air feed tube in the system past the fire point an inject air in the insulated riser to boost the final burn temp???
Just an idea and or question for now
 
pollinator
Posts: 4154
Location: Northern New York Zone4-5 the OUTER 'RONDACs percip 36''
67
hugelkultur fungi books wofati solar woodworking
  • Likes 2
  • Mark post as helpful
  • send pies
    Number of slices to send:
    Optional 'thank-you' note:
  • Quote
  • Report post to moderator
Alan Clashman : Fellow member Satamax Antone has done us a favor by posting a video from Donkeys site Detailing a RMH re-build that clearly answers

most of your questions ! //// See link below :

https://permies.com/t/52658/rocket-stoves/video-Kirk


It is possible to provide a J-bend style Rocket Mass Heater with too much air and actually cool down the combustion zone and retard the freaky high

temperatures needed for a clean efficient burn. But the simple use of a Peter channel ,(1st visible against the barrel side of the Feed Tube opening at 10:00

minutes ) and the audible clues from Your Rockets Roar, and the temperature reading on your Magnetic Thermostat on your barrel should help you keep to

the cleanest burning performance of your Rocket ! So-

1) Note the peter channel in place at 10:00 - Stop/pause video


2) Again in correct operating place at 16:16- Stop/pause video

3)A good look at the Peter Channel at 16:18 stop/pause video

This is also a good 1st glimpse of the techniques involved in converting a straight Thermal mass Bench into a bell bench that will radiate more heat faster.

At 16:10-ish note the start of the scarification necessary to bind the new layers to the old, Also the use of lots of straw/cob to make the structural layer!

This is the strongest layer just below the plaster layer that 'seals' the bench top !

4) note the deliberate indentations to to benches top at 16:33, this is the 'mark of the Cobbers thumb' and helps the new/old layers marry together !

I hope you find this timely and useful, for the Good of the Crafts ! Big AL

 
Alan Clashman
Posts: 11
  • Likes 1
  • Mark post as helpful
  • send pies
    Number of slices to send:
    Optional 'thank-you' note:
  • Quote
  • Report post to moderator
I see the bell idea. Quicker warming but less last time as well??
But that is not exactly the question. Have included a drawing. (And yes I must have my pencil. Or thinking stick. )
What about a small amount of oxygen to the high heat zone???
image.jpg
[Thumbnail for image.jpg]
Secondary air addition
 
allen lumley
pollinator
Posts: 4154
Location: Northern New York Zone4-5 the OUTER 'RONDACs percip 36''
67
hugelkultur fungi books wofati solar woodworking
  • Likes 1
  • Mark post as helpful
  • send pies
    Number of slices to send:
    Optional 'thank-you' note:
  • Quote
  • Report post to moderator
Alan Clashman : With a well built J-Bend Style Rocket Mass Heater RMH, we are already running at temperatures where we are very close to ''frying air'' the point where we are

making Oxides of Nitrogen ! Well up into forging temperatures ! There is another whole type of RMH the Horizontally fed batch fired rockets that are a much harder 1st build,

I Think but are designed to be loaded and then walk away from, These do have a secondary air supply and are becoming the standard that other wood stoves are

measured by. Almost all the batch loaded RMHs are less than 2 years old- and some improvements Or problems are always possible.

It is my opinion that all 1st time Builders should build a basic J-Bend RMH, and live with it for a year before moving on. This has the added benefit that if a problem develops

in your build you can always come here to your fellow Permies Rocketeers to get sorted out .

For the Crafts Big AL
 
Posts: 455
Location: climate zone 6b
3
  • Likes 1
  • Mark post as helpful
  • send pies
    Number of slices to send:
    Optional 'thank-you' note:
  • Quote
  • Report post to moderator
I have tried this secondary air technique almost exactly how you drew it out but with a small variation. the issue with your drawing is:
1 your drawing is using cold air... that will cool your fire and you need heat.
2 your drawing is adding additional air to the system than designed and will act like a "leak" and slow suction down.

my exact idea consisted of running a steel tube along the bottom from the front of my access port to the back of the J tunnel up and i moved it back and forth to try and get the proper spot of additional air to the burn tunnel flame.

My results unfortunately i only documented them in in person and did not record them, sorry: my results found that the additional air in any part of the burn tunnel did not increase temperature and in fact decreased the draw and temp significantly. i did not try different sizes of air tube and maybe that could be done. my air tube was about an inch in ID.

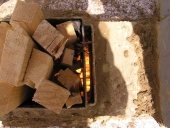
Color and Temperature of my fire described: its hard to capture in a youtube video what the naked eye can see but the flame is very bright and dazzling with fine blue edges and you can see it at the end of this video when i get real close you can see im trying to focus in on the fire brick in the burn tunnel that is glowing orange/red. the camera goes into the front of the access port where the cold air is designed to pull through and feed my RMH with lots of air to draw into the burn cahmber and that is the exact location i placed my air tube going to the back of the burn tunnel.


Most of our RMH are getting to freaky temps and are getting everything they need or they wouldnt operate the way they do. my RMH heater is getting so hot the bricks are glowing and my flames edges are turning blue with a bright dazzling inferno. when your flames are turning blue it means you have reached about max flame temp you can do. if there is a hotter color temp than blue i do not know about it.

The temperature range from Red to White:

Red
Just visible: 525 °C (980 °F)
Dull: 700 °C (1,300 °F)
Cherry, dull: 800 °C (1,500 °F)
Cherry, full: 900 °C (1,700 °F)
Cherry, clear: 1,000 °C (1,800 °F)
Orange
Deep: 1,100 °C (2,000 °F)
Clear: 1,200 °C (2,200 °F)
White
Whitish: 1,300 °C (2,400 °F)
Bright: 1,400 °C (2,600 °F)
Dazzling: 1,500 °C (2,700 °F)

According to the info above (source: Wikipedia) the difference between red-hot and white-hot is about 1000 degrees. But what about blue-hot?

Anytime you see blue in a fire it is hotter than white. The range is between 2,600 and 3,000 degrees Fahrenheit and its the most oxygen-rich type of flame. A bunsen burner is a good example:

Bunsen burner flames:


1) air hole closed

2) air hole slightly open

3) air hole half open

4) air hole almost fully open (this is the roaring blue flame).

Bunsen burners use a mixture of gases. Gas burns hotter than organic materials such as wood and straw. Natural gas stove flames are blue. Propane flames are blue with yellow tips. The hottest fires are from oxyacetylene torches (about 3000 degrees Centigrade) that combine oxygen and gas to create pinpoint blue flames.
 
Posts: 617
Location: ontario, canada
15
transportation fungi tiny house
  • Mark post as helpful
  • send pies
    Number of slices to send:
    Optional 'thank-you' note:
  • Quote
  • Report post to moderator
I like your idea to introduce secondary air, in fact I mentioned experimenting with it in my thread also.

I have recently built a pellet burner feeder for my rocket, I'm going to be upgrading to a new pre-designed & pre-tested pellet burner which uses secondary air and a type of jet nozzle!

Keep up the good work and good ideas, if you check youtube or rocket sites, you will find its already been done with success creating an afterburner, so you can learn more there also


Cheers
 
Rocket Scientist
Posts: 4574
Location: Upstate NY, zone 5
599
5
  • Mark post as helpful
  • send pies
    Number of slices to send:
    Optional 'thank-you' note:
  • Quote
  • Report post to moderator
As F Styles said, a J-tube already has all the air it needs for full combustion (usually a lot extra, actually), and adding new air in the riser doesn't help even if it is preheated. Good turbulent mixing is the big thing for best combustion. The "p-channel" and "tripwire" modifications for the J-tube are the best developments in that direction to date. Also, the square edges where the burn tunnel meets the riser are beneficial for turbulence, and curving that edge for smoother flow would actually be counterproductive.
 
allen lumley
pollinator
Posts: 4154
Location: Northern New York Zone4-5 the OUTER 'RONDACs percip 36''
67
hugelkultur fungi books wofati solar woodworking
  • Likes 1
  • Mark post as helpful
  • send pies
    Number of slices to send:
    Optional 'thank-you' note:
  • Quote
  • Report post to moderator
John McDoodle : Here is a Link to a site with multiple rocket wood pellet hybrid videos you may find entertaining and possibly useful. //// See links below :


https://www.youtube.com/watch?v=7wqJQmD-eVo&index=6&list=PLtIuZ9K-UzcNnCmoKicRLzYQndplSkUuR

https://www.youtube.com/watch?v=66bJsAaJolo&list=PLtIuZ9K-UzcNnCmoKicRLzYQndplSkUuR

Warning ! people I have sent there have got lost and were never heard from again ! Big AL
 
John McDoodle
Posts: 617
Location: ontario, canada
15
transportation fungi tiny house
  • Mark post as helpful
  • send pies
    Number of slices to send:
    Optional 'thank-you' note:
  • Quote
  • Report post to moderator
Thanks for the links Big Al. I have checked out the stuff from bigelow farms before also . He has done over 200 hours of burns on some of his stainless steel parts!
 
Posts: 596
Location: South Tenerife, Canary Islands (Spain)
14
forest garden trees greening the desert
  • Mark post as helpful
  • send pies
    Number of slices to send:
    Optional 'thank-you' note:
  • Quote
  • Report post to moderator
How is it better to take the air you don't need for the combustion of wood at the beginning and drag it over the wood just so it can get to the riser to burn the gases?
Why does cross sectional area need to be constant throughout the system? The temperatures and pressures change during the burn, as do the volumes of the elements involved as chemical reactions take place, so the velocities will be different throughout the system even with constant CSA.

By introducing secondary air later, you could reduce the CSA of the burn tunnel, making for a lighter and smaller system. By introducing cooler oxygen in secondary air, you could lower the temperature of the riser, placing less stress on materials. Can someone explain the importance of pushing for as high as possible temperatures? Is that really necessary for complete combustion? What are the hydrocarbons you are trying to crack/burn at temps over 1000C?

By allowing secondary air in, you might reduce the variability of the oxygen available for secondary burn that is a result of reduced obstruction as primary fuel burns.
 
Steve Farmer
Posts: 596
Location: South Tenerife, Canary Islands (Spain)
14
forest garden trees greening the desert
  • Mark post as helpful
  • send pies
    Number of slices to send:
    Optional 'thank-you' note:
  • Quote
  • Report post to moderator
By sharing the power of the draw between the burn tunnel and a secondary air feed, you will experience a slower rate of fuel use for given CSA. Depending on you application this may be a good or a bad thing. In most cases, I suspect burning the same amount of fuel over a longer period for a slower release of energy would be a good thing.
 
John McDoodle
Posts: 617
Location: ontario, canada
15
transportation fungi tiny house
  • Mark post as helpful
  • send pies
    Number of slices to send:
    Optional 'thank-you' note:
  • Quote
  • Report post to moderator
I think you are on the right track buddy. are you planning/designing a build?
 
Glenn Herbert
Rocket Scientist
Posts: 4574
Location: Upstate NY, zone 5
599
5
  • Likes 1
  • Mark post as helpful
  • send pies
    Number of slices to send:
    Optional 'thank-you' note:
  • Quote
  • Report post to moderator
Within the format of a J-tube combustion core, the space necessary for loading the wood (vertically) is more than the space needed for combustion air to enter. Best practice is to keep the wood shorter than the feed tube height so that a couple of bricks can be slid over the top to restrict airflow. The sticks leaning against the edge of the burn tunnel roof will help with channeling airflow. (You do not want the sticks leaning back against the near side of the feed tube, as that allows air to completely bypass the flame zone.)

The p-channel is a sheet of metal hanging down at the edge of the burn tunnel roof that keeps a constant flow of air available (5% of total CSA) regardless of how crowded the sticks are in the feed, and helps create beneficial turbulence just downstream of the initial fire. Peter van den Berg's experiments found that there was no benefit to moving this inlet nearer the end of the burn tunnel. He had a professional combustion testing instrument (Testo 330 I believe) to get precise measurements, not just visuals.

For the batch box configuration, the air supply situation is completely different and not comparable; secondary air at the port between firebox and riser is valuable. Experimentation is ongoing for continual improvement in this area, especially among PvdB, Shilo Kinarty and Adiel Shnior - they have posted results in the forum at http://donkey32.proboards.com/board/4/experiments-results (see "chet portal" among others).
 
You pay for a gym membership and then you pay a tiny ad to chop your wood?
Learn Permaculture through a little hard work
https://wheaton-labs.com/bootcamp
reply
    Bookmark Topic Watch Topic
  • New Topic