|

|
|
|
|

|

|

|

|

|


 1
1

How permies.com works
What is a Mother Tree ?

Skill verified by gir bot")
 1
1
Glenn Herbert wrote:Huh - I couldn't see any URL to fix. Thanks, Burra!
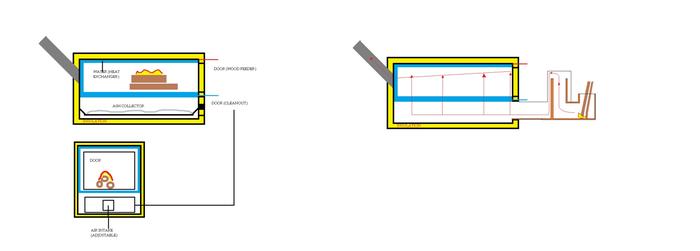
I think your scheme would work, though there are a few things I would change. First, there is no reason to have a front air intake; the top of the feed tube will do the job exactly right, with a variable lid like a couple of bricks that can be positioned to let the right amount of air in. That would also let you monitor the fire directly instead of squatting down, and then having to uncover the top releasing a plume of hot gases that might burst into flame. As long as your pipe is at least 6" and you don't have gigantic hands, you can reach in with a small scraper/scoop to clean any ashes when the system is cold. Ash will build up very slowly in an efficient combustion chamber like this.
The pipe in the burn chamber and lower riser, when well insulated, will corrode fairly soon, but as the pipe was free, all you will lose is your time to make it and replace it later. If you have a source of clay of any kind, you can form a layer of that around the pipe before insulating, and have some containment when the pipe falls apart.
The charcoaling zone looks good except for the wide flaring outer shell. I presume the material you have on hand is shaped like that, but it will let the heat dissipate around the top and reduce the charcoal making effectiveness. If you can get a sheet of metal with a hole in the middle for a lid, you should be able to keep the heat flow concentrated. Just arrange it so there is not a constriction smaller than anywhere else in the flow path.

|
Impossible is for the unwilling --John Keats ... see, this tiny ad now exists:
It's a bit like "run away to the circus" but for gardeners
https://wheaton-labs.com/bootcamp
|