• Post Reply Bookmark Topic Watch Topic
  • New Topic
permaculture forums growies critters building homesteading energy monies kitchen purity ungarbage community wilderness fiber arts art permaculture artisans regional education skip experiences global resources cider press projects digital market permies.com pie forums private forums all forums
this forum made possible by our volunteer staff, including ...
master stewards:
  • Carla Burke
  • Nancy Reading
  • paul wheaton
  • John F Dean
  • r ransom
  • Jay Angler
stewards:
  • Timothy Norton
  • Tereza Okava
  • Pearl Sutton
master gardeners:
  • Christopher Weeks
  • M Ljin
gardeners:
  • Jeremy VanGelder
  • Megan Palmer
  • Thekla McDaniels

how to sharpen a serrated knife blade in 90 seconds - downtown missoula

 
author and steward
Posts: 81326
Location: missoula, montana (zone 4)
hugelkultur trees chicken wofati bee woodworking
  • Likes 6
  • Mark post as helpful
  • send pies
    Number of slices to send:
    Optional 'thank-you' note:
  • Quote
  • Report post to moderator
Wow, that's fast.

And I had no idea that sharpening a blade could be that fast!

When I saw he was gonna just use the rag wheel buffer, I thought it was gonna be lame, but the knife went from useless to razor sharp!

I have two questions:

1)  what is he talking about when he says "wire edge"?

2)  what does he keep doing by running the blade on the wood every ten seconds or so?


Please forward to folks that might be interested in this sort of thing.

Many thanks!


Posts: 40
4
4
urban solar composting
  • Likes 2
  • Mark post as helpful
  • send pies
    Number of slices to send:
    Optional 'thank-you' note:
  • Quote
  • Report post to moderator
I have no idea what I'm talking about here, but....

I think the first pass on the non-ragbuffer wheel what a grinder, where he carefully did the main sharpening and set the angle o the edge. As that grinder moved the metal to the back edge of the blade, what resulted was a fine "wire" of metal at the tip. (Similar to the sawdust that might be on the edge of the wood if you use a belt sander).
So the buffer passes were to then buff off the extra metal, (he called this the weak part of the edge) resulting in only the sharpened blade.
He mentioned the buffer acting like a Razor strop. (think old time barber sharpening his straight edge on that leather belt strap).
Stropping Video:


-Andy


master gardener
Posts: 6683
Location: Carlton County, Minnesota, USA: 3b; Dfb; sandy loam; in the woods
4095
8
forest garden trees books chicken food preservation cooking fiber arts seed woodworking homestead ungarbage
  • Likes 2
  • Mark post as helpful
  • send pies
    Number of slices to send:
    Optional 'thank-you' note:
  • Quote
  • Report post to moderator
experimental comfirming with AI

In the context of knife sharpening, a "wire edge" refers to a thin, fragile strip of metal that forms along the edge of the blade during sharpening—especially when using a grinding wheel or coarse abrasive.

🔍 What causes a wire edge?

When you sharpen a blade, you're removing material to create a new edge.
As the abrasive grinds away metal, it can push a tiny sliver of metal over the edge.
This sliver is not structurally strong and can bend or break easily.
It’s similar to the burr that forms when sanding wood or metal.

đź§Ľ Why remove it?

A wire edge feels sharp but is weak and temporary.
If left in place, it can fold over during use, dulling the blade quickly.
That’s why sharpeners often strop the blade (e.g., on leather or wood) to remove the wire edge and polish the final cutting surface.

In the video you mentioned, the person uses a rag wheel buffer to remove the wire edge—similar to how a barber uses a leather strop to finish a straight razor.

 
Posts: 1
  • Likes 2
  • Mark post as helpful
  • send pies
    Number of slices to send:
    Optional 'thank-you' note:
  • Quote
  • Report post to moderator
When you use those grinding wheels, the edge of the knife heats up. With a heat treated blade that has a cryo treatment bringing the hardness up to 63, getting the edge hot will just ruin the heat treatment. The blade will lose that Rockwell 63 the factory worked so hard to achieve, and end up at 55. The old school method of sharpening a blade with a spinning wheel-  using a modern heat treated steel-  just is a very bad practice. Far better to use a diamond stone or rod, and just carefully work the edge. It stays cool, retains the heat treatment, and then stays sharp as long as it did before you sharpened it.

My grandpa sharpened blades with a power-driven grinding wheel. Back in the non-heat treated 420 stainless era.

Now we have very effective diamond tools in every shape and grit. Fast, effective, and much better on the blade longevity.
 
gardener
Posts: 536
Location: The Old Northwest, South of Superior
336
books building wood heat
  • Likes 2
  • Mark post as helpful
  • send pies
    Number of slices to send:
    Optional 'thank-you' note:
  • Quote
  • Report post to moderator
Though he doesn't address serrated blades - he's a wood worker - Chris Schwarz has made the PDF version of his booklet "Sharpen This" freely available/downloadable, here:
https://blog.lostartpress.com/wp-content/uploads/2025/10/Sharpen_This_Aug2022pdf.pdf

Or, you can buy the print version from him for $20 US:
https://lostartpress.com/products/sharpen-this


For those unacquainted, Chris has been a vocal proponent in the US context of "unplugged" woodworking (though he does use a table saw to break down stock and a thickness planer to remove lots of material).  He was formerly an editor at Popular Woodworking magazine, but now teaches hand woodworking classes and publishes or reprints relevant instructional material through his Lost Art Press.

I have several books from LAP, and a few on the wish list, too.  His hard bound books are well bound, nicely printed and I've never been disappointed by the content, though I am really at the beginning of my journey into the hand woodworking endeavor - I have more tools than skills.  I haven't purchased any of his soft bound offerings, so can't speak to the quality of those, though I'm fairly well confident Chris wouldn't do anything by half measures.
 
Kevin Olson
gardener
Posts: 536
Location: The Old Northwest, South of Superior
336
books building wood heat
  • Likes 2
  • Mark post as helpful
  • send pies
    Number of slices to send:
    Optional 'thank-you' note:
  • Quote
  • Report post to moderator

Michael Feder wrote:When you use those grinding wheels, the edge of the knife heats up. With a heat treated blade that has a cryo treatment bringing the hardness up to 63, getting the edge hot will just ruin the heat treatment. The blade will lose that Rockwell 63 the factory worked so hard to achieve, and end up at 55. The old school method of sharpening a blade with a spinning wheel-  using a modern heat treated steel-  just is a very bad practice. Far better to use a diamond stone or rod, and just carefully work the edge. It stays cool, retains the heat treatment, and then stays sharp as long as it did before you sharpened it.

My grandpa sharpened blades with a power-driven grinding wheel. Back in the non-heat treated 420 stainless era.

Now we have very effective diamond tools in every shape and grit. Fast, effective, and much better on the blade longevity.


Michael -

Welcome to the forums!

Could you explain a little more about this?  Are you advocating against dry grinding only, or also against wet grinding?  Or, are you saying that this caution only need be observed for modern steels?  Do you cryo quench tools to eliminate retained austenite?  If so, do you use dry ice and kerosene for the quench bath, or something else?

Among other things, I've been entertaining purchasing a CPM plane iron from Lee Valley to put in a Stanley #5 to use it as a scrub plane (someone already opened up the mouth of this Bed Rock[!] to convert it to a scrub plane, and it had a broken but glued tote, so swapping in an iron that will hold an edge for longer under trying circumstances seems like less of an indignity than it's already suffered).  I'd be surprised if the newfangled highfalutin thoroughbred steel is any more sensitive to overheating than the old high carbon steel, but I'm admittedly not "up" on the newer steels, so could be way off base, here.

In restoring old tools, it's sometimes necessary to take off quite a lot of material - 1/4" or more - to get back to decent steel, especially for single bevel tools where some extent of the back behind the edge also needs to be made flat-ish.  I've done this by hand with a coarse carborundum stone - I had to take a lot of meat off an old framer's slick (broad paring chisel) that had been rusting in a bucket with some other unloved tools - but it does take quite a while.

I picked up an old Wissota hand cranked grinder a couple of years ago, which I plan to convert to treadle drive (though workable for sharpening chisels, the hand crank is long enough to foul longer tools like a draw knife, or even a bench axe, but a shorter crank with a treadle would obviate that problem).  This is a dry grinder, but I would think as long as I am careful to keep dipping the tool in a can or pan of water, it should be OK.  A buddy also has an older 10" wet grinder (no motor, just the grinding arbor and bath) which is mine for the collecting, but I haven't yet availed myself of it.  That too may be converted to foot power, though it currently has a v-belt sheave for an electric motor drive mounted on the arbor.

Mostly, I do just use progressive grits of diamond plates (down to a DMT 3 micron/8000 grit plate for fine work), as you have suggested, followed by a few swipes on a hard strop loaded with green (chromium oxide) buffing compound to get to a mirror finish.  But, to re-establish the (concave) primary bevel on a thrashed out socket framing chisel or a plane iron, or to work down the edge of a rusty hewing axe to usable condition, the grinding wheel seems to be an ideal tool, if used with care, so I'd be curious if you can clarify your guidance.

Again, welcome to the forums.

Kevin
 
Kevin Olson
gardener
Posts: 536
Location: The Old Northwest, South of Superior
336
books building wood heat
  • Likes 2
  • Mark post as helpful
  • send pies
    Number of slices to send:
    Optional 'thank-you' note:
  • Quote
  • Report post to moderator
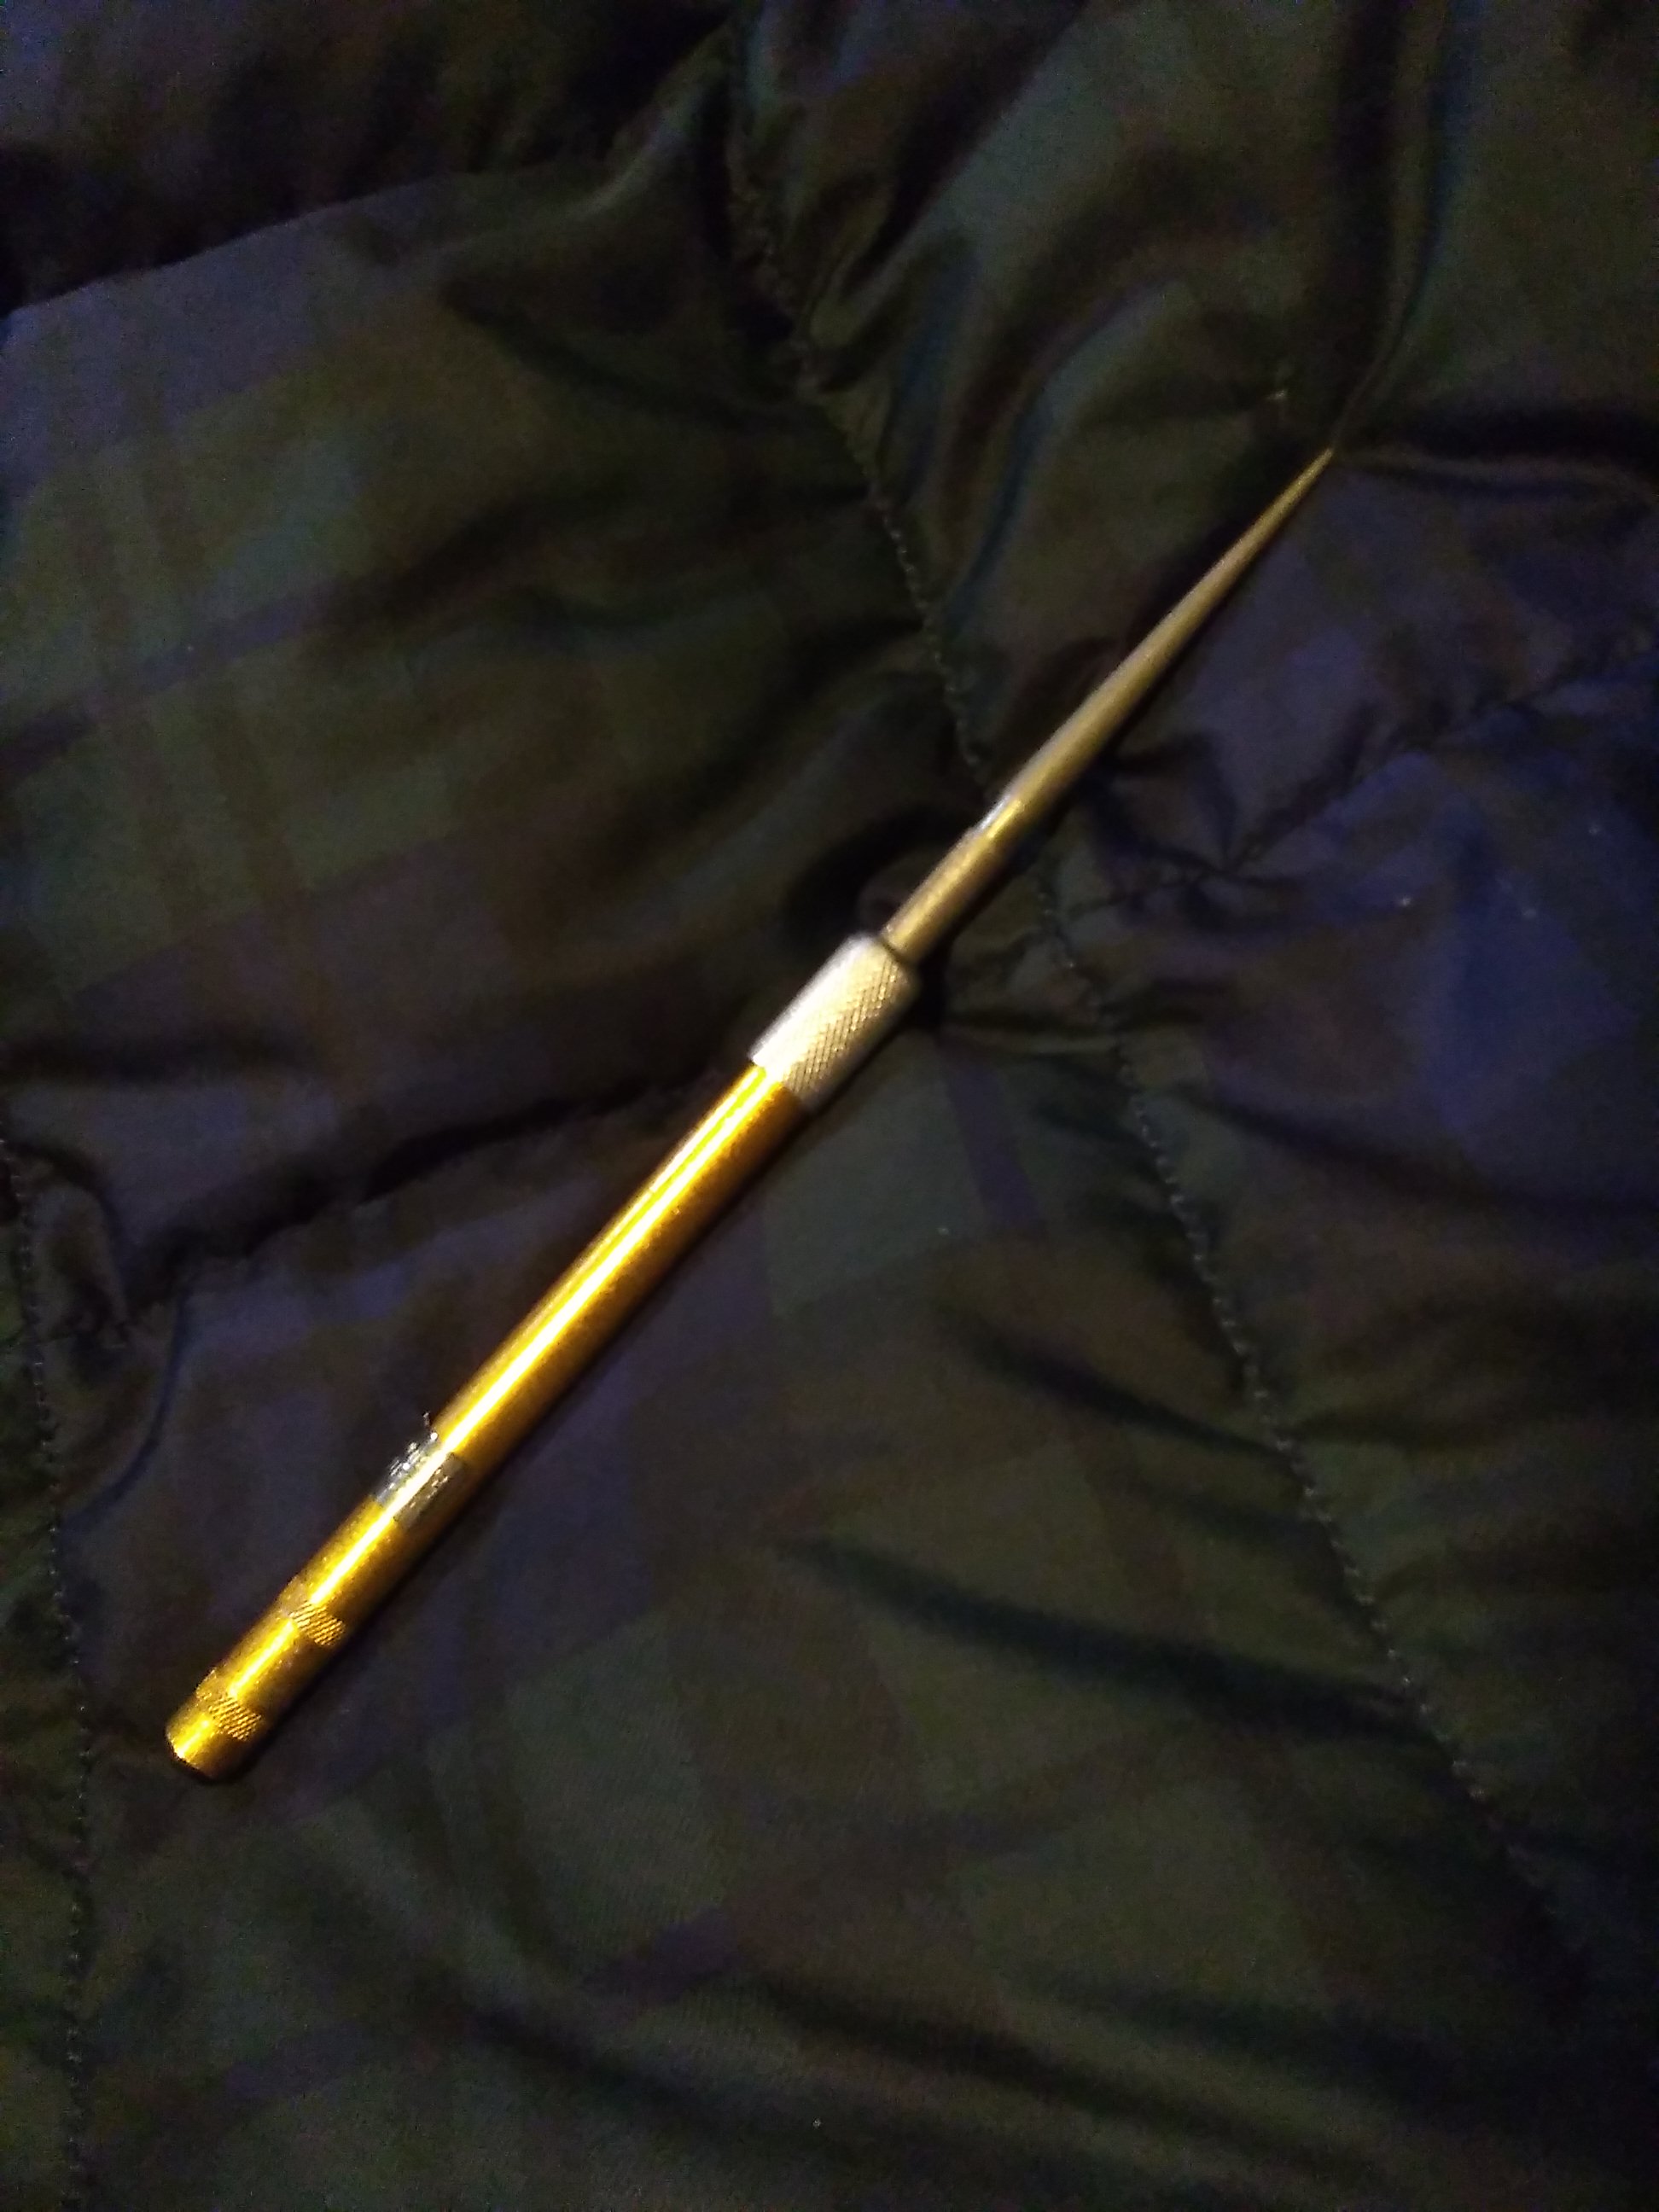
What I typically do for serrated blades (which is a pretty scant subset of my edge tools - a couple of loaf knives, a sheepsfoot blade on a mutli-tool, and the kitchen steak knives) is to use a diamond stone/plate on the flat bevel, and run a diamond needle file over each serration.  The needle file is also used to resharpen utility knife hook blades (hook blades are great for opening packages, because it's very difficult to overpenetrate the tape and whatnot to inadvertently poke whatever is inside).  I also have a slightly larger diameter diamond rod than the one seen here, but I rarely use it, though it might be handy for a linoleum knife or the like.  The conical end of the rod is exposed here, but the ferrule can be turned to loosen the collet, and the ends swapped to bury the conical end within the handle, leaving the cylindrical end exposed (which also has a groove for touching up fish hook barbs).

I will note that when I use my method to touch up serrated blades, they don't hold up as well as non-serrated blades.  I imagine that some burr or wire edge still remains (no matter how careful I am), which breaks down in short order, leaving a less-than-sharp edge.  I can foresee that a quick pass on the buffing wheel would take care of the burr, though eventually proper edge geometry might need to be re-established with the stones.

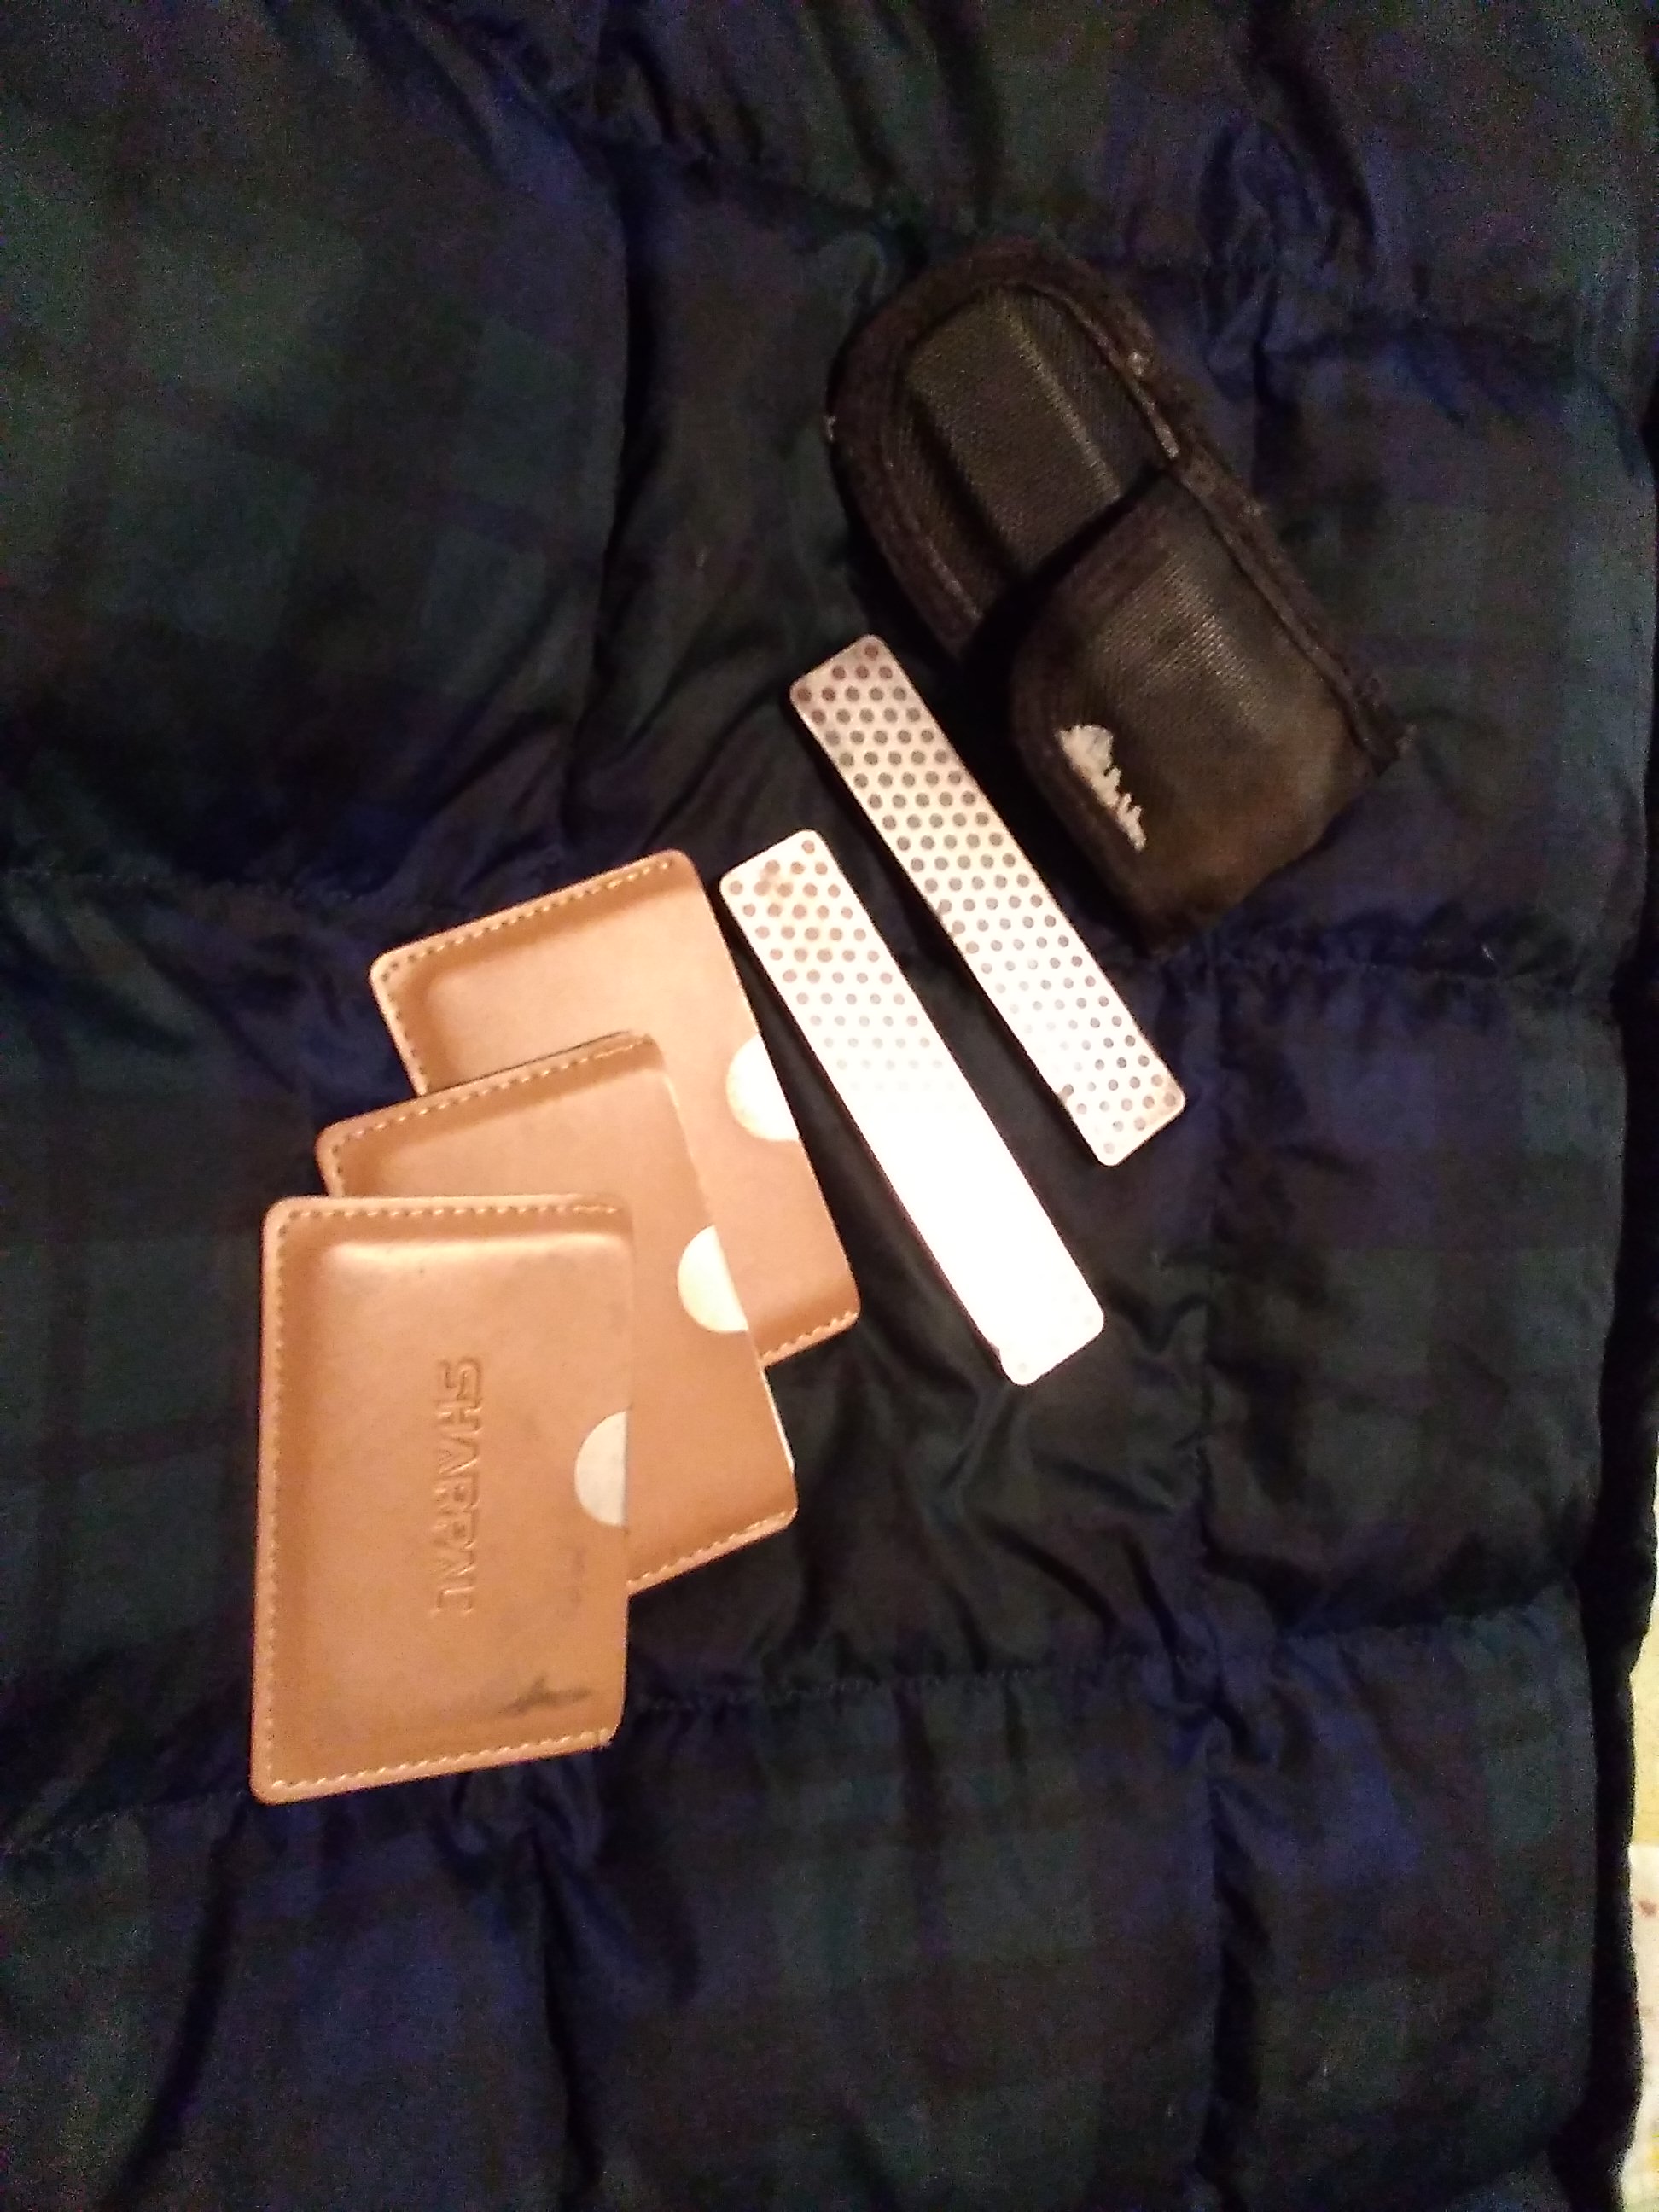
The credit card sized diamond plates are SharPal brand, and span from 600 to 2000 grit, as I recall; the grits are actually mis-identified on the backs, so I got them desperately cheap from my local hardware store, but the grit progression is obvious, so no worries, there.  The two DMT stones are 600 grit (I've had this for nearly 40 years now, and it still cuts steel) and 8000 grit (3 micron), really only used when touching up X-Acto blades.

Once I get the Wissota grinder set up with a treadle drive, maybe I'll try touching up serrated blades with a buffing wheel and chromium oxide compound.  I do have a second hand cranked grinder, which I suspect is a Wissota but is not so marked, so maybe I could set up a grinding wheel on one and a buff on the other (TBD).  Wissota did make these grinders for hardware store and other chains to be rebadged, so it may be one of those.

The diamond needle file and the plates/stones:
IMG_0285.jpg
Lansky (?) diamond needle file
IMG_0286.jpg
SharPal diamond plates and DMT diamond stones
 
master pollinator
Posts: 5922
Location: Canadian Prairies - Zone 3b
1747
  • Likes 2
  • Mark post as helpful
  • send pies
    Number of slices to send:
    Optional 'thank-you' note:
  • Quote
  • Report post to moderator
I have a number of serrated kitchen knives ("bread knives"). I get them for free, nobody wants them, and they live outside in my gardens for crud work.

I use/abuse them hard. I'll use a serrated blade to saw a straw bale lengthwise to get a good size for mulch.

I sharpen them quickly by laying the flat side right down on the stone and raising it about the thickness of a piece of paper. This grinds the inside "C" of every serration.

It does leave a wire edge but I don't care because I'll be back on the stone after 20 minutes of abuse, no matter how pretty I make the edge. I suppose I could try a stiff welder's steel brush on the wire edge. I know one guy who uses a brass wire brush on a grinder to do this.
 
I agree. Here's the link: http://stoves2.com
reply
    Bookmark Topic Watch Topic
  • New Topic