• Post Reply Bookmark Topic Watch Topic
  • New Topic
permaculture forums growies critters building homesteading energy monies kitchen purity ungarbage community wilderness fiber arts art permaculture artisans regional education skip experiences global resources cider press projects digital market permies.com pie forums private forums all forums
this forum made possible by our volunteer staff, including ...
master stewards:
  • r ranson
  • Nancy Reading
  • Carla Burke
  • John F Dean
  • Jay Angler
  • paul wheaton
stewards:
  • Nicole Alderman
  • Pearl Sutton
  • Anne Miller
master gardeners:
  • Christopher Weeks
  • Timothy Norton
gardeners:
  • Nina Surya
  • Matt McSpadden
  • thomas rubino

Question on plumbing corner built MRH

 
Posts: 8
Location: West Central New Hampshire
  • Mark post as helpful
  • send pies
    Number of slices to send:
    Optional 'thank-you' note:
  • Quote
  • Report post to moderator
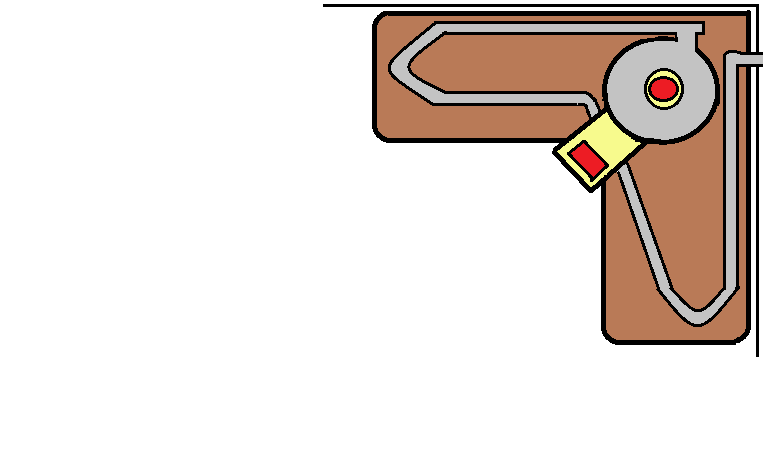
Hi everybody! I'm new here, like 5 minutes new. I have a question about plumbing a rocket mass heater in a corner of a building.
This is a drawing that I made. The drawing sucks I know but it will give you a general idea of what I'm thinking. Any input would be greatly appreciated.
 
gardener
Posts: 3471
Location: Southern alps, on the French side of the french /italian border 5000ft elevation
194
  • Likes 1
  • Mark post as helpful
  • send pies
    Number of slices to send:
    Optional 'thank-you' note:
  • Quote
  • Report post to moderator
http://batchrocket.eu/en/applications#culdesac
 
pollinator
Posts: 815
Location: Central Virginia USA
78
  • Likes 1
  • Mark post as helpful
  • send pies
    Number of slices to send:
    Optional 'thank-you' note:
  • Quote
  • Report post to moderator
First, it would be good to look closely at the above mentioned link--it is lengthy but looks like it has lots of practical expertise.

To directly comment on your design (which has no dimensions), if the round in the bell is a 55 gallon drum, the heat riser in the center is way too small, in practice you will find that sufficient space for your manifolds (in a clay base) is greatly reduced. It may seem like bell and manifold design are afterthoughts, but it can get a bit tricky if everything isn't well pictured before you start to build.

also, crossing a cooling exhaust output under your firebox connection to the core will likely prove to be problematic both as far as just getting the heights required to accommodate both of those tubes, but also interference with heat conservation in the heater core, a key component to getting an efficient burn.

I will qualify this by saying that I don't have hands on experience on this aspect, but I would look at a dual exhaust , each one identical, but smaller cross section for each one than the heat riser (although collectively greater than the heat riser) then bring those two exhausts back together where the stack leaves the building in the corner. (likely you will want to match these closely to get even heat distribution)

Remember, there are lots of factors that influence what you can reasonably expect an RMH to do regarding length of bench pipes, diameters of each component, draft available in addition to the RMH push on the exhaust.

Again, the link above might help, also a thorough understanding of the thermal principles at work is important before undertaking a "new" design. Ianto Evans has a short basic ebook about the design parameters, also Ernie and Erica have some more basic directions that may offer an easier introduction. They are well worth the time required to study them.

Other than that solid background in the basics, your best bet would be to copy a proven design. There are likely many out there, and the link above may have some resources and ideas that will help.

If you want more directed comments on your basic design, at least add things like dimensions, materials, exhaust details, and anything else you think might be unique and relevant
 
Gary Howard
Posts: 8
Location: West Central New Hampshire
  • Mark post as helpful
  • send pies
    Number of slices to send:
    Optional 'thank-you' note:
  • Quote
  • Report post to moderator
Thanks Bob, Yeah I thought the same about running the exhaust under the fire box. First thing I thought of was dual exhaust into a single pipe but havent heard of any designs out there.
Right, the circle is a 55gal drum and each bench would be around 5' long. Is a dual exhaust fairly common? I havent been able to find any info on one.
 
Gary Howard
Posts: 8
Location: West Central New Hampshire
  • Mark post as helpful
  • send pies
    Number of slices to send:
    Optional 'thank-you' note:
  • Quote
  • Report post to moderator
Thank you also, Satamax. Lots of good info there and I will sort thru it.
This is to be a heater for my home and I would like it to look good as well as help with the heating during cold winter months. I plan to have one part along the bathroom wall to help keep the bathroom warm and the other wall will help keep an upstairs bedroom warm. I can kind of figure out the RMH part but the exhaust running thru the two benches, or in my case, (Heat sinks) to warm them up is what has me stumped.

I see instead of a barrel you use fire bricks to form a heat bell. This is appealing but will it use more wood than a conventional steel barrel as far as btu x wood?
 
bob day
pollinator
Posts: 815
Location: Central Virginia USA
78
  • Mark post as helpful
  • send pies
    Number of slices to send:
    Optional 'thank-you' note:
  • Quote
  • Report post to moderator
I finally got a chance to examine that link, and it is pretty different from the basic RMH design you pictured.


I think there may be references to a more standard type RMH with dual exhausts, but I'm not sure where they would be.


Since I really don't have any experience with dual exhausts, most of what I could offer would be theory, maybe someone else has some ideas.

Trying different searches and reading through the numerous threads on RMHs is likely a good place to start, and more than likely there is something similar, already built, and described in detail somewhere in those posts

good luck
 
Gary Howard
Posts: 8
Location: West Central New Hampshire
  • Mark post as helpful
  • send pies
    Number of slices to send:
    Optional 'thank-you' note:
  • Quote
  • Report post to moderator

bob day wrote:I finally got a chance to examine that link, and it is pretty different from the basic RMH design you pictured.


Yep! some pretty nice designs there but not quite what I had in mind. Although I want it to look decent I dont want it to cost a million bucks. It will be a secondary heating system and an attempt to save as much on the heating bill as possible.
I have plenty of cord wood and a huge woodstove now that helps but its a wood eating, fire breathing smoke belching machine that I would rather put to rest.

Thanks for the info! Will be doing some more research on a dual exhaust. If you come across anything please post it, ok

Gary
 
Rocket Scientist
Posts: 4587
Location: Upstate NY, zone 5
600
5
  • Likes 1
  • Mark post as helpful
  • send pies
    Number of slices to send:
    Optional 'thank-you' note:
  • Quote
  • Report post to moderator
M- ke-board is messed up so pardon +he weird spelling...
Max's "cul-de-sac" link is a good example, -ou can make i+ using inexpensive ma+erials like cob ins+ead of brick, and a common J-+ube ins+ead of ba+ch box. I+ will work be++er +han 2 flue pa+hs and be easier +o balance. A s+eel access panel in +he bell will give some of +he ins+an+ hea+ of a barrel.

If -ou're no+ looking for benches, -ou could make a single +all bell wrapping around +he corner wi+h ver- simple cons+ruc+ion.
 
Satamax Antone
gardener
Posts: 3471
Location: Southern alps, on the French side of the french /italian border 5000ft elevation
194
  • Likes 1
  • Mark post as helpful
  • send pies
    Number of slices to send:
    Optional 'thank-you' note:
  • Quote
  • Report post to moderator
Gary, i think going bell should solve your plumbing problem. And  i think going batch would help too. Raising the firebox above the bench. Just my opinion.
 
bob day
pollinator
Posts: 815
Location: Central Virginia USA
78
  • Likes 1
  • Mark post as helpful
  • send pies
    Number of slices to send:
    Optional 'thank-you' note:
  • Quote
  • Report post to moderator
Hi Gary,

I'm not sure how much research you've had time to do, but yesterday it rained and I had a day, away from chores and work, to do nothing but read (talk about living the dream).

Anyway, I've been using an older style rmh for over three years, maybe it's 4 now, i lose count sometimes. so my rmh is about ready for a tear down. cleaning, inspection, add insulation, that sort of thing.  So I'm really glad I got into this discussion with you, because it led me to investigate the batch style rmh and after all sorts of reading misc stuff, some better than others, I found a thread leading to the development of the batch style RMH.

thread

This is a long one, and it is very informative about the thought processes and actual testing monitoring gasses and temps leading to the current SCIENCE around the batch heaters as they developed. This was especially interesting to me as I have long been unhappy with the frequency of adding wood and the extremely small kindling necessary, so just in the normal operation of the stove and watching the various elements and how they affect the draft etc., I was starting to think about ways to enlarge the firebox while not allowing smoke back into the room. This thread goes much farther with that process than I ever would've.

There is another  http://donkey32.proboards.com/thread/734/peterberg-batch-box-dimensions?page=1 and this one is the more advanced discussion once the batch heaters were optimized. In this one I got lots of technical terms answered, and exact measurements for everything so it gets pretty involved, even more so than the basic rocket mass heater.

I urge you to just take the time and read part or all of these threads before building the RMH. It is good to understand the principles and design parameters of the RMH as a start, but you may shortchange your design options and efficiency of your construction if you don't also have a beginning understanding of the possibilities of the batch heaters (which can also use the same "plumbing" through the mass if you so choose

If you are going to spend several days assembling materials and installing a unit it is well worth the time it takes to do some reading on this development as it potentially solves much of the inconvenience of the standard RMH, and also I think might help guide to better design choices even if you do end up with a more or less standard RMH.
 
Gary Howard
Posts: 8
Location: West Central New Hampshire
  • Mark post as helpful
  • send pies
    Number of slices to send:
    Optional 'thank-you' note:
  • Quote
  • Report post to moderator

bob day wrote:Hi Gary,

I'm not sure how much research you've had time to do, but yesterday it rained and I had a day, away from chores and work, to do nothing but read (talk about living the dream).


Thanks much! Bob. I will look into those also. I'm not dead set on a RMH yet but the thought of using 1/2 a cord of wood to heat a small house appeals to me after burning a couple cord of wood, a couple tons of wood pellets and a couple tanks of oil every winter. Thats the way its been going in the house that I live in now. The house that I am building will be a lot tighter than this box of pallets that was built in 1860.

Thanks again!
 
Gary Howard
Posts: 8
Location: West Central New Hampshire
  • Mark post as helpful
  • send pies
    Number of slices to send:
    Optional 'thank-you' note:
  • Quote
  • Report post to moderator

Satamax Antone wrote:Gary, i think going bell should solve your plumbing problem. And  i think going batch would help too. Raising the firebox above the bench. Just my opinion.


Thanks Satamax. Yep, I think a bell will throw more heat for the money. I'm not too worried about how a barrel will look in the house, I can make it look good some how. Besides, nobody that I hang with would really care anyway.
I even thought about using two cast iron tubs filled with stone with the plumbing going thru them and building a nice stone faced masonry box for them to fit into. Then building a nice looking lid over them for my two dogs to hang out on.

Gary
 
Posts: 153
10
  • Mark post as helpful
  • send pies
    Number of slices to send:
    Optional 'thank-you' note:
  • Quote
  • Report post to moderator
me personally, I tend to build it first, then ask questions as too why its not working....
You find out a lot of new things that way.

As for your cooler pipe crossing under the burn tunnel, first question that comes to mind, is how high do you want your stove too be ?
The very next thought is, people underestimate the insulation value of clay and perelite.

I am thinking, you build your stove like in the picture - the way you want too - with an air space under the whole thing - don't want too burn your floor - add to that a 4 or 5 inch layer of perelite clay - again, so you don't burn your floor - lay in your chimney pipe - then add another layer of perelite clay to insulate the heat from the burn tunnel and keep it hot. - only put the perelite clay between the tunnel and the chimney -  Then you can build your burn tunnel as usual.

The first problem, is how high is it going to be . . .  2 inch air gap - 2 inch concrete pad - add 4 inches of perelite clay - add a 6 inch duct - another 4 inch perelite clay - then the burn tunnel ....

You would still want the chimney to exit and go straight up near the stove barrel - the radiant heat from the barrel will encourage the chimney draw - adding to the draw of the stove...

I will include a warning, that when this thing is burning right, that barrel could get hot enough to glow red - i.e. 1200 F plus - so anything closer than 4 feet from the wall, and you could burn your building down ... My stove was 3 feet away from an electrical box, and the box was too hot too touch after a long burn @ 1100 F.  Leave air gaps in between the stove and the walls - for air flow, and so you can stick your hand in there and see how hot it is.

With the added layer of perelite clay insulating the burn tunnel away from the cooler chimney, the stove should hit temperature, before it even starts to effect the chimney pipe, and by then, it will just add to the draw of the stove....

just my opinion . . .
 
bob day
pollinator
Posts: 815
Location: Central Virginia USA
78
  • Mark post as helpful
  • send pies
    Number of slices to send:
    Optional 'thank-you' note:
  • Quote
  • Report post to moderator
Hi Gary, neat that this thread got a reply because it reminded me of the path that led me to the batch heaters.

I got home yesterday and this morning first thing I brought in all the fire brick and refractory cement and started a tear down of the old j tube--at least the firebox part.
Now the house is full of smoke, of course i had to start a fire before everything was sealed, then I found my propane torch was dead (the little cheater I used to start fires in the J tube) and the kindling was damp, the stove was cold, but it finally started drawing (with help from a fresh tank of propane), but now I'm finding that large chunks of mostly dry wood was probably not the best fuel for a good first fire.

Anyway,  I just heard the pump kick on meaning the batch box has caught enough to produce the first hot water from my new "toy", how exciting to be burning regular wood again. If it's working now without all the seams sealed and not even a secondary air supply tube, I can only imagine how much better it might be with those things taken care of  (and some better dry wood).

Let us see what you finally decide to build.

 
Gary Howard
Posts: 8
Location: West Central New Hampshire
  • Mark post as helpful
  • send pies
    Number of slices to send:
    Optional 'thank-you' note:
  • Quote
  • Report post to moderator

Dave Lot wrote:me personally, I tend to build it first, then ask questions as too why its not working....
You find out a lot of new things that way.


Yup, lol! Measure once cut twice. Thanks much for the info Dave! My first thought was to put everything on top of a slab and a layer of fire brick which will call for a massive amount of bracing the wooden floor below, which I think will be ok. I'll just put some concrete block the same shape as the slab under it down stairs.
As far as the wall behind it I plan on bricking it up and keeping the barrel about 12" away. I'd like to keep it as low as possible though, certainly no higher than a bench would normally be.

Its the plumbing and chimney that has me confused. I'd hate to go thru all that and not have it draft out. That would be a big waste of time and money. I still am thinking about running the plumbing thru two cast iron tubs filled with small stones and then building a structure around them to hide them and make it look like more of a piece of furniture. There are a few of those tubs around town for sale but as far as I can tell it's never been done before. I would actually turn them upside down and cut a hole in the bottom to fill them with stone after the exhaust pipes are in place. (I think)

Do you think a duel exhaust out of the barrel going in opposite directions will work with a Y pipe connection before it goes up and out of the house? Sort of like a 2into1 exhaust on a car. And in stead of laying the pipe flat would it be ok to turn the 90 degrees at the elbow and come up over the lower pipe in the tub? I don't think there's room to lay them side by side.


Gary Howard
Posts: 8
Location: West Central New Hampshire
  • Mark post as helpful
  • send pies
    Number of slices to send:
    Optional 'thank-you' note:
  • Quote
  • Report post to moderator

bob day wrote:Hi Gary, neat that this thread got a reply because it reminded me of the path that led me to the batch heaters.


Hi Bob! Funny about the propane torch, that how I start my woodstove up too
I love wood heat myself, best heat there is and the cloths on the line down stairs dry almost instantly. I do put a pot of water on the stove every now and then just to add some moisture to the air. Wood heat sure does dry things out.

I am trying to collect as much info and ideas on the mass heater before I start it. I'm not much on tearing things back apart. This will be in a new small house that I am building and there's plenty of other stuff that will need to be done to. Living in this old house built in 1860 has gotten just to expensive. No matter how much I try to tighten it up we still have the wood stove, pellet stove and oil heat all going at the same time all winter long.

Time to go "small and cheap."
 
bob day
pollinator
Posts: 815
Location: Central Virginia USA
78
  • Mark post as helpful
  • send pies
    Number of slices to send:
    Optional 'thank-you' note:
  • Quote
  • Report post to moderator
some old houses are built on good foundations with tight joints and good sun aspect--some aren't.

I have been evolving with the batch burners over the last month or so, and I have already added a batch box--sort of-- to the existing system, it remains to be seen just how much of the rebuild I do right now, and how much waits till next year and see how this system adapts

Fun and games
 
Glenn Herbert
Rocket Scientist
Posts: 4587
Location: Upstate NY, zone 5
600
5
  • Mark post as helpful
  • send pies
    Number of slices to send:
    Optional 'thank-you' note:
  • Quote
  • Report post to moderator
I still think you will get the best results from a low, wide/long bell rather than trying to make twin 6" ducts work. For a bell, all you need to do is build a masonry box extending both ways from the barrel... no need to fiddle with crossing pipes or balancing two runs. It will not lose any significant draft to friction.
 
bob day
pollinator
Posts: 815
Location: Central Virginia USA
78
  • Mark post as helpful
  • send pies
    Number of slices to send:
    Optional 'thank-you' note:
  • Quote
  • Report post to moderator
Hi Glenn, I agree,

After studying all this "new" technology of benches and bells, it does make me wonder why they have used the pipes as much as they have to transfer the heat. Maybe in a very long bench the pipes might have an advantage, or maybe airtight  is the key and exhaust pipes are the quick, easy, inexpensive way to sling mud around and have an airtight bench but in short benches it seems so obvious to just make an airtight cavity and let the hot air freely distribute itself within, and just do away with "plumbing" in between the riser and exhaust.

Now as I look at my setup it seems so obvious to have a shorter bench with a larger surface area for actual heat exchange.
 
Satamax Antone
gardener
Posts: 3471
Location: Southern alps, on the French side of the french /italian border 5000ft elevation
194
 
I remember before the flying monkeys became such an invasive species. We had tiny ads then.
Binge on 17 Seasons of Permaculture Design Monkeys!
http://permaculture-design-course.com
reply
    Bookmark Topic Watch Topic
  • New Topic