• Post Reply Bookmark Topic Watch Topic
  • New Topic
permaculture forums growies critters building homesteading energy monies kitchen purity ungarbage community wilderness fiber arts art permaculture artisans regional education skip experiences global resources cider press projects digital market permies.com pie forums private forums all forums
this forum made possible by our volunteer staff, including ...
master stewards:
  • r ranson
  • Nancy Reading
  • Carla Burke
  • John F Dean
  • Jay Angler
  • paul wheaton
stewards:
  • Nicole Alderman
  • Pearl Sutton
  • Anne Miller
master gardeners:
  • Christopher Weeks
  • Timothy Norton
gardeners:
  • Nina Surya
  • Matt McSpadden
  • thomas rubino

first time RMH build through interior wall to bell bench..

 
Posts: 9
1
  • Mark post as helpful
  • send pies
    Number of slices to send:
    Optional 'thank-you' note:
  • Quote
  • Report post to moderator
Hello everyone. I have been reading all the threads on this vein and have not found the answers to my particular build. I am building the rocket stove part in my studio right off the kitchen, piping it through a very thick wall with a lot of layers into the living room off the other side of the kitchen. The layers are sheetrock 2x4 studs exterior brick, aluminum siding, clapboard siding, 1" thick barn board, tongue and groove, plywood, sheetrock. It is because the studio was built on to the existing house much later at some point before I bought the house. Anyway, my first question is... how hot is that pipe going through the wall from the barrel and transition going to get?? will it get hot enough to catch the old wood on fire?? my 8" pipe just fits in the hole so I am wondering if i can put in a 6" pipe so that I can cob or perlite or what? around the pipe where it goes thru the wall? Suggestions will be much appreciated.. please be kind I have never done this before. I am just only me and my boys. I want to be warm this winter. That brings me to my next question.. this pipe that comes out on the living room side will travel about three feet to the bell bench. I will cob all around the pipe for mass up to the bench. I used cinderblock and brick then I cobbed the face and added stone at the bottom. I used heavy duty steal racks on top and cobbed the entire top of the bench so far 2" will add another 2" when I figure out the pipe thingy.. I have read about people taping all joints and stuff so gasses do not leak out.. but Matt Walker has a bell and no gases leak out? I am confused about that. the exit flue is over a little bit from the entry pipe. It will travel up right over the pipe coming through the wall to the roof. I put it there so it can warm up a bit where it will be over the inlet pipe hopefully creating a draw. Can you please give me some feedback on my design for this and what you think about 4" of cob. Will this be enough mass to hold the heat through the night? Thank you for your help. I will post pictures if I can to help better explain my thinking..
 
April Greer
Posts: 9
1
  • Mark post as helpful
  • send pies
    Number of slices to send:
    Optional 'thank-you' note:
  • Quote
  • Report post to moderator
pictures of what I have so far..
IMG_20180828_193635.jpg
tile under bell part of the bench over wood floor
IMG_20180828_193646.jpg
studio side that the rocket heater and barrel will sit
IMG_20180829_133754.jpg
bell bench under construction
IMG_20180830_121955.jpg
adding the first 2 of cob
IMG_20180904_120230.jpg
hole through the many layers of wall
IMG_20180905_093907.jpg
pipe to bench
pipe to bench
IMG_20180905_094037.jpg
View from living room side
 
rocket scientist
Posts: 6527
Location: latitude 47 N.W. montana zone 6A
3398
cat pig rocket stoves
  • Likes 2
  • Mark post as helpful
  • send pies
    Number of slices to send:
    Optional 'thank-you' note:
  • Quote
  • Report post to moderator
Hi April;  Welcome to Permies!!
To start, Yes photos are always needed. Now,  I'll try to give you some answers.
#1) How hot will the pipe from the transition area get?  Way to hot to be exposed to any wood surfaces. At the least 200 F and at the most could be 600 F.
#2)Will a 6" pipe inside an 8" pipe filled with perlite be safe ?  In my opinion No .  You need a larger hole thru the wall,  I would say 10" pipe with an 8" and  6" pipe thru would work with no insulation at all . That would emulate the old triple wall pipe at a cheap cost and " Should" be safe , careful checking with a digital temp gun would confirm that.
#3) If you can,  use more than just cob to travel from the wall to the bell. surround your cob with  bricks , rock . Rock holds more heat longer than cob!
#4) No leaks is no leaks however you look at it.  Matt builds his bells airtight you should as well.  When we suggest how to design and build a rmh  First and foremost is SAFETY !  Carbon monoxide is a silent killer You MUST be sure you are not venting into your living area. All wood stoves have this danger it is not limited to rmh's .  The box stove you buy will have a disclaimer about this.  As responsible rocket scientists we want to stress building these rmh safely.
 We really need much better info and pictures to see just what your build is like and if it will be enough to safely heat your home.
 
April Greer
Posts: 9
1
  • Mark post as helpful
  • send pies
    Number of slices to send:
    Optional 'thank-you' note:
  • Quote
  • Report post to moderator
Thank you for the great answers.. looks like i am making this hole bigger for sure. It is hard work. so when i put the 10" in then are you saying i should put an 8 and 6 inch inside that? could I make like a little riser core with fireclay and perlite with the 10" and 6 inch?? Also I can see the pictures I posted when I open my thread.. can you see them? Will the 4 inches of cob be enough on top of the bell bench to hold the heat? I will surround the pipe with cob and rock like you suggested. Thank you. Thank you Thank you. I am hoping the cob will be enough to seal that bench .. It was my only concern going with the bell over the ususal pipe.. What are your thoughts on that.
 
thomas rubino
rocket scientist
Posts: 6527
Location: latitude 47 N.W. montana zone 6A
3398
cat pig rocket stoves
  • Mark post as helpful
  • send pies
    Number of slices to send:
    Optional 'thank-you' note:
  • Quote
  • Report post to moderator
Hi April;
 We can see your pictures. I was already writing a response when you posted those.
#1) Yes , make the hole bigger.  There are options for getting thru that wall .A 10" with a 6" inner and clay perlite mix might work. As I suggested 3 pipes in a triple wall setup / a section of metalbestos pipe /  wrapping the pipe with ceramic fiber blanket,(that would be the safest way . ) Over time when it is constantly heated wood has pyrolysis  where it slowly chars and degrades, lowering the ignition point and even though your not at 456 F  wood can smolder and burst into flame!  You MUST be careful going thru that wall!!!
#2) Yes , if you do a good job, cob will be airtight. The more mass you have the longer it will stay warm.  To start, rock holds more heat than cob. Use more rock. Is 4" enough  well... nope .. but it will do for a start if that's all you got. As an example I have almost 28" deep of rock and cob in my mass.
#3)  I do not like that you put your bell on tiles with that beautiful pine wood underneath.  It will PROBABLY be fine but common practice would have been to use bricks to raise your bell and build it on a piece of cement board. That would of allowed your wood floor to stay cooler.  To late now but...  you might consider a mass  rebuild at some later date after you love your rmh and can't live without it.  
#4)  You can not build your core on the floor like your mass it MUST be insulated from the floor and walls if they are close. Your 55 gal barrel is going to be very hot , mine glows an 8" orange circle over top of the riser that's 1100 F ... Don't take chances. Protect your wood and you are protecting your loved ones.
 
April Greer
Posts: 9
1
  • Mark post as helpful
  • send pies
    Number of slices to send:
    Optional 'thank-you' note:
  • Quote
  • Report post to moderator
thank you so much. I am definitely building up and insulating the core and barrel. I was going to cob around the barrel in the back and sides near the walls and over the top. I have small children, that is why I wanted it in the studio and not near the bench in the living room. I think i will purchase an insulating blanket going thru that wall. Man it is hard to get through. took me two solid days to get that much cut out. You have been very helpful.
I did not mortar those tiles .. I just put them down because I had them on hand and thought it would help protect the floor. I can always rebuild it .. it is not too late yet lol. 
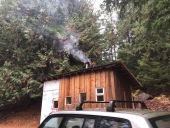
I am so excited to get this right. I know we will love it and I will love the savings in wood. I am tired of freezing all winter with my franklin wood stove. And my kids get sick with sinus stuff every year because I am sure it leaks out smoke.. If this is successful i will sell franklin and gain some space in the studio.  I will post pictures as I progress. I am so happy you have helped me.
 
thomas rubino
rocket scientist
Posts: 6527
Location: latitude 47 N.W. montana zone 6A
3398
cat pig rocket stoves
  • Mark post as helpful
  • send pies
    Number of slices to send:
    Optional 'thank-you' note:
  • Quote
  • Report post to moderator
You can not cob over top of your barrel. Only up the sides, oh no more than about 1/2 way.  You want the barrel to be able to shed heat. If it can't then you risk stalling your rmh and then it smokes up your house.  
Do you have a copy of the RMH Builders Guide ?  Published by Ernie & Erica Wisner it is available from them or thru Amazon .
A 1" thick ceramic fiber blanket wrapped around your 6" pipe inside of your 8" pipe will be SAFE, to pass thru your wall.
Do you own a digital laser temp gun ?  Handy item to have to monitor stove temps and wall / floor temps.  Ebay has them for less than 15 bucks.
 
April Greer
Posts: 9
1
  • Mark post as helpful
  • send pies
    Number of slices to send:
    Optional 'thank-you' note:
  • Quote
  • Report post to moderator
Yes I do have one of those guns. I am looking at purchasing that book before I begin building the actual rocket heater part. I am using Matt Walkers J tube core and riser with fireclay and perlite method. I do understand that there should be a transition where the barrel and outlet pipe meet with a clean out. I have figured that into my design also because i read every little thing you wrote in another post here on this site. I am probably doing this backward lol but I need to get my living room back to normal for the kids. I can take more time with the rocket build. You are great 
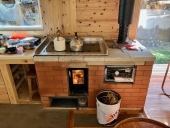
thank you so much. I will adjust my thinking on that barrel. I got a stainless steel barrel because I thought it would look better than the painted or black ones. honestly I want it to look awesome like some I have seen on here but at the same time, it really doesn't matter If it looks good. just if it works right.
 
April Greer
Posts: 9
1
  • Likes 1
  • Mark post as helpful
  • send pies
    Number of slices to send:
    Optional 'thank-you' note:
  • Quote
  • Report post to moderator
Are you saying that i don't need the 10" also or that a 10" then 8" then blanket then 6"  That sounds super safe to me I like that idea. I don't think I can overkill this particular issue.
 
April Greer
Posts: 9
1
  • Likes 2
  • Mark post as helpful
  • send pies
    Number of slices to send:
    Optional 'thank-you' note:
  • Quote
  • Report post to moderator
ok the blanket and book are on their way.  I scored some super thick flagstone free for the bench top and and I gathered a bunch of rock to use with my cob for the mass around that pipe. Now just to widen out that hole a bit and wait for the blanket to get here. I will post more pics as it comes along.. Thank you for all the good advice. I am so thankful for this site.
 
Rocket Scientist
Posts: 4584
Location: Upstate NY, zone 5
600
5
  • Mark post as helpful
  • send pies
    Number of slices to send:
    Optional 'thank-you' note:
  • Quote
  • Report post to moderator
Thomas is giving you good advice. The part about tiles on the floor under the bell... if you can get to them, spacing them up an inch or two on noncombustible spacers would probably help the floorboards stay cooler, and if you can seal the tile joints and put in some airflow gaps from the room to the space under so hot air can escape, that would be even better. The ideal would be to build the whole bench with free airflow beneath it, but that would mean completely redoing the bench.

Flagstone slabs to span the bell would be excellent (I was concerned about the apparent 2x2s between sections of cob), though I think that bare stone would not be an ideal top surface. I think if you can put a couple inches of cob on top of the stone, you can shape the sitting surface slightly like a chair seat and greatly increase the comfort.


If those "2x2s" are actually square steel tube, you're golden.
 
April Greer
Posts: 9
1
  • Mark post as helpful
  • send pies
    Number of slices to send:
    Optional 'thank-you' note:
  • Quote
  • Report post to moderator
Thank you Glenn,
that is very helpful. Those are steel 2x2s they were part of the metal racks I got from the junkyard.
I have a futon type mattress that is 6" thick to put over the flagstone. Since Thomas said 4" of cob would not be enough and rock holds more heat than cob I thought maybe that would be sufficient with the mattress. Then I am going to build up with cob and rock over that pipe to make a kind of backrest and little table area. I think lol .. That is what I have in my brain at least I hope it looks good when it is done. There are so many pretty ones out there.
I can slide out the center rows of tile and replace with hardiboard without completely rebuilding I think I will do that. I the issue with the tile that it will get too hot? I just used it because I had a bunch of it.. I am glad you guys have pointed it out thank you
 
thomas rubino
rocket scientist
Posts: 6527
Location: latitude 47 N.W. montana zone 6A
3398
cat pig rocket stoves
  • Likes 1
  • Mark post as helpful
  • send pies
    Number of slices to send:
    Optional 'thank-you' note:
  • Quote
  • Report post to moderator
Hi April;
The concern with any wood floor under a rmh mass , is long term effect.  Even your hardy board will pass heat thru to the floor.  This is not a burn your home down tonight kind of thing, but over time it could char your wood floor.
On a different subject,    You ordered ceramic fiber blanket ?  How long is it ?  If you have enough you could build a better kind of riser than Matts fireclay / perlite riser.  Called a 5 minute riser (for how long it takes to build) it is the newest best thing recommended.  Also while we are discussing ceramic fiber...  using ceramic fiber boards and split firebricks in your feed tube and in your core is also the newest best thing recommended for cores.  
My first core and riser were Matt Walker style fireclay / perlite built.   They work great !  I still use a matt style riser.  My cast core however I only used for one season before replacing it with a firebrick core. The feed tube is very fragile and will require repair over the course of a burning season.
I am currently building a brick bell rmh in my shop (There will be a post & pictures about it later).  I have ceramic fiber boards & split fire brick for the core and I will be ordering ceramic fiber blanket for my new riser and at that time I will also replace my Matt style riser on the greenhouse rocket. Another year and I will replace the heavy firebrick core in the greenhouse with ceramic fiber boards!
 
April Greer
Posts: 9
1
  • Likes 1
  • Mark post as helpful
  • send pies
    Number of slices to send:
    Optional 'thank-you' note:
  • Quote
  • Report post to moderator
Good Morning 
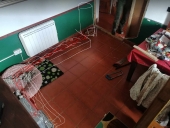
In an effort to fix the floor as much as possible I am removing the center tiles from the floor then I will put some iron wire spaced out horizontally over the tiles and middle gap then slide in a piece of hardiboard over all of that. perhaps that will fix my tile on the floor issue
On the blanket .. I do not think it will be long enough to do any more than the pipe through the wall. I think it is 12x24.  I can always order more because i am very interested in the 5-minute riser. Is there a link to it?

I am so glad the matt walker style riser and core have held up for you. It is a more affordable option for me at this time. The ceramic fiber board is sooo expensive but I know it is worth the money. Hopefully, I can rebuild this next season and use it then. As for firebrick. I do have some that I could split to line the bottom and sides of the firebox side. I have read some issues with the brick taking a long time to heat up and causing a backdraft? Is this an issue or can I do that with success and cast that fireclay and perlite core with the split fb in place? or maybe just line the bottom of the core with the brick?  
I am so excited to see your rebuild and get an update on how well that works.. Your excellent advice has made my project so much more fun to do. Now if only I could recruit some help from my kiddos it would be complete
 
thomas rubino
rocket scientist
Posts: 6527
Location: latitude 47 N.W. montana zone 6A
3398
cat pig rocket stoves
  • Mark post as helpful
  • send pies
    Number of slices to send:
    Optional 'thank-you' note:
  • Quote
  • Report post to moderator
Good Morning April:  Any information about the five minute riser can be found at donkeys , (http://donkey32.proboards.com/)  (LOTS of other rocket info there as well) There really isn't much to explain about it .  For your 6" system  You would take an 8" stove pipe and wrap a 1" thick blanket inside of it , creating a 6" ceramic fiber riser . I can tell you that this is what Matt recommends as the newest innovation!
Spitting full firebrick  down to splits would be horrendous ! Finding and buying splits is MUCH !!! easier.  here is an item # from ebay ( 271881663902 ) for split bricks.Or look for a masonry supply house for them and fireclay.
Sounds like you will be able to raise that mass off of the floor ! That is GREAT ! Things like charing happen without your knowing its happening. Scary scary if you suddenly realize in the middle of winter that your floor is smoking !
I'm very excited about building my new stove! Its been a long time coming! Currently all I have finished is the floor.  I buried 2" EPS rigid foam under my slab at my stove location and isolated with hardy board from the rest of the slab. Now that the floor is poured  I can start building with my clay brick and ceramic fiber !
EDIT)  Good Luck with the Kiddos ...  let us know how that works out for you!
 
thomas rubino
rocket scientist
Posts: 6527
Location: latitude 47 N.W. montana zone 6A
3398
cat pig rocket stoves
  • Mark post as helpful
  • send pies
    Number of slices to send:
    Optional 'thank-you' note:
  • Quote
  • Report post to moderator
Good Morning April;     Came across some old photos. Thought you might enjoy them.
R-1_01.JPG
[Thumbnail for R-1_01.JPG]
My first Walker style perlite core
R-3_01.JPG
[Thumbnail for R-3_01.JPG]
freshly cobbed core with start of riser
R-7_01.JPG
[Thumbnail for R-7_01.JPG]
Walker style riser before firing
 
Glenn Herbert
Rocket Scientist
Posts: 4584
Location: Upstate NY, zone 5
600
5
  • Mark post as helpful
  • send pies
    Number of slices to send:
    Optional 'thank-you' note:
  • Quote
  • Report post to moderator
I think a 6" thick futon would insulate the bell top too much. A thinner cushion of some sort would let more heat through, though I'm sure the futon would be very comfortable.
 
Hey! Wanna see my flashlight? It looks like this tiny ad:
Learn Permaculture through a little hard work
https://wheaton-labs.com/bootcamp
reply
    Bookmark Topic Watch Topic
  • New Topic