• Post Reply Bookmark Topic Watch Topic
  • New Topic
permaculture forums growies critters building homesteading energy monies kitchen purity ungarbage community wilderness fiber arts art permaculture artisans regional education skip experiences global resources cider press projects digital market permies.com pie forums private forums all forums
this forum made possible by our volunteer staff, including ...
master stewards:
  • Nancy Reading
  • Carla Burke
  • r ranson
  • John F Dean
  • paul wheaton
  • Pearl Sutton
stewards:
  • Jay Angler
  • Liv Smith
  • Leigh Tate
master gardeners:
  • Christopher Weeks
  • Timothy Norton
gardeners:
  • thomas rubino
  • Jeremy VanGelder
  • Maieshe Ljin

Pyramid Batch Box Heater Build

 
Posts: 12
1
  • Mark post as helpful
  • send pies
    Number of slices to send:
    Optional 'thank-you' note:
  • Quote
  • Report post to moderator


After complete destruction of that set up i looked at it as a chance to continue experimenting and build something else. That is when i had come across Peter van den Berg and his batch box design. I was immediately intrigued and began planning my route. I had seen somewhere deep in a thread i believe, Peter once mentioned the possibility of various bell shapes, one being a pyramid. Thats when the light blb really lit up and i had my design build in my head. Being obsessed with the ancient Egyptians i saw no other choice than to make a perfect pyramid bell (originally going to be on cardinal directions, however that did not work out) and the rest just fell into place.

I made a mock up in sketch up in the attached link, using Peters 6"" border="0" class="postimg">


Filename: batcn-rocket.skp
Description: Pyramid plus Benches
File size: 308 Kbytes
IMG_4530.JPG
[Thumbnail for IMG_4530.JPG]
Destruction
IMG_4562.JPG
[Thumbnail for IMG_4562.JPG]
Planning out bench base
 
John Patick Conrad
Posts: 12
1
  • Mark post as helpful
  • send pies
    Number of slices to send:
    Optional 'thank-you' note:
  • Quote
  • Report post to moderator
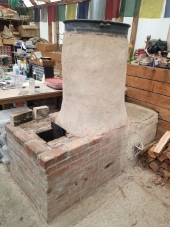
The process, The layout and further down the line. The blocks are filled with cinders for mass and the rear wall row had a 4" slab of cement/perlight formed as well as a 2" heavy perlight insolation on the floor
IMG_4667.JPG
[Thumbnail for IMG_4667.JPG]
Layout
IMG_4747.JPG
[Thumbnail for IMG_4747.JPG]
Blocks filled with Cinders
 
John Patick Conrad
Posts: 12
1
  • Mark post as helpful
  • send pies
    Number of slices to send:
    Optional 'thank-you' note:
  • Quote
  • Report post to moderator
Decided to go with the brick fire box. This is what i am talking about however, excuse my mess. As you can see there are three blocks on each side that have been laid on their side. to close two on each or not to close?
IMG_4776.JPG
[Thumbnail for IMG_4776.JPG]
Overview
IMG_4777.JPG
[Thumbnail for IMG_4777.JPG]
Left
IMG_4778.JPG
[Thumbnail for IMG_4778.JPG]
Right
 
gardener
Posts: 1054
Location: +52° 1' 47.40", +4° 22' 57.80"
447
woodworking rocket stoves wood heat
  • Likes 1
  • Mark post as helpful
  • send pies
    Number of slices to send:
    Optional 'thank-you' note:
  • Quote
  • Report post to moderator
Interesting! I viewed the drawing and I think you need to make the bell somewhat higher. Don't restrict the openings to the bench, leave all three blocks open on both sides. The exhaust opening to the chimney should be situated in the lower half of the bench and remember to make that opening much larger than the chimney cross section area. When done correctly, you would be able to have a row of open blocks on three sides of the bell, that way the bench is effectively part of the main bell.
 
pollinator
Posts: 324
Location: North Olympic Peninsula
92
  • Mark post as helpful
  • send pies
    Number of slices to send:
    Optional 'thank-you' note:
  • Quote
  • Report post to moderator
Wow.  How fun!
 
John Patick Conrad
Posts: 12
1
  • Mark post as helpful
  • send pies
    Number of slices to send:
    Optional 'thank-you' note:
  • Quote
  • Report post to moderator
Thank you Peter! To have the benches as part of the bell was the idea behind leaving those blocks open. I should have at least a 3" Clarence between the top of the heat rider to the peak of the pyramid as long as my calculations are correct. I want it to be a perfect pyramid so to make it taller I would need to widen the base as well, which may not be as big of a problem as I originally suspected. You do not think 3" is enough?

As far as the exhaust I'm set up with an 8" as it is now. Does that mean that I will need to create a funnel type system or maybe even a small pyramid feeding into the exhaust that say have a 10" base? Would that be sufficient enough?
 
John Patick Conrad
Posts: 12
1
  • Likes 1
  • Mark post as helpful
  • send pies
    Number of slices to send:
    Optional 'thank-you' note:
  • Quote
  • Report post to moderator

Matt Walker wrote:Wow.  How fun!


I cannot tell you how many time I have watched your videos haha thank you!
 
John Patick Conrad
Posts: 12
1
  • Mark post as helpful
  • send pies
    Number of slices to send:
    Optional 'thank-you' note:
  • Quote
  • Report post to moderator

Peter van den Berg wrote:Interesting! I viewed the drawing and I think you need to make the bell somewhat higher. Don't restrict the openings to the bench, leave all three blocks open on both sides. The exhaust opening to the chimney should be situated in the lower half of the bench and remember to make that opening much larger than the chimney cross section area. When done correctly, you would be able to have a row of open blocks on three sides of the bell, that way the bench is effectively part of the main bell.


Put this because I'm not sure if you get notifications to as if I replayed but I did further up there! Thank you for the help!
 
Peter van den Berg
gardener
Posts: 1054
Location: +52° 1' 47.40", +4° 22' 57.80"
447
woodworking rocket stoves wood heat
  • Mark post as helpful
  • send pies
    Number of slices to send:
    Optional 'thank-you' note:
  • Quote
  • Report post to moderator

John Patick Conrad wrote:Thank you Peter! To have the benches as part of the bell was the idea behind leaving those blocks open. I should have at least a 3" Clarence between the top of the heat rider to the peak of the pyramid as long as my calculations are correct. I want it to be a perfect pyramid so to make it taller I would need to widen the base as well, which may not be as big of a problem as I originally suspected. You do not think 3" is enough?

As far as the exhaust I'm set up with an 8" as it is now. Does that mean that I will need to create a funnel type system or maybe even a small pyramid feeding into the exhaust that say have a 10" base? Would that be sufficient enough?


No, 3" isn't enough to avoid friction areas. The recommended minimum is 12" though some people used about half of that and reported good results in their specific situation. Or otherwise you have to lower the riser a bit when there're no other possibilities.

A funnel shape for the exhaust opening is perfect. Let's say 12" wide by 5" high, leading to the 8" dia chimney stack. Where gases  need to go around a corner, give it plenty of room. A corner of 90 degrees, 150% of system size at least and 180 degrees 200% of system size, preferably.
 
Rocket Scientist
Posts: 4526
Location: Upstate NY, zone 5
574
5
  • Mark post as helpful
  • send pies
    Number of slices to send:
    Optional 'thank-you' note:
  • Quote
  • Report post to moderator
If your chimney exhaust is coming straight up out of the bench corner, you would want its entrance to be low in the bench cavity, not out of the top of the cavity. So the flared duct can be entirely within the bench, and all you will see coming out is a straight 8" duct.

From my HVAC design experience in a past job, you will get smoother flow if the 12" end of the duct is set smoothly in a flat sheet of metal instead of sharp-edged in the cavity. The sharp edge makes air flowing into the duct bend hard and concentrate toward the center, reducing the effective aperture. The flat sheet lets the air take a gentler bend and use the full diameter of the duct entrance. The 12" vs. 8" entrance already helps with this constriction aspect, so the flat plate is not as critical as it would be with a straight 8" entrance. The smoothest possible entrance would be flared like a trumpet.
 
John Patick Conrad
Posts: 12
1
  • Mark post as helpful
  • send pies
    Number of slices to send:
    Optional 'thank-you' note:
  • Quote
  • Report post to moderator

Peter van den Berg wrote:

John Patick Conrad wrote:Thank you Peter! To have the benches as part of the bell was the idea behind leaving those blocks open. I should have at least a 3" Clarence between the top of the heat rider to the peak of the pyramid as long as my calculations are correct. I want it to be a perfect pyramid so to make it taller I would need to widen the base as well, which may not be as big of a problem as I originally suspected. You do not think 3" is enough?

As far as the exhaust I'm set up with an 8" as it is now. Does that mean that I will need to create a funnel type system or maybe even a small pyramid feeding into the exhaust that say have a 10" base? Would that be sufficient enough?


No, 3" isn't enough to avoid friction areas. The recommended minimum is 12" though some people used about half of that and reported good results in their specific situation. Or otherwise you have to lower the riser a bit when there're no other possibilities.

A funnel shape for the exhaust opening is perfect. Let's say 12" wide by 5" high, leading to the 8" dia chimney stack. Where gases  need to go around a corner, give it plenty of room. A corner of 90 degrees, 150% of system size at least and 180 degrees 200% of system size, preferably.


So the cavity in the rear that leads to the exit flue is only 10" so i do not have the room for a 12" into 8" set up. do you believe that 10" would be sufficient? i could also make it span down to 8 across say 24" at 10" opening stating at the corners?
 
Peter van den Berg
gardener
Posts: 1054
Location: +52° 1' 47.40", +4° 22' 57.80"
447
woodworking rocket stoves wood heat
  • Mark post as helpful
  • send pies
    Number of slices to send:
    Optional 'thank-you' note:
  • Quote
  • Report post to moderator
It isn't clear to me what you mean, 24" wide and 10" high for the exhaust opening? As long as you are able to keep the opening in the lower half of the bench it should work.
 
John Patick Conrad
Posts: 12
1
  • Mark post as helpful
  • send pies
    Number of slices to send:
    Optional 'thank-you' note:
  • Quote
  • Report post to moderator

Peter van den Berg wrote:It isn't clear to me what you mean, 24" wide and 10" high for the exhaust opening? As long as you are able to keep the opening in the lower half of the bench it should work.


This is what i came up with for the funnel. I plan on using the left over hardybacker i have from the forms of the benches. they will feed into a 8" T connector on the floor of the stove base. On that base i will also have a layer of hardybacker to make for a smoother gas flow. i was going to extend the funnel out to the start of the rear cavity. I feel the need to ask of its approval haha.
IMG_4985.JPG
[Thumbnail for IMG_4985.JPG]
T Connector will sit on the floor of this cavity
IMG_4988.JPG
[Thumbnail for IMG_4988.JPG]
just a concept, this would extend to each side an stop at the corner
 
John Patick Conrad
Posts: 12
1
  • Mark post as helpful
  • send pies
    Number of slices to send:
    Optional 'thank-you' note:
  • Quote
  • Report post to moderator

Glenn Herbert wrote:If your chimney exhaust is coming straight up out of the bench corner, you would want its entrance to be low in the bench cavity, not out of the top of the cavity. So the flared duct can be entirely within the bench, and all you will see coming out is a straight 8" duct.

From my HVAC design experience in a past job, you will get smoother flow if the 12" end of the duct is set smoothly in a flat sheet of metal instead of sharp-edged in the cavity. The sharp edge makes air flowing into the duct bend hard and concentrate toward the center, reducing the effective aperture. The flat sheet lets the air take a gentler bend and use the full diameter of the duct entrance. The 12" vs. 8" entrance already helps with this constriction aspect, so the flat plate is not as critical as it would be with a straight 8" entrance. The smoothest possible entrance would be flared like a trumpet.


first off do people who comment on my post get a notification when i someone responds haha? im quoting because i wanted you to take a look at my above post but am not sure if you will recive a notification that i have responded....
 
Glenn Herbert
Rocket Scientist
Posts: 4526
Location: Upstate NY, zone 5
574
5
  • Mark post as helpful
  • send pies
    Number of slices to send:
    Optional 'thank-you' note:
  • Quote
  • Report post to moderator
You can set your account preferences to receive notifications or not. I haven't been online much this weekend so it wouldn't have helped to get e-mail notices anyway

I think the tee you show would work as is; no benefit to extending the ducts to the corners of the space, or ramping the whole back of the cavity. I would even think it would be better if you cut off the bottom half of the tee and suspended the remainder from the ceiling of the cavity, keeping the bottom of the partial tee 5 or 6 inches above the floor. This would tend to funnel the flow with minimum restriction.
 
John Patick Conrad
Posts: 12
1
  • Mark post as helpful
  • send pies
    Number of slices to send:
    Optional 'thank-you' note:
  • Quote
  • Report post to moderator

Glenn Herbert wrote:You can set your account preferences to receive notifications or not. I haven't been online much this weekend so it wouldn't have helped to get e-mail notices anyway

I think the tee you show would work as is; no benefit to extending the ducts to the corners of the space, or ramping the whole back of the cavity. I would even think it would be better if you cut off the bottom half of the tee and suspended the remainder from the ceiling of the cavity, keeping the bottom of the partial tee 5 or 6 inches above the floor. This would tend to funnel the flow with minimum restriction.


sounds like a plan, i couldnt help myself from starting before i got a response so this is what i just made up. but ill just keep it handy in the event that what you have suggested doesnt work.
IMG_4992.JPG
[Thumbnail for IMG_4992.JPG]
did quite have enough to make it all the way
IMG_4993.JPG
[Thumbnail for IMG_4993.JPG]
inside
 
Glenn Herbert
Rocket Scientist
Posts: 4526
Location: Upstate NY, zone 5
574
5
  • Mark post as helpful
  • send pies
    Number of slices to send:
    Optional 'thank-you' note:
  • Quote
  • Report post to moderator
Once you cut the tee in half, bend the cut edges gently out as wide as practical to ease the funnel into the chimney riser.
 
cat heaven has trees that produce tuna and tiny ads
Freaky Cheap Heat - 2 hour movie - HD streaming
https://permies.com/wiki/238453/Freaky-Cheap-Heat-hour-movie
reply
    Bookmark Topic Watch Topic
  • New Topic