• Post Reply Bookmark Topic Watch Topic
  • New Topic
permaculture forums growies critters building homesteading energy monies kitchen purity ungarbage community wilderness fiber arts art permaculture artisans regional education skip experiences global resources cider press projects digital market permies.com pie forums private forums all forums
this forum made possible by our volunteer staff, including ...
master stewards:
  • r ranson
  • Nancy Reading
  • Carla Burke
  • John F Dean
  • Jay Angler
  • paul wheaton
stewards:
  • Nicole Alderman
  • Pearl Sutton
  • Anne Miller
master gardeners:
  • Christopher Weeks
  • Timothy Norton
gardeners:
  • Nina Surya
  • Matt McSpadden
  • thomas rubino

Tips for Cob on vertical bell/barrel

 
Posts: 126
26
  • Mark post as helpful
  • send pies
    Number of slices to send:
    Optional 'thank-you' note:
  • Quote
  • Report post to moderator
Hey guys.

I am looking for advice on cob. On a vertical surface.
I saw this video on youtube a long time ago.


If the video they wrap the bell in cardboard and then another material that looks like something used by plasters. After they use a cob or clay render.

My questions are. Do they burn the cardboard out? What the material called.


And lastly anyone have tips for vertical cob like this application or point me in a good direction

 
rocket scientist
Posts: 6531
Location: latitude 47 N.W. montana zone 6A
3400
cat pig rocket stoves
  • Mark post as helpful
  • send pies
    Number of slices to send:
    Optional 'thank-you' note:
  • Quote
  • Report post to moderator
Hi Fraser;
To apply cob to vertical surface, you work in stages.  Bring the cob up slowly.  Then after you get a few inches on, you use a sheetrock plastic wrap.  If it can be wrapped around that is best. If not then
genteelly push it into your soft cob.   Come back the next day and cob over your mesh. The mesh will help hold your cob up it also helps with cracking.
You are going to have cracking.  Its not a problem you just need to use your finger and work new cob into the crack.
Another trick you might like is to add color to your cob.  There are readily available dies for concrete you can use or natural dies in many colors.
20200913_122456.jpg
My 8" J with cobbed barrel
20200913_124957.jpg
You can see the wrap if you look close
 
fraser stewart
Posts: 126
26
  • Likes 1
  • Mark post as helpful
  • send pies
    Number of slices to send:
    Optional 'thank-you' note:
  • Quote
  • Report post to moderator
Ah this is great help. Thanks alot
 
pollinator
Posts: 556
Location: Northwest Missouri
215
forest garden fungi gear trees plumbing chicken cooking ungarbage
  • Likes 1
  • Mark post as helpful
  • send pies
    Number of slices to send:
    Optional 'thank-you' note:
  • Quote
  • Report post to moderator
Does coating a drum in cob give the drum a shorter lifespan since the heat cannot dissipate from it as fast?
I do not know the answer to that question, but your post brought it up in my mind.
Drums and cob are cheap so even if the drum metal did degrade faster it would be easy to swap out and likely worth the benefits of making the drum heat more slow and stable.  
 
thomas rubino
rocket scientist
Posts: 6531
Location: latitude 47 N.W. montana zone 6A
3400
cat pig rocket stoves
  • Likes 1
  • Mark post as helpful
  • send pies
    Number of slices to send:
    Optional 'thank-you' note:
  • Quote
  • Report post to moderator
Hi Matt;  That drum is seven years old now.  Having cob on it did not hurt it at all.
Here is the same drum installed on my batchbox.
20200918_144320.jpg
[Thumbnail for 20200918_144320.jpg]
 
fraser stewart
Posts: 126
26
  • Likes 1
  • Mark post as helpful
  • send pies
    Number of slices to send:
    Optional 'thank-you' note:
  • Quote
  • Report post to moderator
Good question. I am using old pessure tanks so much thicker steel than barrels. I could not weld barrels and want to make my own variation. I want to be able to add verticle cob for several reaons. But mostly for making sure my sealed bell is extra sealed and also to control the initial heat. Not sure if this second part is correct but i think it might be a way to cover surface that give direct heat and therefore tune that heat for my own needs
 
gardener
Posts: 501
Location: Victor, Montana; Zone 5b
228
hugelkultur forest garden composting toilet building rocket stoves
  • Likes 3
  • Mark post as helpful
  • send pies
    Number of slices to send:
    Optional 'thank-you' note:
  • Quote
  • Report post to moderator
Fraser, I didn't see a reply about the cardboard. While commonly used for airtight masonry heaters, using cardboard between the barrel and cob will result in a smoky mess and will take long time to burn out. What you need is a similar expansion joint between the two so that your cob doesn't crack. This doesn't need to be very thick, you can use refractory blanket that is really thin. I've found that the 1" blanket pulls apart fairly easily into quarter inch sheets. Try not to squish it too much when you apply cob. Build the cob slow, like 3" a day so that it doesn't pull away too much. Also, the thicker the cob, the less likely to crack. Make sure to use some long straw that will help hold it together.

Matt, I don't think that coating the barrel will result in degradation any faster than without. The mass from the cob picks up heat very well and should be able to quickly wick heat from the barrel to the mass to the air fairly quickly. Probably not as quickly as having the barrel completely exposed, but I think read that they are comparable.
20200914_113632.jpg
cob going on in lifts
 
fraser stewart
Posts: 126
26
  • Mark post as helpful
  • send pies
    Number of slices to send:
    Optional 'thank-you' note:
  • Quote
  • Report post to moderator

thomas rubino wrote:Hi Fraser;
To apply cob to vertical surface, you work in stages.  Bring the cob up slowly.  Then after you get a few inches on, you use a sheetrock plastic wrap.  If it can be wrapped around that is best. If not then
genteelly push it into your soft cob.   Come back the next day and cob over your mesh. The mesh will help hold your cob up it also helps with cracking.
You are going to have cracking.  Its not a problem you just need to use your finger and work new cob into the crack.
Another trick you might like is to add color to your cob.  There are readily available dies for concrete you can use or natural dies in many colors.


Can anyone help me. I need to know what sheetrock plastic wrap is. I have googled but not reaching anything. Anyone know what this is and can send a link
 
fraser stewart
Posts: 126
26
  • Mark post as helpful
  • send pies
    Number of slices to send:
    Optional 'thank-you' note:
  • Quote
  • Report post to moderator
Is it a good idea to use burlap or not
 
gardener
Posts: 1068
Location: +52° 1' 47.40", +4° 22' 57.80"
455
woodworking rocket stoves wood heat
  • Likes 1
  • Mark post as helpful
  • send pies
    Number of slices to send:
    Optional 'thank-you' note:
  • Quote
  • Report post to moderator

fraser stewart wrote:Can anyone help me. I need to know what sheetrock plastic wrap is. I have googled but not reaching anything. Anyone know what this is and can send a link


Since you are in the Netherlands, try stucgaas. Knauf Gitex is one of those.
 
fraser stewart
Posts: 126
26
  • Likes 1
  • Mark post as helpful
  • send pies
    Number of slices to send:
    Optional 'thank-you' note:
  • Quote
  • Report post to moderator
Thanks peter. Translations dont always work. Hero
 
thomas rubino
rocket scientist
Posts: 6531
Location: latitude 47 N.W. montana zone 6A
3400
cat pig rocket stoves
  • Mark post as helpful
  • send pies
    Number of slices to send:
    Optional 'thank-you' note:
  • Quote
  • Report post to moderator
Yes Frasier;   The Knauf Gitex that Peter suggested is exactly what I was referring to.
 
fraser stewart
Posts: 126
26
  • Likes 1
  • Mark post as helpful
  • send pies
    Number of slices to send:
    Optional 'thank-you' note:
  • Quote
  • Report post to moderator
Great. Thanks alot
 
fraser stewart
Posts: 126
26
  • Likes 1
  • Mark post as helpful
  • send pies
    Number of slices to send:
    Optional 'thank-you' note:
  • Quote
  • Report post to moderator
Its been a while since i posed my initial question but here i go again.

As we head into winter in Northern Europe I have started to fire up my stove for the past 4 weeks.

The stove is heating up nicely and the bell pours radiant heat, i can confidenly say that i can heat the living room of my ship in 15mins.

I do have concerns about the bench.
It does not seem to be getting any rise in temperature.
In the begining of the build i could observe this with the drying out of the cob. And the bench was warm to the touch.
I also have a temperture gauge at the furthest cleanout.

The bench is made of a brick base.
Oil barrels cut vertically and the lying on its side. A so called stratification chamber.
I insulated air ducting is inside and should in theory bring the gases to the furthest away point before they stratify cool and then exist through the lowest part that is connected to the chimney.
The stove has a direct chimney with a baffel that can ve positioned to allow the pre heating of the chimney to get a good draw.

My normal operation is to start the fire with the baffle open.
Once the fire is up and running i shut the baffel to allow the gasses to journey to the far end of the bench and then to statify and then journey down and then up the chimney and out.

Originally i thought i might need to add insulation and or Cob up the bell. The thought is that this would produce less instant heat and preserve some for the warming of the bench.
But i dont know if this is the problem and if this will resolve the issue.
Perhaps someone out there who has experience with coving parts of the bell can share their experience.


16373533855426984076163826213022.jpg
[Thumbnail for 16373533855426984076163826213022.jpg]
1637353478412263055369717419020.jpg
[Thumbnail for 1637353478412263055369717419020.jpg]
16373535102222030425006965198275.jpg
[Thumbnail for 16373535102222030425006965198275.jpg]
16373535298508083566391474755271.jpg
[Thumbnail for 16373535298508083566391474755271.jpg]
 
thomas rubino
rocket scientist
Posts: 6531
Location: latitude 47 N.W. montana zone 6A
3400
cat pig rocket stoves
  • Likes 1
  • Mark post as helpful
  • send pies
    Number of slices to send:
    Optional 'thank-you' note:
  • Quote
  • Report post to moderator
Hi Fraser;
I think that maybe rather than cob , you need an insulating wrap to place around your barrel.
Morgan super wool being the safest product I am aware of. (you do have that new crew member to think off)
This would send more heat into your stratification chamber and less heat into the living room.
Retain the super wool with wire and barrel removal will still be easy.

 
fraser stewart
Posts: 126
26
  • Likes 1
  • Mark post as helpful
  • send pies
    Number of slices to send:
    Optional 'thank-you' note:
  • Quote
  • Report post to moderator
Ok

How much of the bell to keep exposed is a good balance inorder to achieve a warm bench and quick enough heat on cold mornings?

I guess if the bench is working like i dream it would then that would indeed be less of an issue.

I have morgen superwool  leftover and was thinking to try that. Just wondering how and what to cover that with to keep the stove looking beautiful.
 
thomas rubino
rocket scientist
Posts: 6531
Location: latitude 47 N.W. montana zone 6A
3400
cat pig rocket stoves
  • Likes 1
  • Mark post as helpful
  • send pies
    Number of slices to send:
    Optional 'thank-you' note:
  • Quote
  • Report post to moderator
First thing that comes to my mind is copper sheet.
I think it would look outstanding!
However cost or availability might be a concern.
Decorative cut steel sheet metal?

As far as how much to cover, I would say no more than 2/3.
You can experiment and try to fine tune what works best for you.

 
gardener
Posts: 3471
Location: Southern alps, on the French side of the french /italian border 5000ft elevation
194
  • Mark post as helpful
  • send pies
    Number of slices to send:
    Optional 'thank-you' note:
  • Quote
  • Report post to moderator
Well, first of all, it would be interesting to know the system size?  Batch?

What is the ISA of the water heater "barell" ?

What is the ISA of the bench ?
 
fraser stewart
Posts: 126
26
  • Mark post as helpful
  • send pies
    Number of slices to send:
    Optional 'thank-you' note:
  • Quote
  • Report post to moderator
If i did my maths correctly then it should be 5.7metres sq

Height is 100cm
Diametre is 50cm

Its made of two pressure tanks welded together. So quite thick steel. Maybe 2/3mm
 
fraser stewart
Posts: 126
26
  • Mark post as helpful
  • send pies
    Number of slices to send:
    Optional 'thank-you' note:
  • Quote
  • Report post to moderator
It is a built as a batch stove based on peters open source design. However it is made of ceramic fibre board. A morgen superwool riser (thanks to Thomas) and the bench is made of two barrels cut vertically to form an arch and a stratification chamber (matt inspired that one)

Im not sure what the surface area of the bell is. Inclded some photos from when we were building it to illustrate the construction

20201127_134513.jpg
[Thumbnail for 20201127_134513.jpg]
IMG_20201127_122940.jpg
[Thumbnail for IMG_20201127_122940.jpg]
20201127_134513.jpg
[Thumbnail for 20201127_134513.jpg]
20201119_100638.jpg
[Thumbnail for 20201119_100638.jpg]
 
fraser stewart
Posts: 126
26
  • Mark post as helpful
  • send pies
    Number of slices to send:
    Optional 'thank-you' note:
  • Quote
  • Report post to moderator
These photos where made later when we decided to add the insulted air ducting to encourge hot air to go to the furthest away point of the bench. We did some surgery. The barrels you see are under a layer of granite stone and cob and we finished with an eathern plaster.

And the last photo is how it looks now
IMG-20210228-WA0012.jpeg
[Thumbnail for IMG-20210228-WA0012.jpeg]
IMG-20210228-WA0007.jpg
[Thumbnail for IMG-20210228-WA0007.jpg]
16374031650131711735391641038407.jpg
[Thumbnail for 16374031650131711735391641038407.jpg]
 
Satamax Antone
gardener
Posts: 3471
Location: Southern alps, on the French side of the french /italian border 5000ft elevation
194
  • Likes 1
  • Mark post as helpful
  • send pies
    Number of slices to send:
    Optional 'thank-you' note:
  • Quote
  • Report post to moderator
Well, what is that flexi pipe?

 What is your system size?
 
Satamax Antone
gardener
Posts: 3471
Location: Southern alps, on the French side of the french /italian border 5000ft elevation
194
  • Mark post as helpful
  • send pies
    Number of slices to send:
    Optional 'thank-you' note:
  • Quote
  • Report post to moderator
Could you make a video of your fire?
I suspect a system not functioning that well.  
 
fraser stewart
Posts: 126
26
  • Mark post as helpful
  • send pies
    Number of slices to send:
    Optional 'thank-you' note:
  • Quote
  • Report post to moderator

Satamax Antone wrote:Could you make a video of your fire?
I suspect a system not functioning that well.  


The flexi pipe was put at somepoint.
I think the thought was to bring the heat from the stove to the the furthest away point in the the statification chamber.

Not sure if thats the correct way to think about it but thats what we decided at some point.

I will light the fire up today and film so you can see
 
fraser stewart
Posts: 126
26
  • Mark post as helpful
  • send pies
    Number of slices to send:
    Optional 'thank-you' note:
  • Quote
  • Report post to moderator

Satamax Antone wrote:Could you make a video of your fire?
I suspect a system not functioning that well.  


What aspects makes you suspect that its not doing well
 
Satamax Antone
gardener
Posts: 3471
Location: Southern alps, on the French side of the french /italian border 5000ft elevation
194
  • Mark post as helpful
  • send pies
    Number of slices to send:
    Optional 'thank-you' note:
  • Quote
  • Report post to moderator

fraser stewart wrote:

Satamax Antone wrote:Could you make a video of your fire?
I suspect a system not functioning that well.  


What aspects makes you suspect that its not doing well


Your system is similar to Peter's one.   https://permies.com/t/480/122458/Advice-RMH-build-Hokkaido-Japan

And it's a batch. It should warm the bench. Even if your pressure tank is bigger.


The flexi pipe is an error. It creates drag, huge amounts of drag.

That one worries me too.


Can you show us the chimney cap? Did you burn much?

You didn't say what is your system size.

 
Satamax Antone
gardener
Posts: 3471
Location: Southern alps, on the French side of the french /italian border 5000ft elevation
194
  • Mark post as helpful
  • send pies
    Number of slices to send:
    Optional 'thank-you' note:
  • Quote
  • Report post to moderator
I worry also about your barrel gap/transition area.

https://permies.com/t/61657/Flue-exhaust-transition-plenum-pictures

I see that you have a cleanout. A picture of the insides of your chimney pipe would help the guys who are more weathered, to see if it is burning well.

Myself, i'm dubious.  

 
fraser stewart
Posts: 126
26
  • Likes 1
  • Mark post as helpful
  • send pies
    Number of slices to send:
    Optional 'thank-you' note:
  • Quote
  • Report post to moderator

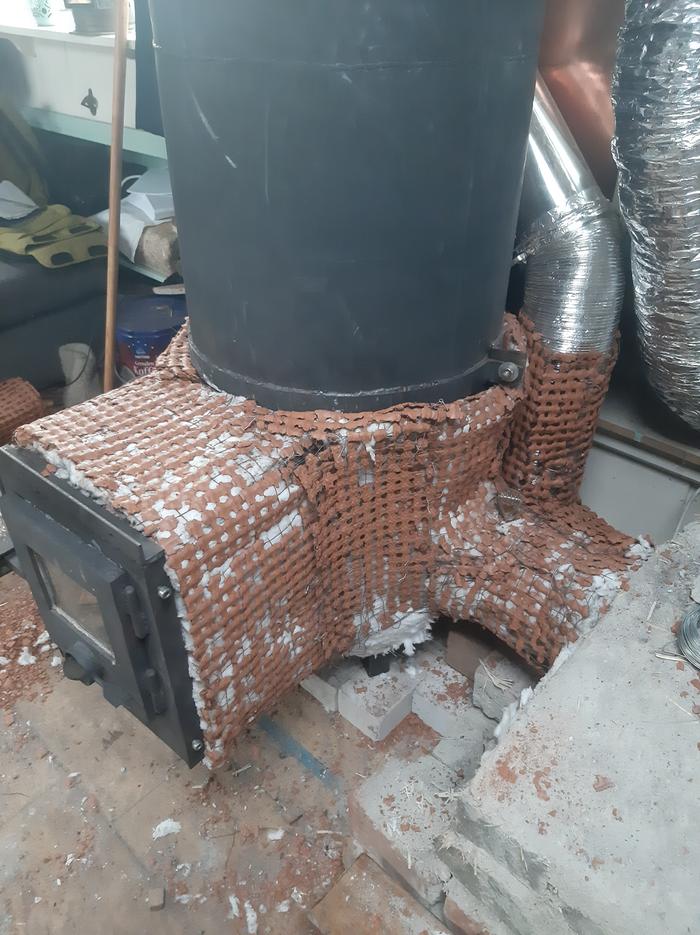
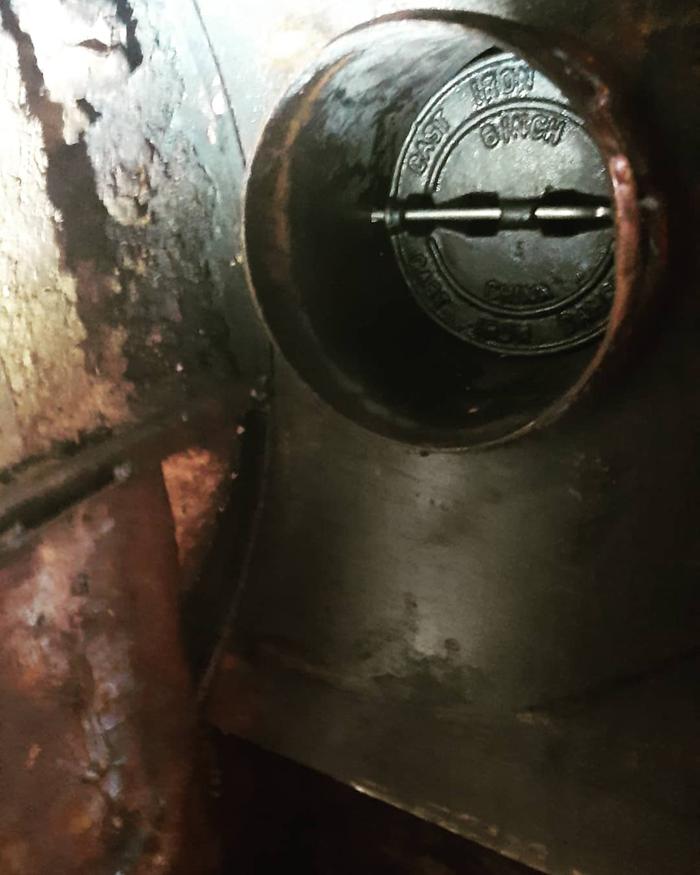
Satamax Antone wrote:I worry also about your barrel gap/transition area.

https://permies.com/t/61657/Flue-exhaust-transition-plenum-pictures

I see that you have a cleanout. A picture of the insides of your chimney pipe would help the guys who are more weathered, to see if it is burning well.

Myself, i'm dubious.  


Ok. What you say makes alot of sense as i think the bench was less effective since adding that flexi pipe. Now that i think about the chronology of it.

I can try to remove from the clean out at the far end of the bench. Otherwise i will need to break it open to get inside

I read your message after i threw the ash from the clean out in the bin. At the bottom clean out i had a small heap of black ash. Its dry ash. I also used the camera on my phone and my wifes phone to inspect the chimney. Very little ash build up but some present.


I will try to make a photo. But that is tricky

 
fraser stewart
Posts: 126
26
  • Likes 1
  • Mark post as helpful
  • send pies
    Number of slices to send:
    Optional 'thank-you' note:
  • Quote
  • Report post to moderator
I could not post a video

But i hope this helps to show how the stove is connecting to the bench

https://www.instagram.com/p/CGh7C5hB-Kv/?utm_medium=copy_link

Eveything is 150mm. The batch box is based on 150mm pvdb sketchup sizes.
 
fraser stewart
Posts: 126
26
  • Likes 1
  • Mark post as helpful
  • send pies
    Number of slices to send:
    Optional 'thank-you' note:
  • Quote
  • Report post to moderator
This is the chimney cleanouts
1637412639225667975700479598483.jpg
[Thumbnail for 1637412639225667975700479598483.jpg]
1637412664306469540544010136956.jpg
[Thumbnail for 1637412664306469540544010136956.jpg]
 
fraser stewart
Posts: 126
26
  • Mark post as helpful
  • send pies
    Number of slices to send:
    Optional 'thank-you' note:
  • Quote
  • Report post to moderator
Can you explain exactly what you mean

barrel gap/transition
 
fraser stewart
Posts: 126
26
  • Mark post as helpful
  • send pies
    Number of slices to send:
    Optional 'thank-you' note:
  • Quote
  • Report post to moderator
I think i know what you are refering to. The pipe leading from the first bell to the bench. See photo.  

Its a 150mm pipe with a baffel. Is this too narrow to warm up the bench and is slowing the path of the gasses down

Is it neccarry to open this up to widen the transition from bell to bench. If i did this i would add a cleanout.

IMG_20201018_220251_399.jpg
[Thumbnail for IMG_20201018_220251_399.jpg]
IMG_20201021_193638_818.jpg
[Thumbnail for IMG_20201021_193638_818.jpg]
 
fraser stewart
Posts: 126
26
  • Mark post as helpful
  • send pies
    Number of slices to send:
    Optional 'thank-you' note:
  • Quote
  • Report post to moderator
Wrong photo

The pipe sticking 2m out is going to my bench.
Question is?
Is this too narrow?
Is the flexi pipe creating so much drag i am not getting a warm bench
Is that resulting in having a cold bench.


The photo where you see the cob drying is from before I added the flexi tube.

Perhaps this is maybe the issue?

Would love to get the thoughts of those more weathered
IMG_20201021_193638_809.jpg
[Thumbnail for IMG_20201021_193638_809.jpg]
IMG_20201020_193849_952.jpg
[Thumbnail for IMG_20201020_193849_952.jpg]
IMG_20201024_084908_887.jpg
[Thumbnail for IMG_20201024_084908_887.jpg]
 
thomas rubino
rocket scientist
Posts: 6531
Location: latitude 47 N.W. montana zone 6A
3400
cat pig rocket stoves
  • Likes 1
  • Mark post as helpful
  • send pies
    Number of slices to send:
    Optional 'thank-you' note:
  • Quote
  • Report post to moderator
Hey Fraser;
Your 150 mm pipe going to the mass would be fine with a J tube.
With a batchbox, I suggest installing  a 200 mm tube  instead.
Free flowing that way and I would also use 200  hard pipe in the bell.
The corrugated pipes are known for slowing flow.

My 6" (150mm) batch in the studio flows into an 8" (200mm) piped mass.
I do need and use a bypass to start a cold stove.

Old Weathered builder...
 
Satamax Antone
gardener
Posts: 3471
Location: Southern alps, on the French side of the french /italian border 5000ft elevation
194
  • Mark post as helpful
  • send pies
    Number of slices to send:
    Optional 'thank-you' note:
  • Quote
  • Report post to moderator
Well,  this is a bit of a problem.


This should not stick in the barrel. The less convolutions the gases do in a stove, the better.

What you have in your other pictures is not ash, but soot. That's not a good sign either.

What i mean by barrel gap, is the space between heat riser and the barrel. In some cases it is so narrow, that the stove can't function. And since you have a straight pipe, sticking in, i wonder if you don't have a restriction there.

You need at least 1.5 times CSA in tube projection. That means if you would project your tube to the heat riser, that theoretical surface should be at least 1.5 times the cross sectional area of your 150mm tube.

https://donkey32.proboards.com/thread/1406/calculating-ring-circumference-projection-gap

 
fraser stewart
Posts: 126
26
  • Mark post as helpful
  • send pies
    Number of slices to send:
    Optional 'thank-you' note:
  • Quote
  • Report post to moderator
I have a large gap between the top of the bell and the heat riser. Roughly 40cm. Was a previous issue which I resolved. The space between the walls and the heat riser could be too narrow. Im not sure and cant remember how it was. But its possible.

Im thinking my only option now is to so some surgery. Open the the side of stove and make a nice free flowing connection to the bench. This would allow me to remove the flexible pipe and create a flow to the bench. And add a cleanout.
.
I guess treating the bench and bell as one part and not seperate is the way to go.

What do you think?
 
fraser stewart
Posts: 126
26
  • Mark post as helpful
  • send pies
    Number of slices to send:
    Optional 'thank-you' note:
  • Quote
  • Report post to moderator
I think the right angel that the gasses have to flow in, is also a mistake and should curve into the bench making it flow easier.

With the previous gap between the heat riser and the top surface of the bell, that was an issue. The gasses needed to make a corner. Once that distance was increased they could turn the bend in a flowing curve.

Is this not the same issue that i am facing with the conection between bench and stove
 
fraser stewart
Posts: 126
26
  • Mark post as helpful
  • send pies
    Number of slices to send:
    Optional 'thank-you' note:
  • Quote
  • Report post to moderator
Earlier someone asked for a video of the stove lit. Here it is

https://youtu.be/S3NU-hlQTdw
 
fraser stewart
Posts: 126
26
  • Mark post as helpful
  • send pies
    Number of slices to send:
    Optional 'thank-you' note:
  • Quote
  • Report post to moderator

Satamax Antone wrote:

You need at least 1.5 times CSA in tube projection. That means if you would project your tube to the heat riser, that theoretical surface should be at least 1.5 times the cross sectional area of your 150mm tube.

https://donkey32.proboards.com/thread/1406/calculating-ring-circumference-projection-gap


I am stuck trying to understand what you mean here. I know its helpful but i dont understand.

What should be 1.5 time of what?
gift
 
Rocket Mass Heater Manual
will be released to subscribers in: soon!
reply
    Bookmark Topic Watch Topic
  • New Topic