|

|
|
|
|

|
-B.png)
|

|

|

|
 3
3


Byron Campbell wrote:Have just been reading and enjoying your RMH thread Peter. Very Nice! And I'll mirror other's comments about the informative and quality of your posts.
Harvesting extra heat by adding the "half barrel" extension over the riser will tend to put more immediate heat into the space, and less into the mass, making for a bit slower warm up of the bench. If the space tends to overheat more quickly than before, that can be slowed down a bit by storing the heat in mass, which is already in place in the form of the stack of brick in the corner by the heat exchange barrel. May I suggest experimenting with dry stacking that stash of brick, forming a corner around the back and to the right of the barrel? Make the brick corner the same height as the top lip of the barrel. Obviously, leave an air-gap between the brick and the house wall/door/window. But between the brick and the heat exchange barrel, the brick can be right up against the barrel or as close as you like.
I use this technique on my 6" RMH, mainly as a heat shield between the heat exchange barrel and the adjacent wall. Works like a charm.


 3
3
![[Thumbnail for CF0328D8-0D5D-4AA1-A09D-9532A372977A.jpeg]](/t/122458/a/159494/CF0328D8-0D5D-4AA1-A09D-9532A372977A.jpeg "Filename: CF0328D8-0D5D-4AA1-A09D-9532A372977A.jpeg
Description:")
![[Thumbnail for FB8526AE-B6B6-47F3-B597-A2500F9E4C76.jpeg]](/t/122458/a/159495/FB8526AE-B6B6-47F3-B597-A2500F9E4C76.jpeg "Filename: FB8526AE-B6B6-47F3-B597-A2500F9E4C76.jpeg
Description:")
![[Thumbnail for 4F96C49E-74C4-4743-8189-0F808A7CA0D8.jpeg]](/t/122458/a/159496/4F96C49E-74C4-4743-8189-0F808A7CA0D8.jpeg "Filename: 4F96C49E-74C4-4743-8189-0F808A7CA0D8.jpeg
Description:")
![[Thumbnail for 9312542C-4221-469F-9DDA-B078DDCC3659.jpeg]](/t/122458/a/159497/9312542C-4221-469F-9DDA-B078DDCC3659.jpeg "Filename: 9312542C-4221-469F-9DDA-B078DDCC3659.jpeg
Description:")
![[Thumbnail for B0A1936E-B24A-4D59-BBC2-2327F5B27FCB.jpeg]](/t/122458/a/159498/B0A1936E-B24A-4D59-BBC2-2327F5B27FCB.jpeg "Filename: B0A1936E-B24A-4D59-BBC2-2327F5B27FCB.jpeg
Description:")
![[Thumbnail for 53D18DD9-9484-43E9-B00C-AA1FA32DE131.jpeg]](/t/122458/a/159499/53D18DD9-9484-43E9-B00C-AA1FA32DE131.jpeg "Filename: 53D18DD9-9484-43E9-B00C-AA1FA32DE131.jpeg
Description:")
![[Thumbnail for 8D5D0496-628B-42FE-813E-6CCB3E66AF43.jpeg]](/t/122458/a/159500/8D5D0496-628B-42FE-813E-6CCB3E66AF43.jpeg "Filename: 8D5D0496-628B-42FE-813E-6CCB3E66AF43.jpeg
Description:")
![[Thumbnail for 95BAFB51-866B-41C8-95CA-B1E50607996F.jpeg]](/t/122458/a/159501/95BAFB51-866B-41C8-95CA-B1E50607996F.jpeg "Filename: 95BAFB51-866B-41C8-95CA-B1E50607996F.jpeg
Description:")
![[Thumbnail for DADEB1AB-EE86-43E3-BDBC-9A7753179D40.jpeg]](/t/122458/a/159502/DADEB1AB-EE86-43E3-BDBC-9A7753179D40.jpeg "Filename: DADEB1AB-EE86-43E3-BDBC-9A7753179D40.jpeg
Description:")


 2
2
best regards, Byron
 1
1

God of procrastination https://www.youtube.com/watch?v=q1EoT9sedqY
1

![[Thumbnail for 1CFB6636-391A-43A1-91D7-7F60F084EA72.jpeg]](/t/122458/a/159637/1CFB6636-391A-43A1-91D7-7F60F084EA72.jpeg "Filename: 1CFB6636-391A-43A1-91D7-7F60F084EA72.jpeg
Description:")
![[Thumbnail for 4ECED3E0-785F-4B3A-9A51-18D16254DE46.jpeg]](/t/122458/a/159638/4ECED3E0-785F-4B3A-9A51-18D16254DE46.jpeg "Filename: 4ECED3E0-785F-4B3A-9A51-18D16254DE46.jpeg
Description:")
![[Thumbnail for 912B9497-FC87-41E7-9441-2E0DDE49D080.jpeg]](/t/122458/a/159639/912B9497-FC87-41E7-9441-2E0DDE49D080.jpeg "Filename: 912B9497-FC87-41E7-9441-2E0DDE49D080.jpeg
Description:")

![[Thumbnail for 4F5EB139-2424-434D-B7DB-9DB3DBB60897.jpeg]](/t/122458/a/159641/4F5EB139-2424-434D-B7DB-9DB3DBB60897.jpeg "Filename: 4F5EB139-2424-434D-B7DB-9DB3DBB60897.jpeg
Description:")
![[Thumbnail for E8A61519-0F90-4DDD-9FD2-91D1C4120302.jpeg]](/t/122458/a/159642/E8A61519-0F90-4DDD-9FD2-91D1C4120302.jpeg "Filename: E8A61519-0F90-4DDD-9FD2-91D1C4120302.jpeg
Description:")


![[Thumbnail for 5351B9BF-4E43-4829-91B5-DEEDFECB83CE.jpeg]](/t/122458/a/159645/5351B9BF-4E43-4829-91B5-DEEDFECB83CE.jpeg "Filename: 5351B9BF-4E43-4829-91B5-DEEDFECB83CE.jpeg
Description:") 3
3
![[Thumbnail for FB4F37F1-D834-41B2-ADE0-603185698A95.jpeg]](/t/122458/a/159651/FB4F37F1-D834-41B2-ADE0-603185698A95.jpeg "Filename: FB4F37F1-D834-41B2-ADE0-603185698A95.jpeg
Description:")
![[Thumbnail for 0863E2F4-83FF-41B3-AB0C-CDC804028B35.jpeg]](/t/122458/a/159652/0863E2F4-83FF-41B3-AB0C-CDC804028B35.jpeg "Filename: 0863E2F4-83FF-41B3-AB0C-CDC804028B35.jpeg
Description:") 1
1
Peter Sedgwick wrote:
One question regarding fuel. Recently wood has been burning faster on the outer portion and the flame creeps up the sticks and out of the burn box. Is this a result of not enough draw? Outside temp is some where around 3°C to 8°C when we are burning most of the time.
🏔🌞🏔
Silence is Golden
For all your RMH needs:
dragontechrmh.com
3
![[Thumbnail for 015D823B-B106-4E68-B2B2-26B5EF903670.jpeg]](/t/122458/a/159678/015D823B-B106-4E68-B2B2-26B5EF903670.jpeg "Filename: 015D823B-B106-4E68-B2B2-26B5EF903670.jpeg
Description:")
![[Thumbnail for F6C981B1-32F6-4BAE-B3DD-7922426FAE8D.jpeg]](/t/122458/a/159679/F6C981B1-32F6-4BAE-B3DD-7922426FAE8D.jpeg "Filename: F6C981B1-32F6-4BAE-B3DD-7922426FAE8D.jpeg
Description:")
![[Thumbnail for 6DA1612E-39D3-4A8E-8AAC-5D37DF67B773.jpeg]](/t/122458/a/159680/6DA1612E-39D3-4A8E-8AAC-5D37DF67B773.jpeg "Filename: 6DA1612E-39D3-4A8E-8AAC-5D37DF67B773.jpeg
Description:")


![[Thumbnail for 0460E060-71C1-48EC-8A84-9FB72678EE2A.jpeg]](/t/122458/a/159683/0460E060-71C1-48EC-8A84-9FB72678EE2A.jpeg "Filename: 0460E060-71C1-48EC-8A84-9FB72678EE2A.jpeg
Description:")
![[Thumbnail for 1C75144B-1448-4125-B973-25C2CD22003D.jpeg]](/t/122458/a/159684/1C75144B-1448-4125-B973-25C2CD22003D.jpeg "Filename: 1C75144B-1448-4125-B973-25C2CD22003D.jpeg
Description:")
![[Thumbnail for 26A8E95F-CB2D-480E-9BA2-DED89E5F7EB9.jpeg]](/t/122458/a/159685/26A8E95F-CB2D-480E-9BA2-DED89E5F7EB9.jpeg "Filename: 26A8E95F-CB2D-480E-9BA2-DED89E5F7EB9.jpeg
Description:")

 3
3
Silence is Golden
For all your RMH needs:
dragontechrmh.com
3
1
Gerry Parent wrote: Hate to tell you this Pete but your dragon has grown up and is now a full-fledged teenager!
Smoke-back, sparks, late night parties... pretty soon it’ll be asking for keys to the car. But don’t worry there are plenty of experienced RMH ‘fathers’ on this forum that you can consolidate with.
That’s great to hear that you found an abundance source of clay to play with. I agree with you, it’s truly a wonderful natural product to experiment and build with. Look forward to seeing some of your interesting creations.
1
Glenn Herbert wrote:My RMH has excellent draft (not powerful but reliable) in any weather that is cool enough to want a fire, but will usually risk fire creeping up the logs in most conditions. I habitually keep a piece of cement board half or 3/4 covering the feed after loading, and that eliminates the issue. Bricks are the common item that people use for this purpose.
You do also need to ensure that all wood is cut to fit inside the feed tube and not stick up.
![[Thumbnail for 28E2FF9E-19F9-4E09-A4F8-CC98941ED135.jpeg]](/t/122458/a/159903/28E2FF9E-19F9-4E09-A4F8-CC98941ED135.jpeg "Filename: 28E2FF9E-19F9-4E09-A4F8-CC98941ED135.jpeg
Description:")
![[Thumbnail for 23C83D0B-1C85-4F28-B118-F2DC7AC58689.jpeg]](/t/122458/a/159904/23C83D0B-1C85-4F28-B118-F2DC7AC58689.jpeg "Filename: 23C83D0B-1C85-4F28-B118-F2DC7AC58689.jpeg
Description:") 2
2
![[Thumbnail for 2E3A88E2-48D1-4A83-A62E-D16616B4B343.jpeg]](/t/122458/a/159905/2E3A88E2-48D1-4A83-A62E-D16616B4B343.jpeg "Filename: 2E3A88E2-48D1-4A83-A62E-D16616B4B343.jpeg
Description:")
![[Thumbnail for C2A62D0D-A7AF-41FE-B6BA-EB6EDA3F345E.jpeg]](/t/122458/a/159906/C2A62D0D-A7AF-41FE-B6BA-EB6EDA3F345E.jpeg "Filename: C2A62D0D-A7AF-41FE-B6BA-EB6EDA3F345E.jpeg
Description:")
![[Thumbnail for 370E9317-CAE6-4E2C-955E-F4DF61082009.jpeg]](/t/122458/a/159907/370E9317-CAE6-4E2C-955E-F4DF61082009.jpeg "Filename: 370E9317-CAE6-4E2C-955E-F4DF61082009.jpeg
Description:") 2
2
best regards, Byron
1
1
Silence is Golden
For all your RMH needs:
dragontechrmh.com
Byron Campbell wrote:Hi Peter, yeah, smoke-back and fire creeping up the sticks are two different animals. To circumvent the latter, it is helpful that the sticks do not extend above the wood-feed opening. Normally 16" (41 cm) feed tube depth is plenty 'nuff for standard firewood length, the usual firewood length here in the US anyway. If RMH's feed is not 16" (41 cm) deep it can be easily modified. Got any extra / scrap strips of CFB or suitable refractory (small rocks, brick, or concrete fragments) to extend the height of the wood-feed opening? Added strips of CFB, or the other material options, should be mortared in place with clay-sand mortar, and then building up or mounding up the mortar (or cob) to surround and support the wood-feed extension on its outside circumference.
![[Thumbnail for 0A57FABC-9234-46A4-8F5F-18B48EFC0639.jpeg]](/t/122458/a/159958/0A57FABC-9234-46A4-8F5F-18B48EFC0639.jpeg "Filename: 0A57FABC-9234-46A4-8F5F-18B48EFC0639.jpeg
Description:")
Glenn Herbert wrote:Since you now have room to extend the height of your riser, you can safely extend your feed tube height as well.
I once tried a piece of hardibacker, and it disintegrated when it got really hot. What I use is actually cement 1/2" thick with fiberglass mesh on each side. Durock is a popular US brand. Mine has lasted for four or five seasons, does eventually crumble with heat and handling, and needs to be replaced now. Pretty cheap for the utility and convenience. Easier to move than bricks though not quite as versatile (can't arrange a slit in the middle.)
1
Gerry Parent wrote:Not sure what a “deer trap” is but sounds like your keeping your garden safe anyways.
I’ve always associated smoke-back to mean any time the exhaust flows in the opposite direction it’s supposed to.
Whether a lot or even a little.
In the early days, it was common to see a small metal bucket with the bottom cut out placed around the feed tube opening to help contain any stray whisps of smoke. A lid controlled the amount of air in or to seal it entirely once the fire was out.
I did this for a season with good results. Made it removable for easier cleaning.
BTW, like your ash cleaning gizmo.
Many ways to ‘skin’ a dragon.
I’ve heard Matt Walker say many times that the top gap was not at all critical to be a set distance. As long as you leave enough space not to create a bottle-neck, there really is no maximum amount.
As for extending the riser, I say go for it.
![[Thumbnail for D96EA789-AA0D-458F-9B84-7C328AD854C1.jpeg]](/t/122458/a/159959/D96EA789-AA0D-458F-9B84-7C328AD854C1.jpeg "Filename: D96EA789-AA0D-458F-9B84-7C328AD854C1.jpeg
Description:")
![[Thumbnail for F7AF1711-F5E2-4192-B1B7-C7A1DFF7B272.jpeg]](/t/122458/a/159960/F7AF1711-F5E2-4192-B1B7-C7A1DFF7B272.jpeg "Filename: F7AF1711-F5E2-4192-B1B7-C7A1DFF7B272.jpeg
Description:")
![[Thumbnail for 94C3A3D6-34EB-4780-87DA-BAC439A5BBC5.jpeg]](/t/122458/a/159961/94C3A3D6-34EB-4780-87DA-BAC439A5BBC5.jpeg "Filename: 94C3A3D6-34EB-4780-87DA-BAC439A5BBC5.jpeg
Description:")
![[Thumbnail for 30EE5003-AFAD-4173-84AF-C195EF294696.jpeg]](/t/122458/a/159962/30EE5003-AFAD-4173-84AF-C195EF294696.jpeg "Filename: 30EE5003-AFAD-4173-84AF-C195EF294696.jpeg
Description:")
![[Thumbnail for 8F1E9EB7-B96E-48B5-8FA2-62EB93091173.jpeg]](/t/122458/a/159963/8F1E9EB7-B96E-48B5-8FA2-62EB93091173.jpeg "Filename: 8F1E9EB7-B96E-48B5-8FA2-62EB93091173.jpeg
Description:")
![[Thumbnail for 05ACCB49-711B-47B1-94B2-5DBB90FB60C3.jpeg]](/t/122458/a/159964/05ACCB49-711B-47B1-94B2-5DBB90FB60C3.jpeg "Filename: 05ACCB49-711B-47B1-94B2-5DBB90FB60C3.jpeg
Description:")

Peter Sedgwick wrote:Any other advice is always welcome.
God of procrastination https://www.youtube.com/watch?v=q1EoT9sedqY
2

best regards, Byron
![[Thumbnail for 50EFEED0-D92E-4258-B420-9310FE300C35.jpeg]](/t/122458/a/160119/50EFEED0-D92E-4258-B420-9310FE300C35.jpeg "Filename: 50EFEED0-D92E-4258-B420-9310FE300C35.jpeg
Description:")
![[Thumbnail for 3FF0776E-CB7F-43AC-A15F-5A12F0830FC4.jpeg]](/t/122458/a/160120/3FF0776E-CB7F-43AC-A15F-5A12F0830FC4.jpeg "Filename: 3FF0776E-CB7F-43AC-A15F-5A12F0830FC4.jpeg
Description:")
![[Thumbnail for 0B9678C4-61BE-4EA2-A03B-098B62360A09.jpeg]](/t/122458/a/160121/0B9678C4-61BE-4EA2-A03B-098B62360A09.jpeg "Filename: 0B9678C4-61BE-4EA2-A03B-098B62360A09.jpeg
Description:")
![[Thumbnail for 7859F405-EF7E-40B8-91C6-209791A72080.jpeg]](/t/122458/a/160129/7859F405-EF7E-40B8-91C6-209791A72080.jpeg "Filename: 7859F405-EF7E-40B8-91C6-209791A72080.jpeg
Description:") 2
2
Peter Sedgwick wrote:The batch box is a great idea and I do plan on experimenting when the weather is warmer, but at the moment we are nearing the cold season and we have a less than functional heating source. Can’t get the fire to do anything other than this and after over an hour of continuous burning smoke is still billowing out the chimney and we have to open all the doors and windows just to breath. Temperature outside is 7°C. Flue pipe temperature won’t go above 50°C.
I’m not really sure what the problem is or what to do. Never had any kind of problems with the system at all.
The present state of the stove seems rather dangerous to me.
Any and all advice would be very welcome thank you.
Cheers, Peter
Silence is Golden
For all your RMH needs:
dragontechrmh.com
3
God of procrastination https://www.youtube.com/watch?v=q1EoT9sedqY
1
![[Thumbnail for A606EF08-1B69-4EAE-A027-425451487031.jpeg]](/t/122458/a/160138/A606EF08-1B69-4EAE-A027-425451487031.jpeg "Filename: A606EF08-1B69-4EAE-A027-425451487031.jpeg
Description:")
![[Thumbnail for 56913476-6B8C-423E-8143-7FD294D9A1BE.jpeg]](/t/122458/a/160139/56913476-6B8C-423E-8143-7FD294D9A1BE.jpeg "Filename: 56913476-6B8C-423E-8143-7FD294D9A1BE.jpeg
Description:")
![[Thumbnail for 9714B5F6-8E80-46A7-9CBC-F956040D5E27.jpeg]](/t/122458/a/160140/9714B5F6-8E80-46A7-9CBC-F956040D5E27.jpeg "Filename: 9714B5F6-8E80-46A7-9CBC-F956040D5E27.jpeg
Description:")
![[Thumbnail for 814D52FB-194B-40E4-9B99-150D541FB77A.jpeg]](/t/122458/a/160141/814D52FB-194B-40E4-9B99-150D541FB77A.jpeg "Filename: 814D52FB-194B-40E4-9B99-150D541FB77A.jpeg
Description:")
![[Thumbnail for 1F82EF53-D5CC-4952-A089-37BC071E78A8.jpeg]](/t/122458/a/160142/1F82EF53-D5CC-4952-A089-37BC071E78A8.jpeg "Filename: 1F82EF53-D5CC-4952-A089-37BC071E78A8.jpeg
Description:")
![[Thumbnail for 9169452B-579F-4B53-9776-AD85DA32E8AD.jpeg]](/t/122458/a/160143/9169452B-579F-4B53-9776-AD85DA32E8AD.jpeg "Filename: 9169452B-579F-4B53-9776-AD85DA32E8AD.jpeg
Description:")
![[Thumbnail for 0E1E6C27-2F50-42D5-AACA-F590A55C923B.jpeg]](/t/122458/a/160144/0E1E6C27-2F50-42D5-AACA-F590A55C923B.jpeg "Filename: 0E1E6C27-2F50-42D5-AACA-F590A55C923B.jpeg
Description:")
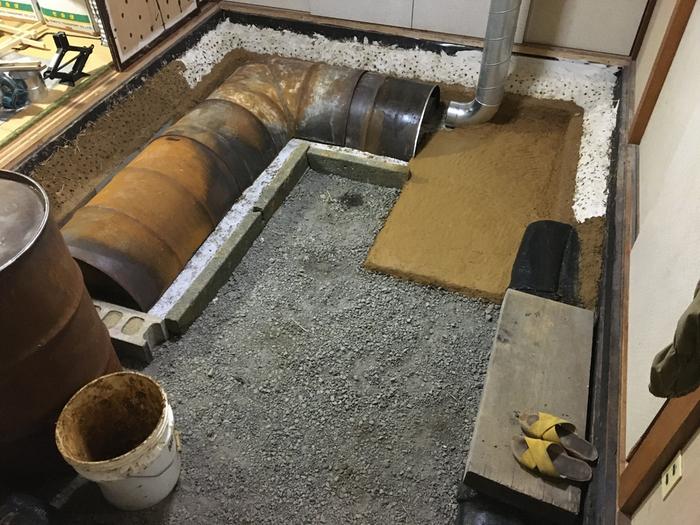
Satamax Antone wrote:You don't have cleanouts?
System clogged, or just partly. You don't immagine how much fly ashes gathers in the very spots where the gas stream slows down.
Order of action i would say.
First of all. Skirt the barrel with roxul, rockwool or any other batt insulation and attach it with wire.
Does it improves? If yes, too much heat extraction.
Fix, use bricks as showed in a previous post. Even just stacked is sufficient.
If that doesn't improve.
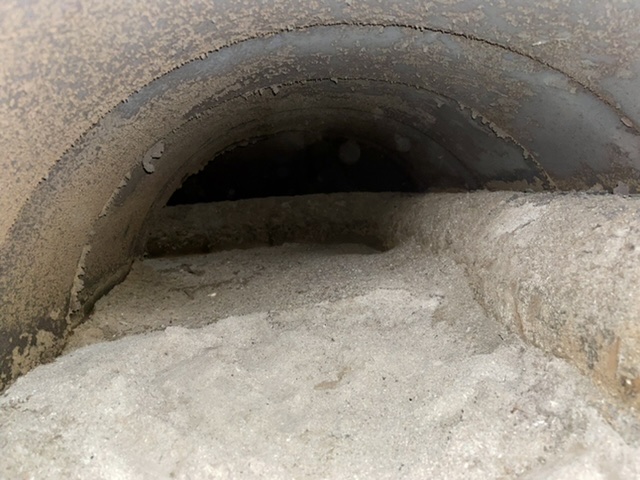
Remove the top barrel, for a visual inspection of the "plenum" try to feel the draft with your hand.
Send a vacuum cleaner's tube in there to clean the pipes of your bench. Try to find an old one at the recycle yard or dumpster, that will most likely kill it.
You could also blow compressed air from the other end, at the same time.
Then if that doesn't declog it.
You'll have to open the bench to clean, and add cleanouts.
Another thing i would do, insulate that vertical hvac pipe chimney.
![[Thumbnail for 7AD8CE59-7467-4A75-B3F5-D0444CF873A1.jpeg]](/t/122458/a/160145/7AD8CE59-7467-4A75-B3F5-D0444CF873A1.jpeg "Filename: 7AD8CE59-7467-4A75-B3F5-D0444CF873A1.jpeg
Description:")
![[Thumbnail for 55AFCB75-25AF-4608-8373-FB8AC2AC0AA9.jpeg]](/t/122458/a/160146/55AFCB75-25AF-4608-8373-FB8AC2AC0AA9.jpeg "Filename: 55AFCB75-25AF-4608-8373-FB8AC2AC0AA9.jpeg
Description:")
![[Thumbnail for EE51F0ED-59BF-427D-B6CE-D8C9434713AC.jpeg]](/t/122458/a/160147/EE51F0ED-59BF-427D-B6CE-D8C9434713AC.jpeg "Filename: EE51F0ED-59BF-427D-B6CE-D8C9434713AC.jpeg
Description:")
![[Thumbnail for EA873158-DAB1-4073-AE5E-30B0C2A7CF3C.jpeg]](/t/122458/a/160148/EA873158-DAB1-4073-AE5E-30B0C2A7CF3C.jpeg "Filename: EA873158-DAB1-4073-AE5E-30B0C2A7CF3C.jpeg
Description:")
![[Thumbnail for D9ACC214-ECFC-48B4-AAC9-4CF1ED8EFB68.jpeg]](/t/122458/a/160149/D9ACC214-ECFC-48B4-AAC9-4CF1ED8EFB68.jpeg "Filename: D9ACC214-ECFC-48B4-AAC9-4CF1ED8EFB68.jpeg
Description:") 2
2

![[Thumbnail for petersbench.jpeg]](/t/122458/a/160150/petersbench.jpeg "Filename: petersbench.jpeg
Description:")
God of procrastination https://www.youtube.com/watch?v=q1EoT9sedqY
God of procrastination https://www.youtube.com/watch?v=q1EoT9sedqY
![[Thumbnail for E17EE7DB-02EC-428E-9E0A-A04039D7FF58.jpeg]](/t/122458/a/160158/E17EE7DB-02EC-428E-9E0A-A04039D7FF58.jpeg "Filename: E17EE7DB-02EC-428E-9E0A-A04039D7FF58.jpeg
Description:")
![[Thumbnail for D623A66D-CDD1-45D5-9DAF-A4A282E3046F.jpeg]](/t/122458/a/160159/D623A66D-CDD1-45D5-9DAF-A4A282E3046F.jpeg "Filename: D623A66D-CDD1-45D5-9DAF-A4A282E3046F.jpeg
Description:")
![[Thumbnail for DEE5D56A-D2F3-4B48-A8A5-092F8C4C37D5.jpeg]](/t/122458/a/160160/DEE5D56A-D2F3-4B48-A8A5-092F8C4C37D5.jpeg "Filename: DEE5D56A-D2F3-4B48-A8A5-092F8C4C37D5.jpeg
Description:")
![[Thumbnail for A1DD41FB-1C93-47EB-A0E7-99D0D25CBB6D.jpeg]](/t/122458/a/160161/A1DD41FB-1C93-47EB-A0E7-99D0D25CBB6D.jpeg "Filename: A1DD41FB-1C93-47EB-A0E7-99D0D25CBB6D.jpeg
Description:")
![[Thumbnail for C98BB946-3154-4EA2-A384-472BD20DD529.jpeg]](/t/122458/a/160162/C98BB946-3154-4EA2-A384-472BD20DD529.jpeg "Filename: C98BB946-3154-4EA2-A384-472BD20DD529.jpeg
Description:") 1
1
Peter Sedgwick wrote: Can’t get the fire to do anything other than this and after over an hour of continuous burning smoke is still billowing out the chimney and we have to open all the doors and windows just to breath. Temperature outside is 7°C. Flue pipe temperature won’t go above 50°C.
I’m not really sure what the problem is or what to do. Never had any kind of problems with the system at all.
best regards, Byron
1

God of procrastination https://www.youtube.com/watch?v=q1EoT9sedqY
1
God of procrastination https://www.youtube.com/watch?v=q1EoT9sedqY


 2
2
For all your Montana Masonry Heater parts (also known as) Rocket Mass heater parts.
Visit me at
dragontechrmh.com Once you go brick you will never go back!
![[Thumbnail for 4AE2FC13-11B4-4C06-9A38-F6703D239C77.jpeg]](/t/122458/a/160262/4AE2FC13-11B4-4C06-9A38-F6703D239C77.jpeg "Filename: 4AE2FC13-11B4-4C06-9A38-F6703D239C77.jpeg
Description:")
![[Thumbnail for 20FF149D-EA52-4640-878E-C18BC829395E.jpeg]](/t/122458/a/160263/20FF149D-EA52-4640-878E-C18BC829395E.jpeg "Filename: 20FF149D-EA52-4640-878E-C18BC829395E.jpeg
Description:")
![[Thumbnail for 47C0146E-7733-4EF3-9A81-D1862A4C8B29.jpeg]](/t/122458/a/160264/47C0146E-7733-4EF3-9A81-D1862A4C8B29.jpeg "Filename: 47C0146E-7733-4EF3-9A81-D1862A4C8B29.jpeg
Description:")
![[Thumbnail for DBBE7DE3-5D7C-44A3-A7B3-40B3DD3A291B.jpeg]](/t/122458/a/160265/DBBE7DE3-5D7C-44A3-A7B3-40B3DD3A291B.jpeg "Filename: DBBE7DE3-5D7C-44A3-A7B3-40B3DD3A291B.jpeg
Description:")
![[Thumbnail for 843EA4F0-58AC-4194-ABA0-907830F72004.jpeg]](/t/122458/a/160266/843EA4F0-58AC-4194-ABA0-907830F72004.jpeg "Filename: 843EA4F0-58AC-4194-ABA0-907830F72004.jpeg
Description:") 3
3

God of procrastination https://www.youtube.com/watch?v=q1EoT9sedqY
2
For all your Montana Masonry Heater parts (also known as) Rocket Mass heater parts.
Visit me at
dragontechrmh.com Once you go brick you will never go back!


|
You can't have everything. Where would you put it?
Homesteading and Permaculture Bundle - More than 35 Things
https://permies.com/w/235626/Homesteading-Permaculture-Bundle
|