gift
permaculture thorns eBook - DRAFT
will be released to subscribers in: soon!
  • Post Reply Bookmark Topic Watch Topic
  • New Topic
permaculture forums growies critters building homesteading energy monies kitchen purity ungarbage community wilderness fiber arts art permaculture artisans regional education skip experiences global resources cider press projects digital market permies.com pie forums private forums all forums
this forum made possible by our volunteer staff, including ...
master stewards:
  • Carla Burke
  • Nancy Reading
  • r ranson
  • John F Dean
  • Pearl Sutton
  • paul wheaton
stewards:
  • Jay Angler
  • Anne Miller
  • Nicole Alderman
master gardeners:
  • Christopher Weeks
gardeners:
  • Maieshe Ljin
  • Benjamin Dinkel
  • Jeremy VanGelder

Advice on a RMH build in Hokkaido Japan

 
pollinator
Posts: 464
Location: Toyoura Hokkaido
163
  • Mark post as helpful
  • send pies
    Number of slices to send:
    Optional 'thank-you' note:
  • Quote
  • Report post to moderator
far side of the moon...🌈💎
 
Peter Sedgwick
pollinator
Posts: 464
Location: Toyoura Hokkaido
163
  • Likes 4
  • Mark post as helpful
  • send pies
    Number of slices to send:
    Optional 'thank-you' note:
  • Quote
  • Report post to moderator

Fox James wrote:I have found that studying rocket stoves can be very frustrating, it is not something that has been developed and perfected by a large company with unlimited resources ... so many questions don’t have conclusive answers that can easily be found out!...

However I can’t help but think there is far more to come........


Frustrating yes.

Think that’s because so many of the laws and principles of the technology are situational. Change one part and it changes the equation.

I  barely know what I’m doing, but we have a stove, that we made, that is burning wood, and keeping us warm. Is it optimized for efficiency? Probably not. Does it draft? Yes! (probably because we have the manifold directly connected to the bell, no “transition”.) That’s all I know...🤓

Tinkering, making observations, asking questions, and sharing thoughts and ideas are the ways I believe we can keep up with the pace at which rocket technology is evolving.

This is where social media can really shine. It’s open source. No one “owns” LINUX

Heat a man’s house for a day and he has to pay a silly power bill. Teach a man to heat his house and he no longer has to pay that bill or worry about having the money to pay that power bill.
And best of all, he’s(she’s) WARM...🌈

Power to the people...

Cheers, Peter (Novice Rocketeer)

🧱🧱🧱🧱🧱
🧱🔥🙏🏼🔥🧱
🧱🧱🧱🧱🧱


master rocket scientist
Posts: 6617
Location: latitude 47 N.W. montana zone 6A
3502
cat pig rocket stoves
  • Likes 2
  • Mark post as helpful
  • send pies
    Number of slices to send:
    Optional 'thank-you' note:
  • Quote
  • Report post to moderator
Peter;  With all due respect you and Mimi are Journeyman rocket scientists!   Your not fooling anyone about being a novice... that was months ago!
Next year after you consult on all your neighbors new RMH'S and start planning / ? construction on your first batch box, You will become a master builder !  
Well OK , might take a day or two longer than a year but you are well on the way!  
 
Rocket Scientist
Posts: 1812
Location: Kaslo, BC
525
building solar woodworking rocket stoves wood heat greening the desert
  • Likes 2
  • Mark post as helpful
  • send pies
    Number of slices to send:
    Optional 'thank-you' note:
  • Quote
  • Report post to moderator
Second the motion Thomas!   As long as you know that there's always more to learn, a 'title' should never slow you down as long as the ego doesn't get in you own way.

On another note, I got around to modifying the wood carrier, by enlarging the holes around the handles....mucho betta!
enlarged-handles.JPG
[Thumbnail for enlarged-handles.JPG]
 
Peter Sedgwick
pollinator
Posts: 464
Location: Toyoura Hokkaido
163
  • Mark post as helpful
  • send pies
    Number of slices to send:
    Optional 'thank-you' note:
  • Quote
  • Report post to moderator

thomas rubino wrote:Peter;  With all due respect you and Mimi are Journeyman rocket scientists!   Your not fooling anyone about being a novice... that was months ago!
Next year after you consult on all your neighbors new RMH'S and start planning / ? construction on your first batch box, You will become a master builder !  
Well OK , might take a day or two longer than a year but you are well on the way!  


Thanks Thomas!

Never much for titles, myself. Believe the real “sensei” here is the rocket. Each time you light it and add wood, it speaks to you. As a student, my job is to decipher what it’s saying.

The batch box is probably the next logical step, for sure. Spending time lying on our warm j-tube bench and reading about batch box builds as we speak.

Many more questions and answers to come...

Peter🙏🏼
2E97BDED-7465-459E-8D4B-403BE1F478AE.jpeg
[Thumbnail for 2E97BDED-7465-459E-8D4B-403BE1F478AE.jpeg]
Satisfied Customer
 
Peter Sedgwick
pollinator
Posts: 464
Location: Toyoura Hokkaido
163
  • Likes 1
  • Mark post as helpful
  • send pies
    Number of slices to send:
    Optional 'thank-you' note:
  • Quote
  • Report post to moderator

Gerry Parent wrote:Second the motion Thomas!   As long as you know that there's always more to learn, a 'title' should never slow you down as long as the ego doesn't get in you own way.

On another note, I got around to modifying the wood carrier, by enlarging the holes around the handles....mucho betta!


That looks awesome Gerry!

Now that you have a blank white canvas, maybe time to add a little art work to it.

Peter😉
 
Peter Sedgwick
pollinator
Posts: 464
Location: Toyoura Hokkaido
163
  • Likes 4
  • Mark post as helpful
  • send pies
    Number of slices to send:
    Optional 'thank-you' note:
  • Quote
  • Report post to moderator
Hey folks,

Here are images of our first look under the hood since we started burning. Few points:

1. Burning for 6 weeks straight everyday for about 12-18 hours

2. Originally burning old off cuts of hard and soft wood. Some of the wood burned was treated old wood from rafters that had tar on them. Now only well seasoned hard wood.

3. Ash inside manifold is extremely light and fluffy

4. No damage to the standard metal wire ties holding the riser together.

5. 1cm ash build up on lip of riser

We pretty much left all the ash as it is and only removed the ash which had settled on the lip of the riser. Figured it would act as added insulation and didn’t see it as an issue. (could be wrong)

Plan to keep burning as is and take the barrel off periodically to examine.

Have a look and please let us know what you think. Curious to know what the dragon is saying. Also, feel free to ask for more specifics if needed.

Thanks in advance, Peter and team

🛢🛢🛢
🔥🤔🔥
🛢🛢🛢

B84E4507-00DC-4148-ABE8-CC3E7B199D4F.jpeg
[Thumbnail for B84E4507-00DC-4148-ABE8-CC3E7B199D4F.jpeg]
Top off
08655313-3FB7-4A8B-841C-017751FC2A6F.jpeg
[Thumbnail for 08655313-3FB7-4A8B-841C-017751FC2A6F.jpeg]
D43F09CE-B43F-4087-ADAF-C09C52DA26DD.jpeg
[Thumbnail for D43F09CE-B43F-4087-ADAF-C09C52DA26DD.jpeg]
97D67F8F-D59F-43EC-9294-6041878949A9.jpeg
[Thumbnail for 97D67F8F-D59F-43EC-9294-6041878949A9.jpeg]
F85EA731-8A4C-47DA-9A16-C9A9FFF7FF42.jpeg
[Thumbnail for F85EA731-8A4C-47DA-9A16-C9A9FFF7FF42.jpeg]
9D57D664-FDD9-484B-B87D-76766F7578A0.jpeg
[Thumbnail for 9D57D664-FDD9-484B-B87D-76766F7578A0.jpeg]
Looking passed the side of the burn box at the transition into the start of the half barrel bench
B60B7E04-445A-428A-ACCA-B4456B446E87.jpeg
[Thumbnail for B60B7E04-445A-428A-ACCA-B4456B446E87.jpeg]
Into the bench
9FCC8E0F-2453-4B62-B111-79846A1D2DD9.jpeg
[Thumbnail for 9FCC8E0F-2453-4B62-B111-79846A1D2DD9.jpeg]
3cm or so of light ash
3D25D2A4-93A5-4FB2-93C6-8B81F11D658A.jpeg
[Thumbnail for 3D25D2A4-93A5-4FB2-93C6-8B81F11D658A.jpeg]
Outside of heat riser
4C7BBE83-CAE2-412A-8E72-3E2CC529370C.jpeg
[Thumbnail for 4C7BBE83-CAE2-412A-8E72-3E2CC529370C.jpeg]
Inside surface of burn barrel
2593B6F4-A701-465C-AF4A-98A9EEF559E3.jpeg
[Thumbnail for 2593B6F4-A701-465C-AF4A-98A9EEF559E3.jpeg]
Inside riser from the top down
E5174F81-F96F-4DCB-94C0-4764D1E3B601.jpeg
[Thumbnail for E5174F81-F96F-4DCB-94C0-4764D1E3B601.jpeg]
Ash on top of burn box
30D1C713-51CC-4076-BAD9-D1BA6001AE2F.jpeg
[Thumbnail for 30D1C713-51CC-4076-BAD9-D1BA6001AE2F.jpeg]
Vacuuming just the top edge
E3C7348C-D21B-4263-9CA0-A84A02E969FD.jpeg
[Thumbnail for E3C7348C-D21B-4263-9CA0-A84A02E969FD.jpeg]
Tape removed from burn barrel manifold seal
 
Gerry Parent
Rocket Scientist
Posts: 1812
Location: Kaslo, BC
525
building solar woodworking rocket stoves wood heat greening the desert
  • Likes 2
  • Mark post as helpful
  • send pies
    Number of slices to send:
    Optional 'thank-you' note:
  • Quote
  • Report post to moderator
The one area that would help to clean as well would be the inside surface of the barrel, unless you want it to radiate a little less heat into the room and more into the bench.
Otherwise, looks quite normal/healthy to me. Its nice that you have so much room to allow the ash to stay where it is so that there is no problems with it restricting draft.
 
gardener
Posts: 3471
Location: Southern alps, on the French side of the french /italian border 5000ft elevation
194
  • Likes 2
  • Mark post as helpful
  • send pies
    Number of slices to send:
    Optional 'thank-you' note:
  • Quote
  • Report post to moderator
Looking at the brownish color of the barrel's ashes. I would insulate a smidge more the heat riser.
 
Peter Sedgwick
pollinator
Posts: 464
Location: Toyoura Hokkaido
163
  • Mark post as helpful
  • send pies
    Number of slices to send:
    Optional 'thank-you' note:
  • Quote
  • Report post to moderator

Gerry Parent wrote:The one area that would help to clean as well would be the inside surface of the barrel, unless you want it to radiate a little less heat into the room and more into the bench.
Otherwise, looks quite normal/healthy to me. Its nice that you have so much room to allow the ash to stay where it is so that there is no problems with it restricting draft.


Cool Gerry!

Yeah, I as this is our first heater I don’t have anything to gauge it against. Glad to hear you think it looks normal. It seems to be functioning well. Like I said, we cleaned the ash of the lip of the heat riser. We haven’t noticed a difference in performance either way. Did notice however that the ash that has settled on the floor around the base of the manifold etc is substantial lighter and fluffier than the ash we clean out of the burn box everyday. Wasn’t really expecting it to be so light. Seems like would have a lot of insulation value if left undisputed. (In moderation I would imagine. Doesn’t look like very much is making its way deep inside the half barrel bench area, but hard to tell as I can only try to judge based on what I can see from the manifold side of the large transition hole.

Peter🤓
 
Peter Sedgwick
pollinator
Posts: 464
Location: Toyoura Hokkaido
163
  • Mark post as helpful
  • send pies
    Number of slices to send:
    Optional 'thank-you' note:
  • Quote
  • Report post to moderator

Satamax Antone wrote:Looking at the brownish color of the barrel's ashes. I would insulate a smidge more the heat riser.


Hey, Satamax,

Thanks for the input🛢🔬🛢

Happy to do that. Out of curiosity, what is it about the color that indicates that more insulation is a good idea?

Also, we have lots of perlite left over, so if I could use that, it would be great. Think I remember you and many others advising  to use “fire clay”. We have only used the clay soil, well sifted, from our property on the whole build so far. It seems to be holding up well inside the burn barrel.

Can we make a mix of perlite/our clay and use hardware cloth as a structural support to hold the mix?

Any other tips or advice would be extremely helpful.

Thanks in advance, Peter and family🙏🏼
 
thomas rubino
master rocket scientist
Posts: 6617
Location: latitude 47 N.W. montana zone 6A
3502
cat pig rocket stoves
  • Likes 3
  • Mark post as helpful
  • send pies
    Number of slices to send:
    Optional 'thank-you' note:
  • Quote
  • Report post to moderator
Hi Peter;  Regular clay mixed with perlite and formed with hardware cloth is fine, once you are out of the riser temperatures are moderate enough to not need fireclay.
 
Gerry Parent
Rocket Scientist
Posts: 1812
Location: Kaslo, BC
525
building solar woodworking rocket stoves wood heat greening the desert
  • Likes 3
  • Mark post as helpful
  • send pies
    Number of slices to send:
    Optional 'thank-you' note:
  • Quote
  • Report post to moderator

Peter Sedgwick wrote:Did notice however that the ash that has settled on the floor around the base of the manifold etc is substantial lighter and fluffier than the ash we clean out of the burn box everyday. Wasn’t really expecting it to be so light. Seems like would have a lot of insulation value if left undisputed. (In moderation I would imagine. Doesn’t look like very much is making its way deep inside the half barrel bench area, but hard to tell as I can only try to judge based on what I can see from the manifold side of the large transition hole. Peter🤓


The best way I explain it to myself through my observations is that the ash separates similar to a soil jar test. The heaviest stuff goes to the bottom and the lighter stuff settles at the top. Likewise, the densest ash stays in the burn box (different colour and texture) because its too coarse/dense to travel far (may be minerals?), and the lighter ash gets swept up the heat riser and settles gently at the base of the manifold, and then the really light stuff goes all the way up the chimney.
Down at the river adjacent to our property, I also notice this natural separation phenomena occurring with the rocks, gravel and sand. Oh how I love it when I can see the interconnectedness of how life operates!

The only other area that just came to mind that would be good to check is the horizontal pipe in your bell. I highly doubt there will be much ash in there seeing as its drawing from the opposite end of the bench but good for a thorough inspection.
At some point in time, look at the patterns on the floor of the bell. Sometimes there will be swirling patterns and places where it tends to accumulate more than others..... really cool and educational as like you said, we just have to learn to 'listen' to the ways in which our dragon speaks to us..... become a RMH whisperer!
 
Peter Sedgwick
pollinator
Posts: 464
Location: Toyoura Hokkaido
163
  • Likes 1
  • Mark post as helpful
  • send pies
    Number of slices to send:
    Optional 'thank-you' note:
  • Quote
  • Report post to moderator
Great way to put it Gerry.

Super easy to understand your explanation of what’s happening. Lightest particles rising to the top and settling last.

So the light ash is what’s known as “fly ash” is that correct? I hear this term used quite a bit. I even read about it being used for the replication of Roman Concert and in other recipes for geopolymers etc.

At present, our system does not appear to be producing dangerous levels of creosote it’s safe to say? Anything we should watch out for?

The drippy brown stuff that showed up on the exit flue before does not seem to be getting any worse. I cleaned the original build up off after taking the photo we posted about a month ago. Since then nothing has reappeared.

Will probably try to inspect the end of the horizontal flue pipe, near the end of the half barrel in the spring. It’s a long ways away from the manifold so feel there is little chance of any dangerously high levels of ash rapidly accumulating any time soon.

Will keep posting and updating.

Thanks again, Peter and family...
🛢🔥🛢
Hokkaido-sunrise.jpeg
Hokkaido sunrise
Hokkaido sunrise
 
Gerry Parent
Rocket Scientist
Posts: 1812
Location: Kaslo, BC
525
building solar woodworking rocket stoves wood heat greening the desert
  • Likes 4
  • Mark post as helpful
  • send pies
    Number of slices to send:
    Optional 'thank-you' note:
  • Quote
  • Report post to moderator
To me, the linguistics of the term "fly ash" would mean ash that flies, but when I looked it up, there is another description: fly ash Not sure if it has to be ash from burning coal or if it can also be from wood?
I know Donkey (Kirk Mobert) has used quite a bit in his builds (as well as for a mortar). I have used it some too but don't have enough experience to say how well it performs.

Also, have you checked your vertical exhaust pipe for the amount of 'fuzz' coating that might be on there?

As I think Thomas pointed out earlier, the brown drippies that come out of the pipe are mostly from the bench drying out and will go away when it dries out completely as you have witnessed. As for creosote buildup, I don't think you have any concern. I don't think the fuzz counts as creosote. The thicker black tar-like substance that will still burn if ignited is at least my definition of what creosote is.
 
Peter Sedgwick
pollinator
Posts: 464
Location: Toyoura Hokkaido
163
  • Mark post as helpful
  • send pies
    Number of slices to send:
    Optional 'thank-you' note:
  • Quote
  • Report post to moderator

Gerry Parent wrote:To me, the linguistics of the term "fly ash" would mean ash that flies, but when I looked it up, there is another description: fly ash Not sure if it has to be ash from burning coal or if it can also be from wood?
I know Donkey (Kirk Mobert) has used quite a bit in his builds (as well as for a mortar). I have used it some too but don't have enough experience to say how well it performs.

Also, have you checked your vertical exhaust pipe for the amount of 'fuzz' coating that might be on there?

As I think Thomas pointed out earlier, the brown drippies that come out of the pipe are mostly from the bench drying out and will go away when it dries out completely as you have witnessed. As for creosote buildup, I don't think you have any concern. I don't think the fuzz counts as creosote. The thicker black tar-like substance that will still burn if ignited is at least my definition of what creosote is.


Thanks for that Gerry.

Did a bit of searching myself. Found this video.

Link:  


Listening to it on the way to the mountain this morning. This guy’s explanation is fantastic and his tone of voice just makes you want to like him.

Think there are a great number of takeaways here that could really benefit the sustainable natural building process.

If you have a bit of time have a listen.

Cheers, Peter
 
Peter Sedgwick
pollinator
Posts: 464
Location: Toyoura Hokkaido
163
  • Likes 3
  • Mark post as helpful
  • send pies
    Number of slices to send:
    Optional 'thank-you' note:
  • Quote
  • Report post to moderator
House, in the near by town, went up yesterday because someone put some winter clothing, to dry, too close to their karosene heater.

Bit of a wake up call. Really have to be careful.

Peter🙏🏼
EBCFA18F-AB17-43BE-86D1-376D65FB3F7F.jpeg
[Thumbnail for EBCFA18F-AB17-43BE-86D1-376D65FB3F7F.jpeg]
0B9429FF-3397-4EF7-97F1-738E7D448150.jpeg
[Thumbnail for 0B9429FF-3397-4EF7-97F1-738E7D448150.jpeg]
DCD6DD03-69BC-45ED-A40E-832CD11249B7.jpeg
[Thumbnail for DCD6DD03-69BC-45ED-A40E-832CD11249B7.jpeg]
 
Satamax Antone
gardener
Posts: 3471
Location: Southern alps, on the French side of the french /italian border 5000ft elevation
194
  • Likes 1
  • Mark post as helpful
  • send pies
    Number of slices to send:
    Optional 'thank-you' note:
  • Quote
  • Report post to moderator

thomas rubino wrote:Hi Peter;  Regular clay mixed with perlite and formed with hardware cloth is fine, once you are out of the riser temperatures are moderate enough to not need fireclay.

Perfect advice from Thomas. Tho, i would use a tube myself, to hold the mix.
 
Peter Sedgwick
pollinator
Posts: 464
Location: Toyoura Hokkaido
163
  • Likes 6
  • Mark post as helpful
  • send pies
    Number of slices to send:
    Optional 'thank-you' note:
  • Quote
  • Report post to moderator
Hangin out on our RMH. Finally got a chance to finish these hand painted kicks, just in time for the holidays. Keep kickin...

Peter🕊👣🕊
hand-painted-kicks.jpeg
hand painted kicks
hand painted kicks
 
Peter Sedgwick
pollinator
Posts: 464
Location: Toyoura Hokkaido
163
  • Likes 2
  • Mark post as helpful
  • send pies
    Number of slices to send:
    Optional 'thank-you' note:
  • Quote
  • Report post to moderator
Thought of the day,

Legend has it, Pablo Escobar once torched $2 million in crisp USD banknotes just to keep the family warm. Probably would have saved a few bucks if he had know about rock mass technology.

Happy New Years! Keep warm...🔥🤓🔥
0CA7BD0E-7E30-4B35-AE4C-822D4BCC2C4A.jpeg
[Thumbnail for 0CA7BD0E-7E30-4B35-AE4C-822D4BCC2C4A.jpeg]
 
Peter Sedgwick
pollinator
Posts: 464
Location: Toyoura Hokkaido
163
  • Likes 4
  • Mark post as helpful
  • send pies
    Number of slices to send:
    Optional 'thank-you' note:
  • Quote
  • Report post to moderator
Aloha people of permies!
Hope you had a safe and happy winter. It’s been a while since I’ve been on here, so I thought I’d give a bit of an update with what’s happening with us and our rocket mass adventure.

Work and life took us away from the house for the duration of January, February and most of March, so really didn’t have a chance to use our new heater as planned. Only got back to the house once on my own in late January to check the snow on the roof. Spent one night by myself. It was probably around-10C that night. Had to close down all the rooms except for the one with the bench in it. Slept on the heater and lite the fire twice friends the night. Bench stayed warm and was relatively comfortable with a few blanket on top of me. Even though we hadn’t used the stove in about a month it lite up first try just fine. Draft was not a problem with our half barrel bell bench system.

We have been back at the house now for about 10 days now. Heater is working great and as the temperatures warm up we are able to open up more rooms and still keep the house a relatively comfortable temperature.

I believe that the 6 in system would be a great in a slightly more well insulated building. It’s really the insulation that’s holding it back at this point. Having said that, we are really noticing the benefits of the radiant heat coming from the bench now that it’s not battling the arctic cold of winter. Coldest it’s been in the past few nights is around -4C
Day time temp around 6C to 10C.

As the temperature gets milder it’s giving use some freedom to start working on our build again. Will keep periodically updating with photos and description of what we are doing and how it develops.

In recent weeks the landscape of our global situation is rapidly changing. We just want you all to know that we are in a good, safe place, and thanks to all of you who supported us thought the process of our build, we are confident that our heating source will continue to serve us well through everything. (No batteries required)

Planting blueberries and getting ready for spring.

Stay safe, stay smart!
Peter, Mimi & Chimchanga...
🌏🧠🌏
85074258-12BE-4C54-AD0F-9ADE60FBDB77.jpeg
RMH ROOM A WEEK AGO
RMH ROOM A WEEK AGO
0C4211DD-C2A3-47FE-8AF8-12FD76D4E5C9.jpeg
MIMI AND THE GIRLS OUT FOR A WALK AT THE TOWN PARK
12468E93-DF0B-4DF6-BD1A-33D14EF8C194.jpeg
WORKING ON THE FLOOR
4EF78C7F-1385-4864-BC79-DC1BE57CD082.jpeg
NO BATTERIES
NO BATTERIES
21DCFE5E-2DE2-4072-A29B-1B839BBB3FFF.jpeg
NEW BLUEBERRIES AND HONEYSUCKLE BERRY BUSHES
 
Rocket Scientist
Posts: 807
Location: Guernsey a small island near France.
305
  • Likes 2
  • Mark post as helpful
  • send pies
    Number of slices to send:
    Optional 'thank-you' note:
  • Quote
  • Report post to moderator
Nice to have you back and posting again!
 
Gerry Parent
Rocket Scientist
Posts: 1812
Location: Kaslo, BC
525
building solar woodworking rocket stoves wood heat greening the desert
  • Likes 2
  • Mark post as helpful
  • send pies
    Number of slices to send:
    Optional 'thank-you' note:
  • Quote
  • Report post to moderator
Great to have you back Peter! Nice to hear that all is well with you and the family and that your keeping warm.
 
Peter Sedgwick
pollinator
Posts: 464
Location: Toyoura Hokkaido
163
  • Likes 4
  • Mark post as helpful
  • send pies
    Number of slices to send:
    Optional 'thank-you' note:
  • Quote
  • Report post to moderator
Hey guys, here’s another update of what we’ve been getting up to in the past few days with our build. It’s starting to come together. Been working on sculpting the forms of the bench, feed chamber and filling in around the back of the manifold.

We backfilled all the area behind the manifold with mostly river rocks from the near by river and the rocks sifted from our on property clay soil. Then cover that with a few coats of cob/earthen plaster.

As we’ve been working I’ve come to realize that so much naturally building is about processing materials. It’s almost like prepping ingredients for a meal in a way. The same ingredients can be used in so many different ways. It all depends on how finely you dice and chop them. You can make salads and soups with pretty much the same things. It all depends on what your going for.

Was having a bit of an issue with the sand we bought. Felt like the grains were too big. I remembered my father mentioning “stone dust” as being great for mixing concrete. Thought to myself “where am I gonna get that?” Then I looked at the pile of road base we had left from our foundation build. The winter snow had melted and in the warm rays of the sun there were dry peaks of dusty stone powder sitting on top of all the rocks. I figured if I ran them through a fine sieve I should get “stone dust”. 20 minutes later I had a 20 liter bucket filled to the top with the dust I was looking for. Point being, I didn’t need to go out and buy new material, just had to look at the materials that were in front of me and see where the answer was.

I have a feeling this approach may be useful for finding solutions for building in the coming months, as availability and access to materials may prove more difficult and risky to get.

Here’s a look at the mix we’ve been using in the past week. Basically a 20 liter bucket of sifted dry stone dust, one 20 liter bucket of sifted clay soil (from the property) half a medium box of finely chopped rice straw, half of a large sauce pan of cooked white flour wheat paste, and a medium salad bowl of sifted fire ash (from our RMH burn box)

The measurements are not exact, so I’m attaching some photos so everyone can get a better idea of what the proportion look like. We are letting the coats dry naturally as much as we can, so not running the stove right now. It’s a bit cold, but think it’s best to avoid cracking. Laying each layer down at about 1” thick and adjusting to create smooth and uniform shapes. Will keep you posted on how we go. May take off the burn barrel again soon to clean the ash from inside. Then use a mixture of the finer ash and clay with wheat paste to finish everything. Plan to use linseed to seal when everything is complete dry.

Not sure if our recipe is perfect, but it seems be working thus far. Any thoughts or advice is alway welcome. For us now it’s not about having a picture perfect finish, but more about learning to work with the materials we have, become more comfortable with them, and mastering techniques with tools we have available to us.

On another note, I was moving 20 liter buckets of dry sand the other day and almost pulled my back out. Made me think. This is not a good time to get injured. We don’t know what’s coming and we need to stay healthy and fit. We have lots of time. So just fill up half the bucket and move the same amount of sand in two trips. Time is something we can afford right now.

Just food for thought.

Stay healthy, happy and let’s keep learning.

Peter, Mimi and Chimichanga
🌎🙏🏼🌎
1FC06204-D561-448F-961E-51F41AB66C2B.jpeg
[Thumbnail for 1FC06204-D561-448F-961E-51F41AB66C2B.jpeg]
FBEB1D0F-4650-4377-8D9F-8FCBF529E7B8.jpeg
[Thumbnail for FBEB1D0F-4650-4377-8D9F-8FCBF529E7B8.jpeg]
2100E667-6309-486E-B8BD-253ABB05411D.jpeg
[Thumbnail for 2100E667-6309-486E-B8BD-253ABB05411D.jpeg]
AD27ED2D-B881-4308-9BC4-41CC3A9C0E3A.jpeg
[Thumbnail for AD27ED2D-B881-4308-9BC4-41CC3A9C0E3A.jpeg]
4685B9D8-1F56-4495-9937-B7B7F1D4F28A.jpeg
[Thumbnail for 4685B9D8-1F56-4495-9937-B7B7F1D4F28A.jpeg]
69F69BBD-5C85-4364-9A64-C86948097D90.jpeg
[Thumbnail for 69F69BBD-5C85-4364-9A64-C86948097D90.jpeg]
86150910-2856-47C0-AA4D-C741218B67A5.jpeg
[Thumbnail for 86150910-2856-47C0-AA4D-C741218B67A5.jpeg]
C5070B6A-3D2B-4E22-8E13-8F6B630623EE.jpeg
[Thumbnail for C5070B6A-3D2B-4E22-8E13-8F6B630623EE.jpeg]
1CD9DCF3-6A78-45C2-9298-EE089F0E081D.jpeg
[Thumbnail for 1CD9DCF3-6A78-45C2-9298-EE089F0E081D.jpeg]
68C66191-6111-47B8-AC57-2F1D548A9CE3.jpeg
[Thumbnail for 68C66191-6111-47B8-AC57-2F1D548A9CE3.jpeg]
23AEA297-E7A4-47E4-AE31-FF5E182D5C16.jpeg
[Thumbnail for 23AEA297-E7A4-47E4-AE31-FF5E182D5C16.jpeg]
07CFAD3C-1BEA-4CF0-BDD6-80840440985B.jpeg
[Thumbnail for 07CFAD3C-1BEA-4CF0-BDD6-80840440985B.jpeg]
98C37FDA-5E39-4767-A9C7-5D19C778DBB9.jpeg
[Thumbnail for 98C37FDA-5E39-4767-A9C7-5D19C778DBB9.jpeg]
 
Gerry Parent
Rocket Scientist
Posts: 1812
Location: Kaslo, BC
525
building solar woodworking rocket stoves wood heat greening the desert
  • Likes 2
  • Mark post as helpful
  • send pies
    Number of slices to send:
    Optional 'thank-you' note:
  • Quote
  • Report post to moderator
Your a very resourceful person Peter, and its very nice that you take the time to share what you've learned with the rest of us to help point out the fact that there are always more than one way to do things.

As you may know, last week I finished the final coat on my batch box around the core and lit it up right away. Since the core has a layer of rock wool insulation around it, the heat is not intense so the drying only took a total of 3 days with not a single crack to date and quite certain that's the way it will stay. I'm sure anywhere else on the bench (except maybe the manifold which gets much hotter) would have been the same. Since this is not your final layer anyway, a little cracking is no big deal but it does give you a good idea of how your ratios will turn out and be tweaked again if needed for the final layer. As a suggestion, if your still a bit concerned with cracking, you could just lite little fires just to get things warmed up and speed up the drying process.

The linseed oil is not absolutely necessary (especially if you don't already have it and want to continue with the low resources theme) perhaps only needed around the high traffic areas you need more surface strength. I'm going to try it around my door opening inside the stove as this area is getting pretty beat up from the heat and wood dings.

Glad you are keeping an eye on your health. That's the one big thing a quarantine can teach us, is to slow down and learn to enjoy whats around us.


Peter Sedgwick
pollinator
Posts: 464
Location: Toyoura Hokkaido
163
  • Likes 2
  • Mark post as helpful
  • send pies
    Number of slices to send:
    Optional 'thank-you' note:
  • Quote
  • Report post to moderator
Took your advice Gerry and we have been burning all day. Probably more that you suggested. We are getting some cracking, but it seems to be happening along the edge of the rocks that are under the new clay based plaster layer. Nothing too drastic I feel. Will patch them up before we decide to put a final finish coat on.

We have 18 liters of linseed oil that we bought earlier last year so we have more than enough to do this room probably ten times over. Not the eco vegan friendly type I believe so won’t be oiling anytime soon.

Here are some more images of our build from yesterday. Weather keeps changing so we have to adjust our schedule accordingly, but all is coming along and it’s beginning to feel more like a room and less like a cave. Looking forward to finish this one up. So much more to do around here and as we are isolating more and more we will have to reevaluate what makes sense for us to do next.

Also had a look in the chimney from the roof. Here’s what I found. Doesn’t seem to be all that much in the way of build up, but please let us know if anything looks suspicious.

Cheers, Peter and family...🐕👨🏻‍🦱👩🏻🐕
465FDE06-3ED6-4BE2-B029-36C08C7253BD.jpeg
[Thumbnail for 465FDE06-3ED6-4BE2-B029-36C08C7253BD.jpeg]
49D0ACBB-FF6B-43B9-B98F-767BE960BB57.jpeg
[Thumbnail for 49D0ACBB-FF6B-43B9-B98F-767BE960BB57.jpeg]
8F812C7B-B3BB-4F8B-8B7D-82A5978E6818.jpeg
[Thumbnail for 8F812C7B-B3BB-4F8B-8B7D-82A5978E6818.jpeg]
54B9376C-455C-491D-ADD0-2C6C1E26C685.jpeg
[Thumbnail for 54B9376C-455C-491D-ADD0-2C6C1E26C685.jpeg]
A8A59AFE-005E-45BF-A074-F936BD78283F.jpeg
[Thumbnail for A8A59AFE-005E-45BF-A074-F936BD78283F.jpeg]
E19A6302-E365-413A-97B9-74F15FDD69A5.jpeg
[Thumbnail for E19A6302-E365-413A-97B9-74F15FDD69A5.jpeg]
0FE0BF7B-DC17-45C0-81D3-4073FC251F6A.jpeg
[Thumbnail for 0FE0BF7B-DC17-45C0-81D3-4073FC251F6A.jpeg]
 
Gerry Parent
Rocket Scientist
Posts: 1812
Location: Kaslo, BC
525
building solar woodworking rocket stoves wood heat greening the desert
  • Likes 2
  • Mark post as helpful
  • send pies
    Number of slices to send:
    Optional 'thank-you' note:
  • Quote
  • Report post to moderator
Your plastering looks great! Clean cut and simple.  

The 2 pictures of the black crust look like creosote to me. Perhaps there was a time where you were experimenting or burning some wet wood for a short while that caused it to form.
It never gets hot enough where it is to be burnt off, so it just hangs out like a growth ring in a tree indicating the history of the burning. A good thing to take note of so that future burns are not adding to problem and possibly forming in areas where you can't get to clean.
 
Peter Sedgwick
pollinator
Posts: 464
Location: Toyoura Hokkaido
163
  • Likes 1
  • Mark post as helpful
  • send pies
    Number of slices to send:
    Optional 'thank-you' note:
  • Quote
  • Report post to moderator
Roger that Gerry!

There only seems to be a small amount around the top of the inside of the chimney. Not anything major. Just a few crumbs. I will take off the cap later on in the week and have a proper look.

Here are some images of the surface as the bench is drying now.

Also a cover I’m working on for the feed tube when the heater is not being used. Just some old rusty metal stuff I found laying around. Probably drill holes in the bottom side of the plate and then spot weld the bolt on so the connection is clean.

Will keep you posted.

Cheers and thanks again, Peter

591665CE-2984-4BBA-85CE-CDA71577D415.jpeg
[Thumbnail for 591665CE-2984-4BBA-85CE-CDA71577D415.jpeg]
2A575A7D-701B-4FD2-B3CD-FCD443AA9DD3.jpeg
[Thumbnail for 2A575A7D-701B-4FD2-B3CD-FCD443AA9DD3.jpeg]
A4B4FF5E-3599-4357-9436-0C308E675ECF.jpeg
[Thumbnail for A4B4FF5E-3599-4357-9436-0C308E675ECF.jpeg]
9B5708BB-E68F-43A5-BC06-1EF7E4118957.jpeg
[Thumbnail for 9B5708BB-E68F-43A5-BC06-1EF7E4118957.jpeg]
4C2D84DF-2A1D-439C-908B-F9B96663DE76.jpeg
[Thumbnail for 4C2D84DF-2A1D-439C-908B-F9B96663DE76.jpeg]
584D656F-D198-471F-9595-42863464F384.jpeg
[Thumbnail for 584D656F-D198-471F-9595-42863464F384.jpeg]
C19FAC1C-8654-43E0-AA1A-BBBDD9A39D13.jpeg
[Thumbnail for C19FAC1C-8654-43E0-AA1A-BBBDD9A39D13.jpeg]
 
Gerry Parent
Rocket Scientist
Posts: 1812
Location: Kaslo, BC
525
building solar woodworking rocket stoves wood heat greening the desert
  • Likes 2
  • Mark post as helpful
  • send pies
    Number of slices to send:
    Optional 'thank-you' note:
  • Quote
  • Report post to moderator
The best time to fill those cracks would be when they are at their warmest and therefore their widest due to expansion - Dampen down and smear some loose clay/sand into them. Some may come back (again and again) so sometimes its not a perfect fix. Just consider those persistent ones natural expansion joints or dragon wrinkles. Adds character!

Nice retro cap you made. Earth, fire, water, air, and now metal (along with your P-channel). Makes your creation elementally complete.
 
Peter Sedgwick
pollinator
Posts: 464
Location: Toyoura Hokkaido
163
  • Likes 3
  • Mark post as helpful
  • send pies
    Number of slices to send:
    Optional 'thank-you' note:
  • Quote
  • Report post to moderator

Gerry Parent wrote:The best time to fill those cracks would be when they are at their warmest and therefore their widest due to expansion - Dampen down and smear some loose clay/sand into them. Some may come back (again and again) so sometimes its not a perfect fix. Just consider those persistent ones natural expansion joints or dragon wrinkles. Adds character!

Nice retro cap you made. Earth, fire, water, air, and now metal (along with your P-channel). Makes your creation elementally complete.


Thanks for that Gerry!

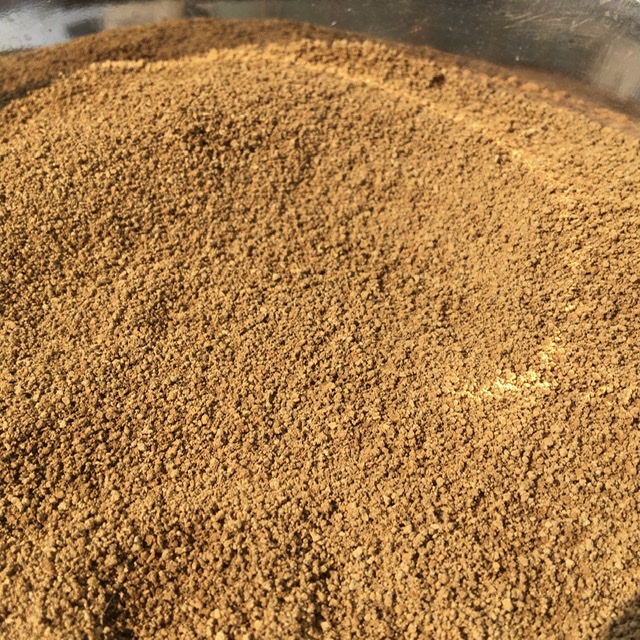
Did a bit of bondo work on the cracks. Seem to be holding up pretty well. Really refined the plaster mix down to the finest mesh screen I could find. Using more or less a one to one ratio on the clay soil to stone dust mix. Adding 25% of that initial mix worth of wheat paste to the mix and then about another 25% of finely sifted ashes.

Experimenting a bit with Chimichanga hair in the mix as well. That seems to be helping with the tinsel strength. Most of the cracks are holding. Really trying to use the crack patch exercise as a chance to work out the best proportions of ingredients for a finish plaster mix. Not too much dusting but would like to eliminate dusting all together if possible. Any suggestions or insight would be much appreciated.

Could add slaked lime to the finished mix. Could finish with linseed oil. The only thing that makes me hesitant on those two options is that it seems like a one time deal. As in once you do it you can’t go back. With the clay based plaster we have now I can always reapply new layers and adjust. That won’t be the case if we use lime or seal with oil correct?

Here are more images of what we’ve been doing and a few other odds and ends of stuff I’ve made for tools etc.

Working on some new projects and stuff outside as the weather gets warmer. Will open a new tread soon as we look for creative ideas and ways to grow the space here.

Hope everyone is healthy and well.

Cheers, Peter, Mimi and Chimichanga...

🌍🙏🏼🌏

 
942BD5F5-C41F-4C67-87D3-584D59FFB269.jpeg
Sifted test sample materials
0FA18C78-B9DE-4175-BCA2-3BA14332C4CB.jpeg
Sifted stone dust
Sifted stone dust
875C09CD-1E5B-4449-8F79-D35683D8CF3C.jpeg
Finally shifted clay soil from site
6794DAF2-9936-4838-9190-B77BD234F4DF.jpeg
First test mix
First test mix
DFCAC3E3-9118-45A1-88E3-C575A3528FDA.jpeg
Sample of crack fill
193169EB-96C0-457F-A7A5-EA42C02D1EEA.jpeg
Chimichanga hair
Chimichanga hair
37AB783D-7053-4FC3-BF33-2CB8CD31FACA.jpeg
[Thumbnail for 37AB783D-7053-4FC3-BF33-2CB8CD31FACA.jpeg]
75595EA0-526E-49D0-9CAF-F261BD6DDBAB.jpeg
Reworking area around entrance
6DBC3BBD-5089-4864-89FC-48FC4A5F8C41.jpeg
All patched up
All patched up
AA9E4FE5-4674-4196-A897-33256A8310CA.jpeg
Some use for patching tools
BA2EAFDB-53D7-40F2-9826-2BA5DC947385.jpeg
Homemade wire whisk
Homemade wire whisk
DF6FABA8-EF20-4090-BA6E-CB789C15301C.jpeg
[Thumbnail for DF6FABA8-EF20-4090-BA6E-CB789C15301C.jpeg]
ABDAD2C3-6704-4EED-841D-0FF6C3429BDE.jpeg
[Thumbnail for ABDAD2C3-6704-4EED-841D-0FF6C3429BDE.jpeg]
67DE8B13-E645-4360-B7AB-3426B78BAAFC.jpeg
Still working on shaping
 
Gerry Parent
Rocket Scientist
Posts: 1812
Location: Kaslo, BC
525
building solar woodworking rocket stoves wood heat greening the desert
  • Likes 3
  • Mark post as helpful
  • send pies
    Number of slices to send:
    Optional 'thank-you' note:
  • Quote
  • Report post to moderator

Peter Sedgwick wrote:Experimenting a bit with Chimichanga hair in the mix as well. That seems to be helping with the tinsel strength. Most of the cracks are holding. Really trying to use the crack patch exercise as a chance to work out the best proportions of ingredients for a finish plaster mix. Not too much dusting but would like to eliminate dusting all together if possible. Any suggestions or insight would be much appreciated.


The man may provide much of the outer strength to a household, but the female often provides an inner strength which holds the household together in more ways than one! One not more important than the other but together creating balance. You 'guys' work great together as a team that is inspiring to see! Keep up the great work!

When you say "dusting" do you mean that when you wipe your hand across the dry surface, you are get a small film of the render left on your fingers?

Peter Sedgwick wrote:Could add slaked lime to the finished mix. Could finish with linseed oil. The only thing that makes me hesitant on those two options is that it seems like a one time deal. As in once you do it you can’t go back. With the clay based plaster we have now I can always reapply new layers and adjust. That won’t be the case if we use lime or seal with oil correct?


I've torn down a few of my creations that have had linseed oil on them and was able to break them up into chunks (with more effort needed than regular dried cob) and somewhat resisted rehydrating in water but were still usable for rough cob work. With that experience, I would say that linseed oil still falls into the reuse and modifiable category.
I have very little experience with lime though. When I plastered my core a week or so ago, I did a section on the side with lime added to the mix so I won't know how it behaves until some future excavation work is done. However, I could see if a person was determined enough that the lime layer could be broken up and put into a kiln and then re-slaked for re-use perhaps.

I love your DIY mixer paddle! You get an A+ for creativity and resourcefulness.


Peter Sedgwick
pollinator
Posts: 464
Location: Toyoura Hokkaido
163
  • Likes 2
  • Mark post as helpful
  • send pies
    Number of slices to send:
    Optional 'thank-you' note:
  • Quote
  • Report post to moderator
Thanks again Gerry!

You always have amazing insight, and we really appreciate your due diligence when it comes to all things eco and rocket and ladies. You must have been a bartender in a past life...🥳


More than anything I was hesitant about using the oil only because I have read it’s difficult to get subsequent layers of new cod to adhere to oiled surfaces.

On another note I have also read of people adding small amounts of oil to their wet mix. Also evaporated milk. Any idea what that would do?

I’ve be adding about 20%-25% of the total clay & sand mix volume in wheat paste to our mix. Do you have any suggestions on how much to add?

We are building and working around the heater all the time so the room is pretty dry. I have heard of concern that the wheat paste can act as food for mold spores. Been adding a bit of borax to our mix just to be safe. Any thoughts on this subject?

Found a bit of mold spores on some of our rice straw we had stored from last fall. We stored the bundles in the leftover plastic perlite bags that we had. The bags are thick and resistant to being punctured by the sharp ends of the straw. The bags were left top end open to breath. Some of the straw that we did not have enough bags for sat on the back tatami mate floor all winter.

One thing that is interesting and might be of use is that we noticed that all the straw that was stood upright, not laying on its side, did not develop any mold, regardless of weather it was in a bag or not.

The stuff that did have a bit of mold I decided to boil in hot borax water and see if that would help. The second reason for boiling the cut straw was to see if it might make the straw a bit more flexible during the layup process. Kindly like the difference between uncooked and cooked pasta.

Didn’t see much difference in ease of layup with the boiled rice straw. Pieces still had a tendency to stag on the trowel when spreading.

The closer we get to a finish layer the less straw I want “poking out”. Came to the conclusion that the finer the finish you are going for the more you have to crush and brake up the straw. In the newest layer on the bench we have only used the top half of the rice straw stalks. This part is thinner and more flexible than the base portion.

Tried using a home wood mulcher to speed up the cutting process, but the dry rice stalks are too thin. After about 5 minutes of use, the stalks get wrapped around the blade axle and build up to the point that it jams the motor.

None of this is a massive problem right now. I just want to keep experimenting with materials and recipes so that we feel confident with different mixes needed for different applications in the future. Base layer with straw is not a problem. Maybe finish layer with dog hair. Looking for a mid layer application fiber that will be finer than straw and still not overly time consuming to process. Don’t have access to cattails locally. Can get rice hulls in vast quantity. Might try those. (Probably in future wall applications)

Much more to share but will leave it at that for now. Any experience or interesting insight would be much appreciated.

Thanks in advance,
Peter and family...🌞👨🏻‍🌾👩🏻‍🌾🌞


3F723B81-9368-4D5D-9E5F-1FC12A130C6D.jpeg
[Thumbnail for 3F723B81-9368-4D5D-9E5F-1FC12A130C6D.jpeg]
0C253E9D-7E5F-45CB-AEFC-91D5DFF760A3.jpeg
[Thumbnail for 0C253E9D-7E5F-45CB-AEFC-91D5DFF760A3.jpeg]
C3919F5E-F6CF-4D1F-869A-B67D8461C5F5.jpeg
[Thumbnail for C3919F5E-F6CF-4D1F-869A-B67D8461C5F5.jpeg]
C6F83716-C029-42CD-BCA8-818B26940532.jpeg
[Thumbnail for C6F83716-C029-42CD-BCA8-818B26940532.jpeg]
 
Gerry Parent
Rocket Scientist
Posts: 1812
Location: Kaslo, BC
525
building solar woodworking rocket stoves wood heat greening the desert
  • Likes 2
  • Mark post as helpful
  • send pies
    Number of slices to send:
    Optional 'thank-you' note:
  • Quote
  • Report post to moderator
Actually, for 4 years I owned a juice bar where I met lots of interesting people, listening to to their stories, giving advice and sharing ideas that (we thought) were going to change the world.
Each time the mailman came in (my best daily customer), we'd shout out "JIIIIIMMMMM"!  (I never did have any customers named Norm so I had to improvise).

As far as adding subsequent layers of cob over an already oiled and smooth surface, a claw hammer can make quick work of roughening it up and be good to go in a relatively short time.
Not too long ago while splitting some wood on my earthen floor (coated with linseed oil) in the shop, the axe sunk into the surface about 1/2". Whoops! A little roughening around the wound and a blob of cob fixed it up real good. Also, I added another layer of cob onto my bench years back (again coated with oil) and it has adhered quite nicely. Roughening the surface, cleaning the dust off, wetting it down good, applying a thin layer of clay slip (optional but acts like extra glue), then pressing in the cob to help it seep into all the little nooks and crannies for best bonding is what I found to work really well for me.

I don't have any experience with adding the oil to the wet mix before applying it but sounds like it would work. Only thing I can see is that it wouldn't be as strong as its diluted down quite a bit and not have all its strength right on the very surface where its needed the most. If you mixed some oil in on a final thin layer, then also applying it neat, you probably would have a super strong surface. Just guessing here though.
Have heard of the powdered milk thing but can't remember why or what it does. Perhaps the casein in the milk acting as a glue? Similar to what the wheat paste does? Heck, sounds like a job for a scientist!

Quantities of wheat paste are always added in splashes for me. I just know by the look and feel when enough is enough. When the mix feels somewhat like dough and spreads 'oh-so-nice', I know its there.
Perhaps if I was rendering a whole house or work for a client, I would come up with a more accurate figure but it works for me so that's what flies.

Just as wet cob with any kind of organic matter in it can start to decompose if left wet for too long (each climate is different) so can wheat paste. In fact, I know from experience that if you don't use it right away it spoils very quickly. Drying your cob is the best defence against this, but not too fast (as you know), cracks can increase in quantity and severity. I've never used borax but it never can hurt.

Thanks for the tips on the boiled rice straw. As your learning, the more closer you get to the surface layer you get, the more refined the ingredients need to be. Make the final layer so that it makes you want to dip your finger into it to see how it tastes! That's how you know you've got it right.

I've got a very small wood mulcher that I used for the same purpose too. What I found to help prevent it wrapping around the motor shaft is to pre-cut the length to maybe 6" before feeding it to the chipper.
A lawn mower does a pretty good job too. For small jobs, I have also used a blender set aside for this and mushroom spore slurries.

Good day and good luck my friend   :)
 
Peter Sedgwick
pollinator
Posts: 464
Location: Toyoura Hokkaido
163
  • Likes 2
  • Mark post as helpful
  • send pies
    Number of slices to send:
    Optional 'thank-you' note:
  • Quote
  • Report post to moderator
Great points Getty, thanks!

Will give that stuff a try and report back with findings. Probably start a new batch tomorrow and work out a layer for the stairs and possibly the floor. Can’t do everything at once as we still need to be able to access and use our stove during the minimal 3 days of drying.

Will likely add more fire ash to the mix as well. I’ve been doing some research and there was an interesting piece on ash based natural cement on YouTube from Primitive Technology


As well as a tread from a while back on Donkey’s

https://donkey32.proboards.com/thread/233

Processing lots of fire ash the past few days.
Will keep testing and posting.

Thanks again for all your help.

Cheers, Peter

B5FF3966-9589-4A11-88F0-5290F93E1637.jpeg
[Thumbnail for B5FF3966-9589-4A11-88F0-5290F93E1637.jpeg]
 
Peter Sedgwick
pollinator
Posts: 464
Location: Toyoura Hokkaido
163
  • Likes 2
  • Mark post as helpful
  • send pies
    Number of slices to send:
    Optional 'thank-you' note:
  • Quote
  • Report post to moderator
Here’s a dumb and dangerous idea from someone who’s trying to find a way to quickly cut and process straw for earthen plaster. Idea abandoned. Parental discretion advised, don’t try this at home...🙏🏼
AE1B4DB1-3FBA-430A-9C36-7AB0272F6997.jpeg
[Thumbnail for AE1B4DB1-3FBA-430A-9C36-7AB0272F6997.jpeg]
 
thomas rubino
master rocket scientist
Posts: 6617
Location: latitude 47 N.W. montana zone 6A
3502
cat pig rocket stoves
  • Likes 3
  • Mark post as helpful
  • send pies
    Number of slices to send:
    Optional 'thank-you' note:
  • Quote
  • Report post to moderator
Thanks for sharing that Peter!
Lets others know that we all, are less than perfect.
Hopefully no one else will try building "Peter's homemade finger guillotine".... ahh ,straw cutter : )

Your build is looking outstanding! Keep up the good "safe" work!
Keep your pictures and finish ideas coming!
 
Peter Sedgwick
pollinator
Posts: 464
Location: Toyoura Hokkaido
163
  • Likes 1
  • Mark post as helpful
  • send pies
    Number of slices to send:
    Optional 'thank-you' note:
  • Quote
  • Report post to moderator
Yeah for sure Thomas.

I make mistakes all the time, some of that make me laugh, hopefully none of them get me hurt. But keep trying to improvise and come up with new solutions they are both cost-effective and time efficient.

On a lighter note, I started to clear out some of the dead branches on the trees around the property. What I found is that surprisingly enough, is a battery powered Sawzall, an axe and a hatchet seem to be enough to process the type of wood used in a J tube style RMH. Don’t think you really need to have a chainsaw to get what you need from relatively small diameter timber. A few blades and a few charged batteries should get the job done and is much safer and less cumbersome than a gas chainsaw.

Correct me if I’m wrong, but I think that should be useful information for people reluctant to processing their own wood out of fear I’ve been injured.

Here’s a photo of a pile of wood I cut up yesterday. Ready to split and dry.

Easy for Mimi to do safely as well.🪓🌞🪓
C45E839E-184F-4F0D-B732-FCA8DD0A7CD6.jpeg
[Thumbnail for C45E839E-184F-4F0D-B732-FCA8DD0A7CD6.jpeg]
 
Satamax Antone
gardener
Posts: 3471
Location: Southern alps, on the French side of the french /italian border 5000ft elevation
194
  • Likes 2
  • Mark post as helpful
  • send pies
    Number of slices to send:
    Optional 'thank-you' note:
  • Quote
  • Report post to moderator
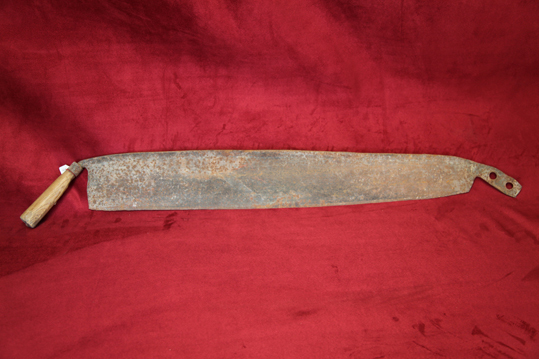
Peter, in France, we used to have a "hache paille"


But far more basic, with just a board with a ledge, and with a sort of huge knife, with a hook at the end.

Just like this one, for example.


They used to recycle old scythe for this. Making the end into a sort of metal rod, and bending it to form a hook, which would in turn fit in a ring at the end of the board.


And a far more modern way!


Or even newer!


Peter Sedgwick
pollinator
Posts: 464
Location: Toyoura Hokkaido
163
  • Mark post as helpful
  • send pies
    Number of slices to send:
    Optional 'thank-you' note:
  • Quote
  • Report post to moderator
These are absolutely awesome Max! Thank you so much. Got me thinking of what we could make. Either of these designs would be great, not only for processing straw for cob and earthen plaster, but would really come in handy to make quick work of all the plants that you would want to chop up for composting. Make the whole composting process much faster I would imagine.

Hokkaido is covered in a plant the Japanese call “kuma zasa”. It’s a shrub style bamboo grass and it is extremely invasive and resilient. Our property is covered in it and you have to use a weed wacker with a chipsaw blade to cut it down.

Something like what you sent would work perfectly for processing the stuff so that we could put it to good use.

This has me excited. So cool.

Thanks again! Peter
4041932C-5F46-430C-8D7C-0D4431A347B9.jpeg
[Thumbnail for 4041932C-5F46-430C-8D7C-0D4431A347B9.jpeg]
FBF1B764-3B09-4DF1-8AEC-3D069E635C92.jpeg
[Thumbnail for FBF1B764-3B09-4DF1-8AEC-3D069E635C92.jpeg]
 
Peter Sedgwick
pollinator
Posts: 464
Location: Toyoura Hokkaido
163
  • Likes 3
  • Mark post as helpful
  • send pies
    Number of slices to send:
    Optional 'thank-you' note:
  • Quote
  • Report post to moderator
Hey folks!

Did a full clean out again two days ago. Here’s what it looked like. Think it’s not bad, but please let me know if anything looks suspicious.

Took out a small amount of the ash that had built up on the rim of the heat riser and stuff on the inside of the barrel. Most of the rest we left on the bottom, as Matt said it would act as extra insulation for the floor of the manifold and bell chamber.

Upgraded the wire we first used, to hold our CFB riser together, with a slightly thicker stainless version. Also resealed the connection between the riser firebox and the firebox hole on the manifold with a mix of clay, sifted fire ash, and CFB dust. (just for fun)

With the way it looks now I’m thinking of covering the heat tape connection joint between the manifold and burn barrel with cob, and potentially some more rock mass, to milk a bit more thermal storage.

Wound be able to open and check as frequently, but feel pretty confident that the system should stay safe for the foreseeable future. Maybe cut the top of the burn barrel in the future and fit with second lid with a clamping ring.

Would like to point out that our half barrel bell system bench is really only effectively emanates heat on the top and then the heat quickly dissipates as you go out from the center. Our bench is roughly 75cm wide with a curved front face. The back edge of bench sits up against perlite insulated cement blocks and interior wall foundation beams. This back edge of the bench never really gets warm. Some of this might be because of design flaws on our part, not sure. I raise this point for anyone thinking of building a horizontal bell style chamber using a standard size gas drum can and hoping to heat a king size bed. Probably won’t cut it. Would suggest finding something larger in diameter to use for you bell or opt for slab style stones that can span the width of your desired build. Would seem to be a more sensible option.

Also to anyone who plans to build any rocket mass bench style build, the one thing I would very strongly recommend is to really insulate the hell out of the floor of your unit as much as you can. I can’t stress this enough. Use perlite, use bottles, use aircrete as a sublayer. I don’t believe you can over insulate and ever bit of heat that goes into the ground is heat not coming to you. Really think about where you want your heat to go and channel it there.

Likely going to start a playing with a second build soon. Need to work out a new water heater system for the bath we don’t yet have. Was using the local JAPAN public onsen baths last year, but with recent corona mayhem we have decided that is no longer an option. Will open a new thread for that soon.

Thanks again in advance for all your support and ideas. We are both having so much fun playing with mud and setting shit on fire.

Keep rockin in the free world.

Peter, Mimi and Chimichanga
🔥🐕👩🏻👨🏻‍🦱🐕🔥

E9D3008F-C317-428D-B304-71A97D90A6E5.jpeg
Lip the heat riser before cleaning
051FCF10-7DB4-4163-B646-DF369D069C1E.jpeg
Top of the firebox crossing through the manifold
285068B4-8152-418C-AA94-7C01BECA5AD1.jpeg
Looking into the bell
D788C3EE-BD78-4A81-B1CC-9B5E34808034.jpeg
Bottom of the feed tube with broken bricks still working
BA01AED9-C145-4BC8-8E63-D81826B69455.jpeg
Bit of spring cleaning
EAACA926-DC7E-4D1A-B3C3-B1E6D28C36B1.jpeg
Bottom of the end of the Burn box
AEAC172C-C5AD-4A25-903D-937510404EE7.jpeg
Inside of burn barrel before cleaning
7D112CE0-3C98-4605-B48A-2FB23AF1DF5F.jpeg
New stainless wire
New stainless wire
74DCA6DD-071F-4BBE-876D-A1199B020455.jpeg
New sealing mix wit CFB fairy dust
3F105102-A1C7-434C-AECE-B509570BD8F3.jpeg
Bit of grouting work
510B2B7B-AA29-4186-A2BF-79C66FE5C9B6.jpeg
Newly cleaned
Newly cleaned
3051A63F-71F7-4129-BA24-D4FDAA11B5BB.jpeg
Chariots of Fire...🔥🐕🐕🔥
 
To get a wish, you need a genie. To get a genie, you need a lamp. To get a lamp, you need a tiny ad:
Extend your growing season with the Hotbed Plans eBook + Self Heating Winter Greenhouse Plans eBook
https://permies.com/wiki/192368/ebooks/Hotbed-Plans-eBook-Heating-Winter
reply
    Bookmark Topic Watch Topic
  • New Topic